background image

EN 20

ENVIRONMENTAL ASPECTS

Disposal of packaging and appliance

In the manufacturing of this appliance durable materials were used. Make sure to dispose of 
this equipment responsibly at the end of its lifecycle. Ask the authorities for more information 
regarding this.

The appliance packaging is recyclable. The following may have been used:
•  cardboard;
•  polythene film (PE);
•  CFC-free polystyrene (PS hard foam).

Dispose of these materials in a responsible manner and in accordance with government regulations.

As a reminder of the need to dispose of household appliances 
separately, the product is marked with the symbol of a crossed-out 
wheeled dustbin. This means that at the end of its working life, the 
product must not be disposed of as urban waste. It must be taken to 
a special local authority differentiated waste collection centre or to 
a dealer providing this service.

Disposing of a household appliance separately avoids possible 
negative consequences for the environment and health deriving from 
inappropriate disposal and enables the constituent materials to be 
recovered to obtain significant savings in energy and resources.

Declaration of conformity

We declare that our products meet the applicable European Directives, Decisions and 
Regulations and the requirements listed in the standards referenced.

Содержание HI64 CB Series

Страница 1: ...Gebruiksaanwijzing Inductiekookplaat Instructions for use Induction hob HI64 CB...

Страница 2: ...NL 4 NL Gebruiksaanwijzing NL 3 NL 20 EN Instructions for use EN 3 EN 20 Gebruikte pictogrammen Pictograms used Belangrijk om te weten Important to know Tip...

Страница 3: ...10 Gebruik van de timer 10 Kookinstellingen 11 Bediening Bereiding starten 12 Inschakelen en vermogen instellen 12 Klaar met koken 13 De automatische opwarmfunctie inschakelen 13 De vergrendelingsfunc...

Страница 4: ...uur beveiligingen en een restwarmte indicator waardoor u kunt zien welke kookzones nog heet zijn In deze handleiding wordt beschreven hoe u de inductiekookplaat optimaal kunt benutten Naast informatie...

Страница 5: ...NL 5 UW KOOKPLAAT Toestelbeschrijving 1 2 3 1 2 1 Kookzone 175 mm 1 1 kW 1 4 kW boost 2 Kookzone 215 mm 2 3 kW 3 0 kW boost 3 Bedieningspaneel...

Страница 6: ...2 4 3 5 6 6 7 7 7 8 7 6 6 1 Aan uittoets 2 Schuifregelaar 9 kookstanden boost P 3 Warmhoudtoets 4 Vergrendelingsfunctie 5 Pauzetoets 6 Kookzonetoets en kookzonedisplay 7 Timersymbool 8 Timertoets en t...

Страница 7: ...jk van de gekozen instelling wordt de kookduur als volgt begrensd Kookstand Maximale gebruikstijd 1 8 uur 2 6 uur 3 5 uur 4 5 uur 5 4 uur 6 1 5 uur 7 1 5 uur Kookstand Maximale gebruikstijd 8 1 5 uur...

Страница 8: ...akeld om het toestel te koelen Dit zorgt voor een zoemend geluid De ventilator blijft nog enkele minuten actief nadat de kookplaat wordt uitgeschakeld Pannen Plaats een pan altijd in het midden van ee...

Страница 9: ...e pan te klein is wordt de kookzone niet ingeschakeld Vermogen instellen De kookzones hebben 9 niveaus Daarnaast is er nog een boost niveau P Nadat u de kookplaat hebt ingeschakeld kunt u binnen 20 se...

Страница 10: ...ar Risico op brandwonden Foutcode zie hoofdstuk Problemen oplossen Gebruik van de timer De timer kan op twee verschillende manieren worden gebruikt Als eierwekker tijd is aflopend na afloop van de ing...

Страница 11: ...bakken van omeletten bakken van gekookte aardappelen frituren van voedsel Gebruik stand 7 en 8 voor het bakken van dikke pannenkoeken bakken van dikke lappen gepaneerd vlees bakken van bacon vet koken...

Страница 12: ...de gewenste stand in te stellen De kookzone start automatisch in de ingestelde stand 5 Stel een hoger of lager vermogen in door met uw vinger over de schuifregelaar te schuiven Het vermogen is in te s...

Страница 13: ...seconden automatisch uit De automatische opwarmfunctie inschakelen Met deze functie wordt de kookzone op niveau 9 opgewarmd zodat deze snel op de gewenste temperatuur is Na verloop van een bepaalde t...

Страница 14: ...drie seconden tegelijk op de warmhoudtoets en pauzetoets totdat u een geluidssignaal hoort In de displays van de kookzones verschijnt gedurende enkele seconden L De vergrendelingsfunctie is ingeschake...

Страница 15: ...lde tijd te bekijken of te wijzigen Raak de kookzonetoets aan raak daarna de timertoets aan en raak dan de schuifregelaar aan op stand 0 om voortijdig de kookwekker uit te schakelen Voor alle kookzone...

Страница 16: ...deze over het oppervlak om het vuil te verwijderen Zorg ervoor dat het plastic handvat van de schraper bij sommige modellen niet in aanraking komt met een hete kookzone Druk de schraper niet loodrecht...

Страница 17: ...n of gebieden 4 Verwarmingstechnologie Inductiekookzones Voor ronde elektrische kookzones de diameter van het bruikbare oppervlak per elektrisch verwarmde kookzone in mm 175 215 215 175 Energieverbrui...

Страница 18: ...n paar keer is gebruikt Ventileer de keuken De pannen maken geluid tijdens het koken Dit wordt veroorzaakt door de energie die van de kookplaat naar de pan stroomt Dit is normaal bij bepaalde pannen w...

Страница 19: ...hikte pan voor inductiekoken Foutcode E2 Toestel oververhit Het toestel laten afkoelen en opnieuw beginnen met koken Foutcode E5 en spanning te laag of niet aangesloten Controleer de aansluiting en de...

Страница 20: ...duct het symbool van een doorgekruiste vuilnisbak aangebracht Dit betekent dat het apparaat aan het einde van zijn levensduur niet bij het gewone huisvuil mag worden gevoegd Het toestel moet naar een...

Страница 21: ...er use 10 Cooking settings 11 Operation Start cooking 12 Switching on and power setting 12 Finish cooking 13 Switching on the automatic heat up function 13 Switching on the keep warm function 14 Switc...

Страница 22: ...at indicator which shows which cooking zones are still hot This manual describes how you can make the best possible use of the induction hob In addition to information about operation you will also fi...

Страница 23: ...EN 5 YOUR HOB Appliance description 1 2 3 1 2 1 Cooking zone 175 mm 1 1 kW 1 4 kW boost 2 Cooking zone 215 mm 2 3 kW 3 0 kW boost 3 Control panel...

Страница 24: ...2 4 3 5 6 6 7 7 7 8 7 6 6 1 On off key 2 Slide control 9 Cooking levels boost P 3 Warmhoudtoets 4 Lock function 5 Pause key 6 Cooking zone key and cooking zone display 7 Timer symbol 8 Timer key and t...

Страница 25: ...king level Max operating time 1 8 hours 2 6 hours 3 5 hours 4 5 hours 5 4 hours 6 1 5 hours 7 1 5 hours Cooking level Max operating time 8 1 5 hours 9 1 5 hours P cooking zone 175 mm 1 5 hours P cooki...

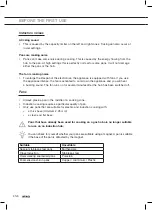
Страница 26: ...ce and you will hear a buzzing sound The fan runs on for several minutes after the hob has been switched off Pans Always place a pan in the middle of a cooking zone Induction cooking requires a partic...

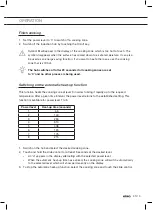
Страница 27: ...the same diameter as the zone If a pan is too small the cooking zone will not work Power level setting The cooking zones have 9 levels Beside it there is a level boost P If you have switched on the h...

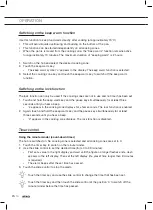
Страница 28: ...lit Danger Risk of burns Fault code See chapter Troubleshooting Timer use The timer can be used in two different ways As a minute minder count down timer after the set time has elapsed an alarm will s...

Страница 29: ...ing 9 to sear meats cook fish cook omelettes fry boiled potatoes deep fry foods Use setting 7 and 8 to fry thick pancakes fry thick slices of breaded meat fry bacon fat cook raw potatoes make French t...

Страница 30: ...level that has been set 5 Set a higher or lower power by sliding with your finger over the slide control The cooking zones have 9 levels and a boost level P Boost You can use the boost function on the...

Страница 31: ...unction heats the cooking zone at level 9 in order to bring it rapidly up to the required temperature After a given time interval the power level returns to the established setting This function is av...

Страница 32: ...three seconds until you hear a beep L appears in the cooking zone displays for a few seconds The lock function is enabled 2 Again touch and hold the keep warm key and the pause key simultaneously for...

Страница 33: ...l at the position 0 to switch off the cooking timer before the time has passed All the cooking zones can have a cooking timer that has been set The timer display always shows the timer with the shorte...

Страница 34: ...t the glass and slide it over the surface to remove the dirt Make sure the plastic handle of the scraper in some models does not meet with a hot cooking zone Do not press the scraper perpendicularly a...

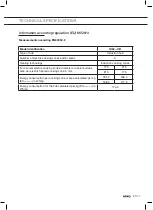
Страница 35: ...ooking zones and or areas 4 Heating technology Induction cooking zones For circular electric cooking zones diameter of useful surface area per electric heated cooking zone in mm 175 215 215 175 Energy...

Страница 36: ...rmal and will disappear once it has been used a few times Ventilate the kitchen The pans make a noise while cooking This is caused by the energy flowing from the hob to the saucepan At high settings t...

Страница 37: ...n cooking Error code E2 Appliance overheated Let the appliance cool down and start again Error code E5 One voltage is too low or not connected Check the connection and mains voltage Fault code E6 The...

Страница 38: ...pliances separately the product is marked with the symbol of a crossed out wheeled dustbin This means that at the end of its working life the product must not be disposed of as urban waste It must be...

Страница 39: ...EN 21...

Страница 40: ...Stick the appliance identification card here Houd wanneer u contact opneemt met de serviceafdeling het complete typenummer bij de hand When contacting the service department have the complete type num...

Отзывы: