background image

NL 15

ONDERHOUD

algemeen

algemeen

–    Regelmatig onder houd  direct na  gebruik voor komt dat over ge kookt 

voed sel lange tijd kan inwer ken en hard nek ki ge, moei lijk te ver wij de ren 
vlekken ver oor zaakt. Gebruik hiervoor een mild reinigingsmiddel.

–   Reinig eerst de bedieningsknoppen, branders en pandragers en dan pas 

de glasplaat. Hiermee voorkomt u dat de glasplaat tijdens het reinigen 
opnieuw vuil wordt.

hardnekkige vlekken op emaille (pandragers, branderdoppen)

Hardnekkige vlekken kunt u het beste ver wij de ren met een vloei-
baar reinigingsmiddel of een kunststof schuursponsje. Gebruik 
nooit schuurpoeders, schuurpads, scherpe voorwerpen of agressieve 
reinigingsmiddelen.

hardnekkige vlekken op de glasplaat

Maak de glasplaat schoon met een speciaal reinigingsmiddel voor keramische 
kookplaten. Waterkringen of kalkresten reinigt u het makkelijkst met behulp 
van schoonmaakazijn.

hardnekkige vlekken op roestvaststaal (vangschalen)

Met name overgekookte rode kool, rode bieten, ketjap, appelmoes, rabarber 
en andere sterk suikerhoudende voedingsmiddelen en zure vloeistoffen 
kunnen een verkleuring van het oppervlak veroorzaken. Wanneer u 
hardnekkige vlekken op roestvaststaal wilt verwijderen kunt u het beste een 
speciaal roestvaststaal-reinigingsmiddel gebruiken. Poets dan wel altijd met 
de structuur van het staal mee om glansplekken te voorkomen. (Schades die 
hierdoor ontstaan vallen niet onder de garantie!) 
Wanneer de vlekken met de hierboven beschreven methode niet te 
verwijderen zijn kunt u de kookplaat reinigen met oven & grillreiniger. 
Houd er echter rekening mee dat u de hele vangschaal moet behandelen 
om “kleur”verschil te voorkomen. U moet de vangschaal bovendien 
nabehandelen met een glans- of onderhoudsmiddel voor roestvaststaal. Het 
is overigens normaal dat het oppervlak gedurende de levenscyclus enigszins 
verkleurt.

Содержание HG11 MD Series

Страница 1: ...Houd wanneer u contact opneemt met de serviceafdeling het complete typenummer bij de hand When contacting the service department have the complete type number to hand Adressen en telefoonnummers van d...

Страница 2: ...NL handleiding NL 3 NL 29 GB manual GB 3 GB 29 gebruike pictogrammen pictograms used belangrijk om te weten important information tip...

Страница 3: ...oet letten NL 6 bediening ontsteken en instellen NL 7 comfortabel koken de kookplaat optimaal gebruiken NL 11 onderhoud algemeen NL 13 storingen storingstabel NL 17 milieu aspecten afvoeren toestel en...

Страница 4: ...1 sterkbrander 2 normaalbrander 3 sudderbrander 4 wokbrander 5 pandrager 6 glasplaat 7 RVS plaat 8 timer 9 aan uittoets 10 bedieningsknop 11 noodstop 4 11 5 10 HG11 MD 8 4 6 2 2 HG97 MC 7 4 5 2 3 2 1...

Страница 5: ...g e d u r e i n a m e k l e w p o n e v e r h c s e b t a a t s g n i d i e l d n a h e z e d n I zo optimaal mogelijk kunt benutten Naast informatie over de bediening treft u ook achtergrondinformat...

Страница 6: ...pandragers nooit onder in koud water Door de snelle afkoeling kan het emaille beschadigen De afstand van de pan tot een knop of niet hittebestendige wand moet altijd groter zijn dan twee centimeter B...

Страница 7: ...at de gastoevoer gesloten wordt als de vlam tijdens het kookproces dooft Bediening elektronische vlambeveiliging Druk de centrale aan uittoets in De knop licht groen op Draai daarna de gewenste bedien...

Страница 8: ...branders in n keer te doven Kinderslot U kunt de gaskookplaat vergrendelen Onbedoeld ontsteken van de branders wordt hiermee voorkomen De gaskookplaat is te ver ontgrendelen door de aan uittoets 5 se...

Страница 9: ...toets te bedienen De timer 00 boven de gewenste bedieningsknop gaat aan 2 Stel met de en toets de gewenste bereidingstijd in max 6 uur Houd de toets 3 seconden ingedrukt om de tijd in stappen van 10 m...

Страница 10: ...ingedrukt Alle timers worden nu uitgeschakeld Kookwekker 1 Stel de tijd in zoals bij de timerfunctie echter bij een brander die u niet gebruikt Wanneer de ingestelde tijd verlopen is hoort u een gelui...

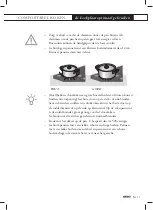
Страница 11: ...veelheden en frituren kunt u indien van toepassing het beste doen op de sterk of wokbrander Sauzen bereiden sudderen en doorkoken kunt u het beste doen op de sudderbrander of op de wok op kleinstand O...

Страница 12: ...erbranden door de grote hitte de gerechten met de langste bereidingstijd het eerst in de pan doet zodat aan het eind van de bereidingstijd alle ingredi nten tegelijk beet gaar zijn gebruik van het wok...

Страница 13: ...ekingsbougies bij voorkeur met een doekje Betracht hierbij wel enige voorzichtigheid Bij een te zware belasting kan de afstand van de bougiepunt tot aan de brander wijzigen waardoor de brander slechte...

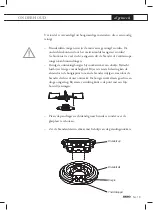
Страница 14: ...NL 14 algemeen ONDERHOUD Branderdeksel Branderdeksel Luchtring Branderkop Bougie Thermokoppel Positioneringsnok Wokbrander...

Страница 15: ...reinigt u het makkelijkst met behulp van schoonmaakazijn hardnekkige vlekken op roestvaststaal vangschalen Met name overgekookte rode kool rode bieten ketjap appelmoes rabarber en andere sterk suiker...

Страница 16: ...ing wokbranderdelen Enkele delen van de wokbrander zijn vervaardigd uit messing Het is normaal dat de kleur van het messing verandert als gevolg van de hoge temperaturen die tijdens het wokken ontstaa...

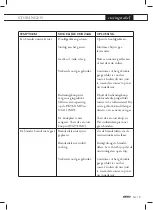
Страница 17: ...t continu Toestel is ingeschakeld Groene LED in de knop knippert Kinderslot Wanneer u nog een keer de aan uittoets bedient en deze 5 seconden ingedrukt houdt kunt u uw kookplaat weer gewoon gebruiken...

Страница 18: ...e www atagservice nl SYMPTOOM MOGELIJKE OORZAAK OPLOSSING Het ruikt naar gas in de omgeving van het toestel De aansluiting van het toestel lekt Sluit de gashoofdkraan Neem contact op met uw installate...

Страница 19: ...te gas geschikt is voor het toestel Indien dit niet juist is neem dan contact op met uw installateur Houd de bedieningsknop voldoende diep ingedrukt tussen vol en kleinstand Bij eerste gebruik kan dit...

Страница 20: ...s De timer geeft aan foutcode F00 F04 HG9611MD en HG1111MD Er ligt een voorwerp water of vuil op de toetsen of een toets is te lang bediend Controleer of er niets op de toetsen ligt Controleer of de t...

Страница 21: ...niet bij het gewone huisvuil mag worden gevoegd maar naar een speciaal centrum voor gescheiden afvalinzameling van de gemeente moet worden gebracht of naar een verkooppunt dat deze service verschaft H...

Страница 22: ...dviseren de kookplaat aan te sluiten met een vaste leiding Aansluiting door middel van een speciaal daarvoor bestemde veiligheidsslang is ook toegestaan Achter een oven moet een volledig metalen slang...

Страница 23: ...en te allen tijde bereikbaar blijven Als u een vaste aansluiting wilt maken moet u er voor zorgen dat er een omnipolaire schakelaar met een contactafstand van minimaal 3 mm in de toevoerleiding wordt...

Страница 24: ...oestel Indien er een lade direct onder de kookplaat wordt geplaatst monteer dan het bijgeleverde gasbuis verlengstuk en vervolgens de bijgeleverde knie op de gasaansluiting van het toestel 1 2 ISO 228...

Страница 25: ...het werkblad HG9711MC Plak het afdichtband niet door de hoek maar knip 4 stukken die goed aansluiten in de hoek uitsparing in werkblad zagen Zaag de uitsparing in het werkblad Doe dit zeer nauwkeurig...

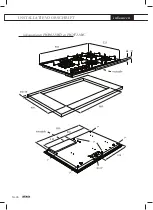
Страница 26: ...Instellen NL 26 INSTALLATIEVOORSCHRIFT inbouwen 48 347 inbouwmaten HG9611MD en HG9711MC...

Страница 27: ...Instellen NL 27 INSTALLATIEVOORSCHRIFT inbouwen inbouwmaten HG1111MD...

Страница 28: ...naast slechts n verticale wand ingebouwd worden Let op De onderzijde van de kookplaat wordt heet Leg geen brandbare spullen in een lade wanneer deze direct onder de kookplaat is gemonteerd toestel pla...

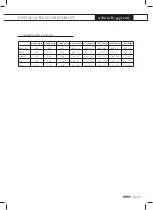
Страница 29: ...bar G30 50 mbar G31 50mbar brandertype kW kW kW kW g h kW g h kW g h kW g h kW g h sudder 1 00 1 00 0 90 0 90 65 0 79 57 0 90 65 1 00 72 0 88 63 normaal 2 00 2 00 1 80 1 60 115 1 41 101 1 60 115 2 00...

Страница 30: ...NL 30 notities...

Страница 31: ...attention to GB 6 controls igniting and adjusting GB 7 comfortable cooking optimal use of the hob GB 11 maintenance general GB 13 faults table GB 17 environmental aspects disposal of packaging and ap...

Страница 32: ...2 semi rapid burner 3 simmer burner 4 wok burner 5 pan support 6 glass plate 7 stainless steel plate 8 timer 9 on off key 10 control knob 11 emergency stop key 4 11 5 10 HG11 MD 8 4 6 2 2 HG97 MC 7 4...

Страница 33: ...ned gas can never pass through the burner This manual explains optimum use of the gas hob In addition to information on operation you will also find background information that may be useful to you wh...

Страница 34: ...rapid cooling can damage the enamel The distance from the pan to a knob or non heat resistant wall should always be greater than two centimetres In the case of smaller distances the high temperature m...

Страница 35: ...that the gas supply is shut off if the flame goes out during cooking Operating the electronic flame failure device Press the central On Off key The green button is lit Turn the required control knob a...

Страница 36: ...ch off the gas hob in one go press the central On Off key Childproof lock You can lock the gas hob This prevents the accidental ignition of the burners The gas hob can be locked and unlocked by depres...

Страница 37: ...sing the selection key once or multiple times The timer 00 above the desired control knob illuminates 2 Use the and key to set the desired cooking time max 6 hours Keep the selection key pressed durin...

Страница 38: ...or 3 seconds All the timers will then be deactivated Egg timer 1 Set the time as for the normal timer yet for an unused burner When the set time has elapsed you will hear an audible sound 2 Press the...

Страница 39: ...en frying stir frying heating through large quantities and deepfrying it is best to use the rapid or wok burner Preparing sauces simmering and boiling can be done best on the simmer burner On its high...

Страница 40: ...urn because of the high heat to place the dishes with the longest cooking time in the pan first so that at the end of the cooking time all ingredients are cooked al dente at the same time use of the w...

Страница 41: ...an the spark plugs preferably with a cloth Do this carefully If too much pressure is applied the distance from the point of the sparkplug to the burner may change causing the burner to ignite poorly o...

Страница 42: ...GB 14 general MAINTENANCE Wokburner...

Страница 43: ...ally for ceramic hobs Water stains or limescale are most easily cleaned using a non abrasive limescale remover Stubborn stains on stainless steel drip trays If spilled acid fluids and sugary foodstuff...

Страница 44: ...eansing agents brass wok burner parts A few parts of the work burner are made from brass It is normal for the colour of the brass to change as a result of the high temperatures that occur when cooking...

Страница 45: ...off Green LED in the button is illuminated continuously The appliance is switched on Green LED in the button is blinking Child lock Hold the On Off key pressed for 5 seconds and you can use the gas ho...

Страница 46: ...r website www atag nl for more information SYMPTOM STATUS SOLUTION There is a smell of gas in the vicinity of the appliance The gas connection to the gas hob is leaking Turn off the gas mains Contact...

Страница 47: ...nough between high and low setting At first use this can take some more time due to the gas supply Press the On Off key The indicator light should illuminate The burner does not burn evenly Burner par...

Страница 48: ...object or a key is pressed for too long Check whether the keys are clear Check whether the keys are clean and dry Contact your service centre if none of the above applies In case of trouble contact th...

Страница 49: ...rdance with government regulations As a reminder of the need to dispose of household appliances separately the product is marked with the symbol of a crossed out wheeled dustbin This means that at the...

Страница 50: ...d local regulations We recommend that the hob be connected by means of a fixed pipe Connection using a specially designed safety hose is also permitted Behind an oven use must be made of a pipe made e...

Страница 51: ...ket and plug must be accessible at all times If you want to make a fixed connection ensure that a multi pole switch with a distance between contacts of 3 mm is installed in the supply cable Attention...

Страница 52: ...he hob Fit the elbow supplied on the appliance s gas connection If a drawer is to be installed immediately below the hob connect the hose extension and the elbow pipe both of which are supplied to the...

Страница 53: ...op HG9711MC Do not attach the sealing strip through the corner Instead cut 4 pieces that fit tightly together in the corners cut opening in worktop Saw the opening in the worktop This should be done v...

Страница 54: ...Instellen GB 26 INSTALLATION INSTRUCTIONS building in 48 347 building in dimensions HG9611MD and HG9711MC...

Страница 55: ...Instellen GB 27 INSTALLATION INSTRUCTIONS building in building in dimensions HG1111MD...

Страница 56: ...steel The gas hob may only be built in next to one vertical wall Attention The bottom of the hob becomes hot Do not place combustible items in a drawer if the drawer is fitted directly below the hob...

Страница 57: ...G30 50 mbar G31 50mbar burner type kW kW kW kW g h kW g h kW g h kW g h kW g h simmer 1 00 1 00 0 90 0 90 65 0 79 57 0 90 65 1 00 72 0 88 63 semi rapid 2 00 2 00 1 80 1 60 115 1 41 101 1 60 115 2 00...

Страница 58: ...GB 30 notes...

Отзывы: