background image

Eee Box-PC

D

eutsch

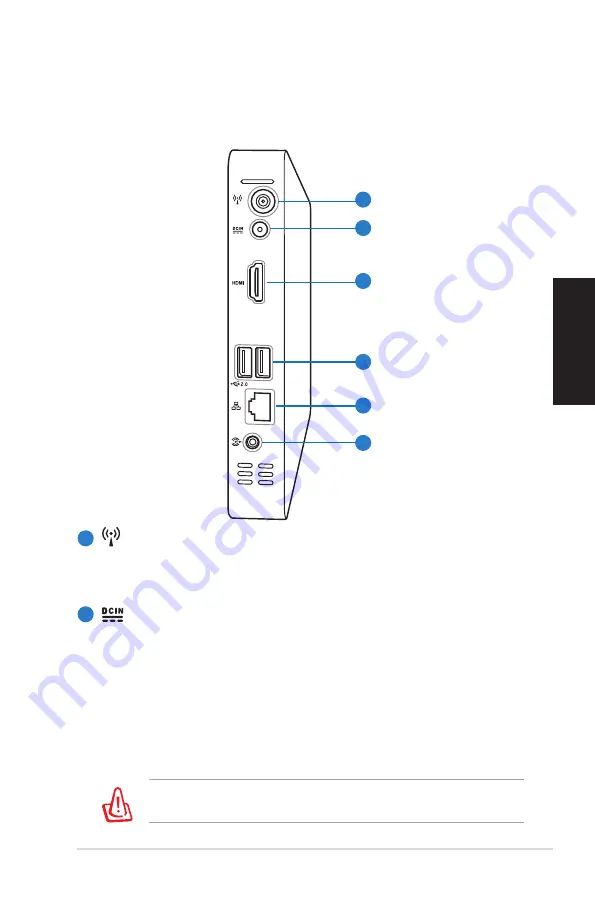
Rückseite

Die nachstehende Abbildung zeigt die Komponenten auf dieser 
Seite des Systems. 

1

2

  Wireless-Antennenbuchse


Diese Buchse verbindet mit der mitgelieferten Wireless-
Antenne, um den Signalempfang zu verbessern. 

  Netzteileingang (Gleichspannung)


Hier schließen Sie das mitgelieferte Netzteil an, 
das Wechselspannung zum Betrieb Ihres Eee PC in 
Gleichspannung umwandelt. Wenn das Netzteil mit diesem 
Anschluss verbunden wird, versorgt es Ihren Eee PC mit 
Strom und lädt den integrierten Akku auf. Damit es nicht 
zu Schäden am Eee PC und am Akku kommt, benutzen Sie 
ausschließlich das mitgelieferte Netzteil. 

Das Netzteil kann sich im Betrieb erhitzen. Decken Sie es nicht 
ab und halten Sie es vom Körper fern. 

1

2

3

4

5

6

Содержание Eee Box

Страница 1: ...User Manual Eee Box PC Eee Box B2 Series ...

Страница 2: ...n permission of ASUSTeK COMPUTER INC ASUS Products and corporate names mentioned in this manual may or may not be registered trademarks or copyrights of their respective companies and are used for identification purposes only All trademarks are the property of their respective owners Every effort has been made to ensure that the contents of this manual are correct and up to date However the manufa...

Страница 3: ... harmful interference to radio communications However there is no guarantee that interference will not occur in a particular installation If this equipment does cause harmful interference to radio or television reception which can be determined by turning the equipment off and on the user is encouraged to try to correct the interference by one or more of the following measures Reorient or relocate...

Страница 4: ...ian ICES 003 Macrovision Corporation Product Notice This product incorporates copyright protection technology that is protected by method claims of certain U S patents and other intellectual property rights owned by Macrovision Corporation and other rights owners Use of this copyright protection technology must be authorized by Macrovision Corporation and is intended for home and other limited vie...

Страница 5: ... plenty of space around the system for ventilation Never insert objects of any kind into the ventilation openings Use this product in environments with ambient temperatures between 0 C and 35 C If you use an extension cord make sure that the total ampere rating of the devices plugged into the extension cord does not exceed its ampere rating Care during use Do not walk on the power cord or allow an...

Страница 6: ...hould not be placed in municipal waste Check local technical support services for product recycling NO DISASSEMBLY The warranty does not apply to the products that have been disassembled by users DO NOT throw the battery in municipal waste This symbol of the crossed out wheeled bin indicates that the battery should not be placed in municipal waste Check local technical support services for battery...

Страница 7: ...of the following symbols used throughout this manual WARNING Vital information that you MUST follow to prevent injury to yourself IMPORTANT Instructions that you MUST follow to complete a task TIP Tips and useful information that help you complete a task NOTE Additional information for special situations ...

Страница 8: ... your new Eee Box PC If any of the below items is damaged or missing contact your retailer Package contents Eee Box PC Stand Remote control Metal shelf Screw pack Wireless antenna AC adapter Power cord HDMI cable optional Mini jack to S PDIF adapter Recovery DVD Support CD User Manual IR receiver Warranty card User manual Software DVD CD ...

Страница 9: ...3 1 2 3 Hard disk LED The hard disk LED blinks when data is being written into or read from the hard disk drive Power switch The power switch allows powering ON and OFF the system Memory card slot The built in memory card reader reads MMC SD SDHC MS MS Pro cards used in devices like digital cameras MP3 players mobile phones and PDAs 4 5 6 ...

Страница 10: ...multaneously on a single computer with some peripheral acting as additional plug in sites or hubs Headphone Audio Out jack The stereo headphone jack 3 5mm is used to connect the system s audio out signal to amplified speakers or headphones Microphone jack The microphone jack is designed to connect the microphone used for video conferencing voice narrations or simple audio recordings 4 5 6 ...

Страница 11: ...ied wireless antenna to enhance wireless signal reception Power input DC 12V The supplied power adapter converts AC power to DC power for use with this jack Power supplied through this jack supplies power to the PC To prevent damage to the PC always use the supplied power adapter The power adapter may become warm to hot when in use Do not cover the adapter and keep it away from your body ...

Страница 12: ...ng as additional plug in sites or hubs LAN port The eight pin RJ 45 LAN port supports a standard Ethernet cable for connection to a local network Audio Out S PDIF Out jack Plug an 3 5mm mini jack audio cable into this jack for analog or digital audio transfer For S PDIF Out function use the supplied mini jack to S PDIF adapter to connect to your amplifier 3 4 5 6 The B204 model comes with a batter...

Страница 13: ...5 4 3 2 14 13 26 25 24 23 22 21 20 19 18 17 16 15 Using the remote control Use the remote to launch the Eee Cinema program to play media files Refer to the next page to familiarize yourself with the functions of the remote control buttons 1 ...

Страница 14: ...ress to launch the Music menu in Eee Cinema Enter Press to confirm a selection Color buttons Press to access menu options in Eee Cinema or in Teletext mode The button functions may vary with areas Teletext on off Press to turn on off Teletext mode This function is available in certain areas only Clear Press to clear input information Numeric buttons Press to enter numbers or select a channel Eee C...

Страница 15: ...a file Record Press to start recording TV 26 25 24 The TV function is available in certain areas only Setting up the remote control 1 Plug the IR receiver into any of the USB ports on your Eee Box PC 2 Place the IR receiver on a stable surface 3 Aim the remote control at the receiver when using the remote ...

Страница 16: ... with the supplied stand To do so 1 Locate the screw hole on the bottom of the Eee Box PC 2 Align the stand screw to the PC screw hole and then secure the stand to the PC with a coin Do not place your Eee Box PC on the desktop without the stand 1 Screw hole Eee Box PC bottom view 2 Stand screw ...

Страница 17: ... a monitor To do so 1 Secure the metal shelf to your monitor with four screws HNM M4 x 8 To fasten the metal shelf your monitor must comply with VESA75 or VESA100 standard 2 Place your Eee Box PC on the metal shelf noting the correct alignment and then secure the PC to the shelf with a coin Eee Box PC bottom view ...

Страница 18: ... display Connect one end of an HDMI cable to an LCD monitor or an LCD TV 1 and the other end to the HDMI port on the system rear panel 2 1 2 Connecting to USB devices Connect USB devices like wired wireless keyboards varying with areas mouse devices and printers to the USB ports on the system rear panel or LCD monitor LCD TV ...

Страница 19: ...ort on the system rear panel and the other end to a hub or switch Network cable with RJ 45 connectors Network hub or switch Turning on the system Connect the supplied AC adapter to the DC IN jack on the system rear panel and then press the power switch on the front panel to turn on the system 2 4 1 3 ...

Страница 20: ... antenna to your Eee Box PC to enhance wireless signal reception 1 From the Windows notification area right click the wireless network icon and select View Available Wireless Networks 2 Select the wireless network you want to connect to from the list and click Connect Enter the network security key if necessary 3 After connection was established you will see Connected ...

Страница 21: ...ired network follow the instructions below Using a static IP 3 Hightlight Internet Protocol TCP IP and click Properties 2 Right click Local Area Connection and select Properties 1 Right click the network icon on the notification area and select Open Network Connections ...

Страница 22: ...eded enter the Preferred DNS server address 7 After entering all of the related values click OK to finish the configuration Using a dynamic IP PPPoE connection 1 Repeat Step 1 3 in the previous section 2 Select Obtain an IP address automatically and click OK 3 Click Create a new connection to start the New Connection Wizard ...

Страница 23: ...Click Next 5 Select Connect to the Internet and click Next 6 Select Set up my connection manually 7 Select your connection type and click Next 8 Enter your ISP Name and click Next 9 Enter your User name and Password Click Next ...

Страница 24: ...glish Contact your Internet Service Provider ISP if you have problems connecting to the network 10 Click Finish to finish the configuration 11 Enter your user name and password Click Connect to connect to the Internet ...

Страница 25: ... drivers and applications for your Eee Box PC 2 Select Schedule to set how often you want to update your system 3 Select Update to activate the update 1 From the Windows notification area right click the ASUS Easy Update icon 4 Click OK to display the items you can download 5 Check the item s you want to download and then click OK ...

Страница 26: ... your computer and press F8 to enter the Please select boot device menu 2 Insert the recovery DVD into the optical drive and select the optical drive DVDROM XXX as the boot device Press Enter and then press any key to continue 3 The ASUS Recovery DVD window appears Select where to install a new system min 20GB space is required Options are Recover system to a partition This option will recover onl...

Страница 27: ...s completed restart the computer 6 Set up your language time zone keyboard computer name and user name to enter the Windows OS This recovery DVD is for Eee Box PC only DO NOT use it on other computers Visit the ASUS website www asus com for any updates ...

Страница 28: ...any customized configuration settings such as network settings DO NOT delete the partition named RECOVERY The recovery partition is created at the factory and cannot be restored by the user if deleted Take your system to an authorized ASUS service center if you have problems with the recovery process 1 Press F9 during bootup requires a recovery partition 2 The ASUS Recovery System window appears S...

Страница 29: ...Eee Box PC Benutzerhandbuch Eee Box PC Eee Box B2 Series ...

Страница 30: ...stem gespeichert oder in eine andere Sprache übersetzt werden In diesem Handbuch angegebene Produkt und Firmennamen können u U eingetragene Warenzeichen oder Urheberrechte der entsprechenden Firmen sein und dienen nur der Identifizierung oder Erklärung zu Gunsten des Eigentümers ohne Rechte verletzen zu wollen Es wurden keine Mühen gescheut den Inhalt dieses Handbuchs korrekt und aktuell zu gestal...

Страница 31: ...und Fernsehempfang empfindlich stören Es wird jedoch nicht garantiert dass bei einer bestimmten Installation keine Interferenzen auftreten Wenn das Gerät den Radio oder Fernsehempfang empfindlich stört was sich durch Aus und Einschalten des Geräts feststellen lässt ist der Benutzer ersucht die Interferenzen mittels einer oder mehrerer der folgenden Maßnahmen zu beheben Empfangsantenne neu ausricht...

Страница 32: ...erein Macrovision Corporation Produktanmerkung Dieses Produkt verfügt über Kopierschutztechnologie die durch methodische Anforderungen bestimmter U S A Patente und anderer geistiger Eigentumsrechte der Macrovision Corporation und anderer Parteien geschützt sind Die Verwendung dieser Kopierschutztechnologie muss von Macrovision Corporation genehmigt werden und ist wenn nicht anderweitig von der Mac...

Страница 33: ... den Computer genügend Abstand mind 15 cm zur optimalen Belüftung vorhanden ist Stecken Sie keine Gegenstände in die Luftschlitze Benutzen Sie dieses Gerät in einer Umgebung deren Temperatur zwischen 0 C und 35 C liegt Wenn Sie ein Verlängerungskabel mit mehreren Steckdosen für das Gerät verwenden vergewissern Sie sich dass die zulässige Stromstärke insgesamt nicht überschritten wird Vorsicht bei ...

Страница 34: ...ches Zubehör nicht im normalen Hausmüll entsorgt werden darf Bitte erkundigen Sie sich nach lokalen Regelungen zur Entsorgung von Elektroschrott LASER PRODUKTWARNUNG LASER PRODUKT DER KLASSE 1 ttthbfkjhskjhgdfkjhgsdkjhfkjsdhfgkjhs NICHT AUSEINANDERNEHMEN Die Garantie verfällt wenn das Produkt vom Benutzer auseinandergenommen wurde Werfen Sie den Eee Box PC NICHT in den normalen Hausmüll Dieses Pro...

Страница 35: ...n Symbole die in diesem Handbuch verwendet werden GEFAHR WARNUNG Informationen zum Vermeiden von Verletzungen beim Ausführen einer Aufgabe WICHTIG Anweisungen die Sie beim Ausführen einer Aufgabe befolgen müssen TIPP Tipps und nützliche Informationen zur Durchführung einer Aufgabe ANMERKUNG Tipps und nützliche Informationen für besondere Umstände ...

Страница 36: ...ten folgende Artikel beschädigt oder nicht vorhanden sein wenden Sie sich bitte an Ihren Händler Paketinhalt Eee Box PC Standfuss Fernbedienung Metallhalterung Schrauben Wireless Antenne Netzteil Netzkabel HDMI Kabel optional Mini Stecker auf S PDIF Wiederherstellungs DVD Software Support DVD CD User Manual I Empfänger Garantiekarte Benutzerhandbuch ...

Страница 37: ...stems 1 2 3 1 2 3 Festplatten LED Diese LED blinkt wenn Daten auf der Festplatte gelesen oder auf ihr geschrieben werden Netzschalter Dieser Schalter schaltet das System EIN und AUS Speicherkartensteckplatz Der integrierte Kartenleser liest MMC SD SDHC MS MS Pro Karten aus Geräten wie z B Digitalkameras MP3 Playern Handys und PDAs 4 5 6 ...

Страница 38: ... zu nutzen Einige Peripherigeräte können dabei als zusätzliche Steck Möglichkeiten oder Hubs genutzt werden Kopfhörer Audio Ausgang Die Stereo Kopfhörerbuchse 3 5mm dient zum Verbinden des Audioausgangssignals des Systems mit verstärkten Lautsprechern oder einem Kopfhörer Mikrofonbuchse An den Mikrofonanschluss können Sie ein Mikrofon anschließen das Sie für Skype Sprachanwendungen und einfache To...

Страница 39: ... Hier schließen Sie das mitgelieferte Netzteil an das Wechselspannung zum Betrieb Ihres Eee PC in Gleichspannung umwandelt Wenn das Netzteil mit diesem Anschluss verbunden wird versorgt es Ihren Eee PC mit Strom und lädt den integrierten Akku auf Damit es nicht zu Schäden am Eee PC und am Akku kommt benutzen Sie ausschließlich das mitgelieferte Netzteil Das Netzteil kann sich im Betrieb erhitzen D...

Страница 40: ...öglichkeiten oder Hubs genutzt werden LAN Anschluss Der 8 polige RJ 45 LAN Anschluss unterstützt ein Standard Ethernet Kabel zum Anschluss an ein lokales Netzwerk Audio Ausgangsbuchse S PDIF Ausgang Stecken Sie ein 3 5mm Mini Buchsenaudiokabel an diesen Anschluss um analoges oder digitales Audio zu übertragen Verbinden Sie das mitgelieferte Mini Buchsen zu S PDIF Adapter mit Ihrem Verstärker um di...

Страница 41: ...n die Fernbedienung benutzen um das Programm Eee Cinema zum Abspielen von Mediendateien zu starten Die nächsten Seiten machen Sie mit den Funktionen und den Tasten der Fernbedienung vertraut 12 11 10 9 8 7 6 5 4 3 2 14 13 26 25 24 23 22 21 20 19 18 17 16 15 1 ...

Страница 42: ... Eee Cinema öffnen Musik Musikmenü in Eee Cinema öffnen Enter Auswahl bestätigen Farbige Tasten Auf Menüoptionen in Eee Cinema oder im Te letext Modus zugreifen Tastenfunktionen sind von der Region abhängig Teletext ein aus Teletextmodus ein ausschalten Diese Funk tion ist nur in einigen Gebieten verfügbar Löschen Eingabeinformation löschen Zifferntasten Zahleneingabe oder Kanalaswahl Eee Cinema E...

Страница 43: ... TV Sendung aufnehmen 26 25 24 Die TV Funktionen sind nur in bestimmten Gebieten verfügbar Fernbedienung einrichten 1 Stecken Sie den IR Empfänger in einen USB Anschluss an Ihren Eee Box PC 2 Stellen Sie den Empfänger auf eine stabile Oberfläche 3 Richten Sie die Fernbedienung auf den Empfänger wenn Sie sie benutzen ...

Страница 44: ...r folgendermaßen auf 1 Suchen Sie die Schraubenlöcher auf der Unterseite des Eee Box PCs 2 Richten Sie die Ständerschrauben auf die Löcher aus und befestigen Sie dann den Ständer mit Hilfe einer Münze am PC Stellen Sie den Eee Box PC auf keinen Fall ohne Ständer auf 1 Schraubenloch Eee Box PC Unterseite 2 Ständerschraube ...

Страница 45: ...ndermaßen vor 1 Befestigen Sie die Metallhalterung HNM M4 x 8 mit vier Schrauben am Bildschirm Um die Metallhalterung befestigen zu können muss der Bildschirm dem Standard VESA75 oder VESA100 entsprechen 2 2 Stellen Sie den Eee Box PC auf die Metallhalterung Achten Sie auf die korrekte Ausrichtung Befestigen Sie den PC mit Hilfe einer Münze Eee Box PC Unterseite ...

Страница 46: ...hließen Bildschirm anschließen Verbinden Sie ein Ende des HDMI Kabels mit dem Bildschirm 1 und das andere Ende mit dem HDMI Anschluss auf der Rückseite des Systems 2 USB Geräte anschließen Verbinden Sie USB Geräte wie Tastatur Maus oder Drucker mit den USB Anschlüssen auf der Rückseite des Systems 1 2 oder LCD Monitor LCD TV ...

Страница 47: ...uf der Rückseite des Systems und das andere mit einem Hub oder Switch Netzwerkkabel mit RJ 45 Anschluss Netzwerk Hub oder Switch System einschalten Verbinden Sie das Netzteil mit dem Anschluss DC IN auf der Rückseite des Systems und drücken Sie dann den Netzschalter auf der Vorderseite um das System einzuschalten 4 2 1 3 ...

Страница 48: ... mit Ihrem Eee Box PC um den Signalempfang zu verbessern 1 Rechtsklicken Sie in der Windows Taskleiste auf das Wireless Netzwerk Symbol und wählen Sie Verfügbare Netzwerke anzeigen 2 Wählen Sie das Wireless Netzwerk mit dem Sie sich verbinden möchten und klicken Sie auf Verbinden Geben Sie falls notwendig das Netzwerk Passwort ein 3 Sobald die Verbindung hergestellt ist erscheint die Anzeige Verbu...

Страница 49: ...ten gehen Sie folgendermaßen vor Statische IP verwenden 3 Wählen Sie Internet Protokoll TCP IP und klicken Sie auf Eigenschaften 2 Rechtsklicken Sie auf Lokale Verbindung und wählen Sie Eigenschaften 1 Rechtsklicken Sie auf das Netzwerk Symbol in der Taskleiste und wählen Sie Netzwerkverbindungen öffnen ...

Страница 50: ...vorzugten DNS Server ein 7 Wenn alle erforderlichen Werte eingegeben wurden klicken Sie auf OK um die Konfiguration fertigzustellen Dynamische IP verwenden PPPoE Verbindung 1 Wiederholen Sie Schritt 1 3 im vorhergehenden Abschnitt 2 Wählen Sie IP Adresse automatisch beziehen und klicken Sie auf OK 3 Klicken Sie auf Neue Verbindung erstellen um den Verbindungsassistenten zu starten ...

Страница 51: ... verbinden und klicken Sie auf Weiter 6 Wählen Sie Verbindung manuell einrichten 7 Wählen Sie den Verbindungstyp und klicken Sie auf Weiter 8 Geben Sie Ihren ISP Namen ein und klicken Sie auf Weiter 9 Geben Sie Ihren Benutzernamen und das Passwort ein Klicken Sie auf Weiter ...

Страница 52: ...rnet Service Provider ISP wenn Sie Probleme mit der Netzwerkverbindung haben 10 Klicken Sie auf Fertig um die Konfiguration zu beenden 11 Geben Sie Ihren Benutzernamen und das Passwort ein Klicken Sie auf Verbinden um sich mit dem Internet zu verbinden ...

Страница 53: ...rlädt 2 Wählen Sie Schedule um einzustellen wie oft Sie Ihr System aktualisieren wollen 3 Wählen Sie Update um die Aktualisierungsfunktion zu aktivieren 1 Rechtsklicken Sie in der Windows Taskleiste auf das Symbol ASUS Easy Update 4 Klicken Sie auf OK um die Elemente anzuzeigen die Sie herunterladen können 5 Markieren Sie die Elemente die Sie herunterladen wollen und klicken Sie dann auf OK ...

Страница 54: ...rät auswählen anzuzeigen 2 Legen Sie die Wiederherstellungs DVD in das optische Laufwerk und wählen Sie das optische Laufwerk DVDROM XXX als Boot Laufwerk Drücken Sie Enter und dann eine beliebige Taste um fortzufahren 3 Der ASUS Recovery DVD Bildschirm wird angezeigt Wählen Sie wo das neue System installiert werden soll dazu werden mind 20GB freier Speicherplatz benötigt Zur Auswahl stehen Recove...

Страница 55: ...ellen Sie Sprache Zeitzone Tastatur Computername und Benutzername ein um das Windows Betriebssystem zu öffnen Die Wiederherstellungs DVD kann nur in Verbindung mit dem Eee Box PC genutzt werden Benutzen Sie sich NICHT auf anderen Computern Aktuelle Versionen finden Sie auf der ASUS Webseite www asus com ...

Страница 56: ...etzwerkeinstellungen Löschen Sie NICHT die Partition mit dem Namen RECOVERY Die Wiederherstellungspartition wurde werkseitig erstellt und kann wenn vom Benutzer gelöscht NICHT wieder hergestellt werden Bringen Sie Ihr System zu einem ASUS Kundendienst wenn Sie mit der Wiederherstellung Probleme haben 1 Drücken Sie während des Starvorgangs F9 erfordert eine Wiederherstellungs Partition 2 Das ASUS R...

Страница 57: ...Manuale Utente Eee Box PC Eee Box Serie B2 ...

Страница 58: ...e a scopi di backup senza l espressa autorizzazione scritta di ASUSTeK COMPUTER INC ASUS I prodotti e nomi delle aziende che compaiono in questo manuale possono o meno essere marchi registrati o diritti d autore delle rispettive aziende e sono usati solo a scopo identificativo Tutti i marchi sono di proprietà dei rispettivi proprietari E stato compiuto ogni sforzo per assicurare la correttezza e l...

Страница 59: ...rto disponibili se previsti nonchè le spese e gli altri termini relativi all assistenza e al supporto se previsti verranno specificati nella documentazione destinata al cliente fornita a corredo con il Prodotto E responsabilità dell utente prima ancora di richiedere l assistenza effettuare il backup dei contenuti presenti sul Prodotto inclusi i dati archiviati o il software installato nel prodotto...

Страница 60: ...ra di furto o in ogni altra situazione che lo renda inutilizzabile anche la possibilità di utilizzare il prodotto OEM viene compromessa Chiunque acquisti unitamente al prodotto un software OEM è tenuto ad osservare i termini e le condizioni del contratto di licenza tra il proprietario del software e l utente finale denominato EULA End User Licence Agreement visualizzato a video durante la fase di ...

Страница 61: ...cause harmful interference to radio communications However there is no guarantee that interference will not occur in a particular installation If this equipment does cause harmful interference to radio or television reception which can be determined by turning the equipment off and on the user is encouraged to try to correct the interference by one or more of the following measures Reorient or rel...

Страница 62: ...CES 003 Macrovision Corporation Product Notice This product incorporates copyright protection technology that is protected by method claims of certain U S patents and other intellectual property rights owned by Macrovision Corporation and other rights owners Use of this copyright protection technology must be authorized by Macrovision Corporation and is intended for home and other limited viewing ...

Страница 63: ...n ampio spazio intorno al sistema per la ventilazione Mai inserire oggetti di alcun tipo sulle scanalature fori destinati alla ventilazione Utilizzare il prodotto in ambienti a temperature comprese fra 0 C e 40 C In caso di impiego di un cavo di estensione assicurarsi che l amperaggio totale dei dispositivi inseriti non superi quello di Eee Box PC Precauzioni d Uso Non camminare sul cavo di alimen...

Страница 64: ... rifiuti comunali Controllare le normative locali in materia di smaltimento dei prodotti elettronici NON gettare la batteria nei rifiuti comunali Il simbolo del bidone sbarrato conleruote comedafigura indicachelabatteria nondeve esseregettataneirifiuticomunali Verficareconilserviziodiassistenza tecnica nazionale le modalità di sostituizione delle batterie AVVERTENZA SUI PRODOTTI LASER PRODOTTO LAS...

Страница 65: ...simbologia ricorrente in tutto il manuale AVVERTENZA Informazioni importanti per un utilizzo sicuro del dispositivo IMPORTANTE Istruzioni da seguire OBBLIGATORIAMENTE per completare un operazione SUGGERIMENTO Informazioni utili di ausilio nel completamento di un attività NOTA Informazioni aggiuntive per situazioni particolari ...

Страница 66: ...ox PC Contattare il rivenditore in caso di articoli mancanti o danneggiati Contenuto della Confezione Eee Box PC Piedistallo Telecomando Ripiano metallico Viti Antenna Wireless Adattatore AC Cavo di Alimentazione Cavo HDMI opzionale Mini jack x adatt S PDIF DVD di Ripristino CD di Supporto User Manual Ricevitore IR Garanzia Manuale Utente DVD CD Software ...

Страница 67: ... LED del disco rigido lampeggia in fase di scrittura o lettura dati da disco rigido Pulsante di Accensione llpulsantediaccensioneconsentediACCENDEREe SPEGNERE il sistema Slot per Scheda di Memoria Il lettore di schede di memoria integrato è in grado di leggere le schede MMC SD SDHC MS MS Pro utilizzato in dispositivi come fotocamere digitali lettori MP3 telefoni cellulari e PDA 4 5 6 ...

Страница 68: ...ente su uno stesso computer tramite periferiche che funzionano come hub o siti plugin aggiuntivi Jack Uscita Cuffie Audio Il jack per cuffie stereo 3 5mm è utilizzato per collegare il segnaleaudioinuscitadelsistemaconaltoparlantiamplificati o cuffie Jack Microfono Il jack per il microfono è stato progettato per collegare un microfono esterno in occasione di video conferenze narrazioni vocali o sem...

Страница 69: ...da migliorare la ricezione del segnale wireless Ingresso Alimentazione DC 19V L adattatore in dotazione converte la corrente elettrica alternata di rete in corrente continua da utilizzare con questo jack L energia elettrica fornita attraverso questo connettore alimenta il PC Per evitare danni al PC utilizzare sempre l adattatore in dotazione Quando in funzione l adattatore può diventare piuttosto ...

Страница 70: ...o siti plugin aggiuntivi Porta LAN La porta RJ 45 LAN a otto pin supporta un cavo standard Ethernet per la connessione alla rete locale Jack Uscita Audio S PDIF Out Inserire un cavo audio con mini jack da 3 5mm mini jack in questo jack per il trasferimento audio analogico o digitale Per la funzione S PDIF Out utilizzare il mini jack in dotazione per adattatore S PDIF da collegare all amplificatore...

Страница 71: ...14 13 26 25 24 23 22 21 20 19 18 17 16 15 Telecomando Utilizzare il telecomando per avviare il programma Eee Cinema per la riproduzione di file multimediali Consultare la pagina seguente per familiarizzare con le funzioni dei tasti del telecomando 1 ...

Страница 72: ...inema Music Avvio del menu Musica in Eee Cinema Enter Conferma di una selezione Tasti colorati Accesso alle opzioni del menu in Eee Cinema o in modalità Teletesto Le funzioni dei tasti variano in base al paese Teletesto attivo disattivo Attiva disattiva la modalità Teletesto Questa funzione è disponibile solo in alcuni paesi Clear Cancellazione delle informazioni inserite Tasti Numerici Tasti per ...

Страница 73: ...rapido avvolgimento file multimediale Record Avvio registrazione TV 26 25 24 La funzione TV è disponibile solo in alcune zone Installazione del Telecomando 1 Inserire il ricevitore IR in una delle porte USB di Eee Box PC 2 Porre il ricevitore IR su una superficie stabile 3 Durante l uso puntare il telecomando sul ricevitore 23 ...

Страница 74: ...tazione A questo fine 1 Individuare il foro per la vite sul lato inferiore di Eee Box PC 2 Allineare la vite del piedistallo con il foro per la vite del PC quindi fissare il piedistallo al PC con una moneta Non porre Eee Box PC sulla scrivania senza il piedistallo 1 Foro per la vite Lato inferiore di Eee Box PC 2 Vite del piedistallo ...

Страница 75: ...ne 1 Fissare il ripiano metallico al monitor con quattro viti HNM M4 x 8 Per l installazione del ripiano metallico il monitor deve essere conforme allo standard VESA75 o VESA100 2 Porre Eee Box PC sul ripiano metallico in modo che sia correttamenteallineato quindifissareilPCsulripiano servendosi di una moneta Lato inferiore di Eee Box PC ...

Страница 76: ...llegare un estremità di un cavo HDMI ad un monitor LCD o ad una TV LCD 1 e l altra estremità alla porta HDMI sul pannello posteriore del sistema 2 1 2 Connessione con Dispositivi USB Collegare dispositivi USB come tastiere con o senza cavo a seconda della zona mouse e stampanti alle porte USB sul pannello posteriore del sistema or Monitor LCD TV LCD ...

Страница 77: ...ello posteriore del sistema e l altra estremità ad un hub o switch Cavo di rete con connettori RJ 45 Switch o hub di rete Accensione del Sistema Collegare l adattatore AC in dotazione al jack DC IN sul pannello posteriore del sistema quindi premere il pulsante di accensione sul pannello frontale per accendere il sistema 4 1 3 ...

Страница 78: ...l segnale wireless 1 Dall area di notifica di Windows cliccare con il tasto di destra sull icona wireless network rete senza fili e selezionare View Available Wireless Networks Visualizza le reti senza fili disponibili 2 Selezionare dall elenco la rete senza fili a cui connettersi e cliccare Connect Connetti Se necessario inserire la chiave per la protezione di rete 3 Dopo aver stabilito la connes...

Страница 79: ...i seguito Tramite IP Statico 3 Evidenziare Internet Protocol TCP IP e cliccare Properties Proprietà 2 Con il tasto di destra cliccare Local Area Connection e selezionare Properties Proprietà 1 Cliccare con il tasto di destra sull icona di rete in area di notifica e selezionare Open Network Connections Apri connessioni di rete ...

Страница 80: ...DNS server Server DNS preferito 7 Dopo l inserimento dei relativi valori cliccare OK per completare la configurazione Tramite IP Dinamico Connessione PPPoE 1 Ripetere i passaggi 1 3 del paragrafo precedente 2 Selezionare Obtain an IP address automatically Ottieni automaticamente un indirizzo IP e poi cliccare OK 3 Cliccare Create a new connection Crea una nuova connessione per avviare il programma...

Страница 81: ...onnessione a Internet e cliccare Next Avanti 6 Selezionare Set up my connection manually Imposta connessione manualmente 7 Selezionare il tipo di connessione e cliccare Next Avanti 8 Inserire il nome dell ISP e cliccare Next Avanti 9 Inserire Nome Utente e Password Cliccare Next Avanti ...

Страница 82: ...attare l Internet Service Provider ISP in caso di problemi di connessione di rete 10 Cliccare Finish Fine per terminare la configurazione 11 Inserire nome utente e password Cliccare Connect Connetti per la connessione a Internet ...

Страница 83: ...lezionare Schedule Pianifica per impostare l intervallo di tempo per l aggiornamento del sistema 3 Selezionare Update Aggiorna per attivare l aggiornamento 1 Dallabarradelleapplicazionidi Windows cliccare con il tasto di destra sull icona ASUS Easy Update 4 Cliccare OK per visualizzare gli elementi da scaricare 5 Selezionare gli elementi da scaricare e poi cliccare OK ...

Страница 84: ...erire il DVD di Ripristino nell unità ottica e selezionare tale unità DVDROM XXX come dispositivo di avvio Premere Enter Accedi quindi cliccare su un tasto qualsiasi per continuare 3 Appare la finestra ASUS Recovery System Selezionare dove installare un nuovo sistema necessari min 20GB di spazio Le opzioni sono Recover Windows to a partition Questa opzione eliminerà soltanto una delle partizioni d...

Страница 85: ... del sistema riavviare il computer 6 Dopo aver riavviato il sistema Windows inizia le configurazioni del sistema e l installazione dei driver e delle utilità Questo DVD di Ripristino è esclusivamente per Eee Box PC NON utilizzarlo su altri computer Visitare il sito web ASUS www asus com per gli aggiornamenti ...

Страница 86: ...ete NON eliminare la partizione denominata RECOVERY La Partizione Recovery è stata creata dal fabbricante e se eliminata non può essere più ripristinata dall utente In caso di problemi durante il processo di ripristino portare il sistema presso un centro assistenza autorizzato ASUS 1 Premere F9 in fase di caricamento iniziale richiede una Partizione di Recupero 2 Appare la finestra ASUS Recovery S...

Страница 87: ...Manuel d utilisation Eee Box PC Séries Eee Box B2 ...

Страница 88: ...se de ASUSTeK COMPUTER INC ASUS Les produits et noms de sociétés qui apparaissent dans ce manuel ne sont utilisés que dans un but d identification ou d explication dans l intérêt du propriétaire sans intention de contrefaçon Toutes les marques mentionnées dans ce manuel sont la propriété de leur propriétaires respectifs Des efforts particuliers ont été faits pour garantir que le contenu de ce manu...

Страница 89: ...cive aux communications radio Cependant il n est pas exclu qu une interférence se produise lors d une installation particulière Si cet équipement cause une interférence nuisible au signal radio ou télévisé ce qui peut être déterminé par l arrêt puis le réamorçage de celui ci l utilisateur est encouragé à essayer de corriger l interférence en s aidant d une ou plusieurs des mesures suivantes Réorie...

Страница 90: ...onforme à la norme ICES 003 du Canada Note relative aux produits de Macrovision Corporation Ce produit comprend une technologie de protection de copyright protégée par certains brevets déposés aux U S A et autres droits de propriété intellectuelle appartenant à Macrovision Corporation et autres détenteurs de droits L usage de cette technologie doit être autorisé par Macrovision Corporation et n es...

Страница 91: ...nées à la ventilation Veillez à ne pas les bloquer ou les recouvrir N insérez jamais d objet dans les ouvertures de ventilation Utilisez ce produit dans un environnement avec une température ambiante comprise entre 0 C et 40 C SivousutilisezunerallongepourconnectervotrePCMultimédia vérifiezquelasommedesintensitésnominalesdeséquipements connectésàlarallongenedépassepascellesupportéeparcette dernièr...

Страница 92: ...ublique Vérifiez auprès de votre municipalité les dispositions locales en matière de mise au rebut des déchets électroniques NE PAS jeter la batterie dans une benne à ordures municipale Le symbole de la benne à roue barrée indique que la pile ne doit pas être placée dans une décharge publique PAS DE DÉMONTAGE La garantie ne couvre pas les appareils ayant été désassemblés par les utilisateurs Avert...

Страница 93: ...t différents degrés d importance AVERTISSEMENT Instructions que vous DEVEZ suivre pour éviter de vous blesser lors de la réalisation d une tâche IMPORTANT Instructions que vous DEVEZ suivre pour mener une tâche à bien ASTUCE Trucs et informations additionnelles pour vous aider à mener une tâche à bien NOTE Informations additionnelles destinées à certaines situations spécifiques ...

Страница 94: ...sous était manquant ou end ommagé contactez votre revendeur Contenu de la boîte Eee Box PC Socle Télécommande Tablette métallique Sachet de vis Antenne sans fil Adaptateur secteur Cordon d alimentation Câble HDMI optionnel Adaptateur Mini jack audio vers S PDIF DVD de restauration CD de support User Manual Récepteur infrarouge Carte de garantie Manuel d utilisation DVD CD logiciel ...

Страница 95: ...vité du disque dur La LED du disque dur clignote lorsque des données sont lues ou inscrites sur le disque dur Bouton d alimentation L interrupteur d alimentation permet de mettre l appareil sous hors tension Slot pour cartes mémoire Le lecteur de cartes mémoire embarqué supporte les cartes MMC SD SDHC MS MS Pro utilisées pour les caméscopes numériques lecteurs MP3 téléphones mobiles et PDA 4 5 6 ...

Страница 96: ...durs La norme USB permet à plusieurs périphériques de fonctionner simultanément sur un ordinateur Port casque sortie audio Le port casque stéréo de 1 8 3 55mm est utilisé pour la connexion d un casque ou de haut parleurs externes Port microphone Le port microphone est destiné à la connexion d un microphone utilisé généralement pour les visioconférences ou de simples enregistrements audio 4 5 6 ...

Страница 97: ...enne sans fil fournie afin d accroître la réception du signal sans fil Port d alimentation CC 12V L adaptateur d alimentation inclus convertit le courant alternatif en courant continu pour alimenter le système Pour éviter d endommager le PC utilisez toujours l adaptateur d alimentation fourni L adaptateur d alimentation peut devenir chaud ou brûlant lors de son utilisation ne pas couvrir l adaptat...

Страница 98: ...tanément sur un ordinateur Port LAN Le port LAN RJ 45 de 8 broches supporte un câble Ethernet standard pour la connexion à un réseau local Port de sortie audio port S PDIF out Connectez un câble audio stéréo de 3 5mm sur ce port pour des transferts audio numériques Pour une sortie S PDIF connectez l adaptateur mini jack audio vers S PDIF fourni à votre amplificateur 3 4 5 6 Le modèle B204 est acco...

Страница 99: ...3 26 25 24 23 22 21 20 19 18 17 16 15 Utiliser la télécommande Utilisez la télécommande pour lancer le programme Eee Cinema et visionner vos fichiers multimédia Référez vous à la page suivante pour vous familiariser avec les boutons de la télécommande 1 ...

Страница 100: ... préc pressez pour changer de chaîne Vidéo pressez pour lancer le menu Videos de Eee Cinema Musique pressez pour lancer le menu Music de Eee Cinema Entrée pressez pour confirmer une sélection Boutons colorés pressez pour accéder aux options des menus de Eee Cinema ou en mode Télétexte Les fonctions de ces boutons peuvent varier selon les régions Télétexte pressez pour activer désactiver le mode té...

Страница 101: ...ide pressez pour rembobiner un fichier multimédia Enregistrer pressez pour commencer l enregistrement d un programme TV 26 25 24 La fonction TV n est disponible que dans certaines régions Configurer la télécommande 1 Branchez le récepteur infrarouge sur l un des ports USB de votre Eee Box PC 2 Placez le récepteur infrarouge sur une surface stable 3 Pointez la télécommande vers le récepteur lors de...

Страница 102: ...C sur son socle Pour ce faire 1 Localisez le pas de vis sous le Eee Box PC 2 Alignez la vis du socle au pas de vis du PC puis sécurisez le socle au PC à l aide d une pièce de monnaie Ne placez pas votre Eee Box PC sur un bureau sans son socle 1 Pas de vis Dessous du Eee Box PC 2 Vis du socle ...

Страница 103: ...curisez la tablette métallique à votre moniteur à l aide de quatre vis HNM M4 x 8 Pour sécuriser la tablette métallique votre moniteur doit être compatible avec le standard VESA75 ou VESA100 2 Placez votre Eee Box PC sur la tablette métallique comme illustré ci dessous Puis sécurisez le PC à la tablette à l aide dune pièce de monnaie Dessous du Eee Box PC ...

Страница 104: ...d un écran Connectez une extrémité d un câble HDMI DVI à un téléviseur ou moniteur LCD 1 et l autre extrémité au port HDMI localisé à l arrière du système 2 1 2 Connexion de périphériques USB Connectez des périphériques USB tels qu un clavier avec ou sans fil varient selo les régions une souris ou une imprimante aux ports USB du système or Moniteur LCD TV LCD ...

Страница 105: ...LAN localisé à l arrière du système et l autre extrémité à un hub ou switch Câble réseau RJ 45 Hub réseau ou switch Allumer le système Connectez l adaptateur secteur au port DC IN localisé à l arrière du système puis appuyez sur le bouton d alimentation situé en façade de l appareil 2 4 1 3 ...

Страница 106: ... améliorer la réception du signal sans fil 1 Faites un clic droit sur l icône réseau sans fil de la zone de notification de Windows et sélectionnez Afficher les réseaux sans fil disponibles 2 Sélectionnez le réseau sans fil auquel vous souhaitez vous connecter et cliquez sur Connecter Entrez si nécessaire la clé de sécurité réseau 3 Une fois la connexion établie le statut de la connexion sans fil ...

Страница 107: ...ructions suivantes Utiliser une IP statique 3 Sélectionnez Internet Protocol TCP IP et cliquez sur Propriétés 2 Faites un clic droit sur Connexion à un réseau local et sélectionnez Propriétés 1 Faites un clic droit sur l icône réseau de la zone de notification de Windows et sélectionnez Ouvrir les connexions réseau ...

Страница 108: ...e entez votre adresse de Serveur DNS préféré 7 Une fois terminé cliquez sur OK pour terminer la configuration Utiliser une IP dynamique connexion PPPoE 1 Répétez les étapes 1 à 3 de la section précédente 2 Sélectionnez Obtenir une adresse IP automatiquement et cliquez sur OK 3 Cliquez sur Créer une nouvelle connexion pour lancer l Assistant de nouvelle connexion ...

Страница 109: ...nnexion à Internet et cliquez sur Suivant 6 Sélectionnez Configurer ma connexion manuellement 7 Sélectionnez votre type de connexion et cliquez sur Suivant 8 Entrez le nom de votre FAI et cliquez sur Suivant 9 Entrez votre Nom d utilisateur et Mot de passe Cliquez sur Suivant ...

Страница 110: ...ur d Accès à Internet FAI si vous rencontrez des problèmes lors de la connexion au réseau 10 Cliquez sur Terminer pour compléter la configuration 11 Entrez votre Nom d utilisateur et Mot de passe Cliquez sur Se connecter pour vous connecter à Internet ...

Страница 111: ...nez Schedule Programmer pour déterminer à quelle fréquence vous souhaitez que le système soit mis à jour 3 Sélectionnez Update Mettre à jour pour activer la mise à jour 1 Dans la zone de notification de Windows faites un clic droit sur l icône ASUS Easy Update 4 Cliquez sur OK pour afficher les éléments que vous souhaitez télécharger 5 Cochez le s élément s que vous souhaitez télécharger puis cliq...

Страница 112: ...z votre ordinateur et appuyez sur F8 pour accéder au menu de sélection du périphérique de démarrage 2 Insérez le DVD de restauration dans le lecteur optique et sélectionnez le lecteur optique normalement identifié DVDROM XXXX comme périphérique de boot primaire Appuyez sur Entrée puis appuyez sur une touche quelconque pour continuer 3 La fenêtre Asus Recovery DVD apparaît Sélectionnez un emplaceme...

Страница 113: ...e sauvegarde de vos données avant de restaurer le système 5 Une fois le processus de restauration terminé redémarrez l ordinateur 6 Configurez les paramètres de langue de fuseau horaire de clavier et nom d utilisateur avant d accéder au système d exploitation Windows Le DVD de restauration est réservé au Eee Box PC Ne l utilisez pas sur d autres ordinateurs Visitez le site Web d ASUS www asus com ...

Страница 114: ...NE PAS supprimer la partition nommée RECOVERY La partition de restauration est créée en usine et ne pourra être restaurée par l utilisateur si celle ci est supprimée Amenez votre système à l un des centres de service agréés par ASUS si vous rencontrez des problèmes lors du processus de restauration 1 Appuyez sur F9 lors du démarrage nécessite une partition de restauration 2 La fenêtre Asus Recover...

Отзывы: