background image

16

LED projector E-Manual

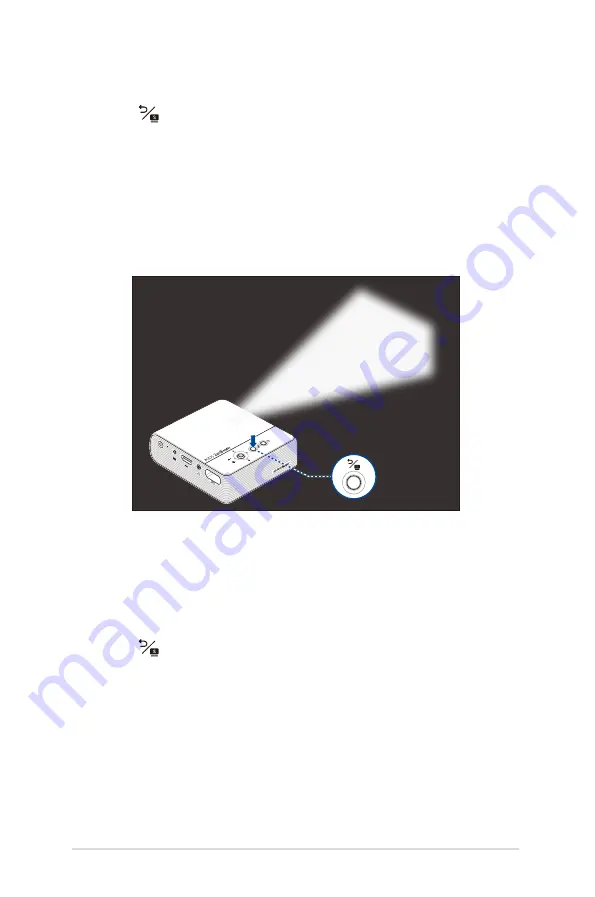
Emergency light mode

The LED projector flashes a blinking white light when you use this 

feature.


Back/Splendid 

button

To use your LED projector as an emergency light:

1.  Disconnect all peripherals and the Wi-Fi dongle from your LED 

projector then press the power button to turn it on.

2.  Press the 

Input

 button and change the input source to HDMI.

3. Press   repeatedly until the LED projector flashes a blinking 

white light.

2.  Press the 

Input

 button and change the input source to HDMI.

3. Press   repeatedly until the LED projector flashes a steady 

white light.

Содержание ZenBeam E2

Страница 1: ......

Страница 2: ...N CONTAINED IN THIS MANUAL ARE FURNISHED FOR INFORMATIONAL USE ONLY AND ARE SUBJECT TO CHANGE AT ANY TIME WITHOUT NOTICE AND SHOULD NOT BE CONSTRUED AS A COMMITMENT BY ASUS ASUS ASSUMES NO RESPONSIBILITY OR LIABILITY FOR ANY ERRORS OR INACCURACIES THAT MAY APPEAR IN THIS MANUAL INCLUDING THE PRODUCTS AND SOFTWARE DESCRIBED IN IT Copyright 2021 ASUSTeK COMPUTER INC All Rights Reserved LIMITATION OF...

Страница 3: ...l 9 Chapter 1 Knowing your LED projector Features 12 Top View 12 Extended features 15 Flashlight 15 Emergency light mode 16 Front View 17 Rear View 18 Right View 20 Bottom View 21 Chapter 2 Setting up Operating your LED projector 24 Connect the LED projector to the power adapter 24 AC power plug requirements 26 Connect the LED projector to your device 27 Press the power button 28 Adjust the focus ...

Страница 4: ...ut 40 Splendid 40 Brightness 40 Contrast 41 Keystone 41 Projector Position 41 Setup 42 Information 43 Turning off your LED projector 44 Appendices Federal Communications Commission Statement 46 Regional notice for California 47 Canadian Department of Communications Statement 47 Global Environmental Regulation Compliance and Declaration 48 ASUS Recycling Takeback Services 48 HDMI Connectivity 49 Su...

Страница 5: ...ter details the parts of your LED projector Chapter 2 Setting up This chapter shows you how to set up your LED projector and use its parts for input device connection Chapter 3 Using the LED projector This chapter describes the features of the LED projector s control panel buttons and how to use them to launch the functions of your LED projector Appendices This section includes safety notices for ...

Страница 6: ...ion and tips that can help complete tasks WARNING This message contains important information that must be followed to keep you safe while performing tasks and prevent damage to your LED projector s data and components Typography Bold This indicates a menu or an item that must be selected Italic This indicates sections that you can refer to in this manual Multi language versions Download other lan...

Страница 7: ...ages out of the reach of children DO NOT block or place anything near the LED projector s ventilation holes Doing so may cause internal heat build up that can degrade picture quality and damage the projector Ensure that the operating voltage of your LED projector matches the voltage of your power source Servicing and replacement of parts DO NOT disassemble or attempt to service this LED projector ...

Страница 8: ...erosole cleaners benzene or thinners on your LED projector Never operate this LED projector immediately after moving it from a cold location When the LED projector is exposed to a drastic change in temperature moisture may condense on the lens and its other internal parts To prevent this use the unit two 2 hours after an extreme or sudden change in temperature occurs DO NOT use a spray containing ...

Страница 9: ... the crossed out wheeled bin indicates that the product electrical electronic equipment and mercury containing button cell battery should not be placed in municipal waste Check local regulations for disposal of electronic products DO NOT throw the battery in municipal waste The symbol of the crossed out wheeled bin indicates that the battery should not be placed in municipal waste ...

Страница 10: ...LED projector E Manual 11 Chapter 1 Knowing your LED projector Chapter 1 Knowing your LED projector ...

Страница 11: ...isplay menu Individually these buttons also correspond to a specific LED projector setting as indicated below Select move up or down Adjust volume move left or right Back Splendid Input NOTE For more information on using the control panel buttons to access your LED projector s settings refer to Chapter 3 Using the LED projector ...

Страница 12: ...ctor is plugged to a power source running on battery mode and the battery power is more than 25 or running in power bank mode Solid Red The LED projector is running on battery mode only and the battery power is not more than 25 Blinking Red The temperature of the LED projector is too high and will lower its brightness automatically The LED projector will shut down if the temperature is still too h...

Страница 13: ...y charge indicator This LED indicator lights up when the LED projector is plugged to a power source using its power adapter IMPORTANT Use only the bundled power adapter to charge the battery pack and supply power to your LED projector ...

Страница 14: ...nd emergency light feature of your LED projector just press the Back Splendid button until your preferred lighting feature is disabled or enabled IMPORTANT Ensure that your LED projector is charged and can run on battery mode before enabling these features Battery time varies depending on usage Flashlight The LED projector flashes a steady white light when you use this feature Back Splendid button...

Страница 15: ...ight 1 Disconnect all peripherals and the Wi Fi dongle from your LED projector then press the power button to turn it on 2 Press the Input button and change the input source to HDMI 3 Press repeatedly until the LED projector flashes a blinking white light 2 Press the Input button and change the input source to HDMI 3 Press repeatedly until the LED projector flashes a steady white light ...

Страница 16: ...ojector E Manual 17 Front View Lens The lens projects video or image files onscreen from your input device WARNING DO NOT touch the lens with your hands or any sharp object DO NOT look directly into the lens ...

Страница 17: ...your LED projector then press the power button to turn on your LED projector again Power DC input port Insert the bundled power adapter into this port to charge the battery pack and supply power to your LED projector IMPORTANT Use only the bundled power adapter to charge the battery pack and supply power to your LED projector WARNING The adapter may become warm to hot while in use DO NOT cover the...

Страница 18: ...s you to connect your LED projector to headphones Power output Wi Fi dongle port This power output port provides up to 5V 1A of output voltage and current You can connect your mobile device to this port to keep it charged while using it with your LED projector You can also insert the bundled Wi Fi dongle that allows you to mirror or cast content from your mobile device NOTE For more details refer ...

Страница 19: ...just the image focus of your LED projector Air vents The air vents allow cool air to enter and warm air to exit the LED projector WARNING Ensure that paper books clothing cables or other objects do not block any of the air vents or else overheating may occur Right View ...

Страница 20: ...LED projector E Manual 21 Bottom View Tripod socket Attach the LED projector to a tripod using this socket Adjustable foot Rotate this adjustable foot to adjust the height of the LED projector ...

Страница 21: ...LED projector E Manual 23 Chapter 2 Setting up Chapter 2 Setting up ...

Страница 22: ...fety and to maintain the quality of this unit refer to the following steps when operating your LED projector Connect the LED projector to the power adapter A Plug the AC power adapter into a 100V 240V power source B Connect the DC power connector into your LED projector NOTE The power adapter may vary in appearance depending on models and your region Charge the LED projector for 5 hours before usi...

Страница 23: ... a battery into fire or a hot oven or mechanically crushing or cutting of a battery that can result in an explosion Leaving a battery in an extremely high temperature surrounding environment that can result in an explosion or the leakage of flammable liquid or gas A battery subjected to extremely low air pressure that may result in an explosion or the leakage of flammable liquid or gas IMPORTANT U...

Страница 24: ...les dealer if the AC power plug bundled with your LED projector does not match your local power source NOTE We highly recommend that you use a video source device that also uses a grounding type plug to prevent signal interference due to voltage fluctuations For Australia and Mainland China For Argentina For Korea For U K For U S A Japan and Taiwan ...

Страница 25: ...LED projector E Manual 27 Connect the LED projector to your device Audio output HDMI Power output 5V 1A ...

Страница 26: ...TE The battery pack inside your LED projector stops charging while the LED projector is in use Refer to the battery indicator for the current charge status of your LED projector You may also refer to the Top View section in this manual for more details ...

Страница 27: ...LED projector E Manual 29 Adjust the focus ring NOTE Use a still image when adjusting the onscreen display Adjust the image focus of the projection onscreen by moving the focus ring up or down ...

Страница 28: ...To use the portrait mode rotate the projector to a vertical position and the vertical image can be viewed in full screen without black bars on the sides NOTE Your LED projector allows you to mirror or cast content from your mobile device refer to the Using the Wi Fi dongle section in this manual for more details ...

Страница 29: ...nce Diagonal Horizontal Vertical inch mm mm mm mm 30 762 664 373 864 35 889 775 436 1007 40 1016 886 498 1151 45 1143 996 560 1295 60 1270 1107 622 1439 55 1397 1218 684 1583 60 1524 1329 747 1727 65 1651 1439 809 1871 70 1778 1550 871 2015 75 1905 1661 933 2159 80 2032 1771 996 2303 85 2159 1882 1058 2447 90 2286 1993 1120 2591 95 2413 2104 1182 2735 100 2540 2214 1245 2879 ...

Страница 30: ...LED projector E Manual 33 Chapter 3 Using the LED projector Chapter 3 Using the LED projector ...

Страница 31: ... the first time We strongly recommend that you use a grounded wall socket while using your LED projector on power adapter mode 1 Set up your LED projector then press and hold the power button for three 3 seconds to turn it on 2 Press or on your LED projector s control panel to browse through the available language options Select button Navigation buttons Using your LED projector for the first time...

Страница 32: ...the onscreen display menu press the navigation buttons up down left right on your LED projector s control panel After adjusting the settings press the Select button to save the new settings and press or move the Select button up to go back to the home screen 3 After you have chosen your prefered language press the Select button to set this language for use on your LED projector 4 You may now start...

Страница 33: ...ightly between Android and iOS mobile devices Before setting up the screen mirroring or casting ensure to 1 insert the bundled Wi Fi dongle correctly and 2 turn on the Wi Fi on your mobile device Using the Wi Fi dongle NOTE If you wish to change the Wi Fi band from 5GHz to 2 4GHz press and hold the Input button for three 3 seconds and wait for another three 3 seconds to enable the change ...

Страница 34: ... the password as shown on the projection screen to connect 3 Open your browser and type the URL as shown on the projection screen in the address bar You will be directed to a web page to connect your LED projector to the Wi Fi network NOTE Ensure your mobile device and LED projector are connected to the same Wi Fi network before you continue to the next step To connect to a different Wi Fi network...

Страница 35: ...nter the password as shown on the projection screen to connect 3 Open your browser and type the URL as shown on the projection screen in the address bar You will be directed to a web page to connect your LED projector to the Wi Fi network NOTE Ensure your mobile device and LED projector are connected to the same Wi Fi network before you continue to the next step To connect to a different Wi Fi net...

Страница 36: ... Ensure your mobile device and LED projector are connected to the same Wi Fi network before you continue to the next step To connect to a different Wi Fi network repeat step 3 and select the Wi Fi network you prefer on the web page 3 Open the YouTube app then tap the Cast button at the top of the Home screen From the device list select your LED projector to cast to 4 Once connected tap Play and yo...

Страница 37: ... to quickly mute or adjust the volume to the loudest Input Select this menu option to configure the input source for your LED projector Splendid Select this menu option to activate different display modes You may also directly launch this menu option by pressing Available options Plugged to a power source Standard Theater Presentation Battery mode High Middle Low Brightness Select this menu option...

Страница 38: ...one of your projection onscreen NOTE If you wish to enable the Auto Keystone feature after manual adjustment go to Setup and turn on Auto Keystone Projector Position This option allows you to change the way your projections are oriented on screen based from the current location of your LED projector You may change your projection s orientation to correspond with the location where your LED project...

Страница 39: ...ion Auto Ceiling Detection This option allows you to enable or disable auto ceiling detection Auto Power This option allows you to enable or disable the auto power on feature when your LED projector is connected to an HDMI device and plugged to a power source using its power adapter OSD Timeout This option allows you to set the number of seconds before the onscreen display menu disappears from you...

Страница 40: ...LED projector E Manual 43 Information Select this menu option to see an overview of information about your LED projector model name LED projector s firmware version input device s screen resolution ...

Страница 41: ...our LED projector If you need to turn on your LED projector again immediately after turning it off please wait until the Power indicator and battery status indicator lights off NOTE For safety purposes charging the battery of your LED projector may not immediately start after the device is powered off Once the projector cools off charging its battery automatically begins ...

Страница 42: ...LED projector E Manual 45 Appendices Appendices Appendices Appendices ...

Страница 43: ...interference to radio communications However there is no guarantee that interference will not occur in a particular installation If this equipment does cause harmful interference to radio or television reception which can be determined by turning the equipment off and on the user is encouraged to try to correct the interference by one or more of the following measures Reorient or relocate the rece...

Страница 44: ...or other reproductive harm Wash hands after handling Canadian Department of Communications Statement This digital apparatus does not exceed the Class B limits for radio noise emissions from digital apparatus set out in the Radio Interference Regulations of the Canadian Department of Communications This class B digital apparatus complies with Canadian ICES 003 ...

Страница 45: ...csr asus com english Compliance htm for information disclosure based on regulation requirements ASUS is complied with Japan JIS C 0950 Material Declarations EU REACH SVHC Korea RoHS ASUS Recycling Takeback Services ASUS recycling and takeback programs come from our commitment to the highest standards for protecting our environment We believe in providing solutions for you to be able to responsibly...

Страница 46: ...Devices with micro HDMI port Micro HDMI to HDMI Adapter HDMI to HDMI Cable iOS devices with Lightning port Lightning Digital AV Adapter HDMI to HDMI Cable Devices with USB 3 1 Gen 2 Type C port USB 3 1 Gen 2 Type C Digital AV Adapter HDMI to HDMI Cable HDMI Connectivity ...

Страница 47: ...00x1050 60 0 65 3 101 000 UXGA 1600x1200 60 0 75 0 162 000 PowerBook G4 640x480 60 0 31 4 25 175 PowerBook G4 800x600 60 0 37 9 40 000 PowerBook G4 1024x768 60 0 48 4 65 000 HDMI Extended Wide timing Mode Resolution Refresh rate Hz H frequency kHz Clock MHz WXGA 1280x720 60 0 44 8 74 250 1280x800 60 0 49 6 71 000 QuadVGA 1280x960 60 0 59 7 108 000 1680x1050 60 0 65 3 119 000 WSXGA 1920x1080 1080P ...

Страница 48: ...76 16 9 50 0 31 3 27 000 720p 1280x720 60 0 45 0 74 250 720p 1280x720 50 0 37 5 74 250 1080i 1920x1080 60 30 33 8 74 250 1080i 1920x1080 50 25 28 1 74 250 1080p 1920x1080 23 97 24 27 0 74 250 1080p 1920x1080 60 0 67 5 145 500 1080p 1920x1080 50 0 56 3 145 500 1080p 1920x1080 25 0 28 1 74 250 1080p 1920x1080 30 0 33 8 74 250 Graphic source monitor range limits Horizontal scan rate 15k 75kHz Vertica...

Страница 49: ... colors Projection Lens Throw Ratio 1 3 1 35 in 1 m 16 9 Projection Distance 0 76 m to 2 54 m Projection Screen Size 30 in to 100 in Projection Offset 100 Zoom Ratio Fixed Video Features Picture Modes Standard Theater Presentation Keystone Adjustment Vertical 40 Auto Keystone Yes Projector Placement Front Table Rear Table Audio Features Built in speakers 5W speaker ASUS SonicMaster Audio technolog...

Страница 50: ... 2W up to 4 hours Noise Acoustic Noise 30 dB Standard mode 28 dB Theater mode Input Output PC Signal Input HDMI 1 3 compatible to 1 4 Audio Out Earphone out USB 2 0 port for power output Yes 5V 1A Mechanical Design Chassis Colors Golden Tripod Socket Yes On machine Buttons Yes Lens Cover No Dimension Physical Dimension 107 5 mm x 110 mm x 37 mm L x W x H Weight Net Weight Esti 400 g continued on t...

Страница 51: ...er Adapter AC Plug HDMI Cable Dongle Quick Start Guide Warranty Card Regulation Approvals FCC CE CB CCC RCM VCCI CU IEC62471 CEC NOTE Specifications are subject to change without prior notice Product availability may vary by region All brand and product names mentioned are trademarks of their respective companies ...

Отзывы: