


2-22
Chapter 2: Hardware information
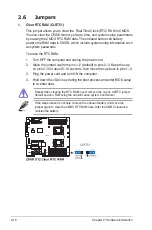
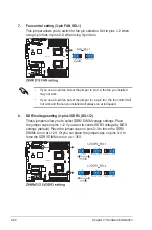
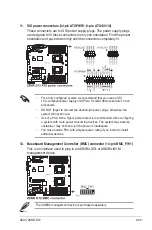
7. Fan control setting (3-pin FAN_SEL1)
This jumper allows you to switch for fan pin selection. Set to pins 1–2 when
using 4-pin fans or pins 2–3 when using 3-pin fans.
• If you use a 4-pin fan but set the jumper to pin 2-3, the fan you installed
may not work.
• If you use a 3-pin fan but set the jumper for a 4-pin fan, the fan controll will
not work and the fan you installed will always run at full speed.
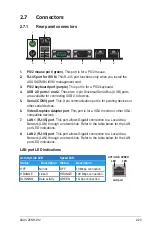
8. DDR3 voltage setting (4-pin LVDDR3_SEL1/2)
These jumpers allow you to select DDR3 DIMM voltage settings. Place
the jumper caps on pins 1–2 if you want to control DDR3 voltage by BIOS
settings (default). Place the jumper caps on pins 2–3 to force the DDR3
DIMMs to run at +1.2V. Or you can place the jumper caps on pins 3–4 to
force the DDR3 DIMMs to run at +1.35V.
Содержание Z8NR-D12 - Motherboard - SSI EEB 3.61
Страница 1: ...Motherboard Z8NR D12 ...
Страница 13: ...1 Product introduction This chapter describes the motherboard features and the new technologies it supports ...
Страница 23: ...ASUS Z8NR D12 2 3 2 2 3 Motherboard layouts ...
Страница 52: ...2 32 Chapter 2 Hardware information ...
Страница 53: ...3 Powering up This chapter describes the power up sequence and ways of shutting down the system ...
Страница 54: ...ASUS Z8NR D12 Chapter summary 3 3 1 Starting up for the first time 3 1 3 2 Turning off the computer 3 2 ...
Страница 143: ...ASUS Z8NR D12 6 15 8 Follow the screen instructions to complete installation 9 When finished press Finish to continue ...
Страница 148: ...6 20 Chapter 6 Driver installation ...
Страница 150: ...Appendix summary A ASUS Z8NR D12 A 1 Z8NR D12 model block diagram A 1 ...
Страница 151: ...ASUS Z8NR D12 A 1 A 1 Z8NR D12 model block diagram ...
Страница 152: ...A 2 Appendix A Reference information ...