


5-54
Chapter 5: RAID Configuration
8.
Repeat step 6 - 7 to add the other disks to the array.
9.
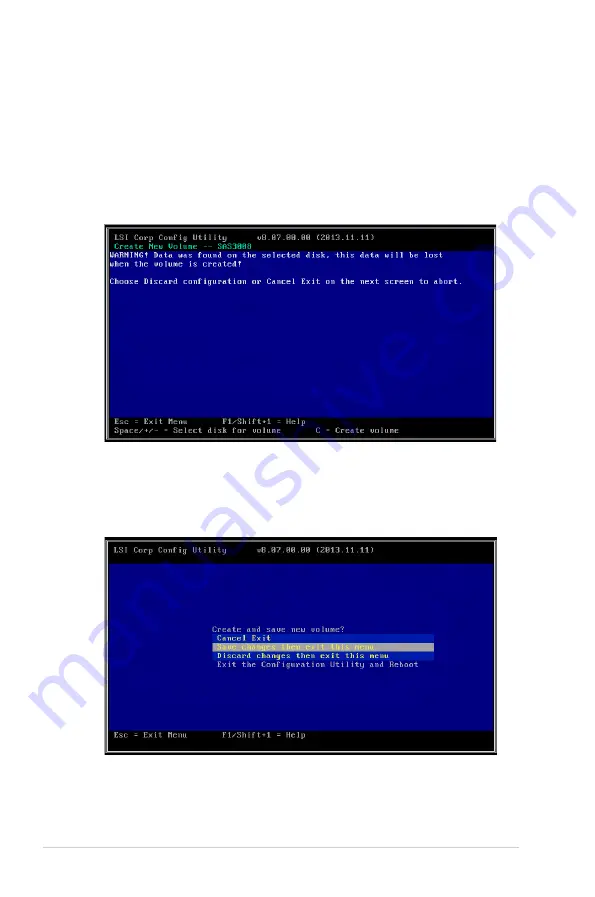
When done, press <C> to continue with the creation of the new volume.
10. Select
Save changes then exit this menu
to create the volume.
If a selected disk contains files or data, the following message appears on the screen.
To proceed, do either of the following:
•
Click any key to continue.
•
Press <M> to keep existing data on the first disk. If you choose this option, data
on the first disk will be mirrored on the second disk that you will add to the volume
later. Ensure the data you want to mirror is on the first disk.
•
Press <D> to overwrite any data and create the new IM array on the selected
disks.
Содержание Z10PC-D8 Series
Страница 1: ...Z10PC D8 Series User Guide ...
Страница 24: ...2 4 Chapter 2 Hardware Information 2 2 3 Motherboard layout Z10PC D8 SAS 10G 2S ...
Страница 25: ...2 5 ASUS Z10PC D8 Series Z10PC D8 SAS ...
Страница 26: ...2 6 Chapter 2 Hardware Information Z10PC D8 10G 2S ...
Страница 27: ...2 7 ASUS Z10PC D8 Series Z10PC D8 ...
Страница 66: ...3 4 Chapter 3 Powering Up ...
Страница 192: ...72 Chapter 5 RAID Configuration ...
Страница 215: ...ASUS Z10PC D8 Series 6 23 6 Click Finish to complete the installation 5 Click Install to proceed with the installation ...
Страница 220: ...A 2 Appendix Z10PC D8 Series block diagram Z10PC D8 SAS 10G 2S ...
Страница 221: ...ASUS Z10PC D8 Series A 3 Z10PC D8 SAS ...
Страница 222: ...A 4 Appendix Z10PC D8 10G 2S ...
Страница 223: ...ASUS Z10PC D8 Series A 5 Z10PC D8 ...


