background image

8

ASUS Xonar U5 SI User Guide

English

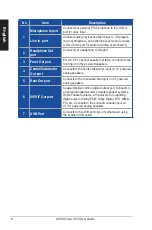
No

Item

Description

1

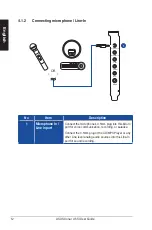
Microphone In port

Connect your external PC microphone to this 3.5mm 

port for voice input. 

Line In  port

Connect analog devices like Mp3 players, CD players, 

music synthesizers, and other line-level sound sources 

to this 3.5mm port for audio recording or processing.

2

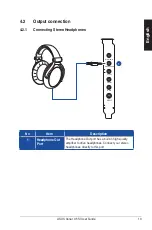
Headphone Out 
port

Connect your headphone to this port.

3

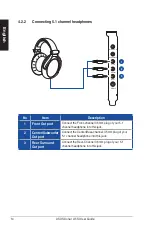
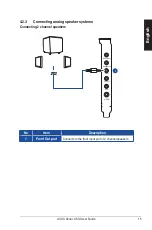
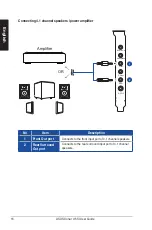
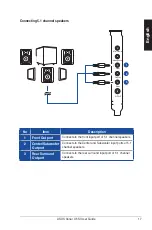
Front Out port

For 2/4.1/5.1 channel speaker systems, connects to the 

front input on the powered speakers.

4

Center/Subwoofer 
Out port

Connects to the center/subwoofer input on 5.1 powered 

analog speakers.

5

Rear Out port

Connects to the rear/subwoofer input on 5.1 powered 

analog speakers.

6

S/PDIF Out port

Coaxial (Optical combo) digital output port. Connects to 

an external digital decoder or digital speaker systems, 

Home Theater systems, AV receivers for outputting 

digital audio including PCM, Dolby Digital, DTS, WMA-

Pro, etc. Connects to the surround channel input on 

4.1/5.1 powered analog speakers.

7

USB Port

Connects to the USB port of your motherboard using 

the bundled USB cable.

Содержание XONAR U5 SI

Страница 1: ...Xonar U5 SI 5 1 Channel Audio Card User Guide ...

Страница 2: ...LAR PURPOSE IN NO EVENT SHALL ASUS ITS DIRECTORS OFFICERS EMPLOYEES OR AGENTS BE LIABLE FOR ANY INDIRECT SPECIAL INCIDENTAL OR CONSEQUENTIAL DAMAGES INCLUDING DAMAGES FOR LOSS OF PROFITS LOSS OF BUSINESS LOSS OF USE OR DATA INTERRUPTION OF BUSINESS AND THE LIKE EVEN IF ASUS HAS BEEN ADVISED OF THE POSSIBILITY OF SUCH DAMAGES ARISING FROM ANY DEFECT OR ERROR IN THIS MANUAL OR PRODUCT SPECIFICATIONS...

Страница 3: ...rdware 7 2 1 Xonar U5 SI Audio Card 7 2 2 Installing Xonar U5 SI Audio Card 9 3 Driver Installation 10 3 1 Installing the Xonar U5 SI Card Driver 10 3 2 Uninstalling or Reinstalling the Xonar U5 SI Card Driver 10 4 Connecting Speakers and Peripherals 11 4 1 Input connection 11 4 2 Output connection 13 5 Software Utilities 18 6 Troubleshooting 19 ...

Страница 4: ...ensure a successful installation of the Xonar U5 SI audio card make sure that your computer meets the following requirements 32 64bit Microsoft Windows 10 8 1 8 7 32 64bit Intel Pentium 4 1 4GHz AMD Athlon 1400 CPU or faster CPU 256MB system memory 60MB available storage space for driver installation CD ROM drive or DVD ROM drive for software installation High quality headphones powered analog spe...

Страница 5: ...rms 3 677 Vp p for headphone out 1 Vrms 3 677 Vp p for line in Bus Compatibility USB audio class USB audio class 2 0 for all functions Main Chipset Audio Processor Cmedia 6631A High Performance Sound Processor Max 192kHz 24bit D A Converter of Digital Sources Cmedia CM9882A x1 108dB SNR Max 192kHz 24bit A D Converter for Analog Inputs Cmedia CM9882A x1 104dB SNR Max 192kHz 24bit Sample Rate and Re...

Страница 6: ...mm mini jack x3 for 5 1 speaker Front Center Subwoofer Rear out 3 50mm mini jack x1 Headphone out Analog Input Jack 3 50mm mini jack x1 Shared by Line In Mic In Digital S PDIF Output High bandwidth coaxial optical port supports 192kHz 24bit Driver Features As SW specifications Version 1 01 ...

Страница 7: ...7 ASUS Xonar U5 SI User Guide English Mic Line in Headphone Front Rear Center S PDIF 2 Hardware 2 1 Xonar U5 SI Audio Card 3 2 1 Side view Rear view 4 5 6 7 3 2 1 4 5 6 ...

Страница 8: ...tems connects to the front input on the powered speakers 4 Center Subwoofer Out port Connects to the center subwoofer input on 5 1 powered analog speakers 5 Rear Out port Connects to the rear subwoofer input on 5 1 powered analog speakers 6 S PDIF Out port Coaxial Optical combo digital output port Connects to an external digital decoder or digital speaker systems Home Theater systems AV receivers ...

Страница 9: ...cord from your computer and power outlet 3 Touch the metal back or side panel of the computer to avoid static electricity 4 Remove the chassis cover 5 Remove the metal bracket from an available PCIe slot for the Xonar U5 SI audio card 6 Carefully insert the audio card into the PCIe slot Ensure the audio card sits properly in place 7 Connect the USB port of Xonar U5 SI to the internal USB port of y...

Страница 10: ...uble click setup exe located on the optical drive 4 Click Driver to start the installation 5 Follow the on screen instructions to complete the installation Read understand and accept the END USER LICENSE AGREEMENT before continuing the installation 6 When the installation finishes you may be prompted to restart your computer You can choose to restart the computer at a later time 3 2 Uninstalling o...

Страница 11: ...in Headphone Front Rear Center S PDIF S PDIF AVR 4 Connecting Speakers and Peripherals 4 1 Input connection 4 1 1 Connecting digital audio systems 1 No Item Description 1 S PDIF Out port Connect an AVR Audio Video Receiver to this S PDIF output port ...

Страница 12: ...g microphone Line In 1 No Item Description 1 Microphone In Line In port Connect the microphone s 3 5mm plug into this Mic In port for voice communication recording or karaoke Connect the 3 5mm plug of the CD MP3 Player or any other Line level analog audio sources into this Line In port for sound recording ...

Страница 13: ...e Front Rear Center S PDIF 4 2 Output connection 4 2 1 Connecting Stereo Headphones 1 No Item Description 1 Headphone Out Port The Headphone Out port has a built in high quality amplifier to drive headphones Connect your stereo headphones directly to this port ...

Страница 14: ...Front channel 3 5mm plug of your 5 1 channel headphone into this jack 2 Center Subwoofer Out port Connect the Center Bass channel 3 5mm plug of your 5 1 channel headphone into this jack 3 Rear Surround Out port Connect the Rear Channel 3 5mm plug of your 5 1 channel headphone into this jack 4 2 2 Connecting 5 1 channel headphones 1 2 3 ...

Страница 15: ... Guide English Mic Line in Headphone Front Rear Center S PDIF 4 2 3 Connecting analog speaker systems Connecting 2 channel speakers No Item Description 1 Front Out port Connects to the front input port of 2 channel speakers 1 ...

Страница 16: ... Rear Center S PDIF Amplifier OR Connecting 4 1 channel speakers power amplifier No Item Description 1 Front Out port Connects to the front input port of 4 1 channel speakers 2 Rear Surround Out port Connects to the rear surround input port of 4 1 channel speakers 1 2 ...

Страница 17: ...port Connects to the front input port of 5 1 channel speakers 2 Center Subwoofer Out port Connects to the Center and Subwoofer input ports of 5 1 channel speakers 3 Rear Surround Out port Connects to the rear surround input port of 5 1 channel speakers Mic Line in Headphone Front Rear Center S PDIF 1 2 3 ...

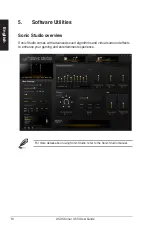
Страница 18: ...ftware Utilities For more details about using Sonic Studio refer to the Sonic Studio manual Sonic Studio overview Sonic Studio comes with advanced sound algorithms and virtual surround effects to enhance your gaming and entertainment experience ...

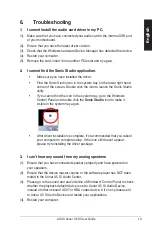
Страница 19: ...e icon in the system tray go to the Windows Control Panel and double click the Sonic Studio icon to make it visible in the system tray again After driver installation is complete it s recommended that you reboot your computer to complete setup If the icon still doesn t appear please try reinstalling the driver package 3 I can t hear any sound from my analog speakers 1 Ensure that you have connecte...

Страница 20: ...of Sonic Studio 2 Ensure that you have connected the correct S PDIF output jack in the card to the decoder s AV receiver S PDIF input jack 3 You may need to select the correct input and mode of your decoder or AV receiver 4 If you are using 192KHz PCM output make sure that your decoder can support 192KHz decoding Try changing it to 44 1K or 48KHz first ...

Отзывы: