background image

1-5

ASUS.UFOTO.UF735

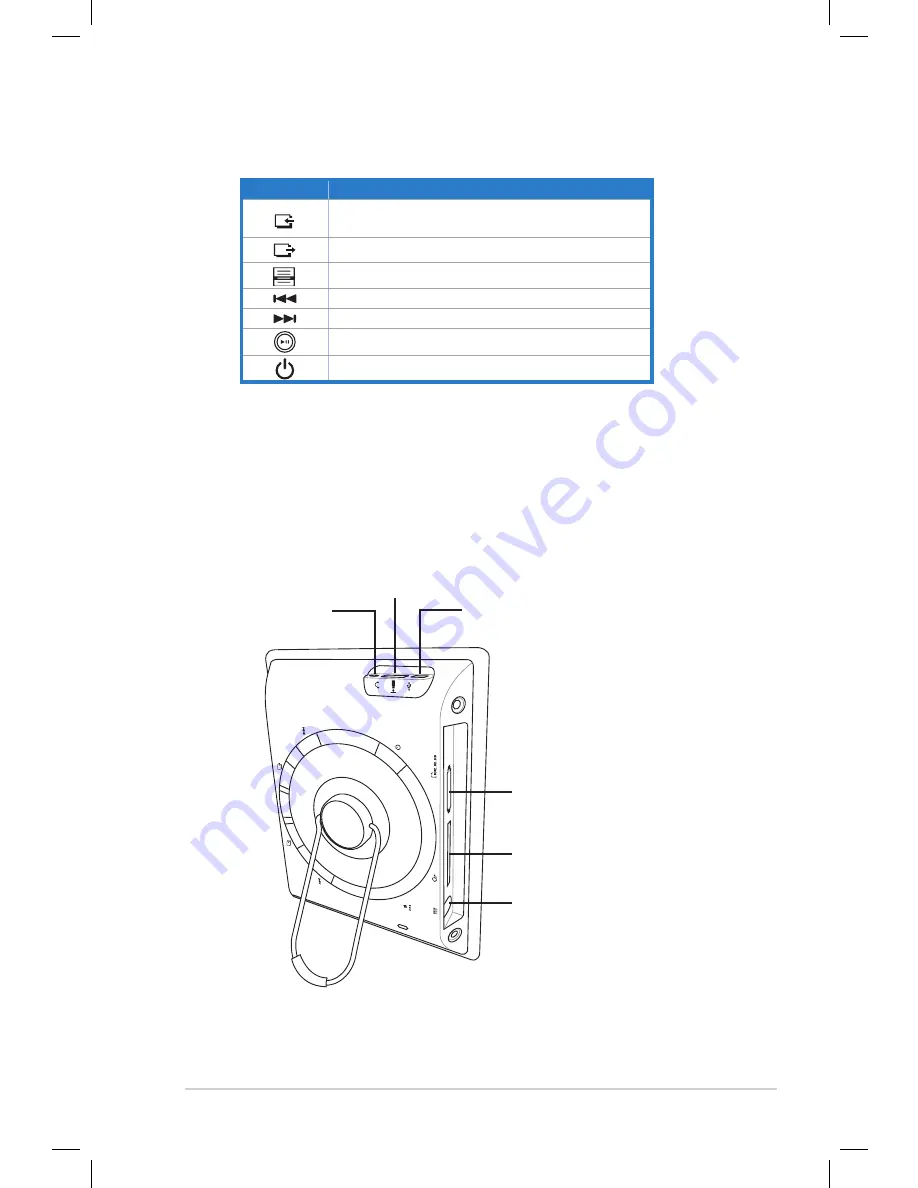
Side view

mini-USB port  
(A/B type)

Headphone port

USB port 
(A type)

SD/MMC/xD/MS/MS Pro port

CF Type I port

DC IN port

Button

Function

Single select, Volume control hotkey, Photo and 
calendar selection switch
Exit
Menu for advanced selection
Right / Down
Left / Up
Confirm / Play or Pause / Quick Power On 

Power On/Off

(From the back panel)

Содержание UF735B

Страница 1: ...uFOTO UF735 User Guide ...

Страница 2: ...MERCHANTABILITY OR FITNESS FOR A PARTICULAR PURPOSE IN NO EVENT SHALL ASUS ITS DIRECTORS OFFICERS EMPLOYEES OR AGENTS BE LIABLE FOR ANY INDIRECT SPECIAL INCIDENTAL OR CONSEQUENTIAL DAMAGES INCLUDING DAMAGES FOR LOSS OF PROFITS LOSS OF BUSINESS LOSS OF USE OR DATA INTERRUPTION OF BUSINESS AND THE LIKE EVEN IF ASUS HAS BEEN ADVISED OF THE POSSIBILITY OF SUCH DAMAGES ARISING FROM ANY DEFECT OR ERROR ...

Страница 3: ...O 1 6 Chapter 2 Getting started Using your uFOTO for the first time 2 2 Setting language and time date 2 2 Installing the Sub Display utility 2 2 uFOTO placement 2 3 Screenmenu 2 4 Setting your uFOTO 2 4 Viewing photos 2 9 Displaying images from different sources 2 9 Previewing photos 2 10 Adjusting effects 2 11 Copying photos to your uFOTO 2 12 Deleting photos from your uFOTO 2 13 Listening to MP...

Страница 4: ...iv Software introduction 2 19 Data synchronization 2 19 Sub Display 2 19 Specifications summary 2 24 Troubleshooting FAQ 2 25 ...

Страница 5: ...interference will not occur in a particular installation If this equipment does cause harmful interference to radio or television reception which can be determined by turning the equipment off and on the user is encouraged to try to correct the interference by one or more of the following measures Reorient or relocate the receiving antenna Increase the separation between the equipment and receiver...

Страница 6: ...ediately Make sure to use uFOTO only from the type of power source indicated on the label If you are not sure of the type of power supply to your home consult your dealer or local power company Use the appropriate power plug which complies with your local power standard Do not overload power strips and extention cords Overloading can result in fire or electric shock Avoid dust humidity and tempera...

Страница 7: ...it may drip inside device and cause an electric shock The following indications are normal with uFOTO The screen may flicker during the initial use due to the nature of the fluorescent light When this happens turn off the power switch then turn the device back on You may find slightly uneven brightness on the screen depending on the desktop pattern you use When the same image is displayed for hour...

Страница 8: ...entation that may have been added by your retailer These documents are not part of the standard package NOTE Information for special situations TIP Tips for completing tasks WARNING Important information that must be followed for safe operation IMPORTANT Vital information that must be followed to prevent damage to data components or persons Notes for This Manual A few notes and warnings are used t...

Страница 9: ...Chapter 1 Hardware introduction This chapter provides a general description of uFOTO UF735 including the installation requirements hardware features and basic installation procedures ...

Страница 10: ...ng items If any of the above items is damaged or missing contact your retailer immediately uFOTO photo frame Power adaptor USB cable Support CD Quick Start Guide Warranty card Optional accessories Digital Camera under mass storage mode PC Notebook memory card USB flash disk SPLENDID MENU Quick Start Guide Warranty Card ...

Страница 11: ...or sub display function Make sure your PC Notebook syetem meets the minimum requirements Minimum requirements Windows XP 1GHz CPU 512MB RAM 150MB available HD space Recommended specifications Windows XP 2GHz CPU 1GB RAM 150MB available HD space ...

Страница 12: ...1 Hardware introduction 1 4 Hardware introduction Front view Back view Stereo speakers Return button Menu button Next button Left Up button Righ Down button Reset Power button Play Confirm button Support stand ...

Страница 13: ... port A type SD MMC xD MS MS Pro port CF Type I port DC IN port Button Function Single select Volume control hotkey Photo and calendar selection switch Exit Menu for advanced selection Right Down Left Up Confirm Play or Pause Quick Power On Power On Off From the back panel ...

Страница 14: ...k Memory card 1 Plug the uFOTO power adaptor to a power outlet 2 a Connect your digital camera under mass storage mode or USB flash disk to the uFOTO 2 b Insert your memory card to the card slot 2 c Connect your uFOTO to your PC or notebook as a mass storage or a sub screen Camera under mass storage mode USB flash disk SPLENDID MENU To connect you uFOTO ...

Страница 15: ...Chapter 2 Getting started This chapter guides you to use the functions of your uFOTO including viewing photos listening to MP3 displaying the calendar and using the Sub Display ...

Страница 16: ...urn on or off your uFOTO normally Power button Installing the ASUS uFOTO Utility The ASUS uFOTO Utility contains two functions data synchronization and sub display To normally use the functions make sure to install the ASUS uFOTO Utility successfully To install the ASUS uFOTO Utility 1 Insert the support CD into the optical drive 2 Double click the ASUS uFOTO Utility icon then the follow the on sc...

Страница 17: ...surface Horizontal placement Vertical placement The display automatically rotates 90 degrees clockwise depending on your preferred orientation Adjust the support stand Rotate the support stand clockwise to adjust and support vertical or horizontal placement Back view Front view You can also rotate the support stand in an upward position to hand on a hook as shown ...

Страница 18: ...ings from the Setting function From the main menu use or to select the Setting icon and press the confirm button to enter Screen menu uFOTO provides several visual and audio functions such as viewing photos listening to mp3s displaying digital calendar and using the Sub Display ...

Страница 19: ...Date From Setting menu use or to select the Time and Date item then press to set the precise time and date for the Calendar display To set the time 1 From the main menu go to Setting Time and Date Time to display the following screen 2 Use or to select the field hh mm ss and change the values Press to confirm the setting To set the date 1 From the main menu go to Setting Time and Date Date to disp...

Страница 20: ...ues Press to confirm the setting Brightness Enter the Brightness item to adjust the desired brightness Setting the alarm 1 From the main menu go to Setting Alarm to display the following screen 2 Use or to select alarm preset then press Set the snooze Set the alarm time Set the alarm type ...

Страница 21: ...al memory card USB device or your computer Select Volume to adjust the alarm volume using or AI Light The AI Light feature smartly adjusts the brightness of the LCD screen accrording to the lighting in the surrounding environment Light in Motion When enabled the both sides of the LCD panel is lightened up in specific color ...

Страница 22: ...on Enter this item to view detailed information about your uFOTO the status of the inserted memory card and the current software version Set Default Select Yes to restore to the factory default setting or No to maintain the current settings ...

Страница 23: ... images from different sources To display images from your personal memory card 1 Insert your memory card with pictures into the corresponding slot 2 Select the image file s you want to display To display images from your USB device Digital Camera USB flash disk 1 Connect the bundled USB cable from your digital camera to your uFOTO Digital camera under mass storage mode uFOTO Bundled USB cable Ins...

Страница 24: ...press to enter 2 Select the photo source then press to view the browsing screen 3 In the browsing screen press and to select a photo then press to display the full view While viewing the selected photo you can switch to the previous or next one pressing press and Pressing allows you to switch between the Slideshow mode or the Browse mode Changing photo sequence To change the photo display sequence...

Страница 25: ... displays photos in old picture style Spotlight Mode enhances color sharpness and strong contrast Black and White Mode displays photos in black and white 2 Slideshow Mode Auto display your photos in order saving you from clicking on each photo 3 Transition Effect Provides you several transition effects 4 Frequency Allows you to set the photo transition frequency 5 Story Mode A built in photo demon...

Страница 26: ...y resized into a 720 x 480 resolution The operating system of your uFOTO takes around 28MB of the total internal memory 100MB allows you to store over 700 photos Copying a single photo 1 While browsing highlight a photo then press to check the checkbox below the photo and press 2 Select Copy to then press 3 Select the storage source where you want to paste the copied photo then press to confirm Co...

Страница 27: ...press to check the checkbox below the photo and press 2 Select Delete then press 3 Select Yes to delete the file or No to abort the selection Deleting all photos 1 While browsing press 2 Select Select All then press 3 Press again then select Delete and press 4 Select Yes to delete the file or No to abort the selection ...

Страница 28: ... music file s you want to play To play music from your USB device 1 Connect your USB device with MP3 files to your uFOTO with the bundled USB cable Or Insert your USB device into the USB port on your uFOTO 2 Select the music file s you wan to play To play music from your My uFOTO Music folder in your computer 1 Connect your computer to your uFOTO with the bundled USB cable 2 Install the software i...

Страница 29: ...OTO Copying a single MP3 file 1 While in the playlist screen highlight an MP3 file then press to check the checkbox below the file and press 2 Select Copy to then press 3 Select the storage source where you want to paste the copied MP3 file then press to confirm the setting Copying all MP3 files 1 While in the playlist screen press 2 Select Select All then press 3 Press again then select Copy to a...

Страница 30: ...ile then press to check the checkbox below the file and press 2 Select Delete then press 3 Select Yes to delete the file or No to abort the selection Deleting all MP3 files 1 While in the playlist screen press 2 Select Select All then press 3 Press again then select Delete and press 4 Select Yes to delete the file or No to abort the selection ...

Страница 31: ...iguring Calendar settings From the Calendar screen press to configure several settings for photo display and music playback 1 Slideshow Mode Allows you to disable the slideshow mode or set to sequential random mode 2 Transition Effect Provides you several transition effects 3 Frequency Allows you to set the photo transition frequency 4 Play with MP3 Allows you to select the desired music from your...

Страница 32: ...llows you to display the calendar in Sub Screen or Full Screen 8 MP3 Menu Allows you to adjust the volume and playback mode for the currently playing MP3 file Reminiscence The Reminiscence function allows you to search for a photo according to the date when the photo was taken Use and to select the field mm dd yyyy and change the values Press to confirm the setting ...

Страница 33: ...ss Storage then press to enter 3 Double click the ASUS uFOTO Utility icon on the computer desktop to start the ASUS uFOTO Folder Sync utility 4 Copy your favorite MP3 files to the My uFOTO Music folder and photos to the My uFOTO Picture folder Before synchronizing files make sure to check if the files are already in C My Documents My uFOTO Picture or C My Documents My uFOTO Music 5 Click Auto to s...

Страница 34: ... your uFOTO Resolution adjusting buttons Sub Display modes Advanced settings Screen displayed on your PC Screen proportion Adjusting the screen Press the following buttons to adjust the viewing screen and to zoom in or zoom out to fit the screen in proportion to display the screen in original proportion Selecting your ideal Sub Display mode The Sub Display utility offers three kinds of viewing mod...

Страница 35: ...a file writing a sentence etc When you select the Duplication mode the screen on your computer is duplicated to your uFOTO Adjust the position of the screen by dragging the screen with the hand shaped cursor Selection mode Move the scroll bar in the preview screen to select the window you want to display on the uFOTO Scroll bar Preview screen Checkbox Hand shaped cursor ...

Страница 36: ...sion mode When enabling the extension mode you can hide the current viewing window by dragging it ouside of the computer desktop window Adjust the position of the window on your uFOTO by dragging the same screen with the hand shaped cursor in the control panel You can also extend part of the current viewing window to your uFOTO ...

Страница 37: ...35 Advanced settings Click Advanced to adjust the settings including Image Adjustment and Display Setting Advanced settings Image Adjustment Brightness Constrast Quality Speed Display Setting Display resolution selection ...

Страница 38: ...ptor I O 1x USB 2 0 High Speed Host mini A B 1x Slave OTG female A type 3 5 mm audio jack stereo Data input CF Type I SD MMC xD MS and MS Pro Internal memory NAND Flash 128MB Supported file format Picture JPEG BMP GIF Music MP3 OS compatibility Mass Storage Windows 2000 ME XP Vista Mac OS X Sub Display Windows XP Vista Firmware update Through external memory cards SD mini SD Languages supported En...

Страница 39: ...to your uFOTO for charging I cannot launch the Sub Display function The USB cable is not well connected The ASUS uFOTO utility is not completely installed Refer to page 2 19 and re install the utility The Sub Display function cannot work with the Mass Storage mode simultaneously Make sure that you are not in the Mass Storage mode prior to launching the Sub Display function I cannot import photos o...

Страница 40: ...2 26 Chapter 2 Getting started ...

Отзывы: