


Chapter 1: Product Introduction
1-8
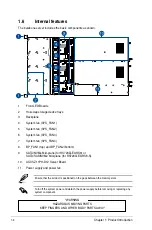
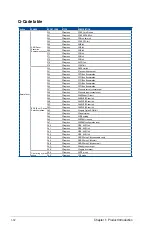
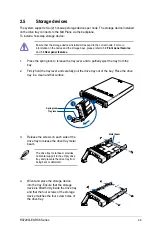
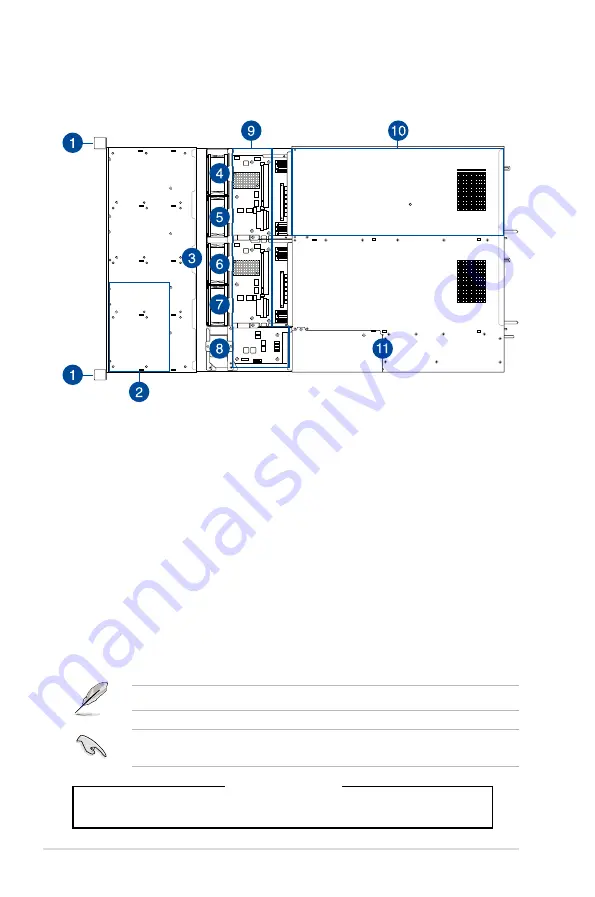
1.6
Internal features
The barebone server includes the basic components as shown.
*WARNING
HAZARDOUS MOVING PARTS
KEEP FINGERS AND OTHER BODY PARTS AWAY
Turn off the system power and detach the power supply before removing or replacing any
system component.
1.
Front LED Boards
2.
Hot-swap storage device trays
3. Backplane
4.
System fan (SYS_FAN1)
5.
System fan (SYS_FAN2)
6.
System fan (SYS_FAN3)
7.
System fan (SYS_FAN4)
8.
BP_FAN1 (top) and BP_FAN2 (bottom)
9.
SATA/NVMe Mid-plane (for RS720Q-E9-RS8) or
SATA/SAS/NVMe Mid-plane (for RS720Q-E9-RS8-S)
10. ASUS Z11PH-D12 Server Board
11. Power supply and power fan
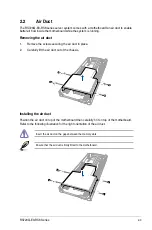
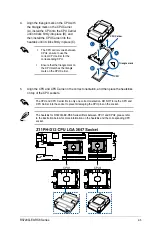
Ensure that the air duct is positioned on the gaps between the memory slots.
Содержание RS720Q-E9-RS8
Страница 1: ...2U Rackmount Server RS720Q E9 RS8 User Guide ...
Страница 12: ...xii ...
Страница 45: ...2 21 RS720Q E9 RS8 Series RS720Q E9 RS8 Upper Mid Plane Lower Mid Plane Backplane ...
Страница 56: ...Chapter 4 Motherboard Information 4 2 4 1 Motherboard and Mid plane layout Z11PH D12 ...
Страница 57: ...4 3 RS720Q E9 RS8 Series RS720Q E9 RS8 S Mid Plane RS720Q E9 RS8 Mid Plane ...
Страница 68: ...Chapter 4 Motherboard Information 4 14 7 Power connector This power connector connects to the Mid Plane ...
Страница 72: ...Chapter 4 Motherboard Information 4 18 ...
Страница 118: ...Chapter 5 BIOS Setup 5 46 ...
Страница 130: ...Chapter 6 RAID Configuration 6 12 ...
Страница 148: ...7 18 Chapter 7 Driver Installation ...
Страница 149: ...Appendix Appendix ...
Страница 150: ...A 2 Appendix Z11PH D12 block diagram ...
Страница 154: ...A 6 Appendix ...