PRIME Z690-P WIFI D4
1-15
Chapter 1
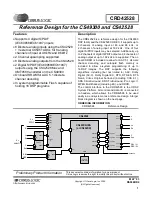
12. AURA RGB header
The AURA RGB header allows you to connect RGB LED strips.
RGB_HEADER
PIN 1
+12V
G
R
B
The RGB header supports 5050 RGB multi-color LED strips (12V/G/R/B), with a maximum
power rating of 3A (12V).
Before you install or remove any component, ensure that the power supply is switched off
or the power cord is detached from the power supply. Failure to do so may cause severe
damage to the motherboard, peripherals, or components.
•
Actual lighting and color will vary with LED strip.
•
If your LED strip does not light up, check if the RGB LED extension cable and the
RGB LED strip is connected in the correct orientation, and the 12V connector is
aligned with the 12V header on the motherboard.
•
The LED strip will only light up when the system is powered on.
•
The LED strip is purchased separately.
Содержание PRIME Z690-P D4
Страница 1: ...Motherboard PRIME Z690 P WIFI D4 ...
Страница 12: ...xii ...
Страница 34: ...2 2 Chapter 2 Basic Installation Chapter 2 ...
Страница 38: ...2 6 Chapter 2 Basic Installation Chapter 2 2 1 3 DIMM installation To remove a DIMM ...
Страница 43: ...PRIME Z690 P WIFI D4 2 11 Chapter 2 2 1 6 ATX power connection Ensure to connect the 8 pin power plug OR AND ...
Страница 44: ...2 12 Chapter 2 Basic Installation Chapter 2 2 1 7 SATA device connection OR ...
Страница 52: ...2 20 Chapter 2 Basic Installation Chapter 2 Connect to 7 1 channel Speakers Connect to 5 1 channel Speakers ...
Страница 54: ...2 22 Chapter 2 Basic Installation Chapter 2 ...
Страница 60: ...3 6 Chapter 3 BIOS and RAID Support Chapter 3 ...