background image

3-6

Chapter 3: OSD (On-Screen Display) menu 

• 

QuickFit Color: adjusts the QuickFit color among 7 preset colors.

• 

All Reset

: “Yes” allows you to restore the default settings.
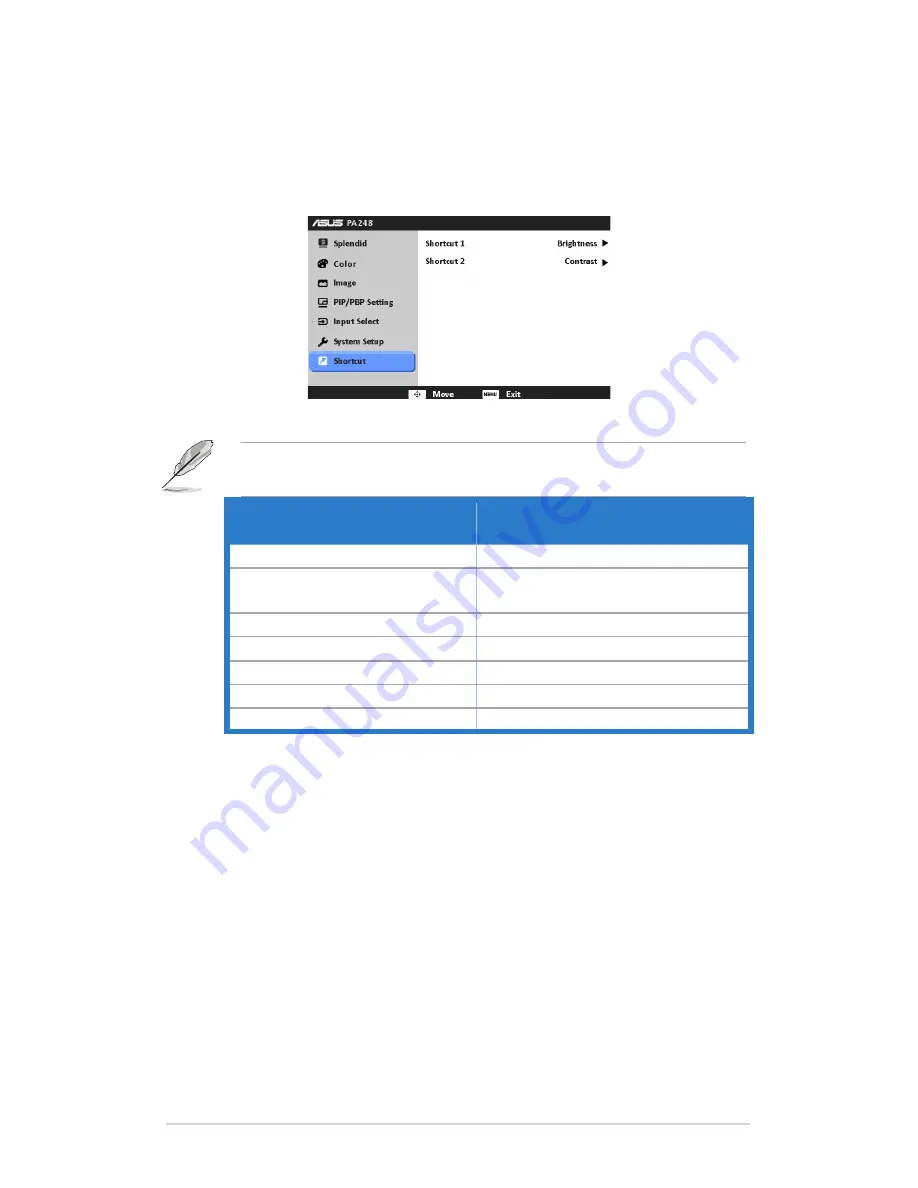
7.  Shortcut

Defines the functions for Shortcut 1 and 2 buttons.

• 

Shortcut 1/Shortcut 2

: selects a function for Shortcut 1 and 2 buttons.

 When a certain function is selected or activated, your shortcut key 

may not support. See the table below for details.

Function selected or activated

The defined shortcut key not 

support

ASCR

Brightness

sRGB

Contrast/Color Temp./Advanced 

Setting

PBP

OSD Rotation

OSD Rotation

PIP/PBP Setting

Standard/Scenery/Theater

Advanced Setting

VGA/DVI

Volume

QuickFit

All, except for QuickFit Color

Содержание PA248Q

Страница 1: ...PA248 Series LCD Monitor User Guide ...

Страница 2: ... Back view 1 3 1 3 3 QuickFit Function 1 4 Chapter 2 Setup 2 1 Detaching the arm base for VESA wall mount 2 1 2 2 Adjusting the monitor 2 2 2 3 Connecting the cables 2 3 2 4 Turning on the monitor 2 3 Chapter 3 General instructions 3 1 OSD On Screen Display menu 3 1 3 1 1 How to reconfigure 3 1 3 1 2 OSD function introduction 3 1 3 2 Specifications summary PA248Q 3 7 3 4 Supported operating modes ...

Страница 3: ...y one or more of the following measures Reorient or relocate the receiving antenna Increase the separation between the equipment and receiver Connect the equipment to an outlet on a circuit different from that to which the receiver is connected Consult the dealer or an experienced radio TV technician for help The use of shielded cables for connection of the monitor to the graphics card is required...

Страница 4: ...er supply to your home consult your dealer or local power company Use the appropriate power plug which complies with your local power standard Do not overload power strips and extention cords Overloading can result in fire or electric shock Avoid dust humidity and temperature extremes Do not place the monitor in any area where it may become wet Place the monitor on a stable surface Unplug the unit...

Страница 5: ... The screen may flicker during the initial use due to the nature of the fluorescent light Turn off the Power Switch and turn it on again to make sure that the flicker disappears You may find slightly uneven brightness on the screen depending on the desktop pattern you use When the same image is displayed for hours an afterimage of the previous screen may remain after switching the image The screen...

Страница 6: ...e updates 1 ASUS websites The ASUS websites worldwide provide updated information on ASUS hardware and software products Refer to http www asus com 2 Optional documentation Your product package may include optional documentation that may have been added by your dealer These documents are not part of the standard package ...

Страница 7: ...g experience With these features you can enjoy the convenience and delightful visual experience that the monitor brings to you 1 2 Package contents Check your package for the following items LCD monitor Quick start guide Warranty card Power cord VGA cable DVI cable DisplayPort cable USB 3 0 cable Support CD Cable tie Color Calibration Testing Report If any of the above items is damaged or missing ...

Страница 8: ...erns and paper and photo sizes Please refer to 1 3 3 QuickFit Function Enacts the selected OSD menu item Increases Decreases values or moves your selection up down left right 2 MENU button Turns on the OSD menu Exits the OSD menu or goes back to the previous menu when the OSD menu is active Exits the QuickFit patterns The OSD menu is not available when the QuickFit function is in use 3 Shortcut De...

Страница 9: ... by pressing this button for 2 4 seconds for VGA mode only 6 button Selects an available input source Press button Input Select button to display HDMI DisplayPort signals after you connect HDMI DisplayPort cable with the monitor 7 Power button power indicator Turns the monitor on off The color definition of the power indicator is as the below table Status Description White On Orange Standby mode O...

Страница 10: ...lock slot 10 USB 3 0 downstream ports These ports are for connection with USB devices such as USB keyboard mouse USB flash drive etc 1 3 3 QuickFit Function The QuickFit function contains three kinds of patterns 1 Grid patterns 2 Paper size 3 Photo size To activate the patterns press the QuickFit button Press the button again until a desired pattern is selected You can move the button up down left...

Страница 11: ...andard paper sizes for users to view their documents in real size on the screen A4 Letter 3 Photo size The various real photo sizes displayed in the QuickFit function provides photographers and other users to accurately view and edit their photos in real size on the screen Photo 4x6 3x5 2x2 Photo 8x10 5x7 ...

Страница 12: ...1 6 Chapter 1 Product introduction ...

Страница 13: ...esigned for VESA wall mount To detach the arm base 1 Have the front of the monitor face down on a table 2 Use a screwdriver to remove the four screws on the arm Figure 1 and then detach the arm base from the monitor Figure 2 We recommend that you cover the table surface with soft cloth to prevent damage to the monitor Figure 1 Figure 2 ...

Страница 14: ... its angle You can adjust the monitor s angle from 20 to 5 and it allows 60 swivel adjustment from either left or right You can also adjust the monitor s height within 10 cm 10cm 60 0 60 20 5 Pivoting the monitor 1 Lift the monitor to the highest position 2 Tilt the monitor to its maximum angle 3 Pivot the monitor clockwise to the angle you need 20 5 It is normal that the monitor slightly shakes w...

Страница 15: ...nector To use the earphone connect the end with plug type to the monitor s earphone jack when an HDMI or DisplayPort signal is fed To use the USB 3 0 ports Take the supplied USB 3 0 cable and plug the smaller end type B of the USB upstream cable to the monitor s USB upstream port and the larger end type A to your computer s USB 3 0 port Make sure your computer is installed with the lastest Windows...

Страница 16: ...2 4 Chapter 2 Setup ...

Страница 17: ...button to activate it 3 Move the button left right to change the settings of the selected function 4 To exit and save the OSD menu press the MENU button repeatedly until the OSD menu disappears To adjust other functions repeat steps 1 3 3 1 2 OSD function introduction 1 Splendid This function contains six sub functions you can select for your preference Each mode has the Reset selection allowing y...

Страница 18: ...tion No No Yes Yes Yes Hue No No No No Yes Color Temperature Yes No Yes Yes Yes Gamma Yes No No No Yes Advanced Setting Six axis Hue No No No No Yes Six axis Saturation No No No No Yes Gain No No No No Yes Offset No No No No Yes 2 Color Set a desired color setting from this menu Brightness the adjusting range is from 0 to 100 Contrast the adjusting range is from 0 to 100 Saturation the adjusting r...

Страница 19: ... Reset Current Splendid color mode reset Resets the color settings of current color mode to the factory default value All Splendid color mode reset Resets the color settings of all color modes to the factory default value 3 Image Set the image related setting from this menu Sharpness the adjusting range is from 0 to 100 Trace Free adjusts the response time of the monitor ...

Страница 20: ...anned by one horizontal sweep If the frequency is not correct the screen shows vertical stripes and the image is not proportional 4 PIP PBP Setting The PIP PBP Setting allows you to open up another sub window connected from another video source besides the main window from your original video source By activating this function you can have two pictures from two different video sources displayed by...

Страница 21: ...mode theater mode only OSD Setup Adjusts the horizontal position H Position the vertical position V Position of the OSD from 0 to 100 Adjusts the OSD timeout from 10 to 120 seconds Enables or disables the DDC CI function Adjusts the OSD background from opaque to transparent Adjusts the OSD rotation Information shows the monitor information Language there are 10 languages for your selection includi...

Страница 22: ...ortcut 2 selects a function for Shortcut 1 and 2 buttons When a certain function is selected or activated your shortcut key may not support See the table below for details Function selected or activated The defined shortcut key not support ASCR Brightness sRGB Contrast Color Temp Advanced Setting PBP OSD Rotation OSD Rotation PIP PBP Setting Standard Scenery Theater Advanced Setting VGA DVI Volume...

Страница 23: ...ght Adjustment 100 mm Kensington lock Yes AC input voltage AC 100 240V Power consumption Power On 75 W Max Standby 1 W Typ Power Off 0 W Switch off Temperature Operating 5 C 35 C Temperature Non operating 20 C 60 C Dimension W x H x D 557 2 mm x 416 3 mm x 235 mm machine 681 mm x 439 mm x 292 mm package Weight Esti 6 4 kg Net 9 9 kg Gross Multi languages 10 languages English German Italian French ...

Страница 24: ...s the button for 2 4 seconds to automatically adjust the image for VGA mode only Adjust the H Position or V Position settings via OSD Screen image bounces or a wave pattern is present in the image Make sure the signal cable is properly connected to the monitor and the computer Move electrical devices that may cause electrical interference Screen image has color defects white does not look white In...

Страница 25: ...8 56 476 N 70 069 N 75 1024x768 60 02 N 75 00 N 78 75 1152x864 67 5 P N 75 00 P N 108 1280x960 60 00 P 60 00 N 108 1280x1024 63 98 P 60 02 P 108 1280x1024 79 98 P 75 02 P 135 1366x768 47 712 P 59 79 P 85 5 1440x900 55 94 N 59 89 P 106 5 1600x1200 75 00 P 60 00 P 162 1680x1050 65 29 N 60 00 P 146 25 1920x1080 67 5 P 60 00 P 148 5 1920x1200 Reduced Blanking 74 038 P 59 95 N 154 Modes not listed in t...

Отзывы: