background image

3

Powering up

This chapter describes the power up
sequence, the vocal POST messages,
and ways of shutting down the
system.

Содержание P5GD1

Страница 1: ...Motherboard P5GD1 ...

Страница 2: ...ORS OFFICERS EMPLOYEES OR AGENTS BE LIABLE FOR ANY INDIRECT SPECIAL INCIDENTAL OR CONSEQUENTIAL DAMAGES INCLUDING DAMAGES FOR LOSS OF PROFITS LOSS OF BUSINESS LOSS OF USE OR DATA INTERRUPTION OF BUSINESS AND THE LIKE EVEN IF ASUS HAS BEEN ADVISED OF THE POSSIBILITY OF SUCH DAMAGES ARISING FROM ANY DEFECT OR ERROR IN THIS MANUAL OR PRODUCT SPECIFICATIONS AND INFORMATION CONTAINED IN THIS MANUAL ARE...

Страница 3: ...mation Chapter 2 Hardware information Chapter 2 Hardware information Chapter 2 Hardware information Chapter 2 Hardware information 2 1 Before you proceed 2 1 2 2 Motherboard overview 2 2 2 2 1 Placement direction 2 2 2 2 2 Screw holes 2 2 2 2 4 Motherboard layout 2 3 2 2 5 Layout Contents 2 4 2 3 Central Processing Unit CPU 2 6 2 3 1 Installling the CPU 2 6 2 3 2 Installling the CPU heatsink and f...

Страница 4: ... 4 BIOS setup Chapter 4 BIOS setup Chapter 4 BIOS setup Chapter 4 BIOS setup Chapter 4 BIOS setup 4 1 Managing and updating your BIOS 4 1 4 1 1 Creating a bootable floppy disk 4 1 4 1 2 ASUS EZ Flash utility 4 2 4 1 3 AFUDOS utility 4 3 4 1 4 ASUS CrashFree BIOS 2 utility 4 5 4 1 5 ASUS Update utility 4 7 4 2 BIOS setup program 4 10 4 2 1 BIOS menu screen 4 11 4 2 2 Menu bar 4 11 4 2 3 Navigation ...

Страница 5: ... Support 4 30 4 5 4 ACPI APIC Support 4 30 4 5 5 APM Configuration 4 31 4 5 6 Hardware Monitor 4 33 4 6 Boot menu 4 35 4 6 1 Boot Device Priority 4 35 4 6 2 Boot Settings Configuration 4 36 4 6 3 Security 4 37 4 7 Exit menu 4 39 Chapter 5 Software support Chapter 5 Software support Chapter 5 Software support Chapter 5 Software support Chapter 5 Software support 5 1 Installing an operating system 5...

Страница 6: ...the Virtual Cable Tester 5 10 5 3 3 Audio configurations 5 11 5 4 RAID configurations 5 16 5 4 1 Installing hard disks 5 17 5 4 2 Intel RAID configurations 5 18 5 4 3 ITE 8212F RAID configurations 5 22 5 5 Creating a RAID driver disk 5 28 Contents ...

Страница 7: ...e user is encouraged to try to correct the interference by one or more of the following measures Reorient or relocate the receiving antenna Increase the separation between the equipment and receiver Connect the equipment to an outlet on a circuit different from that to which the receiver is connected Consult the dealer or an experienced radio TV technician for help Canadian Department of Communica...

Страница 8: ... correct voltage in your area If you are not sure about the voltage of the electrical outlet you are using contact your local power company If the power supply is broken do not try to fix it by yourself Contact a qualified service technician or your retailer Operation safety Operation safety Operation safety Operation safety Operation safety Before installing the motherboard and adding devices on ...

Страница 9: ...ST messages and ways of shutting down the system Chapter 4 BIOS setup Chapter 4 BIOS setup Chapter 4 BIOS setup Chapter 4 BIOS setup Chapter 4 BIOS setup This chapter tells how to change system settings through the BIOS Setup menus Detailed descriptions of the BIOS parameters are also provided Chapter 5 Software support Chapter 5 Software support Chapter 5 Software support Chapter 5 Software suppo...

Страница 10: ...s and additional information to help you complete a task IMPORTANT IMPORTANT IMPORTANT IMPORTANT IMPORTANT Instructions that you MUST follow to complete a task Bold text Bold text Bold text Bold text Bold text Indicates a menu or an item to select Italics Used to emphasize a word or a phrase Key Keys enclosed in the less than and greater than sign means that you must press the enclosed key Example...

Страница 11: ...rchitecture 4 x 184 pin DIMM sockets support unbufferred non ECC 400 333 MHz DDR memory modules 1 x PCI Express x16 slot for discrete graphics card 3 x PCI Express x1 slots 3 x PCI slots Intel ICH6R Southbridge supports 1 x Ultra DMA 100 66 33 4 x Serial ATA with RAID 0 RAID 1 configuration a nd the Intel Matrix Storage Technology ITE 8212F IDE RAID controller supports 2 x Ultra DMA 133 100 66 RAI...

Страница 12: ...lel port 1 x LAN RJ 45 port 1 x Rear speaker out port 1 x Side speaker out port 1 x Line In port 1 x Line Out port 1 x Microphone port 1 x Center Subwoofer port 4 x USB 2 0 ports 1 x Serial port COM 1 x Coaxial S PDIF out port 1 x PS 2 keyboard port 1 x PS 2 mouse port 1 x CPU fan connector 1 x Power fan connector 1 x Chassis fan connector 1 x Serial port connector COM2 port 1 x 24 pin ATX power c...

Страница 13: ...1 Product introduction This chapter describes the motherboard features and the new technologies it supports ...

Страница 14: ...ASUS P5GD1 ASUS P5GD1 ASUS P5GD1 ASUS P5GD1 ASUS P5GD1 Chapter summary 1 1 Welcome 1 1 1 2 Package contents 1 1 1 3 Special features 1 2 ...

Страница 15: ...kage with the list below If any of the above items is damaged or missing contact your retailer 1 2 Package contents Check your motherboard package for the following items Motherboard Motherboard Motherboard Motherboard Motherboard ASUS P5GD1 motherboard I O modules I O modules I O modules I O modules I O modules USB 2 0 2 ports and GAME 1 port module Cables Cables Cables Cables Cables 2 x Serial A...

Страница 16: ...atform is compliant to the Direct Media Interface DMI and supports the sixth generation I O Controller Hub ICH6 Dual channel DDR memory support Dual channel DDR memory support Dual channel DDR memory support Dual channel DDR memory support Dual channel DDR memory support Employing the Double Data Rate DDR memory technology the motherboard supports up to 4GB of system memory using DDR400 333 DIMMs ...

Страница 17: ...ludes the Realtek proprietary UAJ Universal Audio Jack technology See page 2 22 and 2 23 for details S PDIF digital sound ready S PDIF digital sound ready S PDIF digital sound ready S PDIF digital sound ready S PDIF digital sound ready The motherboard supports the S PDIF Out function through the S PDIF interfaces on the rear panel and at midboard The S PDIF technology turns your computer into a hi...

Страница 18: ... allows you to select the language of your choice from the available options The localized BIOS menus allow you to configure easier and faster See page 4 13 for details ASUS MyLogo ASUS MyLogo ASUS MyLogo ASUS MyLogo ASUS MyLogo This new feature present in the motherboard allows you to personalize and add style to your system with customizable boot logos 1 3 2 1 3 2 1 3 2 1 3 2 1 3 2 ASUS Proactiv...

Страница 19: ... Hardware information This chapter lists the hardware setup procedures that you have to perform when installing system components It includes description of the jumpers and connectors on the motherboard ...

Страница 20: ...SUS P5GD1 ASUS P5GD1 ASUS P5GD1 Chapter summary 2 1 Before you proceed 2 1 2 2 Motherboard overview 2 2 2 3 Central Processing Unit CPU 2 6 2 4 System memory 2 12 2 5 Expansion slots 2 16 2 6 Jumpers 2 19 2 7 Connectors 2 22 ...

Страница 21: ...ricity Hold components by the edges to avoid touching the ICs on them Whenever you uninstall any component place it on a grounded antistatic pad or in the bag that came with the component Before you install or remove any component ensure Before you install or remove any component ensure Before you install or remove any component ensure Before you install or remove any component ensure Before you i...

Страница 22: ...2 1 2 2 1 2 2 1 2 2 1 Placement direction Placement direction Placement direction Placement direction Placement direction When installing the motherboard make sure that you place it into the chassis in the correct orientation The edge with external ports goes to the rear part of the chassis as indicated in the image below 2 2 2 2 2 2 2 2 2 2 2 2 2 2 2 Screw holes Screw holes Screw holes Screw hole...

Страница 23: ...n 30 5cm 12 0in PANEL CHASSIS GAME USB78 USB56 USBPW56 USBPW78 COM2 SEC_RAID PRI_RAID CLRTC SATA1 CHA_FAN PCI1 Intel 915 P MCH Intel ICH6R DDR DIMM_A2 64 bit 240 pin module DDR DIMM_B1 64 bit 240 pin module DDR DIMM_B2 64 bit 240 pin module PWR_FAN CPU_FAN PRI_IDE1 ITE 8212F ALC861 EATXPWR SATA3 SATA2 SATA4 PCI2 PCI3 SPDIF_OUT Marvell 88E8053 R R LGA775 PS 2KBMS T Mouse B Keyboard Below Mic In Cen...

Страница 24: ...P a g e P a g e P a g e P a g e P a g e 1 Clear RTC RAM 3 pin CLRTC1 2 19 2 USB Device wake up 3 pin USBPW12 USBPW34 USBPW56 USBPW78 2 20 3 Keyboard power 3 pin KBPWR1 2 21 Rear panel connectors Rear panel connectors Rear panel connectors Rear panel connectors Rear panel connectors P a g e P a g e P a g e P a g e P a g e 1 PS 2 mouse port 2 22 2 Parallel port 2 22 3 RJ 45 port 2 22 4 Rear Speaker ...

Страница 25: ...ctor 4 pin CPU_FAN 2 27 7 Power fan connector 3 pin PWR_FAN 2 27 8 Chassis fan connector 3 pin CHA_FAN1 2 27 9 Serial port connector 10 1 pin COM2 2 28 10 USB headers 10 1 USB56 USB78 2 28 11 ATX power connector 24 pin EATXPWR 2 29 12 ATX 12V power connector 4 pin ATX12V 2 29 13 Optical audio connector 4 pin CD 2 30 14 GAME MIDI connector 16 1 pin GAME 2 30 15 Chassis intrusion connector 4 1 pin C...

Страница 26: ...the LGA775 socket has its PnP cap on and the socket contacts are not bent If the cap is damaged or missing or if the socket contacts are bent contact your retailer immediately Keep the PnP cap after installing the motherboard ASUS will process Return Merchandise Authorization RMA requests only if the motherboard comes with the PnP cap on the LGA775 socket Before installing the CPU make sure that t...

Страница 27: ...et making sure that the gold triangle is on the bottom left corner of the socket The socket alignment key should fit into the CPU notch Alignment key Alignment key Alignment key Alignment key Alignment key Gold triangle mark Gold triangle mark Gold triangle mark Gold triangle mark Gold triangle mark The CPU fits in only one correct orientation DO NOT force the CPU into the socket to prevent bendin...

Страница 28: ...ompiler to compile the code If you are using any other operating systems disable the Hyper Threading Technology item in the BIOS to ensure system stability and performance Installing Windows XP Service Pack 1 is recommended Make sure to enable the Hyper Threading Technology item in BIOS before installing a supported operating system For more information on Hyper Threading Technology visit www inte...

Страница 29: ...The Intel Pentium 4 LGA775 processor requires a specially designed heatsink and fan assembly to ensure optimum thermal condition and performance Install the motherboard to the chassis before you install the CPU fan and heatsink assembly When you buy a boxed Intel Pentium 4 processor the package includes the CPU fan and heatsink assembly If you buy a CPU separately make sure that you use only Intel...

Страница 30: ...ation Chapter 2 Hardware information Chapter 2 Hardware information Chapter 2 Hardware information Chapter 2 Hardware information 2 Push each of the pins downward to secure the heatsink and fan assembly in place 3 Rotate the push pins clockwise to lock ...

Страница 31: ...he fan and heatsink assembly is in place connect the CPU fan cable to the connector on the motherboard labeled CPU_FAN Do not forget to connect the CPU fan connector Hardware monitoring errors can occur if you fail to plug this connector P5GD1 CPU_FAN GND CPU FAN PWR CPU FAN IN CPU FAN PWM ...

Страница 32: ...ckets using the memory configurations in this section Installing DDR DIMMs other than the recommended configurations may cause memory sizing error or system boot failure Use any of the recommended configurations in Table 1 In dual channel configurations install only identical identical identical identical identical the same type and size DDR DIMM pairs for each channel Always install DIMMs with th...

Страница 33: ...i z e S i z e S i z e S i z e S i z e V e n d o r V e n d o r V e n d o r V e n d o r V e n d o r M o d e l M o d e l M o d e l M o d e l M o d e l B r a n d S i d e s B r a n d S i d e s B r a n d S i d e s B r a n d S i d e s B r a n d S i d e s C o m p o n e n t C o m p o n e n t C o m p o n e n t C o m p o n e n t C o m p o n e n t A A A A A B B B B B C C C C C 256MB KINGSTON KVR400X64C3A 256 ...

Страница 34: ...08CH 5 512MB Winbond W9451GCDB 5 Winbond DS W942508CH 5 512MB PSC AL6D8A53T1 5B PSC DS A2S56D30ATP 256MB PSC AL5D8B53T 5B1K PSC SS A2S56D30BTP 512MB PSC AL6D8B53T 5B1K PSC DS A2S56D30BTP 256MB KINGMAX MPXB62D 38KT3R N A SS KDL388P4LA 50 512MB KINGMAX MPXC22D 38KT3R N A DS KDL388P4LA 50 512MB ATP AG64L64T8SQC4S SAMSUNG DS K4H560838D TCC4 1024MB ATP AG28L64T8SMC4M MICRON DS MT46V64M4TG 5BC 256MB NAN...

Страница 35: ... DIMM is properly seated 1 Unlock a DIMM socket by pressing the retaining clips outward 2 Align a DIMM on the socket such that the notch on the DIMM matches the break on the socket Locked Retaining Clip Locked Retaining Clip Locked Retaining Clip Locked Retaining Clip Locked Retaining Clip Make sure to unplug the power supply before adding or removing DIMMs or other system components Failure to do...

Страница 36: ...n a chassis 3 Remove the bracket opposite the slot that you intend to use Keep the screw for later use 4 Align the card connector with the slot and press firmly until the card is completely seated on the slot 5 Secure the card to the chassis with the screw you removed earlier 6 Replace the system cover 2 5 2 2 5 2 2 5 2 2 5 2 2 5 2 Configuring an expansion card Configuring an expansion card Config...

Страница 37: ...r PCI steering 12 7 PS 2 Compatible Mouse Port 13 8 Numeric Data Processor 14 9 Primary IDE Channel 15 10 Secondary IDE Channel These IRQs are usually available for ISA or PCI devices IRQ assignments for this motherboard IRQ assignments for this motherboard IRQ assignments for this motherboard IRQ assignments for this motherboard IRQ assignments for this motherboard A A A A A B B B B B C C C C C D...

Страница 38: ... 5 2 5 5 2 5 5 2 5 5 2 5 5 PCI Express x16 slot PCI Express x16 slot PCI Express x16 slot PCI Express x16 slot PCI Express x16 slot This motherboard supports PCI Express x16 graphic cards that comply with the PCI Express specifications The figure shows a graphics card installed on the PCI Express x16 slot 2 5 6 2 5 6 2 5 6 2 5 6 2 5 6 PCI Express x1 slot PCI Express x1 slot PCI Express x1 slot PCI...

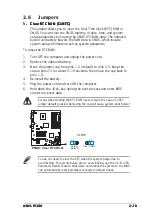
Страница 39: ...the onboard battery 3 Move the jumper cap from pins 1 2 default to pins 2 3 Keep the cap on pins 2 3 for about 5 10 seconds then move the cap back to pins 1 2 4 Re install the battery 5 Plug the power cord and turn ON the computer 6 Hold down the Del key during the boot process and enter BIOS setup to re enter data Except when clearing the RTC RAM never remove the cap on CLRTC jumper default posit...

Страница 40: ... refreshed system running in low power mode using the connected USB devices Set to 5VSB to wake up from S3 and S4 sleep modes no power to CPU DRAM in slow refresh power supply in reduced power mode The USBPWR12 and USBPWR34 jumpers are for the rear USB ports The USBPWR56 and USBPWR78 jumper is for the internal USB connectors that you can connect to additional USB ports The USB device wake up featu...

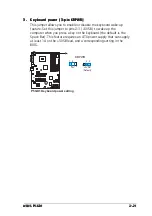
Страница 41: ...d power 3 pin KBPWR This jumper allows you to enable or disable the keyboard wake up feature Set this jumper to pins 2 3 5VSB to wake up the computer when you press a key on the keyboard the default is the Space Bar This feature requires an ATX power supply that can supply at least 1A on the 5VSB lead and a corresponding setting in the BIOS P5GD1 P5GD1 Keyboard power setting Default 5V 5VSB KBPWR ...

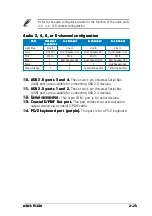
Страница 42: ...io configuration 6 6 6 6 6 Line In port light blue Line In port light blue Line In port light blue Line In port light blue Line In port light blue This port connects a tape CD DVD player or other audio sources 7 7 7 7 7 Line Out port lime Line Out port lime Line Out port lime Line Out port lime Line Out port lime This port connects a headphone or a speaker In 4 channel 6 channel and 8 channel conf...

Страница 43: ...ble 14 14 14 14 14 PS 2 keyboard port purple PS 2 keyboard port purple PS 2 keyboard port purple PS 2 keyboard port purple PS 2 keyboard port purple This port is for a PS 2 keyboard Audio 2 4 6 or 8 channel configuration Audio 2 4 6 or 8 channel configuration Audio 2 4 6 or 8 channel configuration Audio 2 4 6 or 8 channel configuration Audio 2 4 6 or 8 channel configuration Light Blue Line In Line...

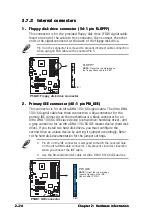
Страница 44: ... 7 2 2 7 2 2 7 2 Internal connectors Internal connectors Internal connectors Internal connectors Internal connectors 1 1 1 1 1 Floppy disk drive connector 34 1 pin FLOPPY Floppy disk drive connector 34 1 pin FLOPPY Floppy disk drive connector 34 1 pin FLOPPY Floppy disk drive connector 34 1 pin FLOPPY Floppy disk drive connector 34 1 pin FLOPPY This connector is for the provided floppy disk drive ...

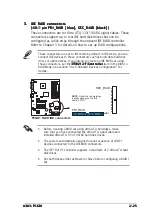
Страница 45: ...e that you have connected the Ultra ATA signal cable and installed Ultra ATA 133 100 66 hard disk drives The system automatically assigns the boot sequence of ATAPI devices connected to the IDE RAID connectors The ITE 8212F controller supports a maximum of 2 Ultra ATA hard disk drives Set both drives either as Master or Slave before configuring a RAID 1 set P5GD1 P5GD1 RAID IDE connectors NOTE Ori...

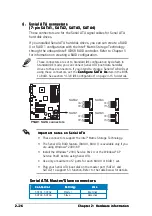
Страница 46: ...ice Pack 4 or the Windows XP Service Pack1 before using Serial ATA Use only a maximum of 2 ports for each RAID 0 or RAID 1 set Plug your Serial ATA boot disk on the master port SATA1 and SATA2 to support S3 function Refer to the table below for details Serial ATA Master Slave connectors Serial ATA Master Slave connectors Serial ATA Master Slave connectors Serial ATA Master Slave connectors Serial ...

Страница 47: ...HA_FAN 4 pin CPU_FAN 3 pin PWR_FAN 3 pin CHA_FAN The fan connectors support cooling fans of 350mA 740mA 8 88W max or a total of 1A 2 22A 26 64W max at 12V Connect the fan cables to the fan connectors on the motherboard making sure that the black wire of each cable matches the ground pin of the connector Do not forget to connect the fan cables to the fan connectors Insufficient air flow inside the ...

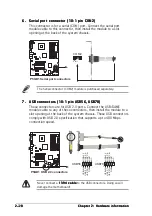
Страница 48: ...able 1394 cable to the USB connectors Doing so will damage the motherboard 7 7 7 7 7 USB connectors 10 1 pin USB56 USB78 USB connectors 10 1 pin USB56 USB78 USB connectors 10 1 pin USB56 USB78 USB connectors 10 1 pin USB56 USB78 USB connectors 10 1 pin USB56 USB78 These connectors are for USB 2 0 ports Connect the USB GAME module cable to any of these connectors then install the module to a slot o...

Страница 49: ...ating of 300 W The system may become unstable or may not boot up if the power is inadequate Do not forget to connect the 4 pin ATX 12 V power plug otherwise the system will not boot up Use of a PSU with a higher power output is recommended when configuring a system with more power consuming devices The system may become unstable or may not boot up if the power is inadequate The ATX 12 V Specificat...

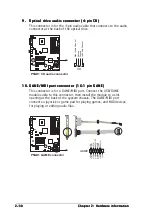
Страница 50: ...rive 10 10 10 10 10 GAME MIDI port connector 16 1 pin GAME GAME MIDI port connector 16 1 pin GAME GAME MIDI port connector 16 1 pin GAME GAME MIDI port connector 16 1 pin GAME GAME MIDI port connector 16 1 pin GAME This connector is for a GAME MIDI port Connect the USB GAME module cable to this connector then install the module to a slot opening at the back of the system chassis The GAME MIDI port...

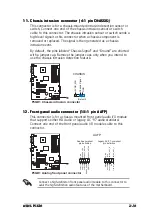
Страница 51: ... when you intend to use the chassis intrusion detection feature 12 12 12 12 12 Front panel audio connector 10 1 pin AAFP Front panel audio connector 10 1 pin AAFP Front panel audio connector 10 1 pin AAFP Front panel audio connector 10 1 pin AAFP Front panel audio connector 10 1 pin AAFP This connector is for a chassis mounted front panel audio I O module that supports either HD Audio or legacy AC...

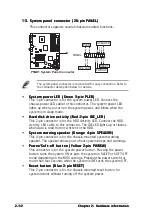
Страница 52: ...DD Activity LED Connect the HDD Activity LED cable to this connector The IDE LED lights up or flashes when data is read from or written to the HDD System warning speaker Orange 4 pin SPEAKER System warning speaker Orange 4 pin SPEAKER System warning speaker Orange 4 pin SPEAKER System warning speaker Orange 4 pin SPEAKER System warning speaker Orange 4 pin SPEAKER This 4 pin connector is for the c...

Страница 53: ...3 Powering up This chapter describes the power up sequence the vocal POST messages and ways of shutting down the system ...

Страница 54: ...ASUS P5GD1 ASUS P5GD1 ASUS P5GD1 ASUS P5GD1 ASUS P5GD1 Chapter summary 3 1 Starting up for the first time 3 1 3 2 Powering off the computer 3 2 ...

Страница 55: ...or switch between orange and green after the system LED turns on The system then runs the power on self tests or POST While the tests are running the BIOS beeps see BIOS beep codes table below or additional messages appear on the screen If you do not see anything within 30 seconds from the time you turned on the power the system may have failed a power on test Check the jumper settings and connect...

Страница 56: ...dows shuts down If you are using Windows XP 1 Click the Start Start Start Start Start button then select Turn Off Computer Turn Off Computer Turn Off Computer Turn Off Computer Turn Off Computer 2 Click the Turn Off Turn Off Turn Off Turn Off Turn Off button to shut down the computer 3 The power supply should turn off after Windows shuts down 3 2 2 3 2 2 3 2 2 3 2 2 3 2 2 Using the dual function p...

Страница 57: ...4 BIOS setup This chapter tells how to change the system settings through the BIOS Setup menus Detailed descriptions of the BIOS parameters are also provided ...

Страница 58: ...GD1 ASUS P5GD1 ASUS P5GD1 ASUS P5GD1 Chapter summary 4 1 Managing and updating your BIOS 4 1 4 2 BIOS setup program 4 10 4 3 Main menu 4 13 4 4 Advanced menu 4 18 4 5 Power menu 4 30 4 6 Boot menu 4 35 4 7 Exit menu 4 39 ...

Страница 59: ...ppy disk DOS environment a Insert a 1 44MB floppy disk into the drive b At the DOS prompt type format A S then press Enter Windows XP environment a Insert a 1 44 MB floppy disk to the floppy disk drive b Click Start Start Start Start Start from the Windows desktop then select M y M y M y M y M y Computer Computer Computer Computer Computer c Select the 3 1 2 Floppy Drive icon d Click File File Fil...

Страница 60: ...1 Visit the ASUS website www asus com to download the latest BIOS file for the motherboard and rename the same to P5GD1 ROM P5GD1 ROM P5GD1 ROM P5GD1 ROM P5GD1 ROM 2 Save the BIOS file to a floppy disk then restart the system 3 Press Alt F2 during POST to display the following EZFlash starting BIOS update Checking for floppy 4 Insert the floppy disk that contains the BIOS file to the floppy disk d...

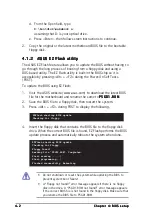
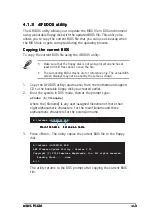
Страница 61: ...ies the current BIOS file to the floppy disk A afudos oOLDBIOS1 ROM AMI Firmware Update Utility Version 1 10 Copyright C 2002 American Megatrends Inc All rights reserved Reading flash done A Main filename Main filename Main filename Main filename Main filename Extension name Extension name Extension name Extension name Extension name 1 Copy the AFUDOS utility afudos exe from the motherboard suppor...

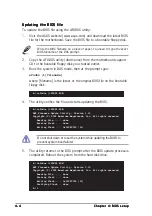
Страница 62: ...me where filename is the latest or the original BIOS file on the bootable floppy disk A afudos iP5GD1 ROM AMI Firmware Update Utility Version 1 10 Copyright C 2002 American Megatrends Inc All rights reserved Reading file done Erasing flash done Writing flash 0x0008CC00 9 Updating the BIOS file Updating the BIOS file Updating the BIOS file Updating the BIOS file Updating the BIOS file To update the...

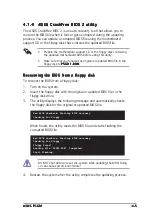
Страница 63: ...S from a floppy disk 1 Turn on the system 2 Insert the floppy disk with the original or updated BIOS file to the floppy disk drive 3 The utility displays the following message and automatically checks the floppy disk for the original or updated BIOS file Bad BIOS checksum Starting BIOS recovery Checking for floppy 4 Restart the system after the utility completes the updating process Bad BIOS check...

Страница 64: ... drive then turn on the system 2 Insert the support CD to the optical drive 3 The utility displays the following message and automatically checks the floppy disk for the original or updated BIOS file 4 Restart the system after the utility completes the updating process DO NOT shut down or reset the system while updating the BIOS Doing so can cause system boot failure Bad BIOS checksum Starting BIO...

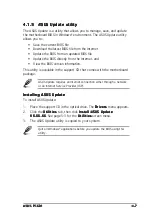
Страница 65: ...screen menu 3 The ASUS Update utility is copied to your system 4 1 5 4 1 5 4 1 5 4 1 5 4 1 5 ASUS Update utility ASUS Update utility ASUS Update utility ASUS Update utility ASUS Update utility The ASUS Update is a utility that allows you to manage save and update the motherboard BIOS in Windows environment The ASUS Update utility allows you to Save the current BIOS file Download the latest BIOS fi...

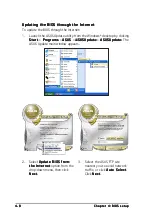
Страница 66: ...the Internet Updating the BIOS through the Internet To update the BIOS through the Internet 1 Launch the ASUS Update utility from the Windows desktop by clicking Start Start Start Start Start Programs Programs Programs Programs Programs ASUS ASUS ASUS ASUS ASUS ASUSUpdate ASUSUpdate ASUSUpdate ASUSUpdate ASUSUpdate ASUSUpdate ASUSUpdate ASUSUpdate ASUSUpdate ASUSUpdate The ASUS Update main window ...

Страница 67: ...ate ASUSUpdate ASUSUpdate ASUSUpdate ASUSUpdate ASUSUpdate The ASUS Update main window appears 2 Select Update BIOS from a Update BIOS from a Update BIOS from a Update BIOS from a Update BIOS from a file file file file file option from the drop down menu then click Next Next Next Next Next 4 From the FTP site select the BIOS version that you wish to download Click Next 5 Follow the screen instruct...

Страница 68: ... Press Del during the Power On Self Test POST to enter the Setup utility otherwise POST continues with its test routines If you wish to enter Setup after POST restart the system by pressing Ctrl Alt Delete or by pressing the reset button on the system chassis You can also restart by turning the system off and then back on Do this last option only if the first two failed The Setup program is design...

Страница 69: ...7 2003 Legacy Diskette A 1 44M 3 5 in Language English Primary IDE Master ST320413A Primary IDE Slave ASUS CD S340 Secondary IDE Master Not Detected Secondary IDE Slave Not Detected Third IDE Master Not Detected Fourth IDE Master Not Detected IDE Configuration System Information Use ENTER TAB or SHIFT TAB to select a field Use or to configure system time Select Screen Select Item Change Field Tab ...

Страница 70: ...s for that item 4 2 8 4 2 8 4 2 8 4 2 8 4 2 8 Scroll bar Scroll bar Scroll bar Scroll bar Scroll bar A scroll bar appears on the right side of a menu screen when there are items that do not fit on the screen Press the Up Down arrow keys or Page Up Page Down keys to display the other items on the screen 4 2 9 4 2 9 4 2 9 4 2 9 4 2 9 General help General help General help General help General help A...

Страница 71: ... in Legacy Diskette A 1 44M 3 5 in Legacy Diskette A 1 44M 3 5 in Legacy Diskette A 1 44M 3 5 in Sets the type of floppy drive installed Configuration options Disabled 360K 5 25 in 1 2M 5 25 in 720K 3 5 in 1 44M 3 5 in 2 88M 3 5 in 4 3 4 4 3 4 4 3 4 4 3 4 4 3 4 Language English Language English Language English Language English Language English Allows you to choose the BIOS language version from t...

Страница 72: ...MD ATAPI Removable Media Device if your device is either a ZIP LS 120 or MO drive Configuration options Not Installed Auto CDROM ARMD LBA Large Mode Auto LBA Large Mode Auto LBA Large Mode Auto LBA Large Mode Auto LBA Large Mode Auto Enables or disables the LBA mode Setting to Auto enables the LBA mode if the device supports this mode and if the device was not previously formatted with LBA mode di...

Страница 73: ...IDE Configuration IDE Configuration The items in this menu allow you to set or change the configurations for the IDE devices installed in the system Select an item then press Enter if you wish to configure the item IDE Configuration Configure SATA As Standard IDE Onboard IDE Operate Mode Enhanced Mode Enhanced Mode Support On S ATA mode IDE Detect Time Out Sec 35 Configure SATA As Standard IDE Con...

Страница 74: ... The Onboard IDE Operate Mode Onboard IDE Operate Mode Onboard IDE Operate Mode Onboard IDE Operate Mode Onboard IDE Operate Mode and its submenu items appear only when the Configure SATA As Configure SATA As Configure SATA As Configure SATA As Configure SATA As item is set to Standard IDE ALPE and ASP Disabled ALPE and ASP Disabled ALPE and ASP Disabled ALPE and ASP Disabled ALPE and ASP Disabled...

Страница 75: ...BIOS automatically detects the items in this menu AMI BIOS AMI BIOS AMI BIOS AMI BIOS AMI BIOS Displays the auto detected BIOS information Processor Processor Processor Processor Processor Displays the auto detected CPU specification System Memory System Memory System Memory System Memory System Memory Displays the auto detected system memory AMIBIOS Version 08 00 10 Build Date 04 07 04 Processor ...

Страница 76: ...1 4 4 1 4 4 1 JumperFree Configuration JumperFree Configuration JumperFree Configuration JumperFree Configuration JumperFree Configuration AI Overclocking Auto AI Overclocking Auto AI Overclocking Auto AI Overclocking Auto AI Overclocking Auto Allows selection of CPU overclocking options to achieve desired CPU internal frequency Select either one of the preset overclocking options Configuration op...

Страница 77: ...to Memory Voltage Auto Allows selection of the DDR SDRAM operating voltage Set to Auto for safe mode Configuration options 2 60V 2 70V 2 80V 2 90V Auto Chipset Core Voltage Auto Chipset Core Voltage Auto Chipset Core Voltage Auto Chipset Core Voltage Auto Chipset Core Voltage Auto Allows selection of the chipset core voltage Configuration options 1 50V 1 60V Auto CPU VCore Voltage Auto CPU VCore V...

Страница 78: ...PU External Frequency CPU External Frequency CPU External Frequency CPU External Frequency CPU External Frequency FSB 800 200 MHz FSB 533 133 MHz Overclock Options Overclock 5 Overclock Options Overclock 5 Overclock Options Overclock 5 Overclock Options Overclock 5 Overclock Options Overclock 5 Allows you to set the oveclocking options Configuration options Overclock 5 Overclock 10 Overclock 20 Ov...

Страница 79: ...sabled Turbo N O S Disabled Turbo N O S Disabled Disables or sets the turbo non delay overclocking system percentage Configuration options Disabled Overclock 3 Overclock 5 Overclock 7 Overclock 10 Overclock 15 Overclock 20 Overclock 30 4 4 2 4 4 2 4 4 2 4 4 2 4 4 2 LAN Cable Status LAN Cable Status LAN Cable Status LAN Cable Status LAN Cable Status The items in this menu displays the status of the...

Страница 80: ...ed If no USB device is detected the legacy USB support is disabled Configuration options Disabled Enabled Auto USB 2 0 Controller Enabled USB 2 0 Controller Enabled USB 2 0 Controller Enabled USB 2 0 Controller Enabled USB 2 0 Controller Enabled Allows you to enable or disable the USB 2 0 controller Configuration options Disabled Enabled The Module Version and USB Devices Enabled items show the au...

Страница 81: ...he Front Side Bus frequency The default value of this item is auto detected by BIOS Use the or keys to adjust the values VID CMOS Setting 45 VID CMOS Setting 45 VID CMOS Setting 45 VID CMOS Setting 45 VID CMOS Setting 45 Allows you to set the VID CMOS setting at which the processor is to run The default value of this item is auto detected by BIOS Use the or keys to adjust the values Max CPUID Valu...

Страница 82: ...ttings Advanced Chipset Settings Configure DRAM Timing by SPD Enabled Configure DRAM Timing by SPD Enabled Configure DRAM Timing by SPD Enabled Configure DRAM Timing by SPD Enabled Configure DRAM Timing by SPD Enabled When this item is enabled the DRAM timing parameters are set according to the DRAM SPD Serial Presence Detect When disabled you can manually set the DRAM timing parameters through th...

Страница 83: ...onfiguration options PCI Express PCI PCI PCI Express PEG Buffer Length Auto PEG Buffer Length Auto PEG Buffer Length Auto PEG Buffer Length Auto PEG Buffer Length Auto Sets the PCI Express Graphics card buffer length Configuration options Auto Long Short PCI EX Ports Configuration PCI EX Ports Configuration PCI EX Ports Configuration PCI EX Ports Configuration PCI EX Ports Configuration VC1 for Az...

Страница 84: ...d Allows you to enable or disable the onboard PCI Express Gigabit LAN controller Configuration options Disabled Enabled LAN Option ROM Disabled Allows you to enable or disable the option ROM in the onboard LAN controller This item appears only when the Onboard LAN item is set to Enabled Configuration options Disabled Enabled ITE8212F Controller IDE Mode ITE8212F Controller IDE Mode ITE8212F Contro...

Страница 85: ... directional EPP ECP ECP Mode DMA Channel DMA3 ECP Mode DMA Channel DMA3 ECP Mode DMA Channel DMA3 ECP Mode DMA Channel DMA3 ECP Mode DMA Channel DMA3 Appears only when the Parallel Port Mode is set to ECP This item allows you to set the Parallel Port ECP DMA Configuration options DMA0 DMA1 DMA3 EPP Version 1 9 EPP Version 1 9 EPP Version 1 9 EPP Version 1 9 EPP Version 1 9 Allows selection of the...

Страница 86: ...Device IRQ 15 assigned to PCI Device Plug and Play O S No Plug and Play O S No Plug and Play O S No Plug and Play O S No Plug and Play O S No When set to No BIOS configures all the devices in the system When set to Yes and if you install a Plug and Play operating system the operating system configures the Plug and Play devices not required for boot Configuration options No Yes PCI Latency Timer 64...

Страница 87: ...use PCI bus mastering when reading writing to IDE devices Configuration options Disabled Enabled IRQ xx assigned to PCI Device IRQ xx assigned to PCI Device IRQ xx assigned to PCI Device IRQ xx assigned to PCI Device IRQ xx assigned to PCI Device When set to PCI Device the specific IRQ is free for use of PCI PnP devices When set to Reserved the IRQ is reserved for legacy ISA devices Configuration ...

Страница 88: ...deo on S3 Resume No Determines whether to invoke VGA BIOS POST on S3 STR resume Configuration options Yes No 4 5 3 4 5 3 4 5 3 4 5 3 4 5 3 ACPI 2 0 Support No ACPI 2 0 Support No ACPI 2 0 Support No ACPI 2 0 Support No ACPI 2 0 Support No Allows you to add more tables for Advanced Configuration and Power Interface ACPI 2 0 specifications Configuration options No Yes 4 5 4 4 5 4 4 5 4 4 5 4 4 5 4 A...

Страница 89: ... after an AC power loss When set to Last State the system goes into either off or on state whatever the system state was before the AC power loss Configuration options Power Off Power On Last State Power On By RTC Alarm Disabled Power On By RTC Alarm Disabled Power On By RTC Alarm Disabled Power On By RTC Alarm Disabled Power On By RTC Alarm Disabled Allows you to enable or disable RTC to generate...

Страница 90: ...at provides at least 1A on the 5VSB lead Configuration options Disabled Enabled Wakeup Password Wakeup Password Wakeup Password Wakeup Password Wakeup Password This item appears only when the Power On By PS 2 Keyboard is set to Enabled Select this item to set or change the keyboard wakeup password The Keyboard Wakeup Password Keyboard Wakeup Password Keyboard Wakeup Password Keyboard Wakeup Passwo...

Страница 91: ... you do not wish to display the detected temperatures CPU Fan Speed xxxxRPM or N A CPU Fan Speed xxxxRPM or N A CPU Fan Speed xxxxRPM or N A CPU Fan Speed xxxxRPM or N A CPU Fan Speed xxxxRPM or N A The onboard hardware monitor automatically detects and displays the CPU fan speed in rotations per minute RPM If the fan is not connected to the motherboard the field shows N A CPU Q Fan Control Disabl...

Страница 92: ...ration options 35ºC 38ºC 41ºC 44ºC 47ºC 50ºC 53ºC 56ºC 59ºC 62ºC 65ºC Chassis Fan Speed xxxxRPM or N A Chassis Fan Speed xxxxRPM or N A Chassis Fan Speed xxxxRPM or N A Chassis Fan Speed xxxxRPM or N A Chassis Fan Speed xxxxRPM or N A The onboard hardware monitor automatically detects and displays the chassis fan speed in rotations per minute RPM If the fan is not connected to the chassis the spec...

Страница 93: ...ority Boot Device Priority Boot Device Priority Boot Device Priority Boot Device Priority 1st xxth Boot Device 1st Floppy Drive 1st xxth Boot Device 1st Floppy Drive 1st xxth Boot Device 1st Floppy Drive 1st xxth Boot Device 1st Floppy Drive 1st xxth Boot Device 1st Floppy Drive These items specify the boot device priority sequence from the available devices The number of device items that appears...

Страница 94: ...tion options Disabled Enabled Full Screen Logo Enabled Full Screen Logo Enabled Full Screen Logo Enabled Full Screen Logo Enabled Full Screen Logo Enabled This allows you to enable or disable the full screen logo display feature Configuration options Disabled Enabled Add On ROM Display Mode Force BIOS Add On ROM Display Mode Force BIOS Add On ROM Display Mode Force BIOS Add On ROM Display Mode For...

Страница 95: ...d User Password Not Installed Change Supervisor Password Boot Sector Virus Protection Disabled Enter to change password Enter again to disabled password Change Supervisor Password Change Supervisor Password Change Supervisor Password Change Supervisor Password Change Supervisor Password Select this item to set or change the supervisor password The Supervisor Password item on top of the screen show...

Страница 96: ...ing and changing all the fields in the Setup utility Change User Password Change User Password Change User Password Change User Password Change User Password Select this item to set or change the user password The User Password item on top of the screen shows the default Not Installed Not Installed Not Installed Not Installed Not Installed After you set a password this item shows Installed Install...

Страница 97: ...figuration options Setup Always Boot Sector Virus Protection Disabled Boot Sector Virus Protection Disabled Boot Sector Virus Protection Disabled Boot Sector Virus Protection Disabled Boot Sector Virus Protection Disabled Allows you to enable or disable the boot sector virus protection Configuration options Disabled Enabled 4 7 Exit menu Pressing Esc does not immediately exit this menu Select one ...

Страница 98: ...Setup Defaults This option allows you to load the default values for each of the parameters on the Setup menus When you select this option or if you press F5 a confirmation window appears Select Y e s Y e s Y e s Y e s Y e s to load default values Select Exit Save Changes Exit Save Changes Exit Save Changes Exit Save Changes Exit Save Changes or make other changes before saving the values to the n...

Страница 99: ...5 Software support This chapter describes the contents of the support CD that comes with the motherboard package ...

Страница 100: ...5GD1 ASUS P5GD1 ASUS P5GD1 ASUS P5GD1 Chapter summary 5 1 Installing an operating system 5 1 5 2 Support CD information 5 1 5 3 Software information 5 8 5 4 RAID configurations 5 16 5 5 Creating a RAID driver disk 5 28 ...

Страница 101: ... 5 2 1 5 2 1 5 2 1 Running the support CD Running the support CD Running the support CD Running the support CD Running the support CD Place the support CD to the optical drive The CD automatically displays the Drivers Drivers Drivers Drivers Drivers menu if Autorun is enabled in your computer Motherboard settings and hardware options vary Use the setup procedures presented in this chapter for refe...

Страница 102: ...m this driver provides the method for configuring the chipset components You can install this utility using three different modes interactive silent or unattended preload Installing the driver in interactive mode requires user input during installation User input is not required when installing the driver in silent or unattended preload modes Refer to the online help or readme file that came with ...

Страница 103: ... that provides up to 1000 Mbps data transfer rates IT8212 Driver and Application IT8212 Driver and Application IT8212 Driver and Application IT8212 Driver and Application IT8212 Driver and Application Installs the IT8212 driver and application Make ITE8212 Driver Disk Make ITE8212 Driver Disk Make ITE8212 Driver Disk Make ITE8212 Driver Disk Make ITE8212 Driver Disk Allows you to create a driver d...

Страница 104: ...es an Internet connection either through a network or an Internet Service Provider ISP See page 4 7 for details Microsoft DirectX Microsoft DirectX Microsoft DirectX Microsoft DirectX Microsoft DirectX Installs the Microsoft DirectX 9 0b driver Anti virus software Anti virus software Anti virus software Anti virus software Anti virus software Installs the anti virus program View the online help fo...

Страница 105: ...er s Manual Intel Application Accelerator RAID User s Manual Intel Application Accelerator RAID User s Manual Allows you to open the Intel Application Accelerator RAID User s manual ITE8212 RAID User s Manual ITE8212 RAID User s Manual ITE8212 RAID User s Manual ITE8212 RAID User s Manual ITE8212 RAID User s Manual Allows you to open the ITE 8212F RAID User s manual Intel LGA775 CPU Install User s...

Страница 106: ...ab to display the ASUS contact information You can also find this information on the inside front cover of this user guide 5 2 6 5 2 6 5 2 6 5 2 6 5 2 6 Other information Other information Other information Other information Other information The icons on the top right corner of the screen give additional information on the motherboard and the contents of the support CD Click an icon to display th...

Страница 107: ...upport Form Displays the ASUS Technical Support Request Form that you have to fill out when requesting technical support Filelist Filelist Filelist Filelist Filelist Displays the contents of the support CD and a brief description of each in text format Browse this CD Browse this CD Browse this CD Browse this CD Browse this CD Displays the support CD contents in graphical format ...

Страница 108: ...Next 3 Check the option Launch MyLogo to replace system boot Launch MyLogo to replace system boot Launch MyLogo to replace system boot Launch MyLogo to replace system boot Launch MyLogo to replace system boot logo before flashing BIOS logo before flashing BIOS logo before flashing BIOS logo before flashing BIOS logo before flashing BIOS then click Next Next Next Next Next 4 Select Update BIOS from...

Страница 109: ...e original BIOS to load the new boot logo 10 After flashing the BIOS restart the computer to display the new boot logo during POST 8 Adjust the boot image to your desired size by selecting a value on the Ratio Ratio Ratio Ratio Ratio box 7 When the logo images appear on the right window pane select an image to enlarge by clicking on it ...

Страница 110: ...Using the Virtual Cable Tester Using the Virtual Cable Tester Using the Virtual Cable Tester To use the the Marvell Virtual Cable Tester utility 1 Launch the VCT utility from the Windows desktop by clicking Start All Programs Marvell Virtual Cable Tester Start All Programs Marvell Virtual Cable Tester Start All Programs Marvell Virtual Cable Tester Start All Programs Marvell Virtual Cable Tester S...

Страница 111: ...he Sound Effect Sound Effect Sound Effect Sound Effect Sound Effect icon to display the Realtek Realtek Realtek Realtek Realtek Sound Manager Sound Manager Sound Manager Sound Manager Sound Manager Realtek Realtek Realtek Realtek Realtek Sound Effect Sound Effect Sound Effect Sound Effect Sound Effect i c o n i c o n i c o n i c o n i c o n Using the Realtek Using the Realtek Using the Realtek Usi...

Страница 112: ...er The Equalizer section allows you to adjust the amplifier frequency Use the 10 band equalizer to individually control the different frequency bands of your speaker system or click a music style preset button to load a pre defined equalizer setting Click the corresponding control button to load save reset or delete a user defined preset Karaoke Karaoke Karaoke Karaoke Karaoke The Karaoke section ...

Страница 113: ...lay Play or Stop Stop Stop Stop Stop button to start or stop the demo Click the corresponding option button to adjust the sound type moving path and EAX settings General The General General General General General option displays your audio driver version DirectX version audio controller and audio CODEC Enable the option button to display the Sound Effect icon on the system tray To change the lang...

Страница 114: ...on only SPDIF The SPDIF SPDIF SPDIF SPDIF SPDIF option allows you to set the S PDIF output and change the S PDIF output frequency Click the option button of your choice Audio Wizard The Audio Wizard Audio Wizard Audio Wizard Audio Wizard Audio Wizard guides you to the proper audio port for the device you plugged in Click the Front Panel Front Panel Front Panel Front Panel Front Panel or Back Panel...

Страница 115: ... 2 4 6 or 8 channel configuration Audio 2 4 6 or 8 channel configuration Audio 2 4 6 or 8 channel configuration Audio 2 4 6 or 8 channel configuration Audio 2 4 6 or 8 channel configuration Light Blue Line In Line In Line In Line In Lime Line Out Front Speaker Out Front Speaker Out Front Speaker Out Pink Mic In Mic In Mic In Mic In Gray Rear Speaker Out Rear Speaker Out Rear Speaker Out Black Side...

Страница 116: ...ge of data from one drive to a second drive If one drive fails the disk array management software directs all applications to the surviving drive as it contains a complete copy of the data in the other drive This RAID configuration provides data protection and increases fault tolerance to the entire system Use two new drives or use an existing drive and a new drive for this setup The new drive mus...

Страница 117: ...ng Parallel ATA hard disks Installing Parallel ATA hard disks To install IDE hard disks for a RAID configuration 1 Set the jumpers of each hard disk as Master Master or Slave Slave 2 Install the hard disks into the drive bays 3 Connect the HDD signal cables 4 Connect a 4 pin power cable to the power connector on each drive Installing Serial ATA SATA hard disks Installing Serial ATA SATA hard disks...

Страница 118: ...Configure SATA As Configure SATA As item as RAID 3 Set the OnBoard Serial ATA BOOTROM OnBoard Serial ATA BOOTROM OnBoard Serial ATA BOOTROM OnBoard Serial ATA BOOTROM OnBoard Serial ATA BOOTROM item as Enabled 4 Save your changes and exit Setup Entering the Intel Entering the Intel Entering the Intel Entering the Intel Entering the Intel Application Accelerator RAID Option Application Accelerator ...

Страница 119: ...e and can not contain special characters Intel R Application Accelerator RAID Option ROM v4 0 0 6211 Copyright C 2003 04 Intel Corporation All Rights Reserved CREATE ARRAY MENU Name RAID_Volume1 RAID Level RAID0 Stripe Disks Select Disk Strip Size 128KB Capacity 149 0GB Change Change TAB Next TAB Next ESC Previous Menu ESC Previous Menu Enter Select Enter Select 2 Key in a unique name for your RAI...

Страница 120: ...ity The utility prompts a confirmation message press Y Deleting a RAID Volume Deleting a RAID Volume Deleting a RAID Volume Deleting a RAID Volume Deleting a RAID Volume HELP Deleting a volume will destroy the volume data on the drive s and cause any member disks to become available as non RAID disks WARNING EXISTING DATA WITHIN THIS VOLUME WILL BE LOST AND NON RECOVERABLE Intel R Application Acce...

Страница 121: ...lection Complete Enter Selection Complete 2 Use the up or down arrow keys to highlight a RAID drive you wish to reset then press Space 3 Repeat step 2 to select other RAID drives 4 Press Enter to reset RAID drive 5 The utility prompts a confirmation message press Y to confirm or N to return to the configuration Main Menu 2 Press Del to delete the RAID volume The following confirmation message appe...

Страница 122: ...F RAID configurations 8212F RAID configurations 8212F RAID configurations The ITE 8212F IDE RAID controller supports RAID 0 RAID 1 RAID 0 1 and JBOD configurations Use the IT8212 BIOS Setup Utility or the ATA RAID Manager application to configure a disk array Setting the BIOS RAID items Setting the BIOS RAID items Setting the BIOS RAID items Setting the BIOS RAID items Setting the BIOS RAID items ...

Страница 123: ...ring a RAID array Auto configuring a RAID array Auto configuring a RAID array Auto configuring a RAID array Auto configuring a RAID array This option allows you to select a supported RAID set for the utility to automatically configure To auto configure a RAID set 1 From the IT8212 Setup Utility screen press 1 The following screen appears 2 Use the left or right arrow keys or the space bar to selec...

Страница 124: ...AID array This option allows you to define supported RAID arrays To define a RAID array 1 From the IT8212 Setup Utility screen press 2 The following screen appears 2 Use the up or down arrow keys or the space bar to select a RAID array then press Enter The following sub menu appears IT8212 Setup Utility C Copyright 2002 2004 ITE Inc Define RAID Sub Menu Capacity GB Up Down Space Change Option Ctrl...

Страница 125: ... Deleting a RAID array This option allows you to delete an existing RAID array To delete a RAID array 1 From the IT8212 Setup Utility screen press 3 The following screen appears IT8212 Setup Utility C Copyright 2002 2004 ITE Inc Delete RAID Menu Array No Array Mode Drive No Size MB Status Array 0 Stripe 2 XXXXXX Functional Array 1 Mirror 2 XXXX Functional Array 2 Array 3 Capacity GB Bootable Array...

Страница 126: ...RAID array Rebuilding a RAID array This option allows you to reconstruct an existing RAID array This option applies only to RAID1 Mirrored or RAID 0 1 Striped Mirrored sets To rebuild a RAID array 1 From the IT8212 Setup Utility screen press 4 The following screen appears 2 Use the up or down arrow keys to select a RAID array then press Enter to rebuild The following screen appears IT8212 Setup Ut...

Страница 127: ...XXXXXXXXXXXXXX XXXXXX Array 0 U6 Drive Status 3 Use the up or down arrow keys to select a drive then press Enter Follow succeeding screen instructions 4 Press Esc to exit Viewing your RAID configuration Viewing your RAID configuration Viewing your RAID configuration Viewing your RAID configuration Viewing your RAID configuration This option allows you to view your RAID configuration You can also e...

Страница 128: ...tem of the RAID driver disk you wish to configure Click Make ITE8212 Driver Disk Make ITE8212 Driver Disk Make ITE8212 Driver Disk Make ITE8212 Driver Disk Make ITE8212 Driver Disk to create an ITE 8212F RAID driver disk 4 Insert floppy disk to floppy disk drive 5 Follow succeeding screen information to complete process 6 Write protect the floppy disk to avoid computer virus infection To install t...

Отзывы: