background image

D

eutsch

D

eutsch

ASUS CM170

107

D

eutsch

D

eutsch

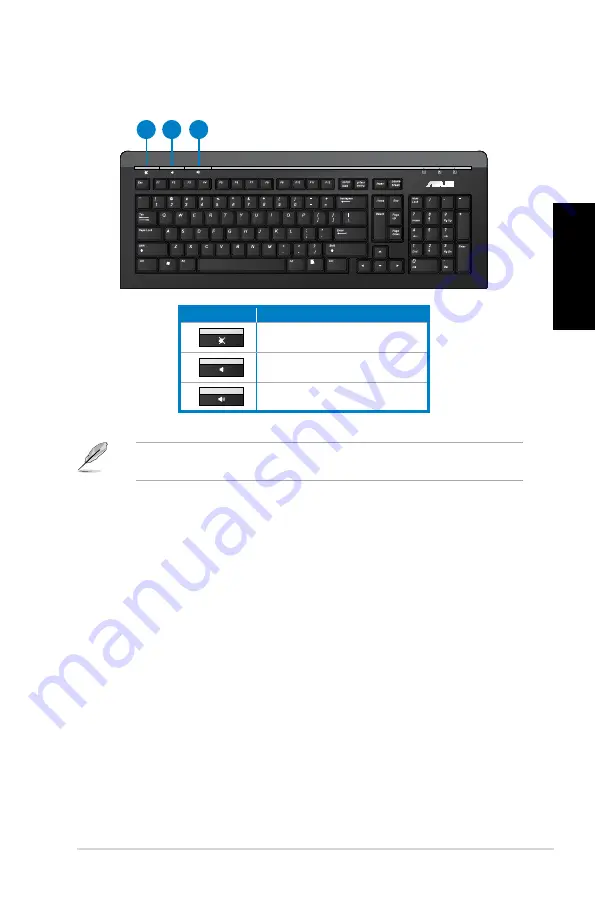
Tasten

Beschreibung

1. 

Schaltet die Lautstärke zwischen 

stumm/an.

Systemlautstärke verringern.

Systemlautstärke vergrößern.

ASUS.KB34211.modern-Kabeltastatur

1 2

3

Die Sonderfunktionstasten funktionieren nur unter den Windows

®

 Vista / Windows

®

 7 / 

XP-Betriebssystemen. 

Содержание Essentio CM1730

Страница 1: ...English 1 Deutsch 67 Français 133 Español 199 Nederlands 265 Index ...

Страница 2: ......

Страница 3: ...ASUS Essentio Desktop PC CM1730 User Manual ...

Страница 4: ...FOR A PARTICULAR PURPOSE IN NO EVENT SHALL ASUS ITS DIRECTORS OFFICERS EMPLOYEES OR AGENTS BE LIABLE FOR ANY INDIRECT SPECIAL INCIDENTAL OR CONSEQUENTIAL DAMAGES INCLUDING DAMAGES FOR LOSS OF PROFITS LOSS OF BUSINESS LOSS OF USE OR DATA INTERRUPTION OF BUSINESS AND THE LIKE EVEN IF ASUS HAS BEEN ADVISED OF THE POSSIBILITY OF SUCH DAMAGES ARISING FROM ANY DEFECT OR ERROR IN THIS MANUAL OR PRODUCT S...

Страница 5: ...lders 22 Restoring your system settings 24 Protecting your computer 25 Getting Windows Help and Support 26 Chapter 3 Connecting devices to your computer Connecting a USB storage device 27 Connecting microphone and speakers 28 Connecting multiple external displays 31 Connecting an HDTV 33 Chapter 4 Using your computer Proper posture when using your Desktop PC 35 Using the memory card reader 36 Usin...

Страница 6: ...Contents Chapter 6 Using the utilities ASUS AI Manager 47 ASUS EPU 4 Engine 50 ASUS Update 54 ASUS MyLogo2 55 Nero 9 56 Recovering your system 57 Chapter 7 Troubleshooting Troubleshooting 59 ASUS contact information 66 ...

Страница 7: ...gital device pursuant to Part 15 of the FCC Rules These limits are designed to provide reasonable protection against harmful interference in a residential installation This equipment generates uses and can radiate radio frequency energy and if not installed and used in accordance with manufacturer s instructions may cause harmful interference to radio communications However there is no guarantee t...

Страница 8: ...right protection technology that is protected by method claims of certain U S patents and other intellectual property rights owned by Macrovision Corporation and other rights owners Use of this copyright protection technology must be authorized by Macrovision Corporation and is intended for home and other limited viewing uses only unless otherwise authorized by Macrovision Corporation Reverse engi...

Страница 9: ...s Battery safety warning DO NOT throw the battery in fire DO NOT short circuit the contacts DO NOT disassemble the battery Use this product in environments with ambient temperatures between 0 C 32 F and 35 C 95 F DO NOT cover the vents on the Desktop PC to prevent the system from getting overheated DO NOT use damaged power cords accessories or other peripherals To prevent electrical shock hazard d...

Страница 10: ... NOTE Tips and additional information to help you complete a task IMPORTANT Instructions that you MUST follow to complete a task Where to find more information Refer to the following sources for additional information and for product and software updates ASUS websites The ASUS website provides updated information on ASUS hardware and software products Refer to the ASUS website www asus com ASUS Lo...

Страница 11: ...ted items above are for reference only Actual product specifications may vary with different models ASUS Essentio Desktop PC Keyboard x1 Mouse x1 Installation Guide Power cord x1 Installation Guide x1 Warranty card x1 Nero 9 burning software DVD x1 Support DVD optional x1 Recovery DVD optional x1 Antenna optional x2 ...

Страница 12: ...10 English ...

Страница 13: ...ry with different models Welcome Thank you for purchasing the ASUS Essentio CM1730 Desktop PC The ASUS Essentio CM1730 Desktop PC provides cutting edge performance uncompromised reliability and user centric utilities All these values are encapsulated in a stunningly futuristic and stylish system casing Read the ASUS Warranty Card before setting up your ASUS Desktop PC 1 5 2 3 4 7 6 ...

Страница 14: ...drive eject button Press this button to eject the optical disk drive tray 5 Secure Digital MultiMediaCard slot Insert a Secure Digital MultiMediaCard card into this slot Memory Stick Memory Stick Pro card slot Insert a Memory Stick Memory Stick Pro card into this slot Extreme Digital card slot Insert an Extreme Digital card into this slot 6 Power button Press this button to turn on your computer 7...

Страница 15: ...P compliant allowing playback of HD DVD Blu ray and other protected content 8 DVI D port This port is for any DVI D compatible device and is HDCP compliant allowing playback of HD DVD Blu ray and other protected content 9 VGA port This port is for VGA compatible devices such as a VGA monitor 10 USB 2 0 ports These Universal Serial Bus 2 0 USB 2 0 ports connect to USB 2 0 devices such as a mouse pr...

Страница 16: ...e Speaker Out port gray This port connects to the side speakers in an 8 channel audio configuration 15 Microphone port pink This port connects to a microphone 16 Line Out port lime This port connects to a headphone or speaker In a 4 6 or 8 channel configuration the function of this port becomes Front Speaker Out 17 Center Subwoofer port orange This port connects to the center subwoofer speakers 18...

Страница 17: ...ternal monitor Using the ASUS Graphics Card on selected models only Connect your monitor to the display output port on the discrete ASUS Graphics Card To connect an external monitor using the ASUS Graphics Card 1 Connect a monitor to a display output port on the ASUS Graphics Card 2 Plug the monitor to a power source DVI HDMI DVI HDMI The display output ports on the ASUS Graphics Card may vary wit...

Страница 18: ...ors to your computer refer to Connecting multiple external monitors in Chapter 3 of this user manual for details Using the onboard display output ports Connect your monitor to the onboard display output port To connect an external monitor using the onboard display output ports 1 Connect a VGA monitor to the VGA port or a DVI D monitor to the DVI D port or an HDMI monitor to the HDMI port on the re...

Страница 19: ...mouse Connect a USB keyboard and a USB mouse to the USB ports on the rear panel of your computer Connecting the power cord Connect one end of the power cord to the power connector on the rear panel of your computer and the other end to a power source DVI HDMI DVI HDMI ...

Страница 20: ...g your computer ON To turn your computer ON 1 Turn on the power switch 2 Turn your monitor ON 3 Press the power button on your computer Turning your computer OFF To turn your computer OFF 1 Close all running applications 2 Click on the Windows desktop 3 Click to shut down the operating system Power button 4 Wait until the operating system loads automatically ...

Страница 21: ...y in uniques names for the user name and computer name then click Next 5 Key in the necessary information to set up your password then click Next You may also click Next to skip this step without entering any information 6 Carefully read the license terms Tick I accept the license terms and click Next 7 Select Use recommended settings or Install important updates only to set up the security settin...

Страница 22: ...ut Windows 7 Using the Getting Started item The Getting Started item on the Start menu contains information about some basic tasks such as personalizing Windows adding new users and transferring files to help you to familiarize yourself with using Windows 7 To use the Getting Started item 1 From the Windows taskbar click the Start icon to launch the Start menu 2 Select Getting Started The list of ...

Страница 23: ...n select Unpin from this list Pinning programs on the Start menu or taskbar To pin programs on the Start menu or taskbar 1 From the Windows taskbar click the Start icon to launch the Start menu 2 Right click the item that you want to pin on the Start menu or taskbar 3 Select Pin to Taskbar or Pin to Start menu You may also right click on the icon of a running program on the taskbar then select Pin...

Страница 24: ... to open it For more details refer to the section Using Windows Action Center in this chapter Customizing icons and notifications You may choose to display or hide the icons and notifications on the taskbar or on the notification area To customize icons and notifications 1 From the notification area click on the arrow icon 2 Click Customize 3 From the dropdown list select the behaviors for the ico...

Страница 25: ...er to select how you want to view the file folder You may also right click anywhere on the View pane click View and select the view type that you want Arranging your files To arrange your files 1 Launch Windows Explorer 2 From the Arrange by field click to display the dropdown list 3 Select your preferred arrangement type Sorting your files To sort your files 1 Launch Windows Explorer 2 Right clic...

Страница 26: ...me choose as your backup mode Restoring your system settings The Windows System Restore feature creates a restore point where the computer s system settings are stored at certain time and date It allows you to restore or undo changes to your computer s system settings without affecting your personal data To restore your system 1 Close all running applications 2 Click All Programs Accessories Syste...

Страница 27: ...task that you want to do Using Windows Update Windows Update allows you to check and install the latest updates to enhance the security and performance of your computer Launching Windows Update To launch Windows Update 1 From the Windows taskbar click the Start icon to launch the Start menu 2 Select All Programs Windows Update 3 From the Windows Update screen click the task that you want to do Set...

Страница 28: ...ter from virus It is purchased separately You have a 30 day trial period after activating it To activate Trend Micro Internet Security 1 Run the Trend Micro Internet Security application 2 Carefully read the license terms Click Agree Activate 3 Input your e mail address and select your location Click Next 4 Click Finish to complete the activation Getting Windows Help and Support Windows Help and S...

Страница 29: ...es to your computer Connecting a USB storage device This desktop PC provides USB 2 0 1 1 ports on both the front and rear panels and USB3 0 ports on the rear panel The USB ports allow you to connect USB devices such as storage devices To connect a USB storage device Insert the USB storage device to your computer DVI HDMI Front panel Rear panel DO NOT remove a USB storage device when data transfer ...

Страница 30: ... speakers This desktop PC comes with microphone ports and speaker ports on both the front and rear panels The audio I O ports located on the rear panel allow you to connect 2 channel 4 channel 6 channel and 8 channel stereo speakers Connecting Headphone and Mic Connecting 2 channel Speakers ...

Страница 31: ...English ASUS CM1730 29 English Connecting 4 channel Speakers Connecting 6 channel Speakers ...

Страница 32: ...30 Chapter 3 Connecting devices to your computer English English Connecting 8 channel Speakers ...

Страница 33: ...sion to enlarge your Windows desktop To set up multiple displays 1 Turn off your computer 2 Connect the two monitors to your computer and connect the power cords to the monitors Refer to Setting up your computer section in Chapter 1 for details on how to connect a monitor to your computer When a graphics card is installed in your computer connect the monitors on the output ports of the graphics ca...

Страница 34: ...your desktop space Show desktop only on 1 2 Select this option to show desktop only on monitor 1 or monitor 2 Remove this display Select this options to remove the selected display 6 Click Apply or OK Then click Keep Changes on the confirmation message 3 Turn on your computer 4 Do any of the following to open the Screen Resolution setting screen Click Control Panel Appearance and Personalization D...

Страница 35: ...onnect a High Definition TV HDTV to the HDMI port of your computer You need an HDMI cable to connect the HDTV and the computer The HDMI cable is purchased separately To get the best display performance ensure that your HDMI cable is less than 15 meters ...

Страница 36: ...34 Chapter 3 Connecting devices to your computer English ...

Страница 37: ...air to make sure that your knees are slightly higher than your hips to relax the backs of your thighs If necessary use a footrest to raise the level of your knees Adjust the back of your chair so that the base of your spine is firmly supported and angled slightly backward Sit upright with your knees elbows and hips at an approximately 90º angle when you are at the PC Place the monitor directly in ...

Страница 38: ...system allows you to read from and write to different memory card drives To use the memory card 1 Insert the memory card into the card slot 2 Select a program from the AutoPlay window to access your files If AutoPlay is NOT enabled in your computer click Windows 7 Start button on the taskbar click Computer and then double click the memory card icon to access the data on it Each card slot has its o...

Страница 39: ...ram from the AutoPlay window to access your files Removing an optical disc To remove an optical disc 1 While the system is on do either of the following to eject the tray Press the eject button below the drive bay cover Right click the CD DVD drive icon on the Computer screen and then click Eject 2 Remove the disc from the disc tray If AutoPlay is NOT enabled in your computer click Windows 7 Start...

Страница 40: ...Press Fn F9 to play or pause playback in Windows Media Player 4 Increases picture size in Windows Photo Viewer 15 Press Fn F10 to stop playback in Windows Media Player 5 Functions with keys F1 F12 16 Press Fn F11 to go to the previous track in Windows Media Player 6 Press Fn F1 to launch Microsoft Word 17 Press Fn F12 to go to the next track in Windows Media Player 7 Press Fn F2 to launch Microsof...

Страница 41: ... media player 4 Goes to the next track in a media player 5 Decreases the system volume 6 Increases the system volume 7 Turns the volume s mute mode on off 8 Switches profiles working with F1 F10 keys 1 3 2 5 6 4 8 7 The special function keys work on Windows XP Vista 7 operating systems Install the keyboard driver before using Visit the Razer website at www razersupport com to download the driver ...

Страница 42: ...eep mode Press any key to wake up your computer and return to the previous working status 8 Increases the system volume 2 Returns to the last page you viewed 9 Turns the volume s mute mode on off 3 Goes to the next page you viewed before 10 Goes to the previous track in a media player 4 Launches the default homepage in Windows Internet Explorer 11 Plays or pauses playback in a media player 5 Launc...

Страница 43: ...eys Description 1 Turns the volume s mute mode on off 2 Decreases the system volume 3 Increases the system volume ASUS KB34211 modern wired keyboard 1 2 3 The special function keys only work on Windows Vista Windows 7 XP operating systems ...

Страница 44: ...42 Chapter 4 Using your computer English ...

Страница 45: ... area network LAN DVI HDMI Modem RJ 45 cable 2 Connect one end of an RJ 45 cable to the LAN RJ 45 port on the rear panel of your computer and the other end to a DSL cable modem Refer to the documentation that came with your DSL cable modem 3 Turn on the DSL cable modem and your computer 4 Configure the necessary Internet connection settings Contact your Internet Service Provider ISP for details or...

Страница 46: ...nnect one end of an RJ 45 cable to the LAN RJ 45 port on the rear panel of your computer and the other end to your LAN DVI HDMI RJ 45 cable LAN 2 Turn on your computer 3 Configure the necessary Internet connection settings Contact your network administrator for details or assistance in setting up your Internet connection ...

Страница 47: ...ablish a wireless connection you need to connect to a wireless access point AP Wireless AP Modem DVI HDMI DVI HDMI To connect to a wireless network 1 Click the network icon in the notification area to display the available wireless networks 2 Select the wireless network that you want to connect to then click Connect 3 You may need to key in the network security key for a secured wireless network t...

Страница 48: ...46 Chapter 5 Connecting to the Internet English ...

Страница 49: ...the support DVD in the optical drive If Autorun is enabled the Drivers installation wizard appears If Autorun is disabled double click the setup exe file from the ASUS AI Manager folder in the support DVD 2 Click the Utilities tab then click ASUS AI Manager 3 Follow the onscreen instructions to complete the installation Launching AI Manager To launch the AI Manager from the Windows desktop click S...

Страница 50: ...sily clear temporary IE files IE cookies IE URLs IE history or the Recycle Bin Click the AI Disk icon on the quick bar to display the full AI Disk window and select the items you want to clear Click Apply when done Click to extend or restore Click to display items on the right Click to display items on the left Main My Favorites Support Information Exit button Switch to main Window Add to ToolBar ...

Страница 51: ...r computer To add an application 1 Click Add then locate the application you want to add to My Favorites 2 Click Open on the file location window The application is added to My Favorites list Right click on the application icon to launch delete or rename the selected application You can also double click to launch the selected application Support Click any links on the Support window to go to the ...

Страница 52: ...taskbar click the ASUS EPU 4 icon Installing ASUS EPU 4 To install ASUS EPU 4 Engine 1 Place the support DVD into the optical drive The Drivers menu appears if Autorun is enabled on your computer If Autorun is disabled double click the setup exe file from the ASUS EPU 4 Engine folder in the support DVD 2 Click ASUS EPU 4 Engine 3 Follow the onscreen instructions to complete the installation Launch...

Страница 53: ... current CPU power and the total CPU power saved 2 VGA card status Displays the status of the graphics card If your graphics card is not compatible with the motherboard a No VGA card detected message appears Refer to the ASUS VGA QVL List at http event asus com mb EPU 4_Engine for compatible VGA cards ...

Страница 54: ...etect the CPU properties for optimal power management 9 Setting button Click this button to configure the mode settings Refer to the section Configuring the mode settings for more details 10 Modes Auto Mode When you select this mode the system changes modes automatically according to the current system status High Performance Mode When you select this mode the system overclocks the components for ...

Страница 55: ...avy Downgrades voltage to the highest level for CPU power saving Medium Downgrades voltage to the medium level Small Downgrades voltage to the minimum level Turn Off hard disks Turns off hard disk drives when they are not accessed after a certain time CPU Loadline Sets up the CPU loadline to manage CPU power saving Light Saves CPU power to the minimum level Medium Saves CPU power to the medium lev...

Страница 56: ... Windows applications before you update the BIOS using this utility Updating the BIOS To update the BIOS 1 From the Windows desktop click Start Programs ASUS ASUS Update ASUS Update to launch the ASUS Update utility 2 From the dropdown list select any of the updating process Updating from the Internet a Select Update BIOS from the Internet then click Next b Select the ASUS FTP site nearest you to ...

Страница 57: ...h MyLogo to replace system boot logo before flashing BIOS then click Next 4 Select Update BIOS from file from the drop down menu then click Next 5 When prompted locate the new BIOS file then click Next ASUS MyLogo window appears 6 From the left window pane locate the image that you want to use as your boot logo Click Next 7 From the Ratio dropdown list select your desired size for the boot logo Cl...

Страница 58: ...ro 9 Essentials 4 Select the language you want to use for Installation Wizard Click Next 5 Click Next to continue 6 Tick I accept the License Conditions When done click Next 7 Select Typical then click Next 8 Tick Yes I want to help by sending anonymous application data to Nero then click Next 9 When done click Exit Burning files To burn files 1 From the main menu click Data Burning Add 2 Select t...

Страница 59: ...ECOVERY The Recovery Partition is created at the factory and cannot be restored if deleted Take your Desktop PC to an authorized ASUS service center if you have problems with the recovery process Using the Recovery Partition 1 Press F9 during bootup 2 Press Enter to select Windows Setup EMS Enabled 3 Select one of the following recovery options System Recovery This feature allows you to restore th...

Страница 60: ...al drive Your Desktop PC needs to be powered ON 2 Restart the Desktop PC and press F8 on bootup and select the optical drive may be labeled as CD DVD and press Enter to boot from the Recovery DVD 3 Select OK to start to restore the image 4 Select OK to confirm the system recovery Restoring will overwrite your hard drive Ensure to back up all your important data before the system recovery 5 Follow ...

Страница 61: ... not responding then click End Task If the keyboard is not responding Press and hold the Power button on the top of your chassis until the computer shuts down Then press the Power button to turn it on I cannot connect to a wireless nestwork using the ASUS WLAN Card on selected models only Ensure that you enter the correct network security key for the wireless network you want to connect to Connect...

Страница 62: ...function works only under Windows When a graphics card is installed on your computer ensure that you connect the monitors to the output port on the graphics card Check if the multiple displays settings are correct Refer to section Connecting multiple external displays in Chapter 3 for details My computer cannot detect my USB storage device The first time you connect your USB storage device to your...

Страница 63: ...no sound Ensure that you connect your speakers to the Line out port lime on the front panel or the rear panel Check if your speak is connected to a electrical source and turned on Adjust your speakers volume Ensure that your computer s system sounds are not Muted If it is muted the volume icon is displayed as To enable the system sounds click from the Windows notification area then click If it is ...

Страница 64: ... on Your computer s power cord is not properly connected Ensure that the power cord is properly connected Use other compatible power cord PSU Power supply unit problems Try installing another PSU on your computer Display Problem Possible Cause Action No display output after turning the computer on Black screen The signal cable is not connected to the correct VGA port on your computer Connect the s...

Страница 65: ...our Internet Service Provider ISP for the correct LAN settings Problems caused by the anti virus software Close the anti virus software Driver problems Reinstall the LAN driver Audio Problem Possible Cause Action No Audio Speaker or headphone is connected to the wrong port Refer to your computer s user manual for the correct port Disconnect and reconnect the speaker to your computer Speaker or hea...

Страница 66: ... The system often hangs or freezes Hard disk drive failure Send the damaged hard disk drive to ASUS Service Center for servicing Replace with a new hard disk drive Memory module problems Replace with compatible memory modules Remove the extra memory modules that you have installed then try again There is not enough air ventilation for your computer Move your computer to an area with better air flo...

Страница 67: ...t asus com to download the latest BIOS versions Computer is too noisy when in use The CPU fan has been replaced Ensure that you are using a compatible or ASUS recommended CPU fan There is not enough air ventilation for the computer Ensure that your computer is working in an area with good air flow The system temperature is too high Update the BIOS If you know how to reinstall the motherboard try t...

Страница 68: ...787 Support fax 1 812 284 0883 Online support support asus com ASUS COMPUTER GmbH Germany and Austria Address Harkort Str 21 23 D 40880 Ratingen Germany Fax 49 2102 959911 Web site www asus de Online contact www asus de sales Technical Support Telephone Component 49 1805 010923 Telephone System Notebook Eee LCD 49 1805 010920 Support Fax 49 2102 9599 11 Online support support asus com EUR 0 14 min...

Страница 69: ...ASUS Essentio Desktop PC CM1730 Benutzerhandbuch ...

Страница 70: ...EIT FÜR EINEN BESTIMMTEN ZWECK ZUR VERFÜGUNG UNTER KEINEN UMSTÄNDEN HAFTET ASUS SEINE DIREKTOREN VORSTANDSMITGLIEDER MITARBEITER ODER AGENTEN FÜR INDIREKTE BESONDERE ZUFÄLLIGE ODER SICH ERGEBENDE SCHÄDEN EINSCHLIESSLICH SCHÄDEN AUF GRUND VON PROFITVERLUST GESCHÄFTSVERLUST BEDIENUNGSAUSFALL ODER DATENVERLUST GESCHÄFTSUNTERBRECHUNG UND ÄHNLICHEM AUCH WENN ASUS VON DER WAHRSCHEINLICHKEIT DERARTIGER S...

Страница 71: ... wiederherstellen 90 Computer schützen 91 Windows Hilfe und Support 92 Kapitel 3 Anschließen von Geräten an Ihren Computer Anschließen eines USB Datenträgers 93 Anschließen von Mikrofon und Lautsprechern 94 Anschließen von mehreren externen Anzeigegeräten 97 Anschließen eines HDTV 99 Kapitel 4 Computer verwenden Richtige Sitzhaltung beim verwenden des Desktop PCs 101 Speicherkartenleser verwenden ...

Страница 72: ...pitel 6 Verwenden der Hilfsprogramme ASUS AI Manager 113 ASUS EPU 4 Engine 116 ASUS Update 120 ASUS MyLogo2 121 Nero 9 122 Systemwiederherstellung 123 Kapitel 7 Problembehandlung Problembehandlung 125 ASUS Kontaktinformationen 132 ...

Страница 73: ...und verwendet Hochfrequenzenergie und kann wenn es nicht gemäß den Anweisungen des Herstellers installiert und bedient wird den Radio und Fernsehempfang empfindlich stören Es wird jedoch nicht garantiert dass bei einer bestimmten Installation keine Interferenzen auftreten Wenn das Gerät den Radio oder Fernsehempfang empfindlich stört was sich durch Aus und Einschalten des Geräts feststellen lässt ...

Страница 74: ...rät überschreitet keine Grenzwerte für Funkrauschemissionen der Klasse B die vom kanadischen Ministeriums für Telekommunikation in den Funkstörvorschriften festgelegt sind Dieses Digitalgerät der Klasse B stimmt mit dem kanadischen ICES 003 überein Macrovision Corporation Produktanmerkung Dieses Produkt verfügt über Kopierschutztechnologie die durch methodische Anforderungen bestimmter U S A Paten...

Страница 75: ...oder Feuchtigkeit Kein Modembetrieb während eines elektrischen Sturms Akku Sicherheitswarnung Batterie nicht in offenes Feuer werfen Kontakte nicht kurzschließen Den Akku nicht auseinandernehmen Dieses Produkt in Umgebungstemperaturen zwischen 0 C 32 F und 35 C 95 F verwenden Die Lufteinlässe des Desktop PCs nicht abdecken um eine Überhitzung des Systems zu vermeiden Keine beschädigten Stromkabel ...

Страница 76: ...d zusätzliche Informationen zur Erleichterung bei der Ausführung einer Aufgabe WICHTIG Anweisungen die Sie beim Ausführen einer Aufgabe befolgen müssen Weitere Informationsquellen An den folgenden Quellen finden Sie weitere Informationen und Produkt sowie Software Updates ASUS Webseiten ASUS Webseiten enthalten weltweit aktualisierte Informationen über ASUS Hardware und Softwareprodukte Beziehen S...

Страница 77: ...ro 9 burning software DVD x1 Support DVD optional x1 Wiederherstellungs DVD optional x1 Antennen optional x2 Sollten o g Artikel beschädigt oder nicht vorhanden sein wenden Sie sich bitte an Ihren Händler Die oberhalb illustrierten Artikel sind nur als eine Referenz gedacht Die tatsächlichen Produktspezifikationen können sich je nach Modell unterscheiden ...

Страница 78: ...76 Deutsch ...

Страница 79: ...llen Willkommen Vielen Dank für den Kauf eines ASUS Essentio CM1730 Desktop PCs Der ASUS Essentio CM1730 Desktop PC liefert topaktuelle Leistung unvergleichliche Zuverlässigkeit und benutzerorientierte Anwendungen All diese Eigenschaften wurden in diesem verblüffend futuristischen und eleganten Systemgehäuse vereint Lesen Sie die ASUS Garantiekarte sorgfältig durch bevor Sie Ihren ASUS Desktop PC ...

Страница 80: ...e um das Laufwerk zu öffnen 5 Secure Digital MultiMediaCard Kartensteckplatz Führen Sie eine Secure Digital Karte MultiMediaCard Karte in diesen Steckplatz ein Memory Stick Memory Stick Pro Kartensteckplatz Führen Sie eine Memory Stick Memory Stick Pro Karte in diesen Steckplatz ein Extreme Digital Kartensteckplatz Führen Sie eine Extreme Digital Karte in diesen Steckplatz ein 6 Einschalttaste Drü...

Страница 81: ...e von HD DVD Blu Ray und anderen geschützten Inhalten zu ermöglichen 8 DVI D Anschluss Dieser Anschluss nimmt DVI D kompatible Geräte auf und ist HDCP konform Dies ermöglicht die Wiedergabe von HD DVDs Blu Ray Disks und anderen geschützten Inhalten 9 VGA Anschluss Dieser Anschluss ist für einen VGA Monitor oder andere VGA kompatible Geräte vorgesehen 10 USB 2 0 Anschlüsse Diese Universal Serial Bu...

Страница 82: ...det mit Tonband CD oder DVD Playern und anderen Audiogeräten Audio 2 4 6 oder 8 Kanalkonfigurationen Anschlüsse Kopfhörer 2 Kanal 4 Kanal 6 Kanal 8 Kanal Hellblau Line In Line In Line In Line In Hellgrün Line Out Frontlautsprecher Frontlautsprecher Frontlautsprecher Rosa Mic In Mic In Mic In Mic In Orange Mitte Subwoofer Mitte Subwoofer Schwarz Hinterer Lautsprecher Hinterer Lautsprecher Hinterer ...

Страница 83: ...nitors ASUS Grafikkarte verwenden nur an bestimmten Modellen Verbinden Sie den Monitor mit dem Anzeigeausgang der aufgesetzten ASUS Grafikkarte So verbinden Sie einen externen Monitor mit der ASUS Grafikkarte 1 Verbinden Sie einen Monitor mit dem Anzeigeausgang der ASUS Grafikkarte 2 Schließen Sie den Monitor an die Stromversorgung an Die Anzeigeausgänge der ASUS Grafikkarten können sich je nach M...

Страница 84: ...luss oder ein HDMI Monitor mit dem HDMI Anschluss auf der Rückseite Ihres Computers 2 Schließen Sie den Monitor an die Stromversorgung an Falls Ihr Computer mit einer ASUS Grafikkarte ausgestattet wurde ist die Grafikkarte in BIOS als primäres Anzeigegerät eingestellt Verbinden Sie den Monitor deshalb mit dem Anzeigeausgang der ASUS Grafikkarte Um mehrere externe Monitore mit dem Computer zu verbi...

Страница 85: ...e eine USB Tastatur und USB Maus mit den USB Anschlüssen auf der Rücktafel Rückseite Ihres Computers Anschließen des Netzkabels Verbinden Sie ein Ende des Netzkabels mit dem Stromanschluss auf der Rücktafel Rückseite Ihres Computers und das andere Ende mit der Steckdose DVI HDMI DVI HDMI ...

Страница 86: ...mputer ein 1 Schalten Sie den Stromschalter ein 2 Schalten Sie den Monitor ein 3 Drücken Sie die Einschalttaste Ihres Computers Computer ausschalten So schalten Sie den Computer aus 1 Schließen Sie alle laufenden Anwendungen 2 Klicken Sie im Windows Desktop auf 3 Klicken Sie auf Herunterfahren um das Betriebssystem herunterzufahren 4 Warten Sie bis das Betriebssystem automatisch hochlädt Einschalt...

Страница 87: ...ationen ein um Ihr Kennwort einzurichten und klicken Sie auf Weiter Next Sie können auch auf Weiter Next klicken und diesen Schritt ohne ein Kennwort einzugeben zu überspringen 6 Lesen Sie sorgfältig die Lizenzbedingungen License terms Wählen Sie Ich akzeptiere die Lizenzbedingungen I accept the license terms und klicken Sie auf Weiter Next 7 Wählen Sie zwischen Empfohlene Einstellungen verwenden ...

Страница 88: ...g Started verwenden Das im Startmenü aufgelistete Element Erste Schritte Getting Started enthält Informationen über allgemeine Aufgaben wie das Personalisieren von Windows Hinzufügen neuer Benutzer und Dateitransfer um Sie mit der Benutzeroberfläche von Windows 7 vertraut zu machen So verwenden Sie das Element Erste Schritte 1 Klicken Sie in der Windows Taskleiste auf das Startsymbol um das Startm...

Страница 89: ...r Liste lösen Unpin from this list Programme an Startmenü oder Taskleiste anheften So heften Sie Programme ans Startmenü oder Taskleiste an 1 Klicken Sie in der Windows Taskleiste auf das Startsymbol um das Startmenü zu laden 2 Klicken Sie mit der rechten Maustatste auf das Gewünschte Element 3 Wählen Sie An Taskleiste anheften Pin to Taskbar oder An Startmenü anheften Pin to Start menu Sie können...

Страница 90: ...ür weitere Details beziehen Sie sich auf den Abschnitt Windows Wartungscenter verwenden in diesem Kapitel Symbole und Benachrichtigungen anpassen Sie können die Symbole und Benachrichtungen in der Taskleiste oder im Infobereich wahlweise ein oder ausblenden So passen Sie Symbole und Benachrichtungen an 1 Klicken Sie im Infobreich auf das Pfeilsymbol 2 Klicken Sie auf Anpassen Customize 3 Wählen Si...

Страница 91: ...ers anzupassen Sie können auch mit der rechten Maustaste den Ansichtsbereich irgendwo anklicken Ansicht View wählen und die gewünschte Ansichtsart bestimmen Dateien ordnen So ordnen Sie Dateien 1 Öffnen Sie Windows Explorer 2 Klicken Sie im Feld Anordnen Arrange by um die Dropdownliste anzuzeigen 3 Wählen Sie die gewünschte Anordnungsart Dateien sortieren So sortieren Sie Dateien 1 Öffnen Sie Wind...

Страница 92: ...ndows choose recommended oder Auswahl durch Benutzer Let me choose für Ihren Backup System wiederherstellen Die Funktion Windows Systemwiederherstellung legt einen Wiederherstellungspunkt an in dem die Systemeinstellungen des Computers an einem Zeitpunkt Datum gespeichert werden Dies erlaubt Ihnen die Wiederherstellung oder das Rückgängigmachen von Änderungen Ihres Computersystems ohne dass Ihre p...

Страница 93: ...t Ihnen den Abruf und Installation der neuesten Updates um die Sicherheit und Leistung Ihres Computers zu verbessern Windows Update ausführen So führen Sie Windows Update aus 1 Klicken Sie in der Windows Taskleiste auf das Startsymbol um das Startmenü zu laden 2 Wählen Sie Alle Programme All Programs Windows Update 3 Klicken Sie im Windows Update Fenster auf die Aufgabe die Sie ausführen möchten B...

Страница 94: ...e Version erwerben nachdem die Probezeit abgelaufen ist So aktivieren Sie Trend Micro Internet Security 1 Führen Sie die Anwendung Trend Micro Internet Security aus 2 Lesen Sie sorgfältig die Lizenzbedingungen License terms Klicken Sie auf Zustimmen Aktivieren Agree Activate 3 Geben Sie Ihre E Mail Adresse und Ihren Standort ein Klicken Sie auf Weiter Next 4 Klicken Sie auf Fertigstellen Finish um...

Страница 95: ...en USB Datenträger in Ihren Computer ein So entfernen Sie einen USB Datenträger 1 Klicken Sie im Windows Infobereich Ihres Computers auf und dann auf USB2 0 Flahslaufwerk auswerfen Eject USB2 0 FlashDisk Der Name variiert je nach USB Datenträgermodell 2 Wenn die Nachricht Hardware kann jetzt entfernt werden Safe to Remove Hardware eingeblendet wird entfernen Sie den USB Datenträger von Ihrem Compu...

Страница 96: ...n Dieser Desktop PC enthält Mikrofon und Lautsprecheranschlüsse auf der Vorder sowie Rückseite Die auf der Rückseite gelegenen Audio E A Anschlüsse ermöglichen Ihnen den Anschluss von 2 Kanal 4 Kanal 6 Kanal and 8 Kanal Stereolautsprechern Anschluss von Kopfhörern und Mikrofon Anschluss von 2 Kanal Lautsprechern ...

Страница 97: ...Deutsch ASUS CM1730 95 Deutsch Anschluss von 4 Kanal Lautsprechern Anschluss von 6 Kanal Lautsprechern ...

Страница 98: ...96 Kapitel 3 Anschließen von Geräten an Ihren Computer Deutsch Deutsch Anschluss von 8 Kanal Lautsprechern ...

Страница 99: ...res Windows Desktops verwenden So richten Sie mehrere Anzeigegeräte ein 1 Schalten Sie den Computer aus 2 Verbinden Sie die zwei Monitore mit Ihrem Computer sowie die Netzteile mit den Monitoren Beziehen Sie sich auf den Abschnitt Einrichten Ihres Computer in Kapitel 1 für Details zum Verbinden eines Monitors mit Ihrem Computer Wenn eine Grafikkarte auf Ihren Computer installiert wurde verbinden S...

Страница 100: ...ropdownliste Mehrere Anzeigen Multiple displays den gewünschten Anzeigemodus Diese Anzeigen duplizieren Duplicate these displays Treffen Sie diese Auswahl um den zusätzlichen Monitor als einen Duplikat Ihres Hauptmonitors zu verwenden Diese Anzeigen erweitern Extend these displays Treffen Sie diese Auswahl um den zusätzlichen Monitor als eine Erweiterung Ihres Hauptmonitors zu verwenden Dies vergr...

Страница 101: ...ein High Definition TV HDTV mit dem HDMI Anschluss Ihres Computers Sie benötigen ein HDMI Kabel um ein HDTV mit dem Computer zu verbinden Das HDMI Kabel muss separat erworben werden Um die beste Anzeigeleistung zu erhalten sollte das HDMI Kabel kürzer als 15 Meter sein ...

Страница 102: ...100 Kapitel 3 Anschließen von Geräten an Ihren Computer Deutsch ...

Страница 103: ...enkel zu entspannen Verwenden Sie falls erforderlich eine Fussablage um Ihre Knie anzuheben Stellen Sie die Rücklehne Ihres Stuhls ein so dass die Unterseite Ihres Rückgrats fest abgestützt und etwas nach hinten gewinkelt wird Sitzen Sie aufrecht so dass Ihre Knie Ellbogen und Hüften beim Sitzen vor dem PC in etwa einen 90º Winkel bilden Stellen Sie den Monitor direkt vor Ihnen auf und passen die ...

Страница 104: ...herkarte entfernen So verwenden Sie eine Speicherkarte 1 Stecken Sie eine Speicherkarte in den Kartensteckplatz 2 Wählen Sie im AutoPlay Fenster ein Programm um auf die Dateien zuzugreifen Falls AutoPlay auf Ihren Computer NICHT aktiviert ist klicken Sie in der Taskleiste von Windows 7 auf die Start Taste klicken Sie auf Arbeitsplatz Computer und doppelklicken Sie das Speicherkartensymbol um auf d...

Страница 105: ...ugreifen Optischen Datenträger entfernen So entfernen Sie einen optischen Datenträger 1 Folgen Sie einer der folgenden Vorgehensweisen um das Laufwerksfach auszuwerfen Drücken Sie die Auswurfstaste Klicken Sie im Fenster Arbeitsplatz Computer mit rechten Maustaste auf das Laufwerkssymbol und wählen Sie Auswerfen Eject 2 Entfernen Sie den Datenträger aus dem Laufwerksfach Falls AutoPlay auf Ihren C...

Страница 106: ...nzuhalten 4 Vergrößert die Bildgröße in Windows Photo Viewer 15 Fn F10 drücken um die Wiedergabe in Windows Media Player zu stoppen 5 F1 F12 Tastenfunktionen 16 Fn F11 drücken um in Windows Media Player zum vorherigen Titel zu gelangen 6 Fn F1 drücken um Microsoft Word zu starten 17 Fn F12 drücken um in Windows Media Player zum nächsten Titel zu gelangen 7 Fn F2 drücken um Microsoft Excel zu start...

Страница 107: ... Player aufrufen 5 Systemlautstärke verringern 6 Systemlautstärke vergrößern 7 Schaltet die Lautstärke zwischen stumm an 8 Schaltet zwischen den Tasten F1 F10 zugewiesenen Profilen Die Sonderfunktionstasten funktionieren nur unter den Windows Vista Windows 7 Betriebssystemen Vor der Inbetriebnahme installieren Sie den Tastaturtreiber Hierzu besuchen Sie die Razer Webseite unter www razersupport co...

Страница 108: ...eine beliebige Taste um Ihren Computer aufzuwecken und den vorherigen Betriebszustand herzustellen 8 Systemlautstärke vergrößern 2 Begibt sich zur letzten von Ihnen betrachteten Seite 9 Schaltet die Lautstärke zwischen stumm an 3 Begibt sich zur nächsten von Ihnen zuvor betrachteten Seite 10 Den vorherigen Titel in Media Player aufrufen 4 Ladet die Startseite in Windows Internet Explorer 11 Wieder...

Страница 109: ...ibung 1 Schaltet die Lautstärke zwischen stumm an 2 Systemlautstärke verringern 3 Systemlautstärke vergrößern ASUS KB34211 modern Kabeltastatur 1 2 3 Die Sonderfunktionstasten funktionieren nur unter den Windows Vista Windows 7 XP Betriebssystemen ...

Страница 110: ...108 Kapitel 4 Computer verwenden Deutsch ...

Страница 111: ... 45 Kabel 2 Verbinden Sie ein Ende des RJ 45 Kabels mit dem LAN RJ 45 Anschluss auf der Rückseite Ihres Computers und das andere Ende mit dem DSL Kabelmodem Beziehen Sie sich auf die Dokumentation die mit Ihrem DSL Kabelmodem geliefert wurde 3 Schalten sie den DSL Kabelmodem und Ihren Computer ein 4 Konfigurieren Sie die nötigen Einstellungen für die Internetverbindung Für Details und Hilfestellun...

Страница 112: ... 45 Kabels mit dem LAN RJ 45 Anschluss auf der Rückseite Ihres Computers und das andere Ende mit dem Internet LAN 2 Schalten sie den Computer ein 3 Konfigurieren Sie die nötigen Einstellungen für die Internetverbindung Für Details und Hilfestellung zur Einrichtung einer Internetverbindung wenden Sie sich an Ihren Internetdienstanbieter ISP DVI HDMI RJ 45 cable LAN ...

Страница 113: ... mit einem drahtlosen Zugriffspunkt AP verbinden So verbinden Sie sich mit dem Drahtlosnetzwerk 1 Klicken Sie im Infobereich auf das Netzwerksymbol um verfügbare Drahtlosnetzwerke anzuzeigen 2 Wählen Sie ein Drahtlosnetzwerk mit dem Sie sich verbinden möchten und klicken Sie auf Verbinden Connect 3 Sie müssen evtl einen Sicherheitsschlüssel für eine verschlüsselte Drahtlosverbindung eingeben klick...

Страница 114: ...112 Kapitel 5 Einrichten der Internetverbindung Deutsch ...

Страница 115: ...ein Hilfsprogramm welches Ihnen schnellen Zugriff auf oft verwendete Anwendungen ermöglicht AI Manager installieren So installieren Sie AI Manager 1 Legen Sie die Support DVD in das optische Laufwerk Die DVD zeigt automatisch das Menü Treiber Driver an wenn Autorun auf Ihrem Computer aktiviert ist Falls Autorun deaktiviert ist doppelklicken Sie die Datei setup exe im Ordner ASUS AI Manager auf der...

Страница 116: ...ten Seite anzeigen Elemente auf der linken Seite anzeigen Hauptfenster Meine Favoriten Support Information Schließen Vollbild Minimieren AI Disk AI Disk ermöglicht Ihnen das einfache Löschen der temporären Internetdateien IE URLs IE Cookies IE Verlaufliste oder Papierkorb Klicken Sie in der Schnellstartleiste auf das Symbol AI Disk um das Hauptfenster des AI Disk anzuzeigen und die Elemente die Si...

Страница 117: ...chwindigkeit Fan Speed und wählen Sie ein Element um es zu aktivieren und den Wert durch verschieben des Reglers zu ändern Meine Favoriten My Favorites Meine Favoriten ermöglicht Ihnen Anwendungen die Sie öfter benutzen hinzuzufügen um diese schneller zu finden So fügen Sie eine Anwendung hinzu 1 Klicken Sie auf Hinzufügen Add und wählen Sie dann die Anwendung die Sie zu Meine Favoriten My Favorit...

Страница 118: ...er Windows Taskleiste auf das ASUS EPU 4 Symbol ASUS EPU 4 installieren So installieren Sie ASUS EPU 4 Engine 1 Legen Sie die Support DVD in das optische Laufwerk Die DVD zeigt automatisch das Menü Treiber Driver an wenn Autorun auf Ihrem Computer aktiviert ist Falls Autorun deaktiviert ist doppelklicken Sie die Datei setup exe im Ordner ASUS EPU 4 Engine auf der Support DVD 2 Klicken Sie auf ASUS...

Страница 119: ... 2 VGA Kartenstatus VGA card status Zeigt den Status der Grafikkarte an Falls Ihre Grafikkarte mit dem Motherboard inkompatibel ist erscheint die Nachricht Keine VGA Karte erkannt No VGA card detected Für kompatible VGA Karten beziehen Sie sich auf die ASUS Liste Qualifizierter Anbieter für VGA unter http event asus com mb EPU 4_Engine 1 2 3 4 5 7 8 9 10 6 ...

Страница 120: ...kennung der CPU Eigenschaften für eine optimale Energieverwaltung 9 Erweiterte Einstellungen Setting Hier klicken um die Moduseigenschaften zu konfigurieren Für weitere Details beziehen Sie sich auf den Abschnitt Erweiterte Einstellungen 10 Modi Automatikmodus Auto Mode Bei der Auswahl des Modus wird das System den Modus automatisch und je nach aktuellen Systemstatus einstellen Hochleistungsmodus ...

Страница 121: ...t die Spannung auf möglichst niedrigstes Niveau um CPU Verbrauch zu minimieren Medium Senkt die Spannung auf ein Mittelwert Small Gering Senkt die Spannung um einen geringen Wert Turn Off hard disks Festplatten Ausschalten Schaltet Festplattenlaufwerke ab wenn nach einer gewisser Zeit auf die Laufwerke nicht zugegriffen wird CPU Loadline Bestimmt die CPU loadline um den CPU Energieverbrauch zu ver...

Страница 122: ...BIOS 1 Starten Sie das Programm ASUS Update unter Windows indem Sie auf Start Alle Programme All Programs ASUS ASUSUpdate ASUSUpdate klicken 2 Wählen Sie in der Dropdownliste eine der folgenden Methoden Aktualisieren über das Internet Updating from the Internet a Wählen Sie BIOS über das Internet aktualisieren Update BIOS from the Internet und klicken dann auf Weiter Next b Wählen Sie den Ihnen am...

Страница 123: ...Sie dann auf Weiter Next 4 Wählen Sie BIOS über eine Datei aktualisieren Update BIOS from a file in der Dropdownliste und klicken Sie dann auf Weiter Next 5 Wenn Sie dazu aufgefordert werden suchen Sie die neue BIOS Datei und klicken Sie dann auf Weiter Next Es erscheint das ASUS MyLogo Fenster 6 Wählen Sie in der linken Fensterhälfte ein Bild das Sie als Boot Logo verwenden möchten Klicken Sie au...

Страница 124: ...tzufahren 6 Wählen Sie Ich akzeptiere die Lizenzbedingungen I accept the License Conditions Wenn soweit klicken Sie auf Weiter Next 7 Wählen Sie Typisch Typical und klicken Sie dann auf Weiter Next 8 Wählen Sie Ja ich möchte Anwendungsdaten anonym an Nero senden Yes I want to help by sending anonymous application data to Nero und klicken Sie Weiter Next 9 Wenn abgeschlossen klicken Sie auf Beenden...

Страница 125: ...ederherstellungspartition wurde werkseitig erstellt und kann wenn vom Benutzer gelöscht NICHT wieder hergestellt werden Bringen Sie Ihr Desktop PC zum ASUS Kundendienst wenn Sie mit der Wiederherstellung Probleme haben Verwenden der Wiederherstellungspartition 1 Drücken Sie während des Starvorgangs F9 2 Drücken Sie die Eingabetaste um Windows Setup EMS Enabled zu wählen 3 Wählen Sie eine der folge...

Страница 126: ... PC neu und drücken Sie beim Boot Vorgang auf die Taste F8 und wählen Sie das optische Laufwerk eventuell als CD DVD bezeichnet Drücken Sie die Eingabetaste um von der Wiederherstellungs DVD zu booten 3 Wählen OK um die Wiederherstellung des Abbild Image zu starten 4 Wählen OK um die Systemwiederherstellung zu bestätigen Die Wiederherstellung überschreibt alle Daten in Ihrer Festplatte Vergewisser...

Страница 127: ...icht reagierende Programm und klicken Sie auf Task beenden End Task Falls die Tastatur nicht reagiert drücken und halten Sie die Einschalttaste bis der Computer sich ausschaltet Drücken Sie erneut auf die Einschalttaste um ihn wieder zu starten Ich kann mich mit der ASUS WLAN Karte nicht mit dem Drahtlos Netzwerk verbinden nur an bestimmten Modellen Stellen Sie sicher dass Sie für das gewünschte N...

Страница 128: ...auf Ihrem Computer installiert ist sollten die Monitore mit den Ausgängen der Grafikkarte verbunden sein Prüfen Sie ob die Einstellungen für mehrere Anzeigegeräte korrekt sind Für Details beziehen Sie sich auf den Abschnitt Anschließen von mehreren externen Anzeigegeräten in Kapital 3 Mein Computer kann meinen USB Datenträger nicht erkennen Beim ersten Verbinden eines USB Datenträgers mit Ihrem Co...

Страница 129: ...s die Lautsprecher mit dem Line Out Anschluss Hellgrün auf der Vorderseite oder Rückseite verbunden sind Prüfen Sie ob die Lautsprecher an die Stromversorgung angeschlossen und eingeschalten sind Passen Sie die Lautstärke Ihrer Lautsprecher an Stellen Sie sicher dass die Lautstärke des Systems nicht stummgeschaltet ist Falls stummgeschaltet erscheint das Lautstärkesymbol als Um Lautstärke zu aktiv...

Страница 130: ...angeschlossen Stellen sie sicher dass das Stromkabel sachgemäß angeschlossen ist Verwenden Sie ein anderes passendes Stromkabel Probleme mit dem Netzteil PSU Power supply unit Versuchen Sie ein anderes Netzteil anzuschließen Anzeige Problem Mögliche Ursachen Maßnahmen Keine Anzeige nachdem der Computer eingeschaltet wurde Schwarzes Bildschirm Das Signalkabel ist nicht mit dem richtigen VGA Anschlu...

Страница 131: ...ng Durch Antivirus Software verursachte Probleme Schließen Sie die Antivirus Software Probleme mit Treibern Reinstallieren Sie die LAN Treiber Audio Problem Mögliche Ursachen Maßnahmen Kein Audio Lautsprecher oder Kopfhörer sind nicht richtig angeschlossen Beziehen Sie sich für die richtigen Anschlusspositionen auf das Benutzerhandbuch Trennen und Verbinden Sie den Lautsprecher mit Ihrem Computer ...

Страница 132: ...riebsausfall des Festplattenlaufwerks Senden Sie das beschädigte Festplattenlaufwerk zur reparatur an den ASUS Kundendienst Ersetzen Sie es durch ein neues Festplattenlaufwerk Probleme mit Speichermodulen Ersetzen Sie diese mit passenden kompatiblen Speichermodulen Entfernen Sie die nachträglich eingebauten Speichermodule und versuchen Sie es erneut Der Luftstrom zur Kühlung Ihres Computers ist un...

Страница 133: ...e BIOS Version herunterzuladen Hoher Geräusch pegel beim Com puterbetrieb Der CPU Lüfter wurde ersetzt Stellen Sie sicher dass Sie einen kompatiblen oder von ASUS empfohlenen CPU Lüfter verwenden Der Luftstrom zur Kühlung Ihres Computers ist unzureichend Stellen Sie den Computer an einem Platz mit besserer Luftzirkulation auf Systemtemperatur ist zu hoch Aktualisieren Sie das BIOS Falls Sie mit de...

Страница 134: ...tzung Telefon 1 812 282 2787 Support Fax 1 812 284 0883 Online Support support asus com ASUS COMPUTER GmbH Deutschland und Österrreich Adresse Harkort Str 21 23 D 40880 Ratingen Germany Fax 49 2102 959911 Webseite www asus de Online Kontakt www asus de sales Technische Unterstützung Telefon Komponenten 49 1805 010923 Telefon System Notebook Eee LCD 49 1805 010920 Support Fax 49 2102 9599 11 Online...

Страница 135: ...Ordinateur de bureau ASUS Essentio CM1730 Manuel de l utilisateur ...

Страница 136: ...LIER EN AUCUN CAS ASUS SES DIRECTEURS CADRES EMPLOYES OU AGENTS NE POURRONT ÊTRE TENUS POUR RESPONSABLES POUR TOUT DOMMAGE INDIRECT SPECIAL SECONDAIRE OU CONSECUTIF INCLUANT LES DOMMAGES POUR PERTE DE PROFIT PERTE DE COMMERCE PERTE D UTILISATION DE DONNEES INTERRUPTION DE COMMERCE ET EVENEMENTS SEMBLABLES MEME SI ASUS A ETE INFORME DE LA POSSIBILITE DE TELS DOMMAGES PROVENANT DE TOUT DEFAUT OU ERR...

Страница 137: ...hiers et vos dossiers 154 Restaurer le système 156 Protéger votre ordinateur 157 Centre d Aide et support Windows 158 Chapitre 3 Connecter des périphériques Connecter un périphérique de stockage USB 159 Connecter un microphone ou un système de haut parleurs 160 Connecter plusieurs périphériques d affichage 163 Connecter un téléviseur HD 165 Chapitre 4 Utiliser votre ordinateur Posture recommandée ...

Страница 138: ... des matières Chapitre 6 Utiliser les utilitaires ASUS AI Manager 179 ASUS EPU 4 Engine 182 ASUS Update 186 ASUS MyLogo2 187 Nero 9 188 Restaurer le système 189 Chapitre 7 Dépannage Dépannage 191 Informations de contact ASUS 198 ...

Страница 139: ...ut irradier de l énergie à fréquence radio et si non installé et utilisé selon les instructions du fabricant peut causer une interférence nocive aux communications radio Cependant il n est pas exclu qu une interférence se produise lors d une installation particulière Si cet équipement cause une interférence nuisible au signal radio ou télévisé ce qui peut être déterminé par l arrêt puis le réamorç...

Страница 140: ...mément aux régulations d interférence par radio établies par le département canadien des communications Cet appareil numérique de la classe B est conforme à la norme ICES 003 du Canada Note relative aux produits de Macrovision Corporation Ce produit comprend une technologie de protection de copyright protégée par certains brevets déposés aux U S A et autres droits de propriété intellectuelle appar...

Страница 141: ...age Avertissement de sécurité concernant la batterie NE PAS jeter au feu NE PAS court circuiter les contacts NE PAS désassembler la batterie Utilisez ce produit dans des environnements dont la température ambiante est comprise entre 0 C 32 F et 35 C 95 F NE PAS bloquer les ouvertures destinées à la ventilation de l ordinateur pour éviter que celui ci ne surchauffe NE PAS utiliser un cordon d alime...

Страница 142: ...additionnelles destinées à certaines situations spécifiques IMPORTANT Instructions que vous devez suivre pour terminer une tâche Où trouver plus d informations Consultez les sources suivantes pour plus d informations ou pour la mise à jour du produit et ou des logiciels Sites Web ASUS Le site Web ASUS offre des informations à jour sur le matériel ASUS et sur les logiciels afférents Reportez vous a...

Страница 143: ...es à titre indicatif Les spécifications du produit peuvent varier en fonction des modèles Ordinateur de bureau ASUS Essentio Clavier x1 Souris x1 Installation Guide Cordon d alimentation x1 Guide d installation x1 Carte de garantie x1 Logiciel de gravure de DVD Nero 9 x1 DVD de support optionnel x1 DVD de restauration optionnel x1 Antennes optionnel x2 ...

Страница 144: ...142 Français ...

Страница 145: ...ie une fiabilité sans faille et des utilitaires variés et conviviaux Le tout dans un boîtier au style futuriste et stylisé Faire connaissance avec votre ordinateur Panneau avant Les illustrations sont uniquement données à titre indicatif Les ports et leur emplacement ainsi que la couleur du châssis peuvent varier en fonction des modèles Lisez la carte de garantie ASUS avant de configurer votre ord...

Страница 146: ...ppuyez pour éjecter le plateau du lecteur optique 5 Fente pour carte Secure Digital MultiMediaCard Insérez une carte mémoire Secure Digital ou MultiMediaCard dans cette fente Fente pour carte Memory Stick Memory Stick Pro Insérez une carte mémoire Memory Stick Memory Stick Pro dans cette fente Fente pour carte Extreme Digital Insérez une carte mémoire Extreme Digital dans cette fente 6 Bouton d al...

Страница 147: ... 9 Port VGA Ce port permet de connecter un moniteur VGA ou tout autre équipement doté d un connecteur VGA 10 Ports USB 3 0 Ces ports USB Universal Serial Bus 3 0 permettent de connecter des périphériques disposant de ports USB 3 0 11 Ports USB 2 0 Ces ports USB Universal Serial Bus 2 0 permettent de connecter des périphériques disposant de ports USB 2 0 souris imprimante PDA appareil photo 12 Port...

Страница 148: ...figurations audio 2 4 6 et 8 canaux Port Casque 2 canaux 4 canaux 6 canaux 8 canaux Bleu clair Entrée audio Entrée audio Entrée audio Entrée audio Vert Sortie audio Sortie haut parleurs avants Sortie haut parleurs avants Sortie haut parleurs avants Rose Entrée micro Entrée micro Entrée micro Entrée micro Orange Haut parleur central Caisson de basse Haut parleur central Caisson de basse Noir Sortie...

Страница 149: ...d alimentation Connecter un moniteur externe Utiliser la carte graphique ASUS disponible sur une sélection de modèles Pour connecter un moniteur externe à la carte graphique ASUS 1 Connectez votre moniteur à l un des ports d affichage de la carte graphique ASUS 2 Connectez le moniteur à une source d alimentation Les ports d affichage de la carte graphique ASUS peuvent varier en fonction des modèle...

Страница 150: ...ecter plusieurs moniteurs à votre ordinateur consultez la section Connecter plusieurs périphériques d affichage du Chapitre 3 de ce manuel pour plus de détails Utiliser les ports d affichage de la carte mère Pour connecter un moniteur externe à l un des ports d affichage de la carte mère 1 Connectez un moniteur VGA au port VGA ou un moniteur DVI D au port DVI D ou un moniteur HDMI au port HDMI loc...

Страница 151: ...vier et ou une souris USB aux ports USB situés à l arrière de votre ordinateur Connecter le cordon d alimentation Connectez une extrémité du cordon d alimentation au connecteur d alimentation situé à l arrière de votre ordinateur et l autre extrémité à une prise électrique DVI HDMI DVI HDMI ...

Страница 152: ...terrupteur d alimentation sur la position I 2 Allumez votre moniteur 3 Appuyez sur le bouton d alimentation pour mettre en route l ordinateur Éteindre votre ordinateur Pour éteindre votre ordinateur 1 Fermez toutes les applications en cours d exécution 2 Cliquez sur dans le Bureau de Windows 3 Cliquez sur pour fermer le système d exploitation 4 Patientez le temps que le système d exploitation se c...

Страница 153: ...et nom de l ordinateur Cliquez sur Suivant 5 Entrez les informations nécessaires à la configuration du mot de passe puis cliquez sur Suivant Vous pouvez aussi cliquer sur Suivant pour ignorer cette étape 6 Lisez attentivement les termes du contrat de licence Cochez J accepte les termes du contrat de licence puis cliquez sur Suivant 7 Sélectionnez Utiliser les paramètres recommandés ou Installer un...

Страница 154: ...alité Mise en route du menu Démarrer contient des informations sur les tâches de base comme la personnalisation de Windows l ajout de nouveaux utilisateurs et le transfert de fichiers pour vous aider à vous familiariser avec Windows 7 Pour utiliser la fonctionnalité Mise en route 1 Dans la barre des tâches de Windows cliquez sur l icône Démarrer pour ouvrir le menu Démarrer 2 Sélectionnez Mise en ...

Страница 155: ...tte liste Épingler des programmes au menu Démarrer ou à la barre des tâches Pour épingler des programmes au menu Démarrer ou à la barre des tâches 1 Dans la barre des tâches de Windows cliquez sur l icône Démarrer pour ouvrir le menu Démarrer 2 Faites un clic droit sur l élément à épingler au menu Démarrer ou à la barre des tâches 3 Sélectionnez Épingler à la barre des tâches ou Épingler au menu D...

Страница 156: ...rtez vous à la section Utiliser le Centre de maintenance Windows de ce chapitre Personnaliser les icônes et les notifications Vous pouvez choisir d afficher ou de masquer les icônes et les notifications de la barre des tâches ou de la zone de notification Pour personnaliser les icônes et les notifications 1 Dans la zone de notification cliquez sur l icône 2 Cliquez sur Personnaliser 3 Dans le menu...

Страница 157: ...d affichage à utiliser Vous pouvez aussi cliquer n importe où sur le volet d affichage cliquer sur Affichage et sélectionner le type d affichage désiré Organiser vos fichiers Pour organiser vos fichiers 1 Lancez Windows Explorer 2 Dans le champ Organiser par cliquez pour afficher le menu déroulant 3 Sélectionnez le type d organisation désiré Trier vos fichiers Pour trier vos fichiers 1 Lancez Wind...

Страница 158: ... date et heure Cette fonction vous permet de restaurer ou annuler les modifications apportées au système sans que ce la n affecte vos données personnelles Pour restaurer votre système 1 Fermez toutes les applications en cours d exécution 2 Cliquez sur Tous les programmes Accessoires Outils système Restauration du système 3 Suivez les instructions apparaissant à l écran pour terminer le processus d...

Страница 159: ...Windows Update Windows Update vous permet de vérifier et installer les dernières mises à jour pour améliorer la sécurité et les performances de votre ordinateur Lancer Windows Update Pour ouvrir Windows Update 1 Dans la barre des tâches de Windows cliquez sur l icône Démarrer pour ouvrir le menu Démarrer 2 Sélectionnez Tous les rogrammes Windows Update 3 À partir de l écran de Windows Update sélec...

Страница 160: ... essai de 60 jours avant que le logiciel n expire L achat d une clé de licence est nécessaire une fois la période d essai terminée Pour activer Trend Micro Internet Security 1 Exécutez l application Trend Micro Internet Security 2 Lisez attentivement les termes de la licence Cliquez sur Agree Activate 3 Entrez votre adresse e mail et sélectionnez votre emplacement géographique Cliquez sur Suivant ...

Страница 161: ...E PAS retirer le périphérique de stockage USB lorsque des données sont en cours de transfert Le faire peut causer la perte de données ou endommager le périphérique de stockage USB Connecter un périphérique de stockage USB Cet ordinateur de bureau dispose de ports USB 2 0 1 1 sur les panneaux avant et arrière Les ports USB vous permettent de connecter des périphériques USB tels que des dispositifs ...

Страница 162: ...Cet ordinateur de bureau intègre un port micro et plusieurs ports audio localisés sur le panneau avant et arrière Les ports audio situés à l arrière de l ordinateur permettent de configurer un système de haut parleurs à 2 4 6 ou 8 canaux Connecter un casque audio ou un micro Connecter un système de haut parleurs 2 0 ...

Страница 163: ...Français ASUS CM1730 161 Français Connecter un système de haut parleurs 4 1 Connecter un système de haut parleurs 6 1 ...

Страница 164: ...162 Chapitre 3 Connecter des périphériques Français Français Connecter un système de haut parleurs 8 1 ...

Страница 165: ...s Pour configurer plusieurs affichages 1 Éteignez votre ordinateur 2 Connectez les deux moniteurs à l ordinateur et les cordons d alimentation aux moniteurs Voir section Configurer votre ordinateur du chapitre 1 pour plus de détails sur la connexion d un moniteur à votre ordinateur Lorsqu une carte graphique est installée sur votre ordinateur connectez les moniteurs sur les ports de sortie intégré...

Страница 166: ...r 1 2 sélectionnez cette option pour n afficher le contenu que sur l un des deux moniteurs Supprimer cet affichage sélectionnez cette option pour supprimer l affichage sélectionné 6 Cliquez sur Appliquer ou OK puis cliquez sur Conserver les modifications à l apparition du message de confirmation 3 Allumez votre ordinateur 4 Suivez l une des méthodes suivantes pour ouvrir l écran Résolution d écran...

Страница 167: ...n téléviseur Haute Définition HDTV par le biais du port HDMI Vous devez faire l achat d un câble HDMI pour connecter un téléviseur HD à votre ordinateur Le câble HDMi est vendu séparément Pour obtenir une qualité d image optimale utilisez un câble HDMI d une longueur inférieure à 15 mètres ...

Страница 168: ...166 Chapitre 3 Connecter des périphériques Français ...

Страница 169: ...Si nécessaire utilisez un repose pied pour surélever le niveau de vos genoux Ajustez le dossier de votre chaise de telle sorte que la base de votre colonne vertébral soit fermement supportée et légèrement inclinée vers l arrière Maintenez vous droit avec vos genoux coudes et hanches à un angle approximatif de 90º lorsque vous faites face à votre ordinateur Placez le moniteur directement en face de...

Страница 170: ...re Pour utiliser une carte mémoire 1 Soulevez le capot situé en façade 2 Insérez la carte dans la fente appropriée à votre format de carte mémoire 3 Sélectionnez l action à effectuer lors de l apparition de la fenêtre d Exécution automatique pour accéder à vos fichiers Si l Exécution automatique n est pas activée sur votre ordinateur cliquez d abord sur le bouton Démarrer de la barre des tâches de...

Страница 171: ...xécution automatique pour accéder à vos fichiers Retirer un disque optique Pour retirer un disque optique 1 Lorsque votre ordinateur est allumé effectuez l une des actions suivantes pour ouvrir le plateau du lecteur optique Appuyez sur le bouton d éjection Faites un clic droit sur l icône du lecteur CD DVD de l écran Ordinateur puis cliquez sur Éjecter 2 Retirez le disque du plateau Si l Exécution...

Страница 172: ...ez sur Fn F9 pour lire ou suspendre la lecture sous Windows Media Player 4 Augmente la taille des photos ouvertes avec la Visionneuse de photos Windows 15 Appuyez sur Fn F10 pour arrêter la lecture sous Windows Media Player 5 Fonctionne avec les touches F1 F12 16 Appuyez sur Fn F11 pour aller à la piste précédente sous Windows Media Player 6 Appuyez sur Fn F1 pour lancer Microsoft Word 17 Appuyez ...

Страница 173: ...ecture d un fichier multimédia 3 Piste précédente 4 Piste suivante 5 Volume 6 Volume 7 Active désactive le son 8 Changement de profil via les touches F1 F10 Les touches de fonction spéciales ne fonctionnent que sous Windows XP Vista 7 Installez le pilote du clavier avant de l utiliser Visitez le site Web Razer sur www razersupport com pour télécharger le pilote ...

Страница 174: ...térieure avant d utiliser les touches Internet Touches Description Touches Description 1 Bascule en mode veille Appuyez sur une touche quelconque pour sortir l ordinateur du mode veille 8 Volume 2 Retourne à la page précédente 9 Active désactive le son 3 Retourne à la page suivante 10 Piste précédente 4 Ouvre la page d acceuil par défaut de Windows Internet Explorer 11 Lecture ou pause d un fichie...

Страница 175: ...0 173 Français Raccourcis Description 1 Active ou désactive le son 2 Baisse le volume 3 Augmente le volume Clavier filaire ASUS KB34211 1 2 3 Les touches de fonction spéciales fonctionnent sous Windows Vista Windows 7 XP ...

Страница 176: ...174 Chapitre 4 Utiliser votre ordinateur Français ...

Страница 177: ... à un réseau local 2 Connectez une extrémité du câble RJ 45 au port réseau RJ 45 situé à l arrière de votre ordinateur et l autre extrémité à un modem câble ADSL Pour plus de détails reportez vous à la documentation accompagnant votre modem câble ADSL 3 Allumez le modem câble ADSL et votre ordinateur 4 Configurez les paramètres de connexion Internet appropriés Contactez votre FAI Fournisseur d acc...

Страница 178: ...rémité du câble RJ 45 au port réseau RJ 45 situé à l arrière de votre ordinateur et l autre extrémité au hub réseau de votre réseau local 2 Allumez votre ordinateur 3 Configurez les paramètres de connexion Internet appropriés Contactez votre administrateur réseau pour toute assistance ou détails sur la configuration de votre connexion Internet Câble RJ 45 Réseau local ...

Страница 179: ...ment Pour établir une connexion sans fil vous devez connecter l ordinateur à un point d accès sans fil Pour connecter l ordinateur à un réseau sans fil 1 Cliquez sur l icône réseau de la zone de notification pour afficher une liste des réseaux sans fil disponibles 2 Sélectionnez le réseau sans fil auquel vous souhaitez établir une connexion puis cliquez sur Connecter 3 Il se peut qu il vous soit d...

Страница 180: ...178 Chapitre 5 Se connecter à Internet Français ...

Страница 181: ...r AI Manager 1 Placez le DVD de support dans votre lecteur optique Si l Exécution automatique est activée l assistant d installation des pilotes apparaît Si l Exécution automatique est désactivée sur votre ordinateur localisez le fichier setup exe contenu dans le dossier ASUS AI Manager du DVD de support 2 Cliquez sur l onglet Utilitaires puis cliquez sur ASUS AI Manager 3 Suivez les instructions ...

Страница 182: ...her les éléments à gauche Princicpal Mes favoris Support Fermer Basculer en mode complet Réduire Informations AI Disk AI Disk permet d effacer les fichiers temporaires les cookies les URL et l historique de Internet Explorer ou de vider la corbeille Cliquez sur l icône AI Disk de la barre de lancement rapide pour afficher la fenêtre complète de AI Disk et sélectionnez les éléments à supprimer Cliq...

Страница 183: ... sélectionner un élément à activer Modifiez en la valeur en faisant glisser le curseur vers la droite ou la gauche Mes favoris Mes favoris vous permet d ajouter à la liste de vos favoris les applications que vous utilisez le plus fréquemment afin d en faciliter l accès Pour ajouter une application 1 Cliquez sur Ajouter puis localisez l application à ajouter à la liste de vos favoris 2 Cliquez sur ...

Страница 184: ... ASUS EPU 4 Pour installer ASUS EPU 4 Engine sur votre ordinateur 1 Placez le DVD de support dans le lecteur optique L onglet d installation des pilotes apparaît si vous avez activé l Exécution automatique Si l Éxecution automatique et désactivée double cliquez sur le fichier setup exe contenu dans le dossier ASUS EPU 4 Engine du DVD de support 2 Cliquez sur ASUS EPU 4 Engine 3 Suivez les instruct...

Страница 185: ... État de la carte graphique Affiche l état de la carte graphique Si votre carte graphique n est pas compatible avec la carte mère le message No VGA card detected Aucune carte graphique détectée apparaît Reportez vous à la liste des fabricants de cartes graphiques agréés à l adresse http event asus com mb EPU 4_Engine pour obtenir la liste des cartes graphiques prises en charge ...

Страница 186: ...PU pour une gestion optimale de l alimentation 9 Bouton Setting Paramètres Cliquez sur ce bouton pour configurer les paramètres de chaque mode Reportez vous à la section Menu de configuration pour plus de détails 10 Modes Mode Auto Lorsque vous sélectionnez ce mode l utilitaire modifie automatiquement le mode de fonctionnement en fonction de l état actuel du système Mode Hautes performances Lorsqu...

Страница 187: ...ue légèrement le voltage à son niveau le plus bas Moyenne diminue le voltage à un niveau moyen Maximum diminue le voltage à son niveau le plus bas Arrêt des disques durs après le délai spécifié le système désactive le s disque s dur s CPU Loadline configure la ligne de charge du CPU pour réaliser des économies d énergie Minimum économies d énergie minimales Moyenne économies d énergie moyennes Max...

Страница 188: ...dows avant de mettre à jour le BIOS en utilisant cet utilitaire Mise à jour du BIOS Pour mettre à jour le BIOS 1 Dans le Bureau de Windows cliquez sur Démarrer tous les programmes ASUS ASUS Update ASUS Update pour lancer l utilitaire ASUS Update 2 Dans le menu déroulant sélectionnez l une des méthodes de mise à jour Mise à jour via Internet a Sélectionnez Mettre à jour le BIOS à partir d Internet ...

Страница 189: ...lectionnez Mettre à jour le BIOS à partir d un fichier dans le menu déroulant puis cliquez sur Suivant 5 Lorsqu on vous le demande localisez le nouveau fichier BIOS puis cliquez sur Suivant La fenêtre d ASUS MyLogo apparaît 6 Dans le volet de gauche choisissez le dossier qui contient l image que vous voulez utiliser en guise de logo de démarrage puis cliquez sur Suivant 7 Ajustez l image de démarr...

Страница 190: ... installer Nero 9 1 Insérez le DVD de Nero 9 DVD dans votre lecteur optique 2 Si l Exécution automatique est activée le menu principal apparaît automatiquement à l écran Si l Exécution automatique est désactivée sur votre ordinateur localisez le fichier SeupX exe contenu dans le répertoire principal du DVD de Nero 9 3 Dans le menu principal cliquez sur Nero 9 Essentials 4 Sélectionnez la langue de...

Страница 191: ...ition de restauration a été créée à l usine et ne peut être restaurée par l utilisateur si elle est effacée Apportez votre PC portable à un service après vente agréé par ASUS si vous rencontrez des problèmes lors de la procédure de restauration Utiliser la partition de restauration 1 Appuyez sur F9 pendant le démarrage 2 Appuyez sur Entrée pour sélectionner Windows Setup EMS Enabled 3 Sélectionnez...

Страница 192: ...Redémarrez l ordinateur et appuyez sur Echap au démarrage puis sélectionnez le lecteur optique apparaît normalement comme CD DVD grâce au curseur Appuyez ensuite sur Entrée pour démarrer à partir du DVD de Restauration 3 Sélectionnez OK pour lancer la restauration de l image 4 Sélectionnez OK pour lancer la restauration du système La restauration supprimera les données de votre disque dur Assurez ...

Страница 193: ...let Applications 3 Sélectionnez le programme à fermer puis cliquez sur Fin de tâche Si le clavier est défaillant maintenez enfoncé le bouton d alimentation du châssis jusqu à ce que l ordinateur s éteigne Puis appuyez de nouveau sur le bouton d alimentation pour le rallumer Je ne peux pas me connecter à un réseau sans fil via une carte réseau sans fil ASUS disponible sur une sélection de modèles A...

Страница 194: ...ous Windows Si votre ordinateur intègre une carte graphique assurez vous que votre moniteur est correctement connecté au port de sortie vidéo de la carte Vérifiez les paramètres d affichage Voir section Connecter plusieurs périphériques d affichage du Chapitre 3 pour plus de détails L ordinateur ne détecte pas le périphérique de stockage USB externe Lors de la première connexion de votre périphéri...

Страница 195: ...eurs n émet pas de son Assurez vous d avoir connecté votre système de haut parleurs au port de sortie audio vert situé en façade ou à l arrière du châssis Vérifiez votre système de haut parleurs est connecté à une source d alimentation et allumé Ajustez le volume de votre système de haut parleurs Assurez vous que le son de votre ordinateur n a pas été désactivé Si le son a été désactivé l icône de...

Страница 196: ...on est correctement raccordé Utilisez un autre cordon d alimentation Dysfonctionnement du bloc d alimentation Essayez d installer un autre bloc d alimentation dans le châssis de l ordinateur Affichage Problème Raison possible Action Aucun affichage après la mise en route de l ordinateur écran noir Le câble de signal vidéo n est pas connecté au port d affichage approprié de votre ordinateur Connect...

Страница 197: ...appropriés Problème causé par un logiciel anti virus Fermez le logiciel anti virus Problème de pilote logiciel Réinstallez le pilote réseau Audio Problème Raison possible Action Pas de son Le système de haut parleurs ou le casque audio est connecté au mauvais port audio Reportez vous au manuel d utilisation de l ordinateur pour localiser l emplacement de chaque port audio Déconnectez puis reconnec...

Страница 198: ...exploitation Le système se bloque fréquemment Dysfonctionnement du disque dur Envoyez le disque dur endommagé au service après vente d ASUS Remplacez le disque dur défectueux Problème causé par les modules mémoire Remplacez les modules mémoire incompatibles Enlevez les modules mémoire additionnels installés Ventilation du système insuffisante Déplacez votre ordinateur dans un endroit offrant une m...

Страница 199: ...télécharger la dernière version du BIOS Système trop bruyant lors de son utilisation Le ventilateur du processeur à été remplacé Assurez vous d utiliser un ventilateur de CPU compatible ou recommandé par ASUS Ventilation insuffisante Déplacez votre ordinateur dans un endroit offrant une meilleure circulation de l air La température du système est trop élevée Mettez le BIOS à jour Si vous savez com...

Страница 200: ...SA Téléphone 1 510 739 3777 Fax 1 510 608 4555 Site Web usa asus com Support technique Téléphone 1 812 282 2787 Support fax 1 812 284 0883 Support en ligne support asus com ASUS France SARL Adresse 10 Allée de Bienvenue 93160 Noisy Le Grand France Téléphone 33 0 1 49 32 96 50 Site Web www france asus com Support technique Téléphone 33 0 8 21 23 27 87 Fax 33 0 1 49 32 96 99 Support en ligne support...

Страница 201: ...Equipo de sobremesa ASUS Essentio CM1730 Manual del usuario ...

Страница 202: ...RESPONSABLES EMPLEADOS O AGENTES SERÁN RESPONSABLES DE NINGÚN DAÑO INDIRECTO ESPECIAL ACCIDENTAL O CONSECUENTE INCLUIDOS AQUÉLLOS DERIVADOS DE PÉRDIDAS DE BENEFICIOS PÉRDIDAS DE OPORTUNIDADES COMERCIALES IMPOSIBILIDAD DE USAR EL EQUIPO PÉRDIDAS DE DATOS INTERRUPCIONES DE LA ACTIVIDAD COMERCIAL Y OTROS PERJUICIOS DE CARÁCTER SIMILAR AÚN CUANDO ASUS HAYA SIDO ADVERTIDA DE LA POSIBILIDAD DE QUE TALES...

Страница 203: ...tección del equipo 223 Uso de la función Help and Support Ayuda y soporte técnico de Windows 224 Capítulo 3 Conexión de dispositivos al equipo Conexión de un dispositivo de almacenamiento USB 225 Conexión de un micrófono y unos auriculares 226 Conexión de varias pantallas externas 229 Conexión de un televisor HDTV 231 Capítulo 4 Uso del equipo Postura correcta durante el uso del PC de sobremesa 23...

Страница 204: ...Índice Capítulo 6 Uso de las utilidades ASUS AI Manager 245 ASUS EPU 4 Engine Motor EPU 4 de ASUS 248 ASUS MyLogo2 253 Nero 9 254 Recuperación del sistema 255 Capítulo 7 Resolución de problemas Resolución de problemas 257 ...

Страница 205: ...iales en una instalación residencial Este equipo genera usa y puede irradiar energía de radiofrecuencia y si no se instala y usa de acuerdo con las instrucciones del fabricante podría causar interferencias perjudiciales para las comunicaciones por radio No es posible no obstante garantizar que no se produzcan interferencias en una instalación particular Si este equipo causa interferencias perjudic...

Страница 206: ...del Departamento Canadiense de Comunicaciones Este aparato digital de Clase B satisface los requisitos de la norma canadiense ICES 003 Aviso de Macrovision Corporation acerca del producto Este producto incorpora una tecnología de protección de los derechos de autor protegida por métodos descritos en ciertas patentes de los EE UU y otros derechos de propiedad intelectual en posesión de Macrovision ...

Страница 207: ...eguridad acerca de la batería NO elimine la batería arrojándola al fuego NO cortocircuite los contactos de la batería NO desmonte la batería Use este producto en entornos sometidos a una temperatura ambiente comprendida entre 0 C 32 F y 35 C 95 F NO cubra los orificios de ventilación del equipo de sobremesa para evitar que el sistema se caliente en exceso NO use cables de alimentación accesorios o...

Страница 208: ...información complementaria que facilitan al usuario la realización de una tarea IMPORTANTE Instrucciones que SE DEBEN respetar al llevar a cabo una tarea Más información Consulte las siguientes fuentes si desea obtener más información o mantenerse al día en cuanto a las actualizaciones del producto y el software Sitios web de ASUS El sitio web de ASUS contiene la información más reciente acerca de...

Страница 209: ... con el software de grabación Nero 9 x 1 Soporte para DVD opcional x1 DVD de recuperación opcional x1 Antena opcional x2 Si alguno de los artículos anteriores falta o se encuentra dañado póngase en contacto con su distribuidor Las ilustraciones de los artículos anteriores deben interpretarse únicamente como referencia Las especificaciones del producto real podrían variar en función del modelo ...

Страница 210: ...208 Español ...

Страница 211: ...enido Gracias por adquirir un equipo de sobremesa ASUS Essentio CM1730 El equipo de sobremesa ASUS Essentio CM1730 desarrolla un elevado rendimiento proporciona la máxima fiabilidad sin compromisos y permite al usuario disfrutar como centro de un útil entorno Todas estas características se concentran en el interior de una atractiva futurista y elegante carcasa Lea la Tarjeta de garantía de ASUS an...

Страница 212: ...ad de disco óptico Pulse este botón para expulsar la bandeja de la unidad de disco óptico 5 Ranura para tarjetas Secure Digital MultiMediaCard Esta ranura admite la inserción de tarjetas Secure Digital MultiMediaCard Ranura para tarjetas Memory Stick Memory Stick Pro Esta ranura admite la inserción de tarjetas Memory Stick Memory Stick Pro Ranura para tarjetas Extreme Digital Inserte una tarjeta E...

Страница 213: ...s de Bus serie universal 3 0 USB 3 0 admiten la conexión de dispositivos USB 3 0 como ratones impresoras escáneres cámaras y PDAs entre otros 11 Puertos USB 2 0 Estos puertos de Bus serie universal 2 0 USB 2 0 admiten la conexión de dispositivos USB 2 0 como ratones impresoras escáneres cámaras y PDAs entre otros 12 Puerto LAN RJ 45 Este puerto permite establecer una conexión Gigabit con una red d...

Страница 214: ...lo 21 Abrazadera de ranura de expansión Retire la abrazadera de la ranura de expansión para instalar una tarjeta de expansión Consulte la tabla de configuración de audio que figura a continuación si desea conocer la función que cumple cada uno de los puertos en las configuraciones de 2 4 6 y 8 canales 13 Puerto de salida de altavoz posterior negro Este puerto permite conectar un altavoz posterior ...

Страница 215: ... tarjeta gráfica ASUS disponible sólo en determinados modelos Conecte el monitor al puerto de salida de pantalla de la tarjeta de gráficos discretos ASUS Para conectar un monitor externo a través de la tarjeta gráfica ASUS 1 Conecte un monitor a uno de los puertos de salida de pantalla de la tarjeta gráfica ASUS 2 Conecte el monitor a una fuente de alimentación Los puertos de salida de pantalla de...

Страница 216: ...erno al equipo consulte el apartado Conexión de varios monitores externos en el Capítulo 3 de este manual Uso de los puertos de salida de pantalla integrados en la placa Conecte el monitor al puerto de salida de pantalla integrado en la placa Para conectar un monitor externo a través de un puerto de salida de pantalla integrado en la placa 1 Conecte un monitor VGA al puerto VGA un monitor DVI D al...

Страница 217: ... USB y un ratón USB a los puertos USB situados en el panel posterior del equipo Conexión del cable de alimentación Conecte un extremo del cable de alimentación al conector de alimentación situado en el panel posterior del equipo y el otro extremo a una fuente de alimentación DVI HDMI DVI HDMI ...

Страница 218: ...talado Encendido del equipo Para encender el equipo 1 Encienda la fuente de alimentación 2 Encienda el monitor 3 Pulse el botón de encendido del equipo Apagado del equipo Para apagar el equipo 1 Cierre todas las aplicaciones en ejecución 2 En el escritorio de Windows haga clic en 3 Haga clic en para cerrar el sistema operativo 4 Espere mientras el sistema se carga automáticamente ...

Страница 219: ...lic en Next Siguiente 5 Introduzca la información necesaria para establecer su contraseña y haga clic en Next Siguiente O bien puede hacer clic en Next Siguiente para omitir este paso sin introducir información 6 Lea detenidamente los términos de la licencia Active la casilla de verificación I accept the license terms Acepto los términos de licencia y haga clic en Next Siguiente 7 Seleccione la op...

Страница 220: ... iniciales El componente Getting Started Tareas iniciales del menú Start Inicio contiene información acerca de ciertas tareas básicas que le ayudarán a familiarizarse con el uso de Windows 7 como la personalización de Windows la agregación de nuevos usuarios y la transferencia de archivos Para usar el componente Getting Started Tareas iniciales 1 En la barra de tareas de Windows haga clic en el ic...

Страница 221: ...del ratón en un icono 2 En la Jump List Lista de acceso rápido haga clic con el botón secundario del ratón en el componente que desee quitar de la Jump List Lista de acceso rápido y a continuación seleccione la opción Unpin from this list Desanclar de esta lista Anclaje de programas al menú Start Inicio o a la barra de tareas Para anclar un programa al menú Start Inicio o a la barra de tareas 1 En...

Страница 222: ...desea obtener más información consulte el apartado Uso del panel Action Center Centro de actividades de Windows en este capítulo Personalización de iconos y notificaciones Puede optar por mostrar u ocultar determinados iconos y notificaciones en la barra de tareas o el área de notificación Para personalizar los iconos y notificaciones 1 En el área de notificación haga clic en el icono con forma de...

Страница 223: ...l icono View Vista 4 En el menú View Vista desplace el control deslizante para seleccionar un modo de visualización de archivos y carpetas Organización de archivos Para organizar los archivos 1 Inicie el Explorador de Windows 2 En el campo Arrange by Organizar por haga clic para abrir la lista desplegable 3 Seleccione el tipo de organización que prefiera Ordenación de archivos Para ordenar los arc...

Страница 224: ...l ratón en cualquier punto del panel View Vista y a continuación seleccionar las opciones New Nuevo Folder Carpeta Restauración del sistema La función System Restore Restaurar sistema de Windows crea puntos de restauración siempre que la configuración del sistema cambia y los vincula a una fecha y una hora De este modo facilita la restauración o reversión de los cambios aplicados a la configuració...

Страница 225: ... este capítulo Uso de Windows Update Windows Update permite buscar e instalar las actualizaciones más recientes con objeto de mejorar la seguridad y el rendimiento del equipo Inicio de Windows Update Para iniciar Windows Update 1 En la barra de tareas de Windows haga clic en el icono Start Inicio para abrir el menú Start Inicio 2 Seleccione All Programs Todos los programas Windows Update 3 En la p...

Страница 226: ... de prueba de 60 días tras la activación Para activar el software Internet Security de Trend Micro 1 Ejecute la aplicación Internet Security de Trend Micro 2 Lea detenidamente los términos de la licencia Haga clic en Agree Activate Aceptar y activar 3 Introduzca su dirección de correo electrónico y seleccione su ubicación Haga clic en Next Siguiente 4 Haga clic en Finish Finalizar para finalizar l...

Страница 227: ...Panel frontal Panel posterior NO quite un dispositivo de almacenamiento USB durante una transferencia de datos Si lo hace podrían producirse pérdidas de datos y el dispositivo de almacenamiento USB podría resultar dañado Conexión de un dispositivo de almacenamiento USB Este equipo de sobremesa cuenta con puertos USB 2 0 1 1 tanto en el panel frontal como en el posterior Los puertos USB permiten co...

Страница 228: ...sa cuenta con puertos de micrófono y auriculares tanto en el panel frontal como en el posterior Los puertos de E S de audio situados en el panel posterior permiten conectar sistemas de altavoces estéreo de 2 4 6 y 8 canales Conexión de unos auriculares y un micrófono Conexión de un sistema de altavoces de 2 canales ENTRADAS DE AUDIO ...

Страница 229: ... de un sistema de altavoces de 4 canales ENTRADAS DE AUDIO ENTRADAS DE AUDIO Posterior Frontal Conexión de un sistema de altavoces de 6 canales ENTRADAS DE AUDIO Posterior Frontal ENTRADAS DE AUDIO ENTRADAS DE AUDIO Altavoz central subwoofer ...

Страница 230: ...228 Capítulo 3 Conexión de dispositivos al equipo Español Español Conexión de un sistema de altavoces de 8 canales ENTRADAS DE AUDIO Posterior Frontal Altavoz central subwoofer ENTRADAS DE AUDIO Lateral ...

Страница 231: ...scritorio de Windows Para configurar varias pantallas 1 Apague el equipo 2 Conecte los dos monitores al equipo y a continuación conecte los cables de alimentación a los monitores Consulte el apartado Instalación del equipo en el Capítulo 1 si desea obtener más información acerca de la conexión de un monitor al equipo Si el equipo cuenta con una tarjeta gráfica instalada conecte los monitores a los...

Страница 232: ...ólo en el monitor 1 o en el monitor 2 Remove this display Quitar esta pantalla Seleccione esta opción si desea quitar la pantalla seleccionada 6 Haga clic en Apply Aplicar o en OK Aceptar A continuación haga clic en Keep Changes Conservar cambios en el mensaje de confirmación 3 Encienda el equipo 4 Lleve a cabo cualquiera de las acciones descritas a continuación para abrir la pantalla de configura...

Страница 233: ...ón de un televisor de alta definición HDTV al puerto HDMI Es preciso usar un cable HDMI para conectar un televisor HDTV al equipo El cable HDMI debe adquirirse por separado A fin de garantizar la máxima calidad de imagen asegúrese de que la longitud del cable HDMI sea inferior a 15 metros ...

Страница 234: ...232 Capítulo 3 Conexión de dispositivos al equipo Español ...

Страница 235: ... rodillas queden a una altura ligeramente superior a la de las caderas para que la parte posterior de los muslos permanezca relajada Si es necesario use un reposapiés para elevar la altura de las rodillas Ajuste el respaldo de la silla de modo que la base de la columna quede apoyada firmemente e inclinada ligeramente hacia atrás Siéntese derecho con las rodillas los codos y las caderas formando un...

Страница 236: ...ria de diferentes tipos Para usar una tarjeta de memoria 1 Inserte la tarjeta de memoria en la ranura para tarjetas que corresponda 2 Seleccione un programa en la ventana AutoPlay Reproducción automática para acceder a los archivos Si la función AutoPlay Reproducción automática NO está habilitada en el equipo haga clic en el botón Start Inicio de Windows 7 en la barra de tareas haga clic en Comput...

Страница 237: ...raer un disco óptico 1 Con el sistema encendido lleve a cabo cualquiera de las siguientes acciones para expulsar la bandeja Pulse el botón de expulsión situado bajo el embellecedor de la bahía de unidad Haga clic con el botón secundario del ratón en el icono de la unidad de CD DVD en la pantalla Computer Equipo y a continuación haga clic en Eject Expulsar 2 Extraiga el disco de la bandeja de disco...

Страница 238: ...esione Fn F9 para reproducir o causar la reproducción en el Reproductor de Windows Media 4 de Windows Media Aumenta el tamaño de la imagen en Windows Photo Viewer 15 Presione Fn F10 para detener la reproducción en el Reproductor de Windows Media 5 Funciones con las teclas F1 F12 16 Presione Fn F11 para ir a la pista anterior del Reproductor de Windows Media 6 Presione Fn F1 para iniciar Microsoft ...

Страница 239: ...ductor multimedia 4 Permite avanzar a la pista siguiente en un reproductor multimedia 5 Permite reducir el nivel de volumen 6 Permite aumentar el nivel de volumen 7 Permite activar desactivar el modo de silencio 8 Cambia los perfiles de trabajo mediante las teclas F1 F10 Las teclas de función especiales sólo funcionan en los sistemas operativos Windows Vista y Windows 7 Instale el controlador del ...

Страница 240: ...y volver al estado de trabajo anterior 8 Permite aumentar el nivel de volumen 2 Vuelve a la última página que se ha visto 9 Permite activar desactivar el modo de silencio 3 Va a la página siguiente que se estaba viendo 10 Permite retroceder a la pista anterior en un reproductor multimedia 4 Inicia la página principal predeterminada en Windows Internet Explorer 11 Permite reproducir o efectuar una ...

Страница 241: ...cceso directo Descripción 1 Permite activar desactivar el modo de silencio 2 Permite reducir el nivel de volumen Teclado cableado moderno ASUS KB34211 Las teclas de función especiales sólo funcionan en los sistemas operativos Windows Vista y Windows 7 ...

Страница 242: ...240 Capítulo 4 Uso del equipo Español ...

Страница 243: ... de área local LAN 2 Conecte un extremo del cable RJ 45 al puerto LAN RJ 45 situado en el panel posterior del equipo y el otro extremo a un módem DSL por cable Consulte la documentación que incluye el módem DSL por cable 3 Encienda el módem DSL por cable y el equipo 4 Configure los parámetros necesarios para establecer una conexión a Internet Póngase en contacto con su proveedor de servicios de In...

Страница 244: ...te un extremo de un cable RJ 45 al puerto LAN RJ 45 situado en el panel posterior del equipo y el otro extremo a la red LAN 2 Encienda el equipo 3 Configure los parámetros necesarios para establecer una conexión a Internet Póngase en contacto con el administrador de la red si desea obtener más información o asistencia acerca de la configuración de la conexión a Internet Cable RJ 45 ...

Страница 245: ...onexión inalámbrica se establecerá correctamente Se mostrará el estado de la conexión y el icono de red indicar al estado de conectado Conexión inalámbrica disponible sólo en determinados modelos Conecte el equipo a Internet a través de una conexión inalámbrica Para aumentar el alcance y la sensibilidad de la señal de radio inalámbrica conecte las antenas externas a los conectores de antena de la ...

Страница 246: ...244 Capítulo 5 Conexión a Internet Español ...

Страница 247: ... uso más frecuente de forma rápida y sencilla Instalación de AI Manager Para instalar AI Manager 1 Coloque el DVD de soporte en la unidad óptica Si la función Autorun Ejecución automática está habilitada aparecerá el asistente Drivers installation Instalación de controladores Si la función Autorun Ejecución automática está deshabilitada acceda a la carpeta ASUS AI Manager del DVD de soporte y haga...

Страница 248: ...s las cookies las URLs y el historial de IE así como la de aquellos archivos conservados en la papelera de reciclaje Haga clic en el icono de AI Disk en la barra rápida para abrir la ventana de AI Disk y seleccionar los elementos que desee borrar Cuando haya terminado haga clic en Apply Aplicar Principal Mis favoritos Soporte Información Botón de salida Cambiar a la ventana principal Agregar a la ...

Страница 249: ...n Change Password Cambiar contraseña y siga las instrucciones que aparecerán en la pantalla para cambiar la contraseña Para agregar una aplicación 1 Haga clic en Add Agregar y busque la aplicación que desee agregar a My Favorites Mis favoritos 2 Haga clic en Open Abrir en la ventana de búsqueda de archivos La aplicación se agregará a la lista My Favorites Mis favoritos Haga clic con el botón secun...

Страница 250: ...ar ASUS EPU 4 Engine Motor EPU 4 de ASUS 1 Inserte el DVD de soporte en la unidad óptica Aparecerá el menú Drivers Controladores si la función de ejecución automática está habilitada en el equipo Si la función de ejecución automática está deshabitada haga doble clic en el archivo setup exe de la carpeta ASUS EPU 4 Engine Motor EPU 4 de ASUS del DVD de soporte 2 Haga clic en ASUS EPU 4 Engine Motor...

Страница 251: ... la energía total de la CPU ahorrada 2 Estado de la tarjeta VGA Muestra el estado de la tarjeta gráfica Si la tarjeta gráfica no es compatible con la placa base aparecerá el mensaje No VGA card detected No se detectó una tarjeta VGA Consulte la lista QVL VGA de ASUS en http event asus com mb EPU 4_Engine para conocer las tarjetas VGA compatibles ...

Страница 252: ...es de la CPU para administrar de forma óptima la energía 9 Botón Setting Configurar Haga clic en este botón para definir la configuración de los modos Consulte la sección Definir la configuración de los modos para obtener más detalles 10 Modos Modo automático Si selecciona este modo el sistema cambiará los modos automáticamente conforme al estado actual del sistema Modo de alto rendimiento Si sele...

Страница 253: ...PU Máximo reduce el voltaje al máximo para ahorrar energía de la CPU Medio reduce del voltaje nivel medio Mínimo reduce el voltaje al nivel mínimo Desactivar discos duros desactiva las unidades de disco duro cuando no se accede a ellas después de un determinado período de tiempo Carga de la CPU configura la carga de la CPU para administrar el ahorro de energía de dicha CPU Poca ahorra energía de l...

Страница 254: ...ar el BIOS Para actualizar el BIOS 1 Desde el escritorio de Windows haga clic en Start Inicio Programs Programas ASUS ASUS Update ASUS Update para iniciar la utilidad ASUS Update 2 En la lista desplegable seleccione cualquiera de los procesos de actualización Actualización desde Internet a Seleccione Update BIOS from the Internet Actualizar BIOS desde Internet y a continuación haga clic en Next Si...

Страница 255: ...ma antes de copiar el BIOS y a continuación haga clic en Next Siguiente 4 Seleccione Update BIOS from file Actualizar BIOS desde archivo en el menú desplegable y haga clic en Next Siguiente 5 Cuando se le pida busque el nuevo archivo de BIOS y a continuación haga clic en Next Siguiente Aparecerá la ventana de ASUS MyLogo 6 En el panel de la ventana de la izquierda busque la imagen que desee utiliz...

Страница 256: ...nte para continuar 6 Active la casilla de verificación I accept the License Conditions Acepto las condiciones de la licencia Cuando haya terminado haga clic en Next Siguiente 7 Seleccione la opción Typical Típica y haga clic en Next Siguiente 8 Active la casilla de verificación Yes I want to help by sending anonymous application data to Nero Sí deseo colaborar enviando a Nero datos anónimos acerca...

Страница 257: ...ar rápidamente el software del PC de sobremesa a su estado original de funcionamiento Antes de usar la partición de recuperación copie sus archivos de datos como por ejemplo sus archivos PST de Outlook a un dispositivo de almacenamiento USB o una unidad de red y anote los datos correspondientes a aquellos parámetros cuya configuración haya personalizado como por ejemplo los correspondientes a la c...

Страница 258: ...nuación seleccione la unidad óptica puede que se llame CD DVD y pulse Enter Entrar para arrancar desde el DVD de recuperación 3 Haga clic en OK Aceptar para iniciar la restauración de la imagen 4 Haga clic en OK Aceptar para confirmar la recuperación del sistema El proceso de restauración causará la eliminación de todos los datos almacenados en el disco duro Asegúrese de crear una copia de segurid...

Страница 259: ...s 3 Seleccione el programa que no responda y haga clic en End Task Finalizar tarea Si el teclado no responde mantenga pulsado el botón de encendido situado en la parte superior del chasis hasta que el equipo se apague Pulse de nuevo el botón de encendido a continuación para encender el equipo No puedo conectarme a una red inalámbrica empleando la tarjeta WLAN ASUS disponible sólo en determinados m...

Страница 260: ...la dual sólo funciona con Windows Si el equipo cuenta con una tarjeta gráfica instalada asegúrese de conectar los monitores a los puertos de salida de la tarjeta gráfica Compruebe si la configuración para el uso de varias pantallas es correcta Consulte el apartado Conexión de varias pantallas externas en el Capítulo 3 si desea obtener más información El equipo no detecta un dispositivo de almacena...

Страница 261: ...lic en Keep Changes Conservar cambios en el mensaje de confirmación Los altavoces no reproducen sonido Asegúrese de conectar los altavoces al puerto de salida de línea de color lima situado en el panel frontal o el panel posterior Compruebe que los altavoces se encuentren conectados a una fuente de alimentación eléctrica y encendidos Ajuste el volumen de los altavoces Asegúrese de no haber desacti...

Страница 262: ...tado correctamente Asegúrese de que el cable de alimentación se encuentre conectado correctamente Use otro cable de alimentación compatible Existe un problema relacionado con la fuente de alimentación PSU Instale otra fuente de alimentación PSU en el equipo Pantalla Problema Posible causa Acción La pantalla no muestra ninguna imagen permanece en color negro después de encender el equipo El cable d...

Страница 263: ...d LAN correcta que deba aplicar Existe un problema relacionado con el uso del software antivirus Cierre el software antivirus Existe un problema relacionado con el controlador Vuelva a instalar el controlador de red LAN Audio Problema Posible causa Acción El equipo no reproduce sonidos Los altavoces o auriculares no están conectados al puerto correcto Consulte el manual del usuario del equipo para...

Страница 264: ...l disco duro ha sufrido un error Envíe el disco duro dañado a un Centro de asistencia técnica autorizado por ASUS y solicite su reparación Sustituya el disco duro por otro nuevo Existe un problema relacionado con los módulos de memoria Sustituya los módulos de memoria por otros compatibles Retire los módulos de memoria complementarios que haya instalado y compruebe si el problema persiste El equip...

Страница 265: ...o el equipo carga el SO La configuración del BIOS se ha modificado Restaure la configuración del BIOS a sus valores predeterminados La versión del BIOS no es la más reciente Actualice el BIOS a la versión más reciente Visite el sitio web de soporte de ASUS a través de la dirección http support asus com si desea descargar la versión más reciente del BIOS El equipo genera demasiado ruido durante el ...

Страница 266: ...écnica General tel 1 888 6783688 Asistencia fax 1 812 284 0883 Contacto en línea support asus com ASUS COMPUTER GmbH Alemania y Austria Domicilio de la compañía Harkort Str 21 23 D 40880 Ratingen Germany Asistencia fax 49 2102 959911 Dirección web www asus de Contacto en línea www asus de sales Asistencia técnica Teléfono de componentes 49 1805 010923 Asistencia fax 49 2102 9599 11 Asistencia en l...

Страница 267: ...ASUS Essentio Desktop PC CM1730 Gebruikershandleiding ...

Страница 268: ...IKTHEID VOOR EEN BEPAALD DOEL IN GEEN GEVAL ZAL ASUS HAAR DIRECTEURS FUNCTIONARISSEN WERKNEMERS OF AGENTEN AANSPRAKELIJK ZIJN VOOR ENIGE INDIRECTE SPECIALE INCIDENTELE OF GEVOLGSCHADE INCLUSIEF SCHADE DOOR WINSTDERVING VERLIES VAN HANDEL VERLIES VAN GEBRUIK OF GEGEVENS ONDERBREKING VAN HANDEL EN DERGELIJKE ZELFS ALS ASUS OP DE HOOGTE WERD GEBRACHT VAN DE MOGELIJKHEID VAN DERGELIJKE SCHADE DIE VOOR...

Страница 269: ...286 Uw systeem herstellen 288 Uw computer beschermen 289 Hulp en ondersteuning voor Windows krijgen 290 Hoofdstuk 3 Apparaten op uw computer aansluiten Een USB opslagapparaat aansluiten 291 Microfoon en luidsprekers aansluiten 292 Meerdere externe schermen aansluiten 295 Een HDTV aansluiten 297 Hoofdstuk 4 Uw computer gebruiken Juiste houding bij het gebruik van uw Desktop PC 299 De geheugenkaartl...

Страница 270: ...nds Inhoudsopgave Hoofdstuk 6 De hulpprogramma s gebruiken ASUS AI Manager 311 ASUS EPU 4 Engine 314 ASUS Update 318 ASUS MyLogo2 319 Nero 9 320 Uw systeem herstellen 321 Hoofdstuk 7 Problemen oplossen Problemen oplossen 323 ...

Страница 271: ...n wanneer niet volgens de instructies van de fabrikant geïnstalleerd en gebruikt kan het schadelijke storingen aan radiocommunicatie veroorzaken Er bestaat echter geen garantie dat bij een bepaalde installatie zich geen storing zal voordoen Als dit apparaat schadelijke storing aan radio of televisie ontvangst veroorzaakt wat kan worden vastgesteld door het apparaat aan en uit te schakelen wordt de...

Страница 272: ...n het Canadees ministerie van Communicatie uiteen worden gezet Dit digitale apparaat van Klasse B voldoet aan de Canadese ICES 003 Productmededeling van Macrovision Corporation Dit product bevat copyright beschermende technologie die door claimmethodes van bepaalde Amerikaanse octrooien en andere intellectuele eigendomsrechten wordt beschermd die eigendom zijn van Macrovision Corporation en andere...

Страница 273: ... tijdens onweer gebruiken Waarschuwing ter beveiliging van de batterij NIET de batterij in vuur werpen NIET de contacten kortsluiten NIET de batterij uit elkaar halen Gebruik dit product in omgevingen met omgevingstemperaturen tussen 0 C 32 F en 35 C 95 F NIET de ventilatieopeningen van de Desktop PC afdekken om oververhitting van het systeem te voorkomen NIET beschadigde stroomkabels accessoires ...

Страница 274: ... te voeren OPMERKING tips en aanvullende informatie om u te helpen bij het voltooien van uw taak BELANGRIJK Instructies die u MOET volgen om een taak te voltooien Waar meer informatie te vinden Raadpleeg de volgende bronnen voor aanvullende informatie en voor updates van het product en de software ASUS websites De ASUS website biedt bijgewerkte informatie over ASUS hardware en softwareproducten Ra...

Страница 275: ...tiekaart x1 Nero 9 brandsoftware dvd x 1 Ondersteuning voor optioneel x1 Herstel DVD DVD optioneel x1 Antenne optioneel x2 Als een van de bovenstaande items beschadigd is of ontbreekt moet u contact opnemen met uw leverancier De hierboven weergegeven items zijn alleen ter referentie Feitelijke productspecificaties kunnen bij verschillende modellen variëren ...

Страница 276: ...274 Nederlands ...

Страница 277: ...e modellen anders zijn Welkom Dank u voor de aankoop van de ASUS Essentio CM1730 Desktop PC De ASUS Essentio CM1730 Desktop PC biedt ultramoderne prestaties ongecomprimeerde betrouwbaarheid en op gebruikers gerichte hulpprogramma s Al deze waarden worden in een prachtige futuristische en stijlvolle systeembehuizing ingesloten Lees de ASUS garantiekaart voordat u uw ASUS Desktop PC opstelt 1 5 2 3 ...

Страница 278: ...station uit te werpen Druk op deze knop om de lade van het optische schijfstation uit te werpen 5 Sleuf voor Secure Digital MultiMediaCard Plaats in deze sleuf een Secure Digital MultiMediaCard kaart Kaartsleuf voor Memory Stick Memory Stick Pro Plaats in deze sleuf een Memory Stick Memory Stick Pro kaart Extreme Digital kaartgleuf Steek in deze gleuf een Extreme Digital kaart 6 Aan uit knop Druk ...

Страница 279: ...ant aan HDCP waardoor HD dvd Blue ray en andere beschermde inhoud kan worden afgespeeld 8 DVI D poort Deze poort is voor een DVI D compatibel apparaat en is compliant aan HDCP waardoor HD dvd Blue ray en andere beschermde inhoud kan worden afgespeeld 9 VGA poort Deze poort is voor VGA compatibele apparaten zoals een VGA monitor 10 USB 3 0 poorten Deze universele seriële bus 3 0 USB 3 0 poorten slu...

Страница 280: ...leufuitbreiding Verwijder de beugel voor sleufuitbreiding als u een uitbreidingskaart installeert Raadpleeg de tabel voor audioconfiguratie voor de functies van de audiopoorten in een configuratie van 2 4 6 of 8 kanalen 13 Poort achterste luidspreker Uit zwart Deze poort wordt in een audio configuratie van 4 6 en 8 kanalen met de luidsprekers aan de achterkant verbonden 14 Poort luidspreker zijkan...

Страница 281: ...ische kaart alleen op geselecteerde modellen Verbind uw monitor via de display uitvoerpoort met de discrete ASUS grafische kaart Ga als volgt te werk om met een ASUS grafische kaart een externe monitor te verbinden 1 Verbind uw monitor via een display uitvoerpoort met de discrete ASUS grafische kaart 2 Steek de stekker van de monitor in een stopcontact De display uitvoerpoorten op de ASUS grafisch...

Страница 282: ...DVI D monitor op de DVI D poort of een HDMI monitor op de HDMI poort 2 Steek de stekker van de monitor in een stopcontact Als uw computer met een ASUS grafische kaart komt wordt de grafische kaart in de BIOS als het primaire display apparaat ingesteld Sluit uw monitor vervolgens aan op een display uitvoerpoort op de grafische kaart aan Raadpleeg Meerdere externe monitors aansluiten in Hoofdstuk 3 ...

Страница 283: ...Sluit op het achterpaneel van uw computer een USB toetsenbord en een USB muis op de USB poorten aan De stroomkabel verbinden Sluit één uiteinde van de stroomkabel aan op de stroomconnector op het achterpaneel van uw computer en het andere uiteinde van een voedingsbron DVI HDMI DVI HDMI ...

Страница 284: ...n Ga als volgt te werk om uw computer AAN te schakelen 1 Draai de aan uit knop naar AAN 2 Schakel uw monitor AAN 3 Druk op de aan uit knop op uw computer Uw computer UIT schakelen Ga als volgt te werk om uw computer UIT te schakelen 1 Sluit alle werkende applicaties 2 Klik op het Windows bureaublad 3 Klik op om het besturingssysteem te sluiten 4 Wacht tot het besturingsysteem automatisch wordt gel...

Страница 285: ...m Klik op Next Volgende 5 Typ de nodige informatie om uw wachtwoord in te stellen en klik daarna op Next Volgende U mag ook op Next Volgende klikken om zonder enige informatie in te voeren deze stap over te slaan 6 Lees aandachtig de licentievoorwaarden Vink I accept the license terms Ik accepteer de licentievoorwaarden aan en klik op Next Volgende 7 Selecteer Use recommended settings Aanbevolen i...

Страница 286: ...item Getting Started Om te beginnen op het startmenu bevat enkele basistaken zoals Windows verpersoonlijken nieuwe gebruikers toevoegen bestanden overdragen Hiermee wordt u geholpen om bekend te raken met het gebruik van Windows 7 Ga als volgt te werk om het item Om te beginnen te gebruiken 1 Klik op de Windows takenbalk op de pictogram Start om het startmenu te lanceren 2 Selecteer Getting Starte...

Страница 287: ...kenbalk vastpinnen Ga als volgt te werk om programma s op het startmenu of de takenbalk vast te pinnen 1 Klik op de Windows takenbalk op de pictogram Start om het startmenu te lanceren 2 Klik met de rechtermuisknop op het item dat u op het startmenu of de takenbalk wilt vastpinnen 3 Selecteer Pin to Taskbar Aan takenbalk vastpinnen of Pin to Start menu Aan startmenu vastpinnen U kunt ook met de re...

Страница 288: ... dit hoofdstuk de paragraaf Windows Actiecentrum gebruiken voor meer details Pictogrammen en notificaties aanpassen U kunt ervoor kiezen om op de takenbalk of in het notificatiegebied de pictogrammen en notificaties weer te geven of te verbergen Ga als volgt te werk om pictogrammen en notificaties aan te passen 1 Klik vanuit het notificatiegebied op de pictogram met de pijl 2 Klik op Customize Aan...

Страница 289: ...rgavescherm met de rechtermuisknop klikken Klik op View Weergave en selecteer het type weergave die u wilt Uw bestanden rangschikken Ga als volgt te werk om uw bestanden te rangschikken 1 Lanceer Windows Verkenner 2 Klik vanuit het veld Arrange by Rangschikken op om de vervolgkeuzelijst weer te geven 3 Selecteer het type rangschikking van uw voorkeur Uw bestanden sorteren Ga als volgt te werk om u...

Страница 290: ...All Programs Alle programma s Maintenance Onderhoud Backup and Restore Back up en Herstellen 2 Klik op Set up backup Back up instellen Klik op Next Volgende 3 Selecteer de bestemming van uw back up Klik op Next Volgende 4 Selecteer Let Windows choose recommended Laat Windows kiezen aanbevolen of Let me choose as your backup mode Laat mij als uw back upmodus kiezen Uw systeem herstellen De functie ...

Страница 291: ... controleren en installeren om de beveiliging en prestaties van uw computer te verbeteren Windows Update lanceren Ga als volgt te werk om Windows Update te lanceren 1 Klik op de Windows takenbalk op de pictogram Start om het startmenu te lanceren 2 Selecteer All Programs Alle programma s Windows Update 3 Klik vanaf het scherm Windows Update op de taak die u wilt uitvoeren Een gebruikersaccount en ...

Страница 292: ...anvallen beschermt Het wordt afzonderlijk gekocht Na activering hebt u een proefperiode van 60 dagen Ga als volgt te werk om Trend Micro Internet Security te activeren 1 Activeer de applicatie Trend Micro Internet Security 2 Lees aandachtig de licentievoorwaarden Klik op Agree Activate Akkoord Activeren 3 Voer uw e mailadres in en selecteer uw locatie Klik op Next Volgende 4 Klik op Voltooien om d...

Страница 293: ...aat in uw computer Ga als volgt te werk om een USB opslagapparaat te verwijderen 1 Klik vanuit het Windows notificatiegebied op uw computer op en klik daarna op Eject USB2 0 FlashDisk USB2 0 FlashDisk uitwerpen 2 Als het bericht Safe to Remove Hardware Veilig om hardware te verwijderen verschijnt verwijdert u het USB opslagapparaat van uw computer Voorpaneel Achterpaneel NIET een USB opslagapparaa...

Страница 294: ...ansluiten Deze desktop PC komt met poorten voor microfoon en luidsprekers op zowel het voor als achterpaneel De audio I O poorten bevinden zich op het achterpaneel en hiermee kunt u stereoluidsprekers met 2 4 6 en 8 kanalen aansluiten Koptelefoon en mic aansluiten Luidsprekers met 2 kanalen aansluiten ...

Страница 295: ...Nederlands ASUS CM1730 293 Nederlands Luidsprekers met 4 kanalen aansluiten Luidsprekers met 6 kanalen aansluiten ...

Страница 296: ...294 Hoofdstuk 3 Apparaten op uw computer aansluiten Nederlands Nederlands Luidsprekers met 8 kanalen aansluiten ...

Страница 297: ...te vergroten Ga als volgt te werk om meerdere schermen in te stellen 1 Schakel uw computer uit 2 Verbind de twee schermen met uw computer en verbindt de stroomkabels van de schermen Raadpleeg in Hoofdstuk 1 de paragraaf Uw computer instellen voor details over op uw computer een monitor aan te sluiten Als in uw computer een grafische kaart is geïnstalleerd sluit u de schermen op de uitvoerpoorten v...

Страница 298: ... scherm 2 weer te geven Dit scherm verwijderen Selecteer deze opties om het geselecteerde scherm te verwijderen 6 Klik op Apply Toepassen of op OK Klik daarna op het bevestigingsbericht op Keep Changes Wijzigingen bewaren 3 Zet uw computer aan 4 Doe één van het volgende om het instellingenscherm Screen Resolution Schermresolutie te openen Klik op Control Panel Configuratiescherm Appearance and Per...

Страница 299: ...luit op de HDMI poort van uw computer een High Definition tv HDTV aan Om de HDTV op de computer aan te sluiten hebt u een HDMI kabel nodig De HDMI kabel is afzonderlijk verkrijgbaar Voor de beste weergaveprestatie mag uw HDMI kabel niet langer dan 15 meter zijn ...

Страница 300: ...298 Hoofdstuk 3 Apparaten op uw computer aansluiten Nederlands ...

Страница 301: ...iets hoger zijn dan uw heupen om de achterkant van uw dijen te ontspannen Indien nodig dient u een voetsteun te gebruiken om de hoogte van uw knieën te verhogen Stel de rug van uw stoel zo af dat de basis van uw ruggengraat stevig wordt ondersteund en iets naar achteren wordt gebracht Zit rechtop met uw knieën ellebogen en heupen in een hoek van ongeveer 90 terwijl u achter de computer zit Plaats ...

Страница 302: ...n naar verschillende geheugenkaartstations lezen en schrijven Ga als volgt te werk om de geheugenkaart te gebruiken 1 Plaats de geheugenkaart in de kaartsleuf 2 Selecteer van het venster AutoPlay automatisch afspelen een programma voor toegang tot uw bestanden Als AutoPlay NIET op uw computer is ingeschakeld klikt u op de takenbalk op de knop Windows 7 Start en klikt u op Computer Daarna dubbelkli...

Страница 303: ...t uw bestanden Een optische schijf verwijderen Ga als volgt te werk om een optische schijf te verwijderen 1 Terwijl het systeem aan is moet u één van het volgende doen om de lade uit te werpen Druk onder de stationlade op de uitwerpknop Druk met de rechtermuisknop op het pictogram van het cd dvd station op het scherm Computer en klik daarna op Eject Uitwerpen 2 Verwijder de schijf uit het schijfst...

Страница 304: ...sgrootte in Windows Photo Viewer 14 Druk op Fn F9 om in Windows Media Player af te spelen of te pauzeren 4 Vergroot de afbeeldingsgrootte in Windows Photo Viewer 15 Druk op Fn F10 om het afspelen in Windows Media Player te stoppen 5 Functies met toetsen F1 F12 16 Druk op Fn F11 om in Windows Media Player naar het vorige nummer te gaan 6 Druk op Fn F1 om Microsoft Word te starten 17 Druk op Fn F12 ...

Страница 305: ...rlaagt het systeemvolume 6 Gaat naar het volgende nummer in een mediaspeler 7 Schakelt de modus voor het dempen van het volume in uit 8 Schakelt naar profielen die met de toetsen F1 F10 werken 1 3 2 5 6 4 8 7 De speciale functietoetsen werken alleen op de besturingsystemen van Windows Vista Windows 7 Instaleer voor het gebruik het stuurprogramma van het toetsenbord Ga naar de Razer website op HYPE...

Страница 306: ...luimermodus Druk op een willekeurige toets om uw computer te wekken en naar de vorige bedrijfsstatus terug te keren 8 Verhoogt het systeemvolume 2 Keert terug naar de laatste pagina die u weergaf 9 Schakelt de modus voor het dempen van het volume in uit 3 Gaat naar de volgende pagina die u eerder weergaf 10 Gaat naar het vorige nummer in een mediaspeler 4 Start de standaard startpagina in Windows ...

Страница 307: ...ving 1 Schakelt de modus voor het dempen van het volume in uit 2 Verlaagt het systeemvolume 3 Verhoogt het systeemvolume Modern bekabeld ASUS KB34211 toetsenbord 1 2 3 De speciale functietoetsen werken alleen op de besturingsystemen van Windows Vista Windows 7 ...

Страница 308: ...306 Hoofdstuk 4 Uw computer gebruiken Nederlands ...

Страница 309: ...ocal area network LAN netwerk te verbinden 2 Verbind één uiteinde van een RJ 45 kabel met de LAN poort RJ 45 op het achterpaneel van uw computer en het andere uiteinde met een DSL kabelmodem Raadpleeg de documentatie die met uw DSL kabelmodem wordt geleverd 3 Schakel de DSL kabelmodem en uw computer in 4 Configureer de benodigde instellingen voor internetverbinding Neem contact op met uw Internet ...

Страница 310: ... via LAN te verbinden 1 Verbind één uiteinde van een RJ 45 kabel met de LAN poort RJ 45 op het achterpaneel van uw computer en het andere uiteinde met uw LAN 2 Zet uw computer aan 3 Configureer de benodigde instellingen voor internetverbinding Neem contact op met uw netwerkbeheerder voor details of hulp bij het instellen van uw internetverbinding RJ 45 kabel LAN ...

Страница 311: ...u met een draadloos toegangspunt access point AP verbinding maken Een verbinding maken met een draadloos netwerk 1 Klik in het systeemvak op het pictogram van het netwerk om beschikbare draadloze netwerken weer te geven 2 Selecteer het draadloze netwerk waarmee u verbinding wilt maken en klik op Connect Verbinden 3 Het kan zijn dat u voor een beveiligd draadloos netwerk de netwerk beveiligingscode...

Страница 312: ...310 Hoofdstuk 5 Verbinden met het Internet Nederlands ...

Страница 313: ...el een eenvoudig toegang tot regelmatig gebruikte applicaties krijgt AI Manager installeren Ga als volgt te werk om Al Manager te installeren 1 Plaats de ondersteunings dvd in het optische station Als Autorun is ingeschakeld verschijnt de Wizard installatie stuurprogramma s Als Autorun is uitgeschakeld dubbelklikt u op het bestand setup exe file in de map ASUS AI Manager op de ondersteunings dvd 2...

Страница 314: ...te herstellen Klik op de weergave items op de rechterkant Klik op de weergave items op de linkerkant Al schijf Met Al Disk Al schijf kunt u gemakkelijk tijdelijke IE bestanden IE cookies IE URL s IE historie of de Prullenbak wissen Klik op de snelbalk op de pictogram Al Disk Al schijf om het volledige Al Disk Al schijf venster weer te geven en de items te selecteren die u wilt wissen Klik op Apply...

Страница 315: ...eid en de spanningsuitvoer en geeft deze weer U kunt de waarden naar uw behoeften bijstellen Klik op het tabblad Temperature Temperatuur Voltage Spanning of Fan Speed Ventilatorsnelheid en selecteer dan een item om in te schakelen en verander de waarde door de balk te slepen Ga als volgt te werk om een applicatie toe te voegen 1 Klik op Add Toevoegen en zoek dan de applicatie die u aan My Favorite...

Страница 316: ...ictogram van de ASUS EPU 4 ASUS EPU 4 installeren Ga als volgt te werk om de ASUS EPU 4 Engine te installeren 1 Plaats de ondersteunings dvd in het optische station Het menu Drivers Stuurprogramma s verschijnt als op uw computer Autorun is ingeschakeld Als Autorun is uitgeschakeld dubbelklikt u op het bestand setup exe in de map ASUS EPU 4 Engine op de ondersteunings dvd 2 Klik op ASUS EPU 4 Engin...

Страница 317: ...mogen en het totaal bespaarde CPU vermogen weer 2 VGA kaartstatus Geeft de status van de grafische kaart weer Als uw grafische kaart niet compatibel is met het moederbord verschijnt het bericht Geen VGA kaart gedetecteerd Raadpleeg de ASUS VGA QVL lijst op http event asus com mb EPU 4_Engine voor compatibele VGA kaarten ...

Страница 318: ... het systeem de CPU eigenschappen voor optimaal energiebeheer detecteren 9 Knop Setting Instellingen Klik op deze knop om de modusinstellingen te configureren Raadpleeg de paragraaf De modusinstellingen configureren voor meer details 10 Modi Automatische modus Als u deze modus selecteert verandert het systeem de modi automatisch volgens de huidige systeemstatus Hoge prestatiemodus Als u deze modus...

Страница 319: ...ng van de CPU vCore Zwaar Verlaagt de spanning naar het hoogste niveau voor CPU energiebesparing Matig Verlaagt de spanning naar gematigd niveau laag Verlaagt de spanning naar het minimum niveau Vaste schijven uitschakelen Schakelt stations van vaste schijven uit als na een bepaalde tijd geen toegang ertoe wordt genomen CPU belastingslijn Stelt de CPU belastingslijn op om energiebesparing van de C...

Страница 320: ...applicaties De BIOS updaten Ga als volgt te werk om de BIOS te updaten 1 Klik vanaf het Windows bureaublad op Start Programs Programma s ASUS ASUS Update ASUS Update om het hulpprogramma ASUS Update te starten 2 Selecteer een van de updateprocessen in de vervolgkeuzelijst Updating vanaf internet a Selecteer Update BIOS from the Internet BIOS updaten vanaf internet en tik daarna op Next Volgende b ...

Страница 321: ...go starten om systeem startlogo te vervangen voordat BIOS knippert en klik vervolgens op Next Volgende 4 Selecteer van het vervolgkeuzemenu Update BIOS from file Update BIOS vanaf bestand en klik daarna op Next Volgende 5 Zoek wanneer gevraagd het nieuwe BIOS bestand en klik daarna op Next Volgende Het venster van ASUS MyLogo verschijnt 6 Zoek vanaf het linker vensterpaneel de afbeelding die u als...

Страница 322: ...u voor de Installatiewizard wilt gebruiken Klik op Next Volgende 5 Klik op Next Volgende om door te gaan 6 Vink I accept the License Conditions Ik accepteer de licentievoorwaarden aan Klik op Next Volgende wanneer u klaar bent 7 Selecteer Typical Typisch en klik daarna op Next Volgende 8 Vink Yes I want to help by sending anonymous application data to Nero Ja ik wil helpen door anonieme applicatie...

Страница 323: ... De Herstellingspartitie is in de fabriek gemaakt en kan niet worden hersteld als u deze verwijderd Breng uw Desktop PC naar een bevoegd ASUS servicecentrum als u problemen ondervindt met het herstellingsproces Ga als volgt te werk om de Herstellingspartitie te gebruiken 1 Druk tijdens het opstarten op F9 2 Druk op Enter om Windows instellingen EMS ingeschakeld te selecteren 3 Selecteer één van de...

Страница 324: ...sktop PC moet worden IN geschakeld 2 Herstart de Desktop PC en druk tijdens het opstarten op F8 en selecteer het optische station kan als CD DVD zijn gelabeld en druk op Enter om de Herstel dvd te starten 3 Selecteer OK om te beginnen met het herstellen van de afbeelding 4 Selecteer OK om het systeemherstel te bevestigen Het herstellen zal uw vaste schijf overschrijven Zorg dat u voordat u het sys...

Страница 325: ...ageert en klik daarna op End Task Taak beëindigen Als het toetsenbord niet reageert Houd de aan uit knop bovenop uw chassis ingedrukt totdat de computer uitschakelt Druk daarna op de aan uit knop om het in te schakelen Ik kan niet via de ASUS WLAN kaart alleen op geselecteerde modellen verbinding maken met een draadloos netwerk Zorg dat u voor het draadloze netwerk waarmee u verbinding wilt maken ...

Страница 326: ...dows Als in uw computer een grafische kaart is geïnstalleerd dien u te verzekeren dat de schermen op de uitvoerpoorten van de grafische kaart zijn aangesloten Controleer of de instellingen voor meervoudige weergave juist zijn Raadpleeg de sectie Meerdere externe schermen aansluiten in Hoofdstuk 3 voor details Mijn computer kan mijn USB opslagapparaat niet te vinden De eerste keer dat u uw USB opsl...

Страница 327: ... Keep Changes Wijzigingen bewaren Mijn luidsprekers produceren geen geluid Zorg dat u uw luidsprekers op de Poort lijn Uit limoen op het voor of achterpaneel aansluit Controleer of uw luidspreker op een elektrische bron is aangesloten en is ingeschakeld Stel het volume van uw luidsprekers bij Zorg dat het geluid van uw computersysteem niet is gedempt Als het is gedempt wordt het volumepictogram al...

Страница 328: ...d De stroomkabel van uw computer is niet goed aangesloten Zorg dat de stroomkabel goed is aangesloten Gebruik een andere compatibele stroomkabel Problemen met PSU Power supply unit voedingseenheid Probeer een andere PSU op uw computer te installeren Scherm Probleem Mogelijke oorzaak Actie Na het inschakelen van de computer is geen beelduitvoer zwart scherm De signaalkabel is niet op de juiste VGA ...

Страница 329: ...instellingen Problemen door de antivirus software veroorzaakt Sluit de antivirus software Problemen stuurprogramma s Installeer het LAN stuurprogramma opnieuw Audio Probleem Mogelijke oorzaak Actie Geen audio Luidspreker of koptelefoon is op de verkeerde poort aangesloten Raadpleeg de gebruikershandleiding van uw computer betreffende de juiste poort Verwijder en sluit de luidspreker opnieuw op uw ...

Страница 330: ... hangen of bevriest Storing station vaste schijf Stuur het beschadigde station van de vaste schijf naar het ASUS servicecentrum voor service Vervang met een nieuw station voor vaste schrijf Problemen geheugenmodule Vervang met compatibele geheugenmodules Verwijder de extra geheugenmodules die u hebt geïnstalleerd en probeer opnieuw Er is niet genoeg luchtventilatie voor uw computer Verplaats uw co...

Страница 331: ...t asus com om de nieuwste BIOS versies te downloaden Computer is te luidruchtig tijdens het gebruik De CPU ventilator is vervangen Zorg dat u een compatibele of door ASUS aangeraden CPU ventilator gebruikt Er is niet genoeg luchtventilatie voor de computer Verplaats uw computer naar een plek met betere luchtstroom De systeemtemperatuur is te hoog Werk de BIOS bij Als u weet hoe het moederbord opni...

Страница 332: ...rsteuning Telefoon 1 886 678 3688 Fax ondersteuning 1 812 284 0883 Online support support asus com ASUS COMPUTER GmbH Germany and Austria Adres Harkort Str 21 23 D 40880 Ratingen Germany Fax 49 2102 959911 Web site www asus de Online contact www asus de sales Technisch Ondersteuning Telefoon 49 1805 010923 Fax ondersteuning 49 2102 9599 11 Online ondersteuning support asus com EUR 0 14 minuut vana...

Отзывы: