background image

1

2

3

4

5

6

7

8

0

9

abc

ghi

pqrs

tuv

wxyz

jkl

mno

def

Chapter 2

Installing and using  

the AiGuru S1 Utility

This chapter provides instructions on how to install the AiGuru S1  

Utility and the required device drivers. This chapter also shows you 

 how to configure the phone and Wireless Link USB dongle.

Содержание AiGuru S1

Страница 1: ...AiGuru S1 Wireless Music Phone ...

Страница 2: ...RCHANTABILITY OR FITNESS FOR A PARTICULAR PURPOSE IN NO EVENT SHALL ASUS ITS DIRECTORS OFFICERS EMPLOYEES OR AGENTS BE LIABLE FOR ANY INDIRECT SPECIAL INCIDENTAL OR CONSEQUENTIAL DAMAGES INCLUDING DAMAGES FOR LOSS OF PROFITS LOSS OF BUSINESS LOSS OF USE OR DATA INTERRUPTION OF BUSINESS AND THE LIKE EVEN IF ASUS HAS BEEN ADVISED OF THE POSSIBILITY OF SUCH DAMAGES ARISING FROM ANY DEFECT OR ERROR IN...

Страница 3: ...ys keep the phone dry and free from dust Make sure that the phone is switched off before removing replacing the battery Refer phone servicing only to qualified personnel Use only approved accessories Do not connect incompatible products or devices Use the phone following the instructions in this user guide IMPORTANT Refer to the Appendix for detailed safety notices ...

Страница 4: ...2 Removing and installing the battery 1 4 1 2 3 Charging the battery 1 6 1 2 4 Turning the phone on or off 1 8 1 2 5 Locking the keypad 1 8 1 2 6 Unlocking the keypad 1 9 1 2 7 Display layout 1 10 Chapter 2 Installing and using the AiGuru S1 Utility 2 1 Installing the AiGuru S1 Utility 2 2 2 2 Configuring the AiGuru S1 Utility settings 2 12 2 2 1 Phone Configuration 2 13 2 2 2 Displaying phone sta...

Страница 5: ...1 Using an entry in the phone book 4 2 4 1 2 Using the numeric keypad 4 3 4 1 3 Terminating a call 4 3 4 2 Options during a call 4 4 4 2 1 Hold 4 4 4 2 2 Loud Speaker 4 6 4 2 3 Mute 4 7 4 3 Retrieving recorded Messages 4 8 4 4 Viewing clearing the call history 4 9 4 5 Hosting a Skype conference call 4 11 4 6 Using the Answer Machine 4 12 Appendix Reference information A 1 Setting PC cillin A 2 A 2...

Страница 6: ...vi Table of contents A 4 Safety statements A 10 A 5 Troubleshooting A 19 A 6 FAQ A 20 ASUS contact information A 24 ...

Страница 7: ...ility This chapter provides instructions on how to install the AiGuru S1 utility and the required device drivers This chapter also shows you how to configure the phone and Wireless Link USB dongle Chapter 3 Setting up and getting to know the phone menu This chapter gives you an overview of a desktop and notebook setup and helps you navigate through the Phone Menu and change phone settings Chapter ...

Страница 8: ... Tips and information to aid in completing a task IMPORTANT Instructions that you MUST follow to complete a task CAUTION Information to prevent injury to yourself when trying to complete a task WARNING Information to prevent injury to the unit when trying to complete a task NETWORK DEPENDENT SUBSCRIBED FEATURE The phone feature is network dependent or subscribed ...

Страница 9: ...wnload it register and within minutes you can use the ASUS AiGuru S1 Wireless Music Phone to call your friends on SkypeTM SkypeTM calls have excellent sound quality and are highly secure with end to end encryption Best of all SkypeTM does not require you to reconfigure your firewall or router it just works SkypeTM is a registered trademark of Skype Technologies S A and all rights related to it are...

Страница 10: ...r function to let everyone join in You can put an existing call on hold and allow callers to leave a message on the answer machine and retrieve voice mail with ease In short the ASUS AiGuru S1 Wireless Music Phone Kit gives you all the functionality of a regular phone through SkypeTM You get the convenience of a wireless phone and all its features plus the high quality voice reception that you get...

Страница 11: ...ntents Check your phone package for the following items AiGuru S1 phone USB cradle and power cord User guide Quick Start Guide Battery Support CD Wireless Link USB dongle Wireless Link USB dongle extension USB cable ...

Страница 12: ...ity may vary depending on the connection speed Skype version 2 0 1 81 recommended bundled in the support CD Specifications Dimension 117 L x 46 W x 23 H mm Weight 100 g Wireless standard IEEE 802 11 b g 11 54 Mbps 2 4 GHz with auto fallback and auto channel selection I O 128 x 64 Dot matrix STNLCD 0 5 W Speaker Receiver Mini USB port 3 5 mm 2 channel Earphone jack Keypad Number keys 0 9 End Exit k...

Страница 13: ...ing Wireless receiver Wireless Link dongle UI mounted on the PC or notebook Sofware to install AiGuru S1 Utility Wireless Link dongle driver Accessories Support CD User Manual Quick Start Guide Cradle Adapter Battery USB cable Wireless Link dongle Wireless Link dongle 3D 180º USB extension Specifications Notes USB connection is only for charging and configuring your phone According to free space t...

Страница 14: ...xiv ...

Страница 15: ...information This chapter describes the phone layout provides information about the battery including how to charge it and basic functions such as locking locking the keypad and turning the phone on off This chapter also describes the different layout displays of the phone ...

Страница 16: ...tus signal strength and menus 3 Up key Scrolls up menu lists 4 Left soft key Allows you to perform the function indicated on the screen 5 Call key Initiates a call 6 Down key Scrolls down menu lists Back view 13 14 12 1 2 3 4 5 6 7 8 0 9 abc ghi pqrs tuv wxyz jkl mno def 2 3 4 5 10 11 1 8 9 00 00 ASUS AiGuru_SP Skype Menu 7 6 7 ...

Страница 17: ...ers letters and symbols 12 Speaker 13 Battery latch Secures the battery cover to the phone 14 Battery cover Covers the battery Side view left Side view right 15 16 15 Power button Turns the phone on or off 16 Earphone port Connects an earphone Bottom view 17 Charging pad Connects the phone to the cradle to charge the phone battery 18 USB B type connector Connects a USB B series plug to charge the ...

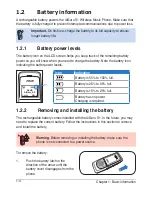
Страница 18: ...tery The rechargeable battery comes installed with the AiGuru S1 In the future you may need to replace the current battery Follow the instructions in this section to remove and install the battery Warning Before removing or installing the battery make sure the phone is not connected to a power source 15 49 ASUS AiGuru_SP Skype Menu To remove the battery 1 Push the battery latch in the direction of...

Страница 19: ...attery cable from the connector on the phone 4 Lift the battery and set it aside To install the battery 1 Plug the battery cable to the connector on the phone 2 Position the battery over the phone then install it into the slot 2 Lift the cover then set it aside 4 Slide the battery cover in the direction of the arrow until the latch snaps in place ...

Страница 20: ...e USB direct charging 1 Connect the USB Series B plug with the squarish end to the port at the bottom of the phone 2 Connect the USB Series A plug with the flat rectangular end to a USB 2 0 port on your computer Important Make sure your computer is turned on For best battery performance allow the battery to charge and discharge completely the first few times you use it Note To know the charging st...

Страница 21: ...ug with the squarish end of the power cable to the port at the back of the USB cradle 2 Slide the phone into the cradle until it fits 3 Connect the power plug to a power source 1 2 3 4 5 6 7 8 0 9 abc ghi pqrs tuv wxyz jkl mno def 1 2 3 4 5 6 7 8 0 9 abc ghi pqrs tuv wxyz jkl mno def ...

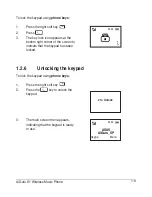
Страница 22: ...ing the on screen Menu 1 Press the righ function key to display the Menu 00 00 ASUS AiGuru_SP Skype Menu 3 The padlock lock icon appears to confirm whether you want the keypad or not Press the left soft key for Yes 2 Scroll down to the Keypad Lock item then press the left soft key to Enter and confirm Enter Exit WiFi Music Phone Setting Keypad Lock Yes No 4 The key lock icon appears in the middle ...

Страница 23: ...at the bottom right corner of the screen to indicate that the keypad has been locked 1 2 6 Unlocking the keypad To lock the keypad using phone keys 1 Press the right soft key 2 Press the key to unlock the keypad to Unlock 3 The main screen then appears indicating that the keypad is ready to use 00 00 ASUS AiGuru_SP Skype Menu 00 00 ...

Страница 24: ...he right soft key the main menu appears You can go to this mode to listen to WiFi music configure phone settings and lock the keypad WiFi Music Phone Setting Keypad Lock Enter Exit Skype mode When you press the left function key the Skype menu appears You can go to this mode to open the Skype phone book listen to recorded voices retrieve recorded messages view the call history initiate a confrence...

Страница 25: ...o def Chapter 2 Installing and using the AiGuru S1 Utility This chapter provides instructions on how to install the AiGuru S1 Utility and the required device drivers This chapter also shows you how to configure the phone and Wireless Link USB dongle ...

Страница 26: ...tures and settings Requirements for installing the AiGuru S1 utility 1 Windows XP SP2 2000 SP4 operating system 2 At least 1 GHz processor 3 At least 256 MB RAM 4 At least 40 MB free hard disk drive space 5 Internet connection Dial up broadband or cable modem at least 33 6 Kbps 6 Skype account 7 Microsoft DirectX 9 0c 8 AiGuru S1 support CD Subscribed feature Consult the Internet Service Provider ...

Страница 27: ...e AiGuru S1 support CD in the optical drive The AiGuru S1 Control Panel appears Click Install AiGuru S1 Utility 2 Click Yes to start installation when the InstallShield Wizard appears 3 Installation begins The Setup Status window appears indicating the progress of installation ...

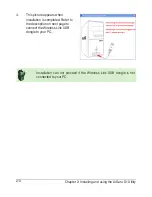
Страница 28: ...u S1 Utility 4 This picture appears when installation is completed Refer to the description on next page to connect the Wireless Link USB dongle to your PC Installation can not proceed if the Wireless Link USB dongle is not connected to your PC ...

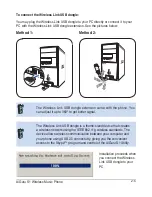
Страница 29: ...USB dongle extension came with the phone You can adjust it up to 360º to get better signal The Wireless Link USB dongle is a thumb sized device that creates a wireless network using the IEEE 802 11g wireless standards The device allows wireless communication between your computer and your phone using USB 2 0 connectivity giving you the convenient access to the Skype program and control of the AiGu...

Страница 30: ... use during the installation then click Next to install the program otherwise click Cancel 1 A dialogue box opens asking if you would lke to install the Skype program Click Yes to install the program To install Skype We recommand you intall the program in the Support CD or the Programs suggested in ASUS website ...

Страница 31: ...greement then click the button I accept the agreement Click Next 4 When Skype installation is done you may choose to launch the program Check the box Launch Skype if you want to do this Click Finish to install the other components of the AiGuru S1 Utility ...

Страница 32: ...lity installation 1 InstallShield Wizard appears after you finish Skype installation Select Yes I want to restart my computer now and click Finish 2 After restarting the computer and launching Skype the piture on the right appears Select Allow this program to use Skype and click OK ...

Страница 33: ...less Music Phone 3 The warning message appears if the phone and the Wireless Link USB dongle are not connected to your PC 4 The following message appears reminding you to press the button Configure to set up the phone ...

Страница 34: ...ne configuration 6 Click OK when phone setup is done 7 The phone displays the information as the right picture 00 00 ASUS TDD W3V_SP Skype Menu Important TDD W3V in the phone display is the computer name 8 To change the computer name displayed in you phone double click the icon in following the task list ...

Страница 35: ...ing screen appears 10 On AiGuru S1 Utility screen click Phone Configuration tab and click Configure 11 When configuration is done the new computer name appears on the screen of your phone 00 00 ASUS AiGuru_SP Skype Menu You may specify a computer name or just keep the original computer name ...

Страница 36: ...d sign in to your account 6 Launch the AiGuru S1 Utility by double clicking the AiGuru S1 Utility icon with the image of this phone on your desktop or the taskbar 7 The AiGuru S1 Utility main screen appears Refer to the following section for details on how to configure the phone with the AiGuru Utility 2 2 Configuring the AiGuru S1 Utility settings After installing the AiGuru S1 Utility and Wirele...

Страница 37: ...nnected to your computer or the phone is not on If icon appears check the connection again and make sure to turn the phone on Important You need to press Configuration button to reset the phone if you connect the phone to another computer or the IP address of your computer changes The system will automatically detect your phone setting if you restart your computer or replug the Wireless Link USB d...

Страница 38: ... and you can not make Skype call Wireless Link Active The Wireless Link USB dongle is successfully connected to the computer Inactive The Wireless Link USB dongle is not connected to the computer or not properly connected Skype Launched You are signed into your Skype account and connected to the AiGuru S1 Utility Not launched You are not signed into your Skype account and or you are connected to t...

Страница 39: ...unction from your AiGuru S1 phone See section 4 6 Using the Answer Machine for details 3 Set the time period within which the function is activated if you do not receive the call 4 Choose whether to use the stored Default Greeting Message or record your Customized Message See section 4 6 Using the Answer Machine for details Notes The Default Greeting Message is saved in C Program Files AiGuru S1 U...

Страница 40: ...11h30m41s 05 18 2006 11 30 41 Click the Voice Mail tab or the icon to retrieve messages left on your answering machine Click to delete Click to rename and save the message Note By default voice mails are saved in C Program Files AiGuru S1 Utility Voice Message Saved message s appear here ...

Страница 41: ...c tab or the icon to select the playlist you would like to listen to on your phone Click Browse to find your desired playlist and click apply Important This device supports Windows Media Player 9 or later version Refer to the Appendix A 2 for details about creating a playlist ...

Страница 42: ...2 18 Chapter 2 Installing and using the AiGuru S1 Utility ...

Страница 43: ... ghi pqrs tuv wxyz jkl mno def Chapter 3 Setting up and getting to know the phone menu This chapter gives you an overview of a desktop and notebook setup and helps you navigate through the Phone Menu and change phone settings ...

Страница 44: ...Enter Exit WiFi Music Phone Setting Keypad Lock 2 When the next screen opens the item WiFi Music is automatically highlighted Press the left soft key to Enter 00 00 ASUS AiGuru_SP Skype Menu Play Exit Song 1 Song 2 Song 3 3 Scroll up or down to select the music file that you want to play then press the left soft key to Play 4 While the music is playing scroll up or down to increase or decrease the...

Страница 45: ...y all in loop To change the playing mode press the Call key 7 To pause press the left soft key Press the left soft key again to resume playing To stop press the right soft key 8 To exit Windows Media Player press the right soft key Pause Stop Song 1 Play Exit 01 Song 1 02 Song 2 03 Song 3 Note Windows Media Player installed in your computer opens automatically when you start playing WiFi Music and...

Страница 46: ...e German and French Enter Back Language Ringing Volume Display 3 2 Phone settings Refer to this section to change your phone settings The Phone Settings menu allows you to change the default language ringing volume and display settings You may also return to the default factory settings from this menu Changing the default language To change the default language 2 Scroll down to Phone Setting then ...

Страница 47: ...ss left soft key to choose Ok when done Ok Back Changing the display settings You may change the display settings to set the backlight time and to adjust the brightness and contrast of your display To set the backlight time 1 From the idle screen go to Menu Phone Setting 2 Scroll down to Display then press the left soft key to Enter Enter Back Language Ringing Volume Display 3 When the next screen...

Страница 48: ... go to Menu Phone Setting Display then press the left soft key to Enter 2 Scroll down to Brightness then press the left soft key to Enter and confirm Enter Back Backlight Time Brightness Contrast 3 The following screen appears Use the Up Down key to increase decrease the brightness level Press the left soft key to choose Ok when done Ok Back _ __ _ _ _ __ _ _ _ __ _ _ _ __ _ _ _ __ _ _ _ __ _ _ _ ...

Страница 49: ...ntrast level 1 From the idle screen go to Menu Phone Setting Display then press the left soft key to Enter Loading the default settings You may revert all phone settings to default which means that you will load all original factory settings You will lose all changes you have made if you load the default settings To load the default settings 1 From the idle screen go to Menu Phone Setting Load Def...

Страница 50: ...idle screen press the right soft key to display the Menu Enter Exit Phone Setting Keypad Lock WiFi Status 2 From the Phone menu scroll to WiFi Status then press the left soft key to Enter 00 00 ASUS AiGuru_SP Skype Menu Back xxx xxx xxx AiGuru_SP Cha 6 Rate 1Mbps 3 The following screen appears displaying information on your WLAN connection Press the right soft key to go Back to the main screen Pho...

Страница 51: ...creen press the right soft key to display the Menu Enter Exit Keypad Lock WiFi Status Mac Address 2 From the Phone menu scroll to WiFi Status then press the left soft key to Enter 00 00 ASUS AiGuru_SP Skype Menu Back Mac Address XX XX XX XX XX XX 3 The following screen appears displaying the MAC address information Press the right soft key to go Back to the main screen ...

Страница 52: ...rmware version 1 From the idle screen press the right soft key to display the Menu Enter Exit WiFi Status Mac Address Software Ver 2 From the Phone menu scroll to Software Ver then press the left soft key to Enter 00 00 ASUS AiGuru_SP Skype Menu Back FW_V1 04 D 3 The following screen appears displaying the software version Press the right soft key to go Back to the main screen ...

Страница 53: ...1 2 3 4 5 6 7 8 0 9 abc ghi pqrs tuv wxyz jkl mno def Chapter 4 Using the Skype features This chapter shows you how to use the phone and navigate the Skype menu ...

Страница 54: ...phone book entry 1 From the idle screen press the left soft key to display the Skype menu 2 When the next screen opens the item Phone Book is automatically highlighted Press the left soft key to Enter Enter Exit Skype Online Phone Book Voice Mail Note The phone book on your phone only displays the contacts saved in your Skype account Subcribed feature To make a call to a mobile phone or land line ...

Страница 55: ...l When you are done with the phone conversation press 4 1 2 Using the numeric keypad 3 Scroll up down to choose the contact you want to call then press to make the call or press the left soft key to view contact s Detail Detail Exit Contact 1 Contact 2 Contact 3 Icon Description The person is online signed in to Skype no icon The person is offline not signed in to Skype Indicates the contact s Sky...

Страница 56: ...hold 4 2 Options during a call 4 2 1 Hold This feature allows you put a call in progress on hold to initiate or receive another call 1 Make a call Refer to section 4 1 1 Using an entry in the phone book 00 00 00886920000000 Option SPK 3 Highlight Hold then press the left soft key to Enter Hold Loud Speaker Mute Enter Exit To use the call waiting function for outgoing calls 2 While the call is in p...

Страница 57: ...all is on hold 00 00 00886920000000 00886920000000 The icon before a number indicates it is on hold The icon before a number indicates it is in progress To terminate a call 00 00 00886920000000 00886920000000 Option 2 To Unhold the first call press the right softs key 1 Press to hang up and terminate the current call Option 00 00 00886920000000 Option Unhold Note Receiving an incoming call while a...

Страница 58: ...t to Enter 2 While the call is in progress press the left sof key to open Options 4 Scroll up or down to On or Off depending on your preference then press left soft key to Select It goes back to the screen in the previous step Press Exit On Off Select Back 00 00 00886920000000 On call Option SPK 5 The following screen appears Note the icon indicating that the loud speaker is enabled 6 Scroll up or...

Страница 59: ... to Enter Enter Exit 4 Scroll up or down to On or Off depending on your preference then press left soft key to Select A mark appears before your choice Press the right soft key to exit and go Back to the previous screen abandoning the choice Select Back On Off 5 The following screen appears Note the icon indicating that the current call is in mute mode 00 00 00886920000000 On Call Option SPK 1 Mak...

Страница 60: ... Voice mail 1 Voice mail 2 Voice mail 3 3 Select either to Play or Delete the voice mail then press the left soft key for Ok Ok Back Voice Mail 1 Play Delete Important If you choose to delete the voice mail a succeeding screen displays a message confirming the action Press the left soft key for Ok You cannot undo this action 4 The following screen appears when select Play Press the left soft key t...

Страница 61: ...he left soft key to Enter 3 Scroll up or down to select a contact name then press the left soft key to open the Detail screen or press the right soft key to Exit A mark appears before your choice Detail Exit Contact A Contact B Contact C 4 The selected contact s Skype account name and or phone number appears on the next screen Press to call the selected contact or press the right soft key to go Ba...

Страница 62: ...ght Clear History then press the left soft key to Enter 3 The Clear History confirmation screen appears Choose Yes to clear the history or No to return to the previous screen 4 If you chose Yes a message appears prompting you to confirm the action Press the left soft key for Yes or press the right soft key for No Enter Back Skype Online Received Call Clear History Yes No Clear History 00 00 Are yo...

Страница 63: ...heir corresponding SkypeOut phone number indicated by the icon Scroll up or down to highlight a participant s name then press the left soft key to Select Repeat the process until you have chosen all participants A mark appears before your choice s To remove the contact from the participants list press the left soft key to deselect Select Back Contact List Contact A Contact B Contact C SkypeOut no ...

Страница 64: ...On or Off depending on your preference then press left to Select A mark appears before your choice Select Back On Off 4 To choose the greeting message to use go back to the Answer Machine menu Scroll down to Greeting Msg then press left to Enter Enter Back Skype Online Setting Greeting Mesg 5 Scroll up or down to choose the greeting message to use then choose Select Choose Play to listen to the de...

Страница 65: ...chine the idle page shows an icon indicator 00 00 ASUS AiGuru_SP Skype Menu Save Exit Recording 00 12 8 When record is in progress press the left soft key to save press the right soft key to abort 9 To play the greeting message recorded scroll up or down to Play then press the left soft key Record Play 10 Playing message recorded screen displays as below Stop SPK Playing 00 13 Refer to 2 2 3 Answe...

Страница 66: ...4 14 Chapter 4 Using the Skype features ...

Страница 67: ...pqrs tuv wxyz jkl mno def Appendix Reference information This chapter describes PC cillin firewall settings and Windows Media Player playlist creating and provides safety notices an FAQ section as well as ASUS contact information ...

Страница 68: ...talled PC cillin Internet Security software in your computer make the following settings before installing AiGuru S1 Utility 1 Open Trend Micro PC cillin Internet Security click Network Security tab then click Personal Fireware 2 On Personal Firewall screen click Add ...

Страница 69: ...A AiGuru S1 Wireless Music Phone 3 Key in ASUS in Profile name field then click OK 4 Select Exception List tab and click Add ...

Страница 70: ...on is saved c Connection Incoming d Action Allow e Protocol TCP UDP d Port s All ports f IP Setting All IP Addresses 6 Add AiGuruOut a Description AiGuruOut b Target Select Specified application and point to the location where the application is saved c Connection Outgoing d Action Allow e Protocol TCP UDP d Port s All ports f IP Setting All IP Addresses ...

Страница 71: ...A AiGuru S1 Wireless Music Phone 7 Back to the Personal Firewall screen select ASUS in Choose profile field then click Apply ...

Страница 72: ...version You may create your own music playlist according to the following steps 1 Open Windows Media Player click Media Library Add By Searching Computer 2 Click Browse to search for music files Or select All Drivers in the Search On field and then click Search to search all the music files in your computer 3 Click Close when search is complete ...

Страница 73: ... AiGuru S1 Wireless Music Phone 4 Click All Music to display all music found 5 Right click My Playlist then press New 6 Key in a new playlist Double click a song to select for the playlist then press OK ...

Страница 74: ...A Appendix Reference information 7 The music files are saved in My Document My Music My Playlist 8 Refer to 2 2 5 WiFi Music to play music with this phone after you finish creating a playlist ...

Страница 75: ...o radio or television reception which can be determined by turning the equipment off and on the user is encouraged to try to correct the interference by one or more of the following measures Reorient or relocate the receiving antenna Increase the separation between the equipment and receiver Connect the equipment into an outlet on a circuit different from that to which the receiver is connected Co...

Страница 76: ... attachment Manufacturer and its authorized resellers or distributors will assume no liability for any damage or violation of government regulations arising from failing to comply with these guidelines CAUTION To maintain compliance with FCC s RF exposure guidelines this equipment should be installed and operated with minimum distance 20cm between the radiator and your body Use on the supplied ant...

Страница 77: ... with FCC RF radiation exposure limits set forth for an uncontrolled environment This equipment must not be co located or operating in conjunction with any other antenna or transmitter Maximum SAR Measurement 1g Head 802 11b 0 815 W kg 802 11g 0 466 W kg Body 802 11b 0 352 W kg 802 11g 0 225 W kg ...

Страница 78: ...se harmful interference and 2 This device must accept any interference received including interference that may cause undesired operation Declaration of Conformity This product complies with the Radio Telecommunication Terminal Equipment Directive 1995 5 EC the Electromagnetic Compatibility Directive 89 336 EEC and Low Voltage Directive 73 23 EEC Compliance with these directives implies conformity...

Страница 79: ...thorization procedure by the Ministry of Defense with maximum authorized power of 100mW in the 2446 5 2483 5 MHz band Use outdoors on public property is not permitted In the departments listed below for the entire 2 4 GHz band Maximum authorized power indoors is 100 mW Maximum authorized power outdoors is 10 mW Departments in which the use of the 2400 2483 5 MHz band is permitted with an EIRP of l...

Страница 80: ...nk or laundry tub in a wet basement or near a swimming pool Do not use the device during an electrical storm There may be a remote risk of electric shock from lightning Do not use the device in the vicinity of a gas leak Required for UL 1642 covering primary nonrechargeable and secondary rechargeable lithium batteries for use as power sources in products These batteries contain metallic lithium or...

Страница 81: ...sic Phone Power Safety Requirement Products with electrical current ratings up to 6 A and weighing more than 3 Kg must use approved power cords greater than or equal to H05VV F 3G 0 75 mm2 or H05VV F 2G 0 75 mm2 Nordic Cautions ...

Страница 82: ... information Proper Disposal The symbol of the crossed out bin indicates that the product electrical and electronic equipment should not be placed in municipal waste Check local regulations for disposal of electronic products ...

Страница 83: ... of radio equipment in fuel depots chemical plants or where blasting operations are in progress The use of the Alert device to operate a vehicle s lights or horn on public roads is not permitted You MUST exercise proper control of your vehicle at all times Observe the following safety precautions when driving Do not use a hand held telephone or microphone while you are driving When driving find a ...

Страница 84: ...arger to an AVR AC Voltage Regulator instead of direct connection to a power outlet Unstable power current may damage the charger and or the device You can connect the USB charger or USB data cable to the device in only one orientation Incorrect insertion of the cable connector may cause short circuiting and may damage the device ...

Страница 85: ...ion to take WiFi Disconnected 1 The phone was not configured properly 2 Communication between the phone and the Wireless Link USB dongle is not established Reconfigure the phone settings See section 2 2 1 Phone Configuration No Service 1 The communication between the phone and the Wireless Link USB dongle is established 2 The AiGuru S1 Utility has not been launched See section 2 2 Configuring the ...

Страница 86: ...se restart Skype Q2 Why does the screen show WiFi Disconnect A2 When the phone is out of the Wireless Link USB dongle s operating range the phone will keep accessing its signal source for 30 seconds If detecting the signal fails the screen shows the message WiFi Disconnect and the goes into sleep mode To regain wireless access move the handset closer to the Wireless Link USB dongle and press any k...

Страница 87: ...may be caused by not starting or logging into Skype properly Verify that you are logged into Skype and the program is running properly Another cause may be that the AiGuru S1 Utility or Wireless Link USB dongle driver has not been launched on the PC or the dongle plug may be disconnected Verify that the AiGuru S1 Utility and Wireless Link USB dongle driver are functioning properly and that the don...

Страница 88: ...Audio Out Virtual Cable 2 Ringing Virtual Cable 2 Q12 Why can I not hear any sound from the PC speakers for normal PC operation while the Wireless Link USB Dongle is plugged in to the PC A12 The PC default audio setting might be in the wrong order You can change back the setting of your PC audio by going to Control panel Sound Speech and Audio Device Sound and Audio Device Audio Check Only use def...

Страница 89: ...r any sound from other Skype devices or headset rather than this phone A15 If you cannot hear any voice from other Skype devices or headset you may 1 Completely turn off the software utility of this phone AiGuru S1 Utility and restart Skype 2 Check the setting of Sound Devices in Skype Go to Skype Tools Options Sound Devices and make the following settings Audio In Desired Skype Device or windows ...

Страница 90: ...line 886 2 2894 3447 Fax 886 2 2890 7698 E mail http vip asus com eservice techserv aspx Web site http www asus com ASUS COMPUTER INTERNATIONAL America Technical Support Motherboard and General Product Support E mail http vip asus com eservice techserv aspx Telephone 1 502 995 0883 select option 3 Fax 1 502 933 8713 ASUS COMPUTER GmbH Germany and Austria Technical Support Hotline MB Others 49 2102...

Страница 91: ...ormation ASUS Holland B V Netherlands Notebook Hotline 31 0 591 668190 Fax 31 0 591 666853 Email http vip asus com eservice techserv aspx Notebook MB VGA only ASUS COMPUTER China Telephone 86 10 82667575 Email http vip asus com cn eservice techserv aspx ...

Страница 92: ...A 26 Appendix Reference information ...

Отзывы: