


5
HOOD STATUS
Car identification
TRUNK STATUS OR
OTHER SENSOR
PRE-SHOCK STATUS
Valet mode status
Lock commands status
Engine running status
ALARM SYSTEM STATUS *
SHOCK SENSOR STATUS
DOORS STATUS
Parking lights
Pager
Low battery
Ready to start /
IGNITION STATUS
/ Parking lights
* AstroStart or when OEM alarm is in alarm condition (Alarm Link)
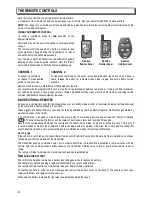
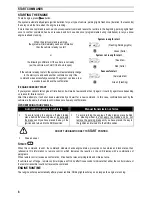
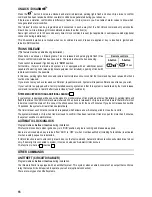
CONFIRMATIONS EMITTED BY THE
4-
BUTTON BIDIRECTIONAL REMOTE
An audible confirmation (piezo) and a visual
confirmation (LCD display) are emitted each time a
command is transmitted.
The following diagram shows the usefulness of each
segment of the display.
Display confirmations will be visible for 4 seconds.
Descriptions in capital letters show confirmations
pertaining to the security system’s functions.
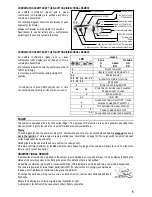
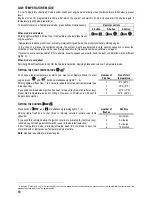
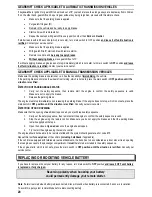
CONFIRMATIONS EMITTED BY THE
5-
BUTTON BIDIRECTIONAL REMOTE
An audible confirmation (piezo) and a visual
confirmation (LCD display) are emitted each time a
command is transmitted.
The following diagram shows the usefulness of each
LED of the display.
In most cases, confirmations remain visible for 5
seconds.
*
CONFIRMATION OF
A
LARM
ON
RECEIVED ONLY AT TIME
OF ARMING WHEN SYSTEM IS EQUIPPED WITH AN ALARM
.
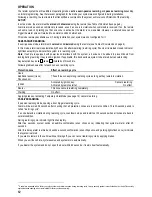
PAGER
The system is equipped with a function called ‘Pager’. The purpose of this function is to send a general call asking those
who carry them to get to the vehicle or to perform a task previously established.
Paging
To send a general call, the user must press the ‘Valet’ switch and hold it for 3 seconds while engine
is stopped
and key is
not in the ignition
, or while engine is remote started (see ‘Valet Mode’ on page 14)(The valet switch is a small red push
button hided under the dash board).
Parking lights on the vehicle blink once to confirm the call was sent.
All remote controls (maximum: 4) located within the radio frequency range of the vehicle will begin to chirp. To silence the
remote control, press any button.
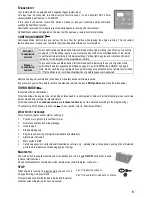
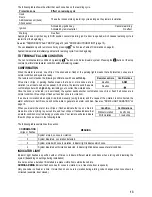
UNIDIRECTIONAL REMOTE
A unidirectional remote can be added to the system to accommodate an occasional driver. It has no display indicating the
status of the security system or confirming the action of commands that are transmitted.
An audible confirmation (piezo) and a visual confirmation (LCD display) are emitted each time a command is transmitted.
The remote is powered by three lithium batteries CR-2016 or equivalent. It is strongly recommended
to keep a set of replacement batteries in the glove compartment.
To change the batteries, simply remove screw on back of remote, remove worn batteries and insert
fresh ones.
Ensure the batteries are correctly oriented. See illustration at right.
A pictogram in the bottom of the case shows correct battery orientation.
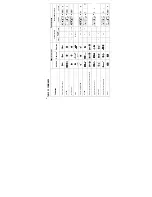
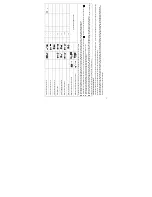
L
EGEND
S
OLID
F
LASHING
LED
G
R
GREEN
R
ED
G G
R R
G
R
EADY FOR START
R
U
NABLE TO START OR
E
NGINE STOP
G G
E
NGINE RUNNING
R R R R R R G G G G
A
LARM WITH ZONE IN VIOLATION
R R R R R R
P
RE
-
SHOCK
R
D
OOR LOCKED
& A
LARM
ON*
R R
G G
D
OOR OPEN FOR MORE THAN
5
MINUTES
/
P
ARKING LIGHTS
/ P
AGER
G
D
OOR UNLOCKED
G
G
V
ALET
ON
G
O
THER FUNCTIONS
/ V
ALET
OFF
/ T
RUNK
RELEASE COMMAND NOT ACCEPTED
R
N
O CONFIRMATION SIGNAL RECEIVED
G
T
RUNK COMMAND
A
CCEPTED
G
G
T
RUNK OPEN FOR MORE THAN
5
MINUTES


