background image

 
11 


Nexus DSC 

Pro

 Quick Setup Guide 

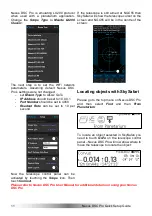
Nexus  DSC 

Pro

  is  emulating  LX200  protocol 

when  used  with  a  planetarium  application. 
Change  the 

Scope  Type

  to 

Meade  LX200 

Classic


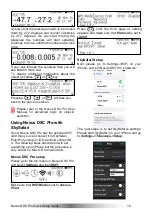
The  next  step  is  to  set  the  WiFi  network 
parameters.  Assuming  default  Nexus  DSC 

Pro

’s settings were not changed: 

-  set 

Mount Type 

to Alt-Az GoTo 

IP Address

 should be set to 10.0.0.1 

Port Number

 should be set to 4060 

Readout  Rate

  can  be  set  to  10  per 

second 


Now  the  telescope  control  panel  can  be 
activated  by  touching  the 

Scope 

icon.  Then 

touch 

Connect

.  

If  the  telescope  is  still  aimed  at  NGC55  then 
SkySafari will show the telescope cursor on the 
screen and NGC55 will be in the centre of the 
screen: 


Locating objects with SkySafari 

 
Please go to the top menu on Nexus DSC 

Pro


and  then  select 

Find

  and  then 

From 

Planetarium


To  locate  an  object  selected  in  SkySafari  you 
need  to  touch

  GoTo

  on  the  telescope  control 

panel – Nexus DSC 

Pro

 will now show where to 

move the telescope to locate the object: 


Please refer to Nexus DSC


Pro User Manual for additional details on using your Nexus 

DSC


Pro 


Содержание Nexus DSC Pro

Страница 1: ...Nexus DSC Pro Quick Setup Guide 7 8 4 1 0 2 5 9 6 3 ESC OK OFF ON DSC Nexus Pro...

Страница 2: ...levels as well as high DO NOT leave Nexus DSC Pro where it is in direct sunlight or in an enclosed space such as a car that can become extremely hot very rapidly Do not drop or subject the Nexus DSC...

Страница 3: ...port running Windows XP or Windows 7 8 10 Apple computers with WiFi support running Mac OS X Please also refer to the system requirements for your favourite planetarium software Package Content The pa...

Страница 4: ...The main screen consists of a status bar horizontal menu with icons and a text description of the currently selected menu item Status bar Main menu Menu description The status bar has the following el...

Страница 5: ...r Connecting to your telescope Please plug the encoder cable into Encoders port on Nexus DSC Pro To make sure that encoders are functioning correctly Nexus DSC Pro has a test mode Selecting Test from...

Страница 6: ...cate celestial objects The two star alignment can be performed using two methods Using Nexus DSC Pro itself Using SkySafari Plus Pro Two star alignment using Nexus DSC Pro The telescope does not need...

Страница 7: ...pe should be pointed at Gacrux using an eyepiece with a reticle crosshair or a very high magnification eyepiece Press the button once the telescope is pointing at the star Nexus DSC Pro will now switc...

Страница 8: ...in the centre of the field of view touch the Align button A popup window will appear to confirm the alignment Touch the Align button to confirm Nexus DSC Pro will produce a short beep if sounds are en...

Страница 9: ...can be used as one of the alignment stars To achieve the best pointing accuracy on an Equatorial mount it is recommended that Polaris should never be used as one of the alignment stars Alignment stars...

Страница 10: ...Nexus DSC Pro with SkySafari If your Nexus DSC Pro has the optional WiFi card then you can connect it to SkySafari Plus Pro running on iOS Android or Mac OS X The following steps describe how to set...

Страница 11: ...telescope control panel can be activated by touching the Scope icon Then touch Connect If the telescope is still aimed at NGC55 then SkySafari will show the telescope cursor on the screen and NGC55 w...

Страница 12: ...Printed in Australia...

Отзывы: