Astralpool 21626 Скачать руководство пользователя страница 3

3

4. ASSEMBLY:  

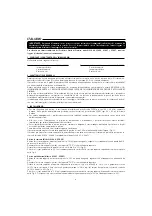
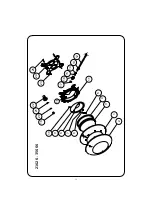
The floodlamp is supplied with 2,5 m of cable ( G ). It should be inserted through the conduit body (Fig. 4), leaving 
approximately 1.50 m of cable in order to be able to remove the floodlamp to the border of the swimming pool if handing or 
lamp change is required (Fig. 1). 
Wind the cable in counter-clockwise direction under the screen fastening clamps (Fig. 5). Firmly secure the gland seal nut 
(No. 12). (Fig. 6). 
In order to secure the floodlamp to the crosshead mount, ensure that the word “TOP” is located on the upper part. First, 
insert the lower clamp of the screen in the crosshead mount. 
Then, press on the upper part until the floodlamp is firmly inserted in the crosshead mount. 

5. MAINTENANCE: 

To remove the floodlamp to the border of the swimming pool (Fig. 1) insert a screwdriver through the upper hole of the 
ornament and press on the spline of the mount until the floodlamp is released. (Fig. 7-8). 
Pull up on the floodlamp until it is released from the lower groove and can be removed from the swimming pool. 
Dismount the floodlamp by turning the screen in counter-clockwise direction (Fig. 9). If this can not be done with your 
hands, use a screwdriver to obtain leverage, using the grooves located on both sides of the ornament (Fig. 9). 
Pull on the lamp ( E ) to separate it from the lamp holder (No. 2). Connect the new lamp (Fig. 10). 
VERY IMPORTANT: To change the lamp, always use the cardboard protector and never touch the new lamp with your bare 
hands.
Then, assemble the floodlamp in the opposite order of that described. Make sure that the butt joint and the transparent lens 
are inserted properly in the screen seat. 
Align the word “TOP” on the ornament with the word “TOP” on the screen fastening. 
Turn the ornament slightly to the right until it is fitted with the screen. 
Wind 1.50 m of cable ( G ) in counter-clockwise direction under the screen fastening clamps. (Fig. 5) 

Attention:

x

Before any handling ensure that there is NO voltage supplied to the floodlamp. 

x

The new lamp should have the same characteristics as that supplied with the floodlamp (100 W 12 V halogen lamp). 

x

In order to ensure full watertightness, clean the seat of the flootlamp lens joint ( D ) or replace this if any permanent 
deformation or notches are visible. 

6. START-UP:  

Ensure that the voltage the lamp receives is never greater than 12 V. 
The floodlamp should only operate underwater while secured to the vertical walls of the pool. Never switch on the floodlamp 
if it is not underwater. 

7. SAFETY WARNINGS: 

x

The persons who are in charge of assembly should have the required qualificatlons for this type of work. 

x

Avoid making contact with the electric voltage. 

x

Comply with the current standards regarding accident prevention. 

x

In this regard, the IEC 364-7-702 standards must be observed: WIRING IN BUILDINGS. SPECIAL WIRING. SWIMMING 
POOLS.

x

Any operation related to the maintenance or replacement of parts should be performed with the floodlamp disconnected 
from the electric power system. 

x

Do not handle with wet feet. 

Содержание 21626

Страница 1: ...ERWASSER SCHEINWERFER FARO SUBACQUEO Model 21626 21627 35666 35667 INSTALLATION AND MAINTENANCE MANUAL MANUEL D INSTALLATION ET D ENTRETIEN MANUAL DE INSTALACI N Y MANTENIMIENTO MANUALE DI INSTALAZION...

Страница 2: ...which are especially deep a 100 W floodlamp is required for every 30 or 40 m of water volume x In order to prevent glare the floodlamps should be installed so that they face away from the residence or...

Страница 3: ...r and never touch the new lamp with your bare hands Then assemble the floodlamp in the opposite order of that described Make sure that the butt joint and the transparent lens are inserted properly in...

Страница 4: ...d eau Dans les piscines particuli rement profondes il faudra employer un projecteur de 100 W tous les 30 ou 40 m de volume d eau x Pour viter d tre aveugl par la lumi re il faut que 1 orientation des...

Страница 5: ...nues Proc der au montage du projecteur de la fa on inverse l op ration d crite pr c demment en prenant bien soin de placer correctement le joint plat et la lentille transparente sur l assiette de l cr...

Страница 6: ...de 100 W cada 30 o 40 m de volumen de agua x A fin de evitar deslumbramientos los proyectores deben instalarse orientados en sentido contrario de la vivienda o vista habitual de la piscina x En caso d...

Страница 7: ...lente transparente en el asiento de la pantalla Hacer coincidir la palabra TOP del embellecedor con la palabra TOP del anclaje de la pantalla Girar el embellecedor ligeramente a la derecha hasta que...

Страница 8: ...o 35 m di superficie d acqua Nelle piscine particolarmente profonde sar necessario un proiettore da 100W ogni 30 o 40 m di volume d acqua x Per evitare abbagliamenti i proiettori dovranno essere insta...

Страница 9: ...erso delle operazioni descritte per lo smontaggio facendo particolare attenzione a situare correctamente la guarnizione piana e la lente trasparente nella sede dello scherzo Fare coincidere la parola...

Страница 10: ...ng oder Einbau von Elektrokomponenten nicht in seinem Betrieb durchgef hrt worden sind 3 INSTALLATION x Um einen Swimmingpool hell zu erleuchten empfiehlt sich die Installation von einem 100 W Strahle...

Страница 11: ...Abb 9 Man zieht an der Lampe E um sie aus der Fassung zu entfernen Nr 2 und setzt die neue ein Abb 10 SEHR WICHTIG Zum Auswechseln der Lampe muss man immer einen Kartonschutz benutzen und darf die neu...

Страница 12: ...o de um projector de 100W a cada 25 ou 35 m de superf cie de gua Em piscinas especialmente profundas ser necess rio um projector de 100 W a cada 30 ou 40 m de volume de gua x A fim de evitar deslumbr...

Страница 13: ...as Proceda montagem do Projector do modo contr rio ao descrito tendo especial cuidado em situar correctamente a junta plana e a lente transparente no assento do quebra luz Fa a coincidir a palavra TOP...

Страница 14: ...21626 35666 2 1 3 4 5 11 12 19 20 21 22 24 25 23 10 9 8 7 6 17 15 16 13 14 18 14...

Страница 15: ...2x1 5 X X 1 25 00346R0008 Screw anchor S 6 X X 4 13 21626R0007 Cable gland plug X X 1 FRAN AIS N CODE DESCRIPTION 21626 35666 Q N CODE DESCRIPTION 21626 35666 Q 1 21626R0002 Anneau enjoliveur X 1 14...

Страница 16: ...ble 2x1 5 de 2 5m X X 1 25 00346R0008 Taco S 6 X X 4 13 21626R0007 Tap n prensaestopas X X 1 ITALIANO N CODICE DESCRIZIONE 21626 35666 Q N CODICE DESCRIZIONE 21626 35666 Q 1 21626R0002 Anello ornament...

Страница 17: ...21626R0005 Elektrokabel 2x1 5x2500 X X 1 25 00346R0008 D bel S 6 X X 4 13 21626R0007 Quetschverschraubungsdeckel X X 1 PORTUGU S N CODE DESCRIPTION 21626 35666 Q N CODE DESCRIPTION 21626 35666 Q 1 216...

Страница 18: ...21627 35667 2 1 3 4 5 11 12 19 20 23 21 22 24 26 27 30 28 29 25 10 9 8 7 6 17 15 16 13 14 18 18...

Страница 19: ...4 15 00346R0011 Cable gland gasket X X 1 30 7012106000 Nut DIN 934 A2 M 6 X X 4 FRAN AIS N CODE DESCRIPTION 21627 35667 Q N CODE DESCRIPTION 21627 35667 Q 1 21626R0002 Anneau enjoliveur X X 1 16 21626...

Страница 20: ...4 15 00346R0011 Junta prensaestopas X X 1 30 7012106000 Tuerca DIN 934 A2 M 6 X X 4 ITALIANO N CODICE DESCRIZIONE 21627 35667 Q N CODICE DESCRIZIONE 21627 35667 Q 1 21626R0002 Anello ornamentale X X 1...

Страница 21: ...DIN 125 A2 M 6 X X 4 15 00346R0011 Quetschverschraubungsdichtun X X 1 30 7012106000 Mutter DIN 934 A2 M 6 X X 4 PORTUGU S N CODE DESCRIPTION 21627 35667 Q N CODE DESCRIPTION 21627 35667 Q 1 21626R000...

Страница 22: ...Fig 1 21626 35666 21626 35667 Fig 2 80 80 25 Fig 3 Fig 4 22...

Страница 23: ...Fig 5 Fig 6 Fig 7 Fig 8 Fig 9 Fig 10 23...

Страница 24: ...E SE NON IMMERSO IN ACQUA UNTERWASSER SHEINWERFER NUR UNTER WASSER GETAUCHT ANZUMACHEN N O ACENDER NUNCA O PROJECTOR SE N O ESTIVER SUBMERGIDO NA GUA Made in EC Sacopa S A U Pol Ind Poliger Sud Sector...

Отзывы: