background image

Using the Device


34

User Guide

     However, when the following screen is displayed, verify 
     that [DAC Input] is selected under [      - Connect USB].

USB DAC Installation

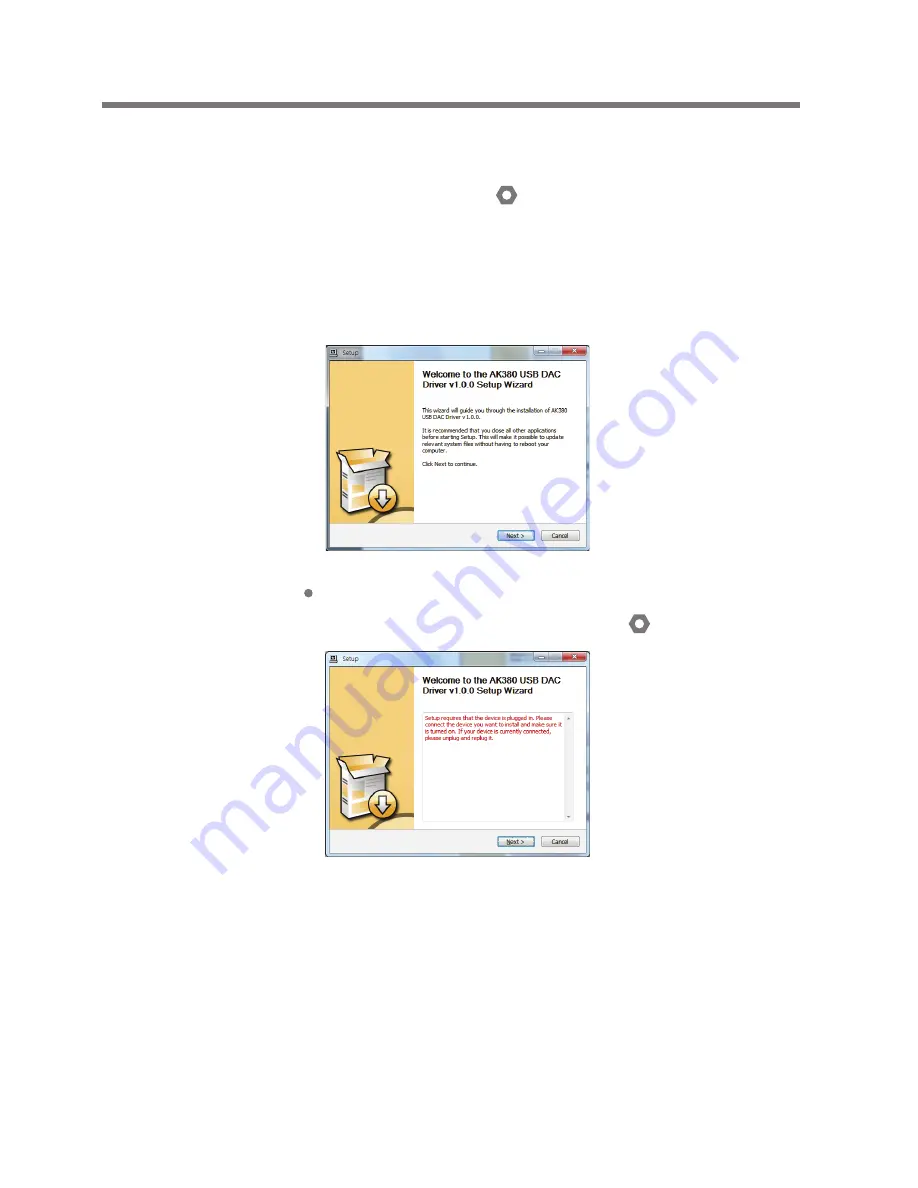
1. Set [DAC Input] from [     - Connect USB].
2. Connect the device to the PC using the supplied Micro-
  USB cable.
3. Run 'Setup.exe' from Drivers.
4. Press [Next] when the below screen is displayed.

Содержание AK380

Страница 1: ...INSTRUCTION BOOK AK380 User Guide...

Страница 2: ...Screen AK Connect Listening to Music Playlist Management USB DAC Installation Using Bluetooth Setup Connecting to a Wireless Network Equalizer Setup 12 14 15 18 24 30 33 38 40 45 46 Using the Device...

Страница 3: ...ty card is required for customer technical support Do not misplace the card User Guide The User Guide can be downloaded from the Astell Kern website http www astellnkern com Support Download microSD C...

Страница 4: ...device by using both the earphone port ground and balanced audio port LR in conjunction Micro USB Port Connect to a computer or recharge the device Expansion Unit Balanced Out Output sound to an expan...

Страница 5: ...timeout feature to reduce battery consumption The screen will turn off after a defined period when there is no user input Power Auto Power Off See p 43 Turn the Screen On Off 1 While the screen is on...

Страница 6: ...The built in battery will gradually lose capacity over time according to the number of charges discharges Be sure to use a high powered USB 2 0 port A low powered USB port e g keyboard or USB hub with...

Страница 7: ...es port Getting Started 06 Balanced Earphones Headphones 1 Connect supported earphones or headphones to the balanced port OR OR Balanced Audio Device 1 Connect to an external audio device by using bot...

Страница 8: ...lied with the device DSD format is converted to PCM when using Optical Out The volume will be fixed at the maximum level Connecting to a Computer 1 Turn on the device and your PC 2 Connect the device...

Страница 9: ...rations have completed before attempting to disconnect the device from the computer Disconnecting the device from the computer during an operation e g file transfer may corrupt data on the device Wind...

Страница 10: ...ansfer speeds may be affected by the computer and or the OS environment Getting Started 09 User Guide Insert Remove a microSD Card 1 Refer to the diagram and gently insert a microSD card into the micr...

Страница 11: ...pt data and cause serious damage to the system Do not remove the microSD card while it s in use Doing so may cause data corruption deletion malfunction and damage to the microSD card Miscellaneous If...

Страница 12: ...a firmware upgrade Doing so may cause data corruption and or damage to the system If an error occurs or the notice in the Notification Bar disappears during an upgrade download the firmware upgrade ag...

Страница 13: ...reen Interact with the device by touching the screen to access various features To prevent damage to the screen do not use a sharp object or excessive force The Home button on the AK380 is pressure se...

Страница 14: ...Using the Device 13 User Guide Moving up down in the list 1 You can scroll through the list by dragging the list screen up and down...

Страница 15: ...rch options can be long pressed and dragged to change their locations Currently playing song information Launches AK Connect View the list of songs by different search options Current Song AK Connect...

Страница 16: ...Using the Device 15 User Guide Notification Bar Screen 8 2 4 10 11 9 13 15 12 3 14 5 6 7 1...

Страница 17: ...Fi speaker functionality on or off Enabled when speakers are connected Notification contents are displayed in this area Enter keywords to display a list of items containing the search terms Displays a...

Страница 18: ...wheel is disabled when the screen is locked Press to cycle through different play modes Sequential playback Shuffle playback Press to cycle through different repeat modes Repeat the entire playlist Re...

Страница 19: ...or download music files stored on a computer on the same network Music can be played through Astell Kern speakers AK CONNECT Please refer to the following PC Mac minimum system requirements PC Minimu...

Страница 20: ...displayed 5 Scroll the screen left and right to select a server The selected server will be connected and the server home screen will be displayed 6 Select a search option at the bottom of the server...

Страница 21: ...of the screen to begin downloading A message on the Notification Bar will indicate a completed download Depending on network conditions song loading may be slow or streaming may stutter Server respons...

Страница 22: ...work as the AK380 2 Turn on AK Connect from the device settings 3 Press from the notification bar to display a list of speakers available on the same network as the AK380 4 Scroll the screen left and...

Страница 23: ...Using the Device 22 User Guide Case 2 Case 3 AK500N LIBRARY REMOTE SPEAKER AK T1 AK380 REMOTE LIBRARY AK380 SPEAKER AK500N...

Страница 24: ...Using the Device 23 User Guide Case 4 Case 5 LIBRARY SPEAKER AK T1 AK380 AK500N REMOTE SPEAKER AK T1 LIBRARY AK380 or REMOTE AK Connect APP AK500N LIBRARY...

Страница 25: ...ayback You can also pause resume playback by pressing the button on the device Press during playback for the previous next song You can also play the previous next song by pressing the button on the d...

Страница 26: ...device to go to the Home Screen Press the album cover during playback to display an additional screen Display the previous screen Display the current playlist Press next to the playlist to edit the pl...

Страница 27: ...Using the Device 26 User Guide Playlist Screen 1 2 4 5 6 3...

Страница 28: ...playlist Displays the playlist for the current location Long press a song to add it to or remove it from the playlist Select a method for sorting the playlist Select a view type for the list of album...

Страница 29: ...12 11 10 6 5 4 3 7 8 9 13 14 15 Music Player Screen Return to the previous screen Displays album covers Press the album cover to show lyrics add the current song to a playlist or view song informatio...

Страница 30: ...playlist Displays current song information Indicates the song s total duration Press to switch from elapsed time to remaining time Indicates song progress Drag the indicator to move to the desired ti...

Страница 31: ...s 2 Press at the upper right corner of the screen 3 Enter a name for the playlist and then press Add to create a new playlist Adding a Song to a Playlist 1 Press Playlists to display a list of playlis...

Страница 32: ...nd then press to remove the song from the selected playlist Editing the Playlist Order 1 Press next to the playlist to modify the playlist order Playing a Playlist 1 Press Playlists to display a list...

Страница 33: ...the playlist to be deleted 3 Press at the top of the screen to delete the selected playlist 1 Press Playlists to display a list of playlists and then press at the top of the screen 2 Select a playlis...

Страница 34: ...ble during USB DAC connection Playback may stutter when computer performance is slow or the USB connection is experiencing heavy usage There may be issues with audio to video synchronization during vi...

Страница 35: ...n is displayed verify that DAC Input is selected under Connect USB USB DAC Installation 1 Set DAC Input from Connect USB 2 Connect the device to the PC using the supplied Micro USB cable 3 Run Setup e...

Страница 36: ...User Guide 6 When the following screen is displayed click Finish to complete the installation Before driver installation After driver installation 5 Click Browse to select the driver destination folde...

Страница 37: ...m as seen in the images below Windows XP Control Panel Sound and Audio Devices Audio tab Change the default audio device under Sound playback to AK380 USB DAC Windows 7 8 Control Panel Hardware and So...

Страница 38: ...d Manage Audio Devices Double click AK380 USB DAC Advanced tab Default format Select 24 bit 192000 Hz Recommended Mac OS X System Preferences Sound Output tab Select AK380 USB DAC This step is only re...

Страница 39: ...device s instruction manual for details 1 Select from the home screen or select On Off from Bluetooth Bluetooth Pairing 1 Select the appropriate Bluetooth device from the list of available devices Re...

Страница 40: ...th For multipoint devices make the necessary connections prior to use Car audio Bluetooth connections are not supported Malfunction noise and other undesirable effects may occur due to the device s ba...

Страница 41: ...n bar 2 Select the desired item for setup Wi Fi Change wireless network settings and turn Wi Fi on or off Bluetooth Connect a Bluetooth device to listen to music wirelessly Refer to page 45 for more i...

Страница 42: ...t use earphones with the Line Out feature enabled Doing so may cause permanent hearing loss EQ Supported Formats PCM 8 192kHz 8 16 24bit Equalizer is not supported during DSD 32bit playback Using the...

Страница 43: ...creen brightness settings Theme Change the theme Date Time Set the current date time and region AMP Set the amplification level for amp connection Language Select a language English Korean Japanese Ch...

Страница 44: ...is prompted to choose a download folder each time a file is downloaded Power Automatic Shutdown The device will turn off after a defined period when there is no user input Screen Timeout The screen w...

Страница 45: ...Be sure to backup any important files before formatting When formatting the microSD card from a computer be sure to select the FAT32 system System Restore Database Initialization Reset the internal da...

Страница 46: ...y be required depending on the network settings 3 Long press the network name and select Network Settings to edit specific network settings Connecting to a Network 1 Long press from the Notification B...

Страница 47: ...Press Pro EQ at the upper left corner of the screen and select 3 Enter a name for the custom EQ settings and select Add Equalizer Setup Equalizer Setup 1 Long press EQ from the Notification Bar or tu...

Страница 48: ...efault settings 4 Adjust the frequencies left and right according to the user s preferences 5 The number values at the lower left corner of the screen can be adjusted for fine tuning 6 Press at the lo...

Страница 49: ...ft corner of the screen 2 Press next to the desired item to delete the selected equalizer Renaming an Equalizer 1 Press Pro EQ at the upper left corner of the screen 2 Press next to the desired item a...

Страница 50: ...or storing the device in direct sunlight e g inside a car in the summer Do not use or store the device in hot and humid areas Do not use or store the device areas with excess dust smoke or debris Avoi...

Страница 51: ...the volume or discontinue using the product and consult a medical professional Do not listen to music at excessive volumes for extended periods Do not use the earphones headphones at excessive volume...

Страница 52: ...ter Check that the USB cable is connected correctly For Windows XP verify that Service Pack 2 or higher and Windows Media Player 10 or higher are installed Check if the device connects properly on a d...

Страница 53: ...produced in any format or by any means without the prior approval of iriver Using or reproducing in whole or part the contents of this document is subject to penalties Software audio video and any oth...

Страница 54: ...ing interference that may cause undesired operation Disclaimers The manufacturer importer and distributor shall not be liable for damages including accidental and personal injury due to the improper u...

Страница 55: ...053dB Condition 20Hz 20kHz Balance 0 56 dB Condition 10Hz 70kHz Unbalance 0 55 dB Condition 10Hz 70kHz Balance 116dB 1kHz Unbalance 117dB 1kHz Balance 130dB 1kHz Unbalance 135dB 1kHz Balance 0 0008 1k...

Отзывы: