ASRock Utility Control Switch
Card Fan Switch
Use this switch to control the card fan speed.
Off: Full (The fan runs at full speed)
ON: Half (The fan runs at half speed, with a half voltage supply)
Graphics 12V Power Connector
This card provides a 6-pin graphics 12V power connector. Install the PSU’s
power cable to this connector when more than two M.2 cards* are installed.
*Intel Optane SSD 900P or other M.2 card with higher power consumption
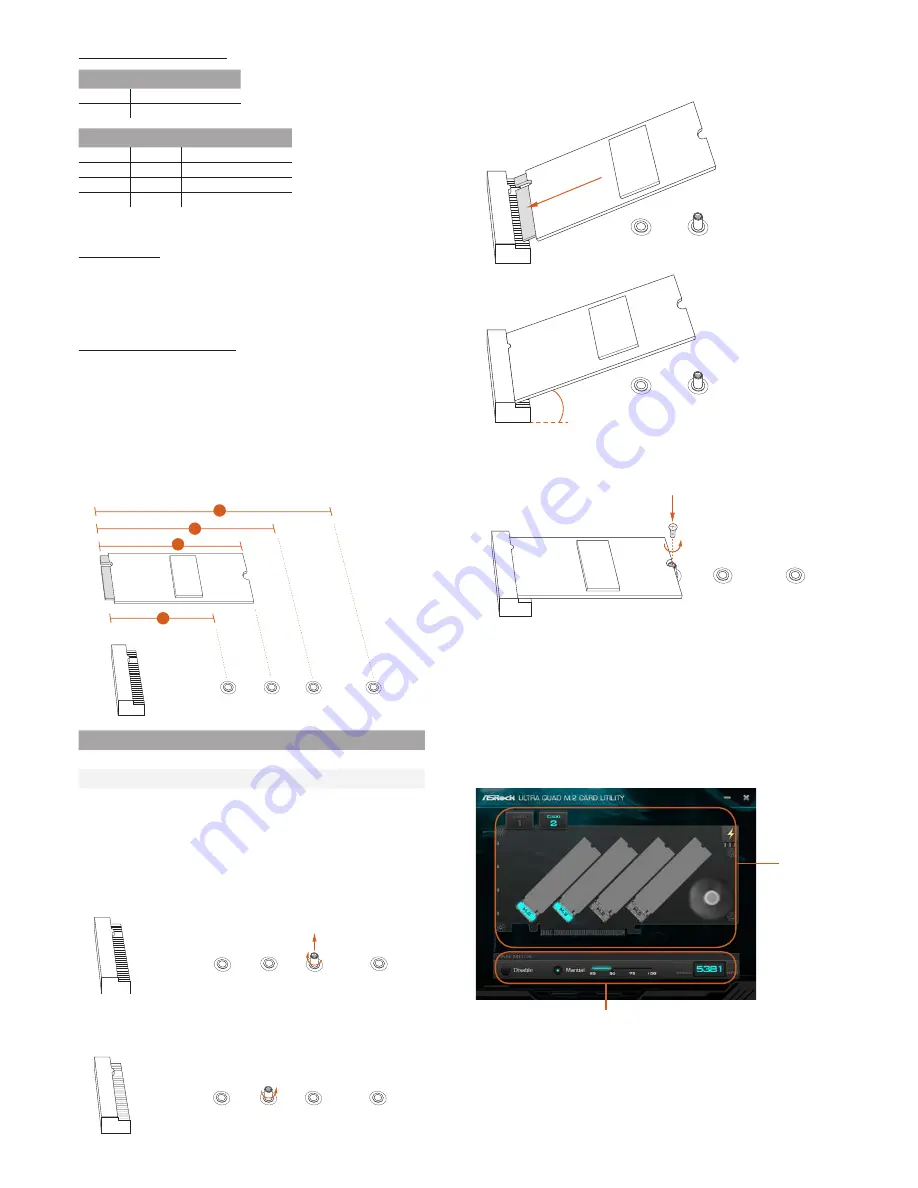
Installing M.2 SSD Module
1. Depending on the PCB type and length of your M.2_SSD (NGFF) module,
find the corresponding nut location to be used.
2
1
3
4
A
B
C
D
2. Move the standoff based on the module type and length. The standoff is
placed at the nut location C by default. Skip Step 3 and 4 and go straight to
Step
5
if you are going to use the default nut. Otherwise, release the standoff
by hand.
A
B
C
D
3. Peel off the yellow protective film on the nut to be used. Hand tighten the
standoff into the desired nut location on the motherboard.
A
B
C
D
Ultra QUAD M.2 card Utility
With the ASRock Ultra QUAD M.2 card Utility, you can check that if your
M.2 SSD is properly installed and adjust the fan speed. Place the Support CD
into your DVD-ROM drive to run this utility or download it from the ASRock
website.
M.2 SSD
Status
Select a fan speed mode
[Manual] Select a fan speed preference
[Disable] Turn off the fan
No.
1
2
3
4
Nut Location
A
B
C
D
PCB Length
4.2cm
6cm
8cm
11cm
Module Type
Type 2242
Type2260
Type 2280
Type 22110
4. Gently insert the M.2 SSD module into the M.2 slot.
Please be aware that the M.2 SSD module only fits in one orientation.
A
B
A
B
20
o
5. Tighten the screw with a screwdriver to secure the module into place.
Please do not overtighten the screw as this might damage the module.
NUT1
NUT2
C
D
SW1
Utility control
On
Disabled
Off
Enabled
SW2
SW3
CARD number
Off
Off
CARD 1
On
Off
CARD 2
Off
On
CARD 3
On
On
CARD 4
SW4: no function


