52
A
B
C
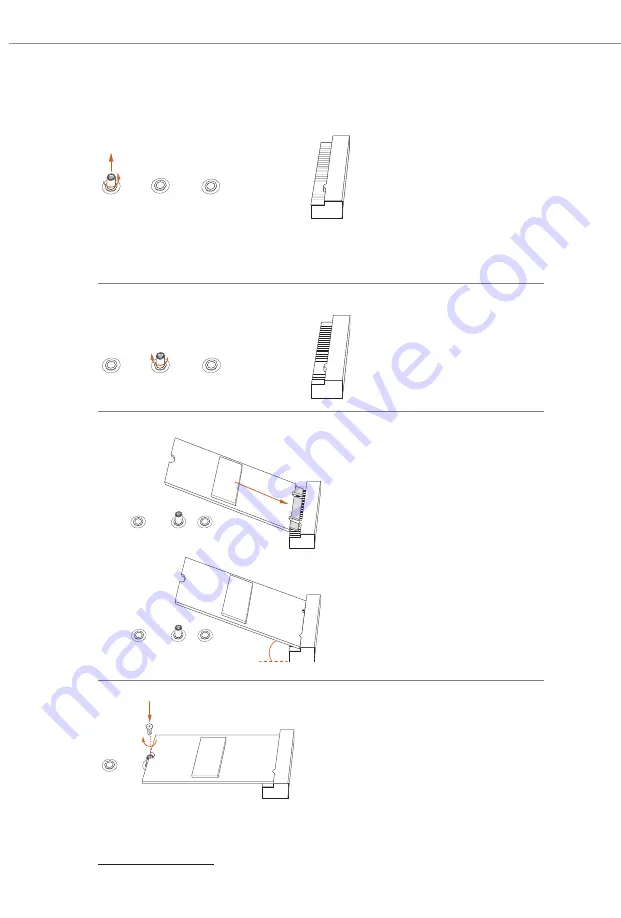
Step 3
Move the standoff based on the
module type and length.
The standoff is placed at the nut
location C by default. Skip Step 3
and 4 and go straight to Step
5
if you
are going to use the default nut.
Otherwise, release the standoff by
hand.
A
B
C
Step 4
Peel off the yellow protective film on
the nut to be used. Hand tighten the
standoff into the desired nut location
on the motherboard.
A
B
C
A
B
C
20
o
Step 5
Align and gently insert the M.2 SSD
module into the M.2 slot. Please be
aware that the M.2 SSD module only
fits in one orientation.
NUT1
NUT2
C
Step 6
Tighten the screw with a screwdriver
to secure the module into place.
Please do not overtighten the screw
as this might damage the module.
For the latest updates of M.2 SSD module support list, please visit our website for details:
http://www.asrock.com
Содержание Phantom Gaming Z790 PG Lightning
Страница 1: ......
Страница 11: ...7 Z790 PG Lightning Back Side View 30 EDP1 ...
Страница 18: ...14 2 2 Installing the CPU Fan and Heatsink 1 2 C P U _ F A N ...
Страница 20: ...16 1 2 3 ...
Страница 22: ...18 2 5 Installing the Motherboard ...
Страница 23: ...19 Z790 PG Lightning 2 6 Installing SATA Drives 1 2 Optical Drive SATA Drive SATA Data Cable ...
Страница 24: ...20 3 4 SATA Power Connector SATA Data Connector ...
Страница 25: ...21 Z790 PG Lightning 2 7 Installing a Graphics Card 1 CLICK ...
Страница 27: ...23 Z790 PG Lightning 2 8 Connecting Peripheral Devices ...
Страница 28: ...24 2 9 Connecting the Power Connectors 7 3 5 7 9 ...
Страница 29: ...25 Z790 PG Lightning 2 10 Power On 2 3 4 1 ...


