background image

27

Using the Notebook PC    

4

Multi-touch Gesture Usage 

Multi-touch recognizes multiple simultaneous touch points to allow advanced software actions 

using just two fingers.

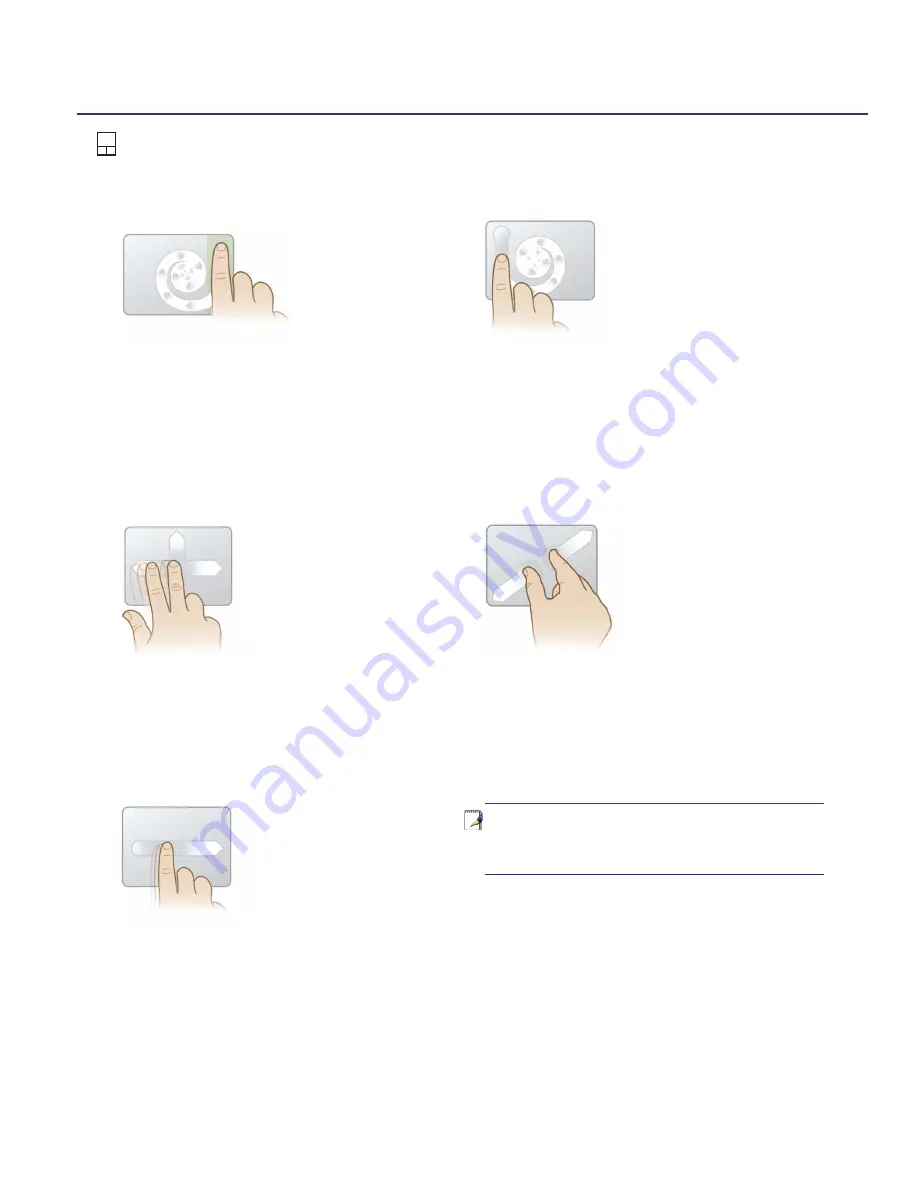
Chiral Scrolling

Touch the vertical scroll zone as shown and 

then  slide  your  finger  CW  or  CCW  to  scroll 

continuously. Convenient for scrolling a long 

document.

Chiral Rotate

Touch the left vertical zone as shown and then 

slide your finger CW or CCW for rotating an 

item, such as a photo.

Two Fingers Flick

Slide  two  fingers  up/down/left/or  right  for 

enhanced navigation, such as browsing back 

on the web.

Two Fingers Pinch Zoom

Slide two fingers outwards to zoom in. Slide two 

fingers inwards to zoom out. 

Momentum Motion

Flick  one  finger  for  delivering  smooth  and 

fast  cursor  motion,  like  that  of  a  trackball. 

Convenient  for  moving  a  window  onto  a 

secondary monitor.

TIP: For detailed gesture usage, please 

refer to the video demonstration in “Mouse 

Properties” > “Device Settings”

Содержание MultiBook F24

Страница 1: ...MultiBook F24 User Manual MEGA 1 3...

Страница 2: ...Side 12 3 Getting Started Power System 14 Using AC Power 14 Using Battery Power 15 Powering ON the Notebook PC 16 Checking Battery Power 17 Charging the Battery Pack 17 Power Options 18 Power Managem...

Страница 3: ...e 27 Caring for the Touchpad 28 Automatic Touchpad Disabling 28 Storage Devices 29 Hard Disk Drive 29 Memory RAM 30 Optical Drive 31 Flash Memory Card Reader 33 Connections 34 Modem Connection 34 Netw...

Страница 4: ...4 Notes...

Страница 5: ...C About This User Manual Safety Precautions Transportation Precautions Preparing your Notebook PC NOTE Photos and icons in this manual are used for artistic purposes only and do not show what is actua...

Страница 6: ...sing the Notebook PC Gives you information on using the Notebook PC s components Notes For This Manual A few notes and warnings in bold are used throughout this manual that you should be aware of in o...

Страница 7: ...se to dirty or dusty environments DO NOT operate during a gas leak DO NOT expose to or use near liquids rain or moisture DO NOT use the modem during an electri cal storm DO NOT leave the Notebook PC o...

Страница 8: ...8 Notes...

Страница 9: ...9 2 Knowing the Parts Basic sides of the Notebook PC NOTE Photos and icons in this manual are used for artistic purposes only and do not show what is actually used in the product itself...

Страница 10: ...de of the Notebook PC NOTE The keyboard will be different for each territory MEGA 1 3 5 6 3 2 4 5 8 9 7 10 1 2 3 5 1 Camera Camera Indicator Microphone Built in Display Panel Audio Speakers 4 Status I...

Страница 11: ...SD 3 2 1 Rear Side Refer to the diagram below to identify the components on this side of the Notebook PC 5 4 6 7 8 4 5 6 7 8 Power DC Input Kensington Lock Port HDMI Port HDMI Display Monitor Output M...

Страница 12: ...agram below to identify the components on this side of the Notebook PC 11 9 10 2 0 USB Ports 2 0 1 1 LAN Port E SATA Port E SATA 10 11 12 Left Side Refer to the diagram below to identify the component...

Страница 13: ...Started Power System Special Keyboard Functions Switches and Status Indicators NOTE Photos and icons in this manual are used for artistic purposes only and do not show what is actually used in the pr...

Страница 14: ...E ADAPTER AND KEEP IT AWAY FROM YOUR BODY TIP You can buy travel kits for the Notebook PC that includes power and modem adapters for almost every country Power System Using AC Power The Notebook PC po...

Страница 15: ...The battery pack consists of a set of battery cells housed together A fully charged pack will provide several hours of battery life which can be further extended by using power management features thr...

Страница 16: ...not a problem with the display WARNING DO NOT carry or cover a Notebook PC that is powered ON with any materials that will reduce air circulation such as a carrying bag Powering ON the Notebook PC The...

Страница 17: ...the CPU system memory size and the size of the display panel Left click the battery icon Cursor over the battery icon without power adapter Cursor over the battery icon with power adapter Right click...

Страница 18: ...ook PC Power Options The power switch turns ON and OFF the Notebook PC or putting the Notebook PC into sleep or hibernation modes Actual behavior of the power switch can be customized in Windows Contr...

Страница 19: ...ts are turned OFF Because RAM is volatile it requires power to keep refresh the data Click the Start button and the arrowhead next to the lock icon to see this option You can also use the keyboard sho...

Страница 20: ...e display panel ON and OFF On certain models stretches the screen area to fill the entire display when using low resolution modes LCD MonitorIcons F8 TogglesbetweentheNotebookPC sLCDdisplayandanextern...

Страница 21: ...and OFF Allows you to use a larger portion of the keyboard for number entering Speaker Up Icon F12 Increases the speaker volume only in Windows OS Speaker Down Icon F11 Decreases the speaker volume o...

Страница 22: ...located at the upper right hand corner of each key as shown in the figure When the numeric keypad is engaged by pressing Fn Ins Num LK the number lock LED lights up If an external keyboard is connecte...

Страница 23: ...es the internal wireless LAN or Bluetooth on selected models ON or OFF with an on screen display When enabled the corresponding wireless indicator will light Windows software settings are necessary to...

Страница 24: ...ss Indicator This is only applicable on models with built in wireless LAN When the built in wireless LAN is enabled this indicator will light Windows software settings are necessary Status Indicators...

Страница 25: ...NOTE Photos and icons in this manual are used for artistic purposes only and do not show what is actually used in the product itself 4 Using the Notebook PC Pointing Device Storage Devices Connection...

Страница 26: ...to operate the touchpad Because the touchpad is electrostatic sensitive objects cannot be used in place of your fingers The touchpad s primary function is to move the cursor around or select items dis...

Страница 27: ...zone as shown and then slide your finger CW or CCW for rotating an item such as a photo Two Fingers Flick Slide two fingers up down left or right for enhanced navigation such as browsing back on the...

Страница 28: ...Do not touch the touchpad if your fingers are dirty or wet Do not rest heavy objects on the touchpad or the touchpad buttons Do not scratch the touchpad with your finger nails or any hard objects Aut...

Страница 29: ...nd reliability Hard Disk Drive Hard disk drives have higher capacities and operate at much faster speeds than floppy disk drives and optical drives The Notebook PC comes with a replaceable hard disk d...

Страница 30: ...authorized retailers of this Notebook PC to ensure maximum compatibility and reliability This is only an example This is only an example Memory RAM Additional memory will increase application performa...

Страница 31: ...and slide the tray completely out Be careful not to touch the drive lens and other mechanisms Make sure there are no obstructions that may get jammed under the drive s tray 3 Hold the disc by the edg...

Страница 32: ...keys or Windows speaker icon on the taskbar WARNING If the disc is not properly locked onto the center hub the disc can be damaged when the tray is closed Always watch the disc closely while closing t...

Страница 33: ...in order to use memory cards from devices such as digital cameras MP3 players mobile phones and PDAs This Notebook PC has a built in memory card reader that can use many flash memory cards as shown i...

Страница 34: ...mage will occur Connections NOTE When you are connected to an online service do not place the Notebook PC in suspend or sleep mode or else you will disconnect the modem connection Modem Connection The...

Страница 35: ...100 BASE TX 1000 BASE T speeds your network cable must be category 5 or better not category 3 with twisted pair wiring If you plan on running the interface at 100 1000Mbps it must be connected to a 10...

Страница 36: ...er that supports Infrastructure and Ad hoc modes giving you flexibility on your existing or future wireless network configurations for distances up to 40 meters between the client and the access point...

Страница 37: ...the Not Connected network icon 4 Select Show Wireless if you have many networks in your area 5 Select the wireless network you want to connect to 6 When connecting you may have to enter a password 7...

Страница 38: ...e s capabilities you can transfer phone book data photos sound files etc or use it as a modem to connect to the Internet You may also use it for SMS messaging Bluetooth enabled computers or PDAs You c...

Отзывы: