English
49
Z790 LiveMixer
A
B
C
A
B
C
For the latest updates of M.2 SSD module support list, please visit our website for details:
http://www.asrock.com
NUT1
NUT2
C
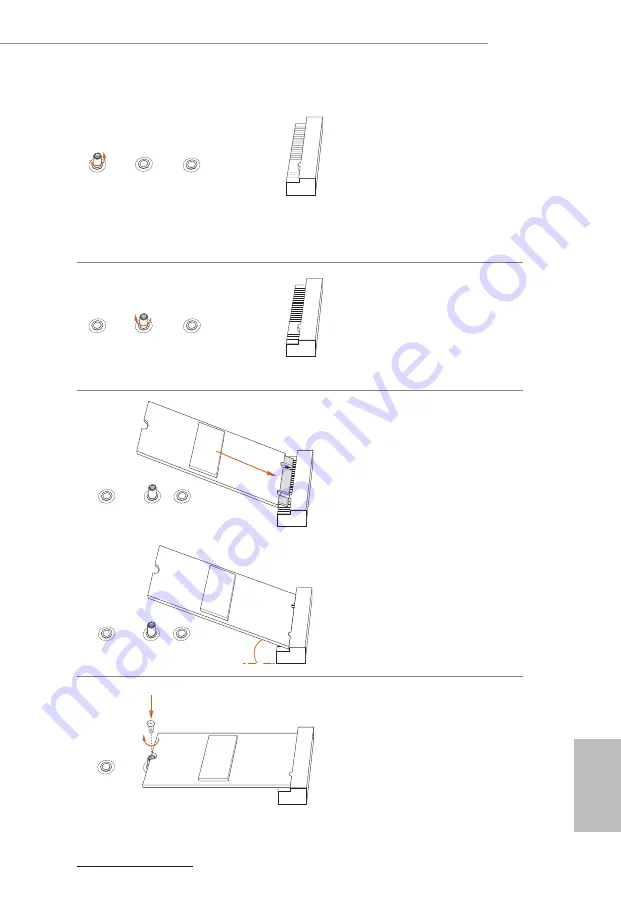
Step 3
Move the standoff based on the
module type and length.
The standoff is placed at the nut
location C by default. Skip Step 3
and 4 and go straight to Step
5
if you
are going to use the default nut.
Step 4
Peel off the yellow protective film on
the nut to be used. Hand tighten the
standoff into the desired nut location
on the motherboard.
Step 5
Align and gently insert the M.2 SSD
module into the M.2 slot. Please
be aware that the M.2 SSD module
only fits in one orientation.
Step 6
Tighten the screw with a screwdriver
to secure the module into place.
Please do not overtighten the screw
as this might damage the module.
A
B
C
A
B
C
20
o
Содержание 90-MXBK10-A0UAYZ
Страница 1: ......
Страница 10: ...English 6 1 3 Motherboard Layout...
Страница 18: ...English 14 2 2 Installing the CPU Fan and Heatsink 1 2 C P U _ F A N...
Страница 20: ...English 16 1 2 3...
Страница 22: ...English 18 2 5 Installing the Motherboard...
Страница 23: ...English 19 Z790 LiveMixer 2 6 Installing SATA Drives 1 2 Optical Drive SATA Drive SATA Data Cable...
Страница 24: ...English 20 3 4 SATA Power Connector SATA Data Connector...
Страница 25: ...English 21 Z790 LiveMixer 2 7 Installing a Graphics Card 1 CLICK...
Страница 27: ...English 23 Z790 LiveMixer 2 8 Connecting Peripheral Devices...
Страница 28: ...English 24 2 9 Connecting the Power Connectors 7 3 5 7 9...
Страница 29: ...English 25 Z790 LiveMixer 2 10 Power On 2 3 4 1...


