background image

EN 6

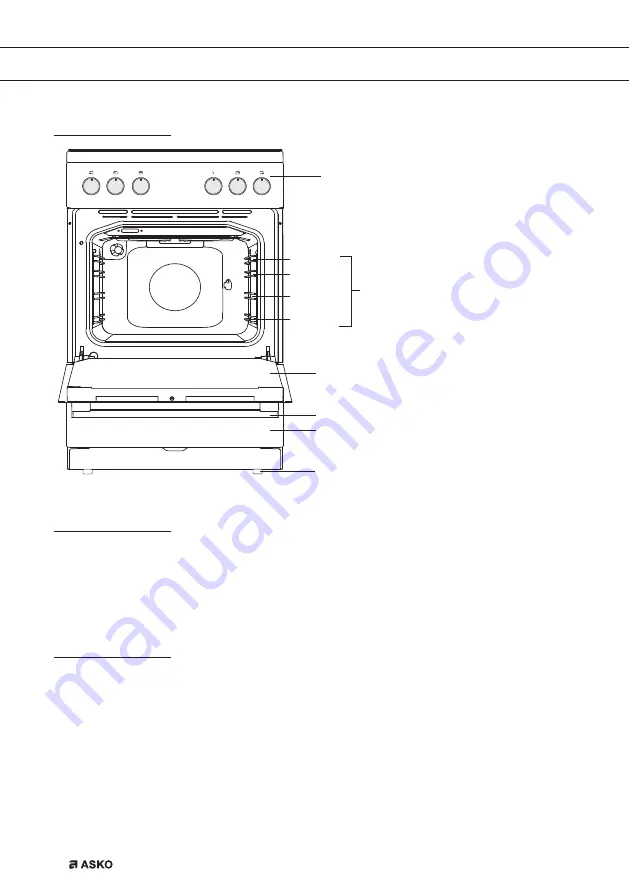
Oven description

6

1

3

Level 1

Level 2

Level 3

Level 4

2

4
5

Guide rails 

•  The oven has four or five guide rails (Level 1 to 4/5), depending on the model. Level 1 is 

mainly used in combination with bottom heat. The two upper levels are mainly used for the 
grill function.

•  Place the oven rack, baking tray or steam dish in the gap between the guide rail sliders.

Cooling fan

•  The appliance is fitted with a cooling fan that cools the housing, door and the appliance 

control panel.

•  After the oven is switched Off, the cooling fan continues to operate for a short while in order 

to cool the oven.

YOUR COOKER

1.  Control panel
2.  Rack levels
3.  Oven door
4.  Handle
5.  Storage drawer/flap door 

(depending on model)

6.  Leveling feet

Содержание CC96264S

Страница 1: ...Instructions for use COOKER CC96264W CC96264S ...

Страница 2: ...EN Manual EN 3 EN 27 Pictograms used Important information Tip ...

Страница 3: ...the oven 15 Operating the ceramic hob 15 Cleaning Please note 16 General 16 Cleaning the glass ceramic surface 17 Cleaning the oven 18 Aqua clean function 18 Removing and cleaning the guide rails 19 Removing the oven door 20 Removing the oven window 21 Replacing the oven lamp 22 Solving problems General 23 Troubleshooting table 23 Installation General 25 Electrical connection 25 Installation 26 Yo...

Страница 4: ...ct cooking method Read this manual to learn how to get the most out of your cooker In addition to information about operating the oven you will also find background information that may be useful when using the appliance Please read the separate safety instructions carefully before using the appliance Read this manual before using the appliance and keep it in a safe place for future use YOUR COOKE...

Страница 5: ...4 Temperature dial knob 5 Control knob for cooking zone right rear 6 Control knob for cooking zone right front Ceramic hob description 9 10 7 8 7 Cooking zone left rear 1 2 Kw Ø 145 mm 8 Cooking zone right rear 1 8 Kw Ø 180 mm 9 Cooking double zone left front 0 7 2 1 Kw Ø 120 210 mm 10 Cooking zone right front 1 2 Kw Ø 145 mm 2 1 3 4 5 6 ...

Страница 6: ... grill function Place the oven rack baking tray or steam dish in the gap between the guide rail sliders Cooling fan The appliance is fitted with a cooling fan that cools the housing door and the appliance control panel After the oven is switched Off the cooling fan continues to operate for a short while in order to cool the oven YOUR COOKER 1 Control panel 2 Rack levels 3 Oven door 4 Handle 5 Stor...

Страница 7: ...r grilling A steam dish or pan with food can also be placed on the oven rack The oven rack is equipped with a safety peg Lift the rack slightly at the front to slide it out of the oven Deep enamelled baking tray to be used for roasting meat and baking moist pastry Never place the deep baking tray in the first level during the cooking process except when grilling food or using the roasting spit and...

Страница 8: ...the oven door Push pull knob Some models can have push pull knobs Slightly push the knob until it pops out then rotate it After each use rotate the knob back to the Off position and push it back in The push pull knob can only be pushed back when it is in the Off position Drawer Your appliance has a drawer to store accessories like trays shelves grids small pots and pans Warning The inside surface ...

Страница 9: ...ghtly and move the latch in the middle top site of the door to the right Open the door fully 90 click A B Deactivate the door lock 1 Open the oven door 2 Push the latch to the right by 90º until you feel a click A The door lock is deactivated Activate the door lock 1 Open the oven door 2 Pull the latch towards you B The door lock is activated 90 click A B ...

Страница 10: ...asive dishwashing sponges or stain removers Using the oven Energy conscious use of the oven Open the oven door as little as possible Prepare dishes with the same cooking temperature simultaneously e g an apple pie and an oven dish on the same grid or above each other using hot air You can also let meat stew at the same time Prepare more meals after each other for example an oven meal after a cake ...

Страница 11: ... meat from 1 kg are the most suitable The meat will get a regularly shaped crispy crust with virtually no weight loss Rub the meat with salt and spices fifteen minutes beforehand Use 80 to 100 g of butter or fat or a mixture of the two per 500 g of meat for roasting Cooking times Flat thin pieces require approximately 5 minutes less cooking time than thick or rolled pieces of meat When cooking lar...

Страница 12: ...er sausages and for toasting bread Place the oven rack on level 4 and the baking tray on level 3 Monitor the cooking process at all times The dish may burn quickly due to the high temperature Large Grill Maximum allowed temperature 230 C Heating by means of the upper element and grill element This mode can be used with dishes and baked goods that require a distinctive bottom crust or browning Use ...

Страница 13: ...od residues from the oven The program takes 30 minutes Using the ceramic hob The heating zone will quickly reach the set temperature while the area around the hot cooking zones will remain cool The hob is resistant to temperature changes Using the glass ceramic hob as a storage area may result in scratches or other damage Do not use aluminium or plastic cookware on hot cooking zones Do not place a...

Страница 14: ...s use the relevant sensor to decrease the cooking power at the right time Make sure there is enough liquid in the pressure cooker or any other pot or pan Due to overheating using an empty pot on the cooking zone may result in damage to both the pot and the cooking zone When using special cookware observe the manufacturer s instructions Energy saving tips Diameter of the pot and pan bottoms should ...

Страница 15: ...0 ºC The oven thermostat control light will light up If necessary first preheat the oven before placing the recipe in the oven Operating the ceramic hob 1 Turn the control knob from the cooking zone you want to use to the desired setting Consult Using the ceramic hob Setting 9 is the highest setting Setting 1 is the lowest setting 2 To activate the larger zone from the two ring cooking zone rotate...

Страница 16: ...bjects or steel wool as this can cause scratches on the unit Stainless steel front panels Clean the surface with a mild detergent soapsuds and a soft sponge that doesn t scratch the surface Do not use abrasive or solvent based cleaning agents If you do not follow these instructions the casing may become damaged Painted and plastic surfaces Clean the knobs with a soft cloth and liquid cleaning agen...

Страница 17: ...ughly remove any cleaner residues after the cleaning process as they may damage the glass ceramic surface when the cooking zones heat up Remove stubborn and burnt residues with a scraper Be careful when handling the scraper to prevent injury Only use the scraper when dirt cannot be removed with a wet cloth or special cleaners for glass ceramic surfaces Hold the scraper at the correct angle 45 to 6...

Страница 18: ...ts ALWAYS ensure that the door seal stays clean This prevents accumulation of dirt and allows you to close the door properly Aqua Clean function With the Aqua Clean function and a damp cloth you can easily remove grease and dirt from the oven walls Using the Aqua Clean function Only use the cleaning programme if the oven is cold If the oven is hot it is more difficult to remove dirt and grease usi...

Страница 19: ... conventional cleaning products to clean the guide rails 1 Grasp the guide rails at the bottom and tilt them towards the middle of the oven A 2 Remove the guide rails from the holes in the back wall B B A Do not clean the extendible guides in the dishwasher ...

Страница 20: ...he hinge beds At the angle of 15 relative to the closed door position slightly lift the door and pull it out from both hinge beds on the appliance A B C To replace the door repeat these actions in reverse If the door does not open or close properly make sure the hinges are positioned correctly in their slots Always ensure that the catches fit properly in their slots Never allow the hinge fitting t...

Страница 21: ...rker 1 on the bracket and pull this away from the glass slightly to marker 2 on the bracket 2 Grasp the glass at the bottom and gently lift this upwards to remove it from the support 3 The inner third glass depending on the model can be removed by lifting this carefully and removing it Also remove the rubber seals around the glass To replace the glass pane observe the reverse order The markings se...

Страница 22: ...oving the lamp The lamp in this household appliance is only suitable for illumination of this appliance The lamp is not suitable for household room illumination The lamp is consumable material and is not covered by the guarantee 1 Unscrew the glass cover anticlockwise and replace the oven lamp Fit a new lamp with the same specifications 2 Screw the glass cover back on tightly CLEANING ...

Страница 23: ...rmal and will disappear once it has been used a few times Ventilate the kitchen The hob is not working There is no power supply due to a defective cable or a faulty connection Check the fuses or the electric switch if there is no plug A fuse blows as soon as the hob is switched on The appliance is incorrectly connected Check the electrical connections Other fault codes Defective generator Contact ...

Страница 24: ...ter use Repairs should only be performed by a qualified service technician If maintenance is required take the plug out of the socket and contact the ASKO customer service Have the following information at hand when you call The model number and serial number This information is on the cooker identification plate which is on the front behind the door Warranty details A clear description of the pro...

Страница 25: ...ly be replaced by original ASKO parts Only those parts are guaranteed by ASKO to meet the safety requirements To avoid dangerous situations resulting from any damage to the connecting cable this should only be replaced by the manufacturer the manufacturer s service organisation or suitably qualified persons Electrical connection 230 V 50 Hz 400 V 50 Hz 400 V models only Wall socket and plug must b...

Страница 26: ...ce the cooker in a kitchen unit the minimum space must be adhered to If the cooker is built in between kitchen cabinets the lining of the units must be able to withstand temperatures up to 90 C Levelling The height of the cooker can be adjusted with the adjusting feet If you want to install the cooker on a platform make sure that it is securely fastened Mounting the door lock Mount the door lock w...

Страница 27: ... This indicates that household appliances must be disposed of separately This means that the appliance may not be processed via the regular waste flow at the end of its useful life You should take it to a special municipal waste depot or a sales outlet that offers to do this for you Collecting household equipment separately prevents harm to the environment and public health The materials used in m...

Страница 28: ...entification card is located on the inside of the appliance When contacting the service department have the complete type number to hand You will find the addresses and phone numbers of the service organisation on the guarantee card en 11 18 ...

Отзывы: