background image

29

Computer input

Manual adjustment via PC

Some computers employ special signal formats which may not be tuned by Multi-scan system of this 
projector. Manual PC Adjustment is provided for you to precisely adjust several parameters to match 
those signal formats. The projector has five independent memory areas to store those parameters 

manually adjusted, which allows you to recall the setting for a specific computer.

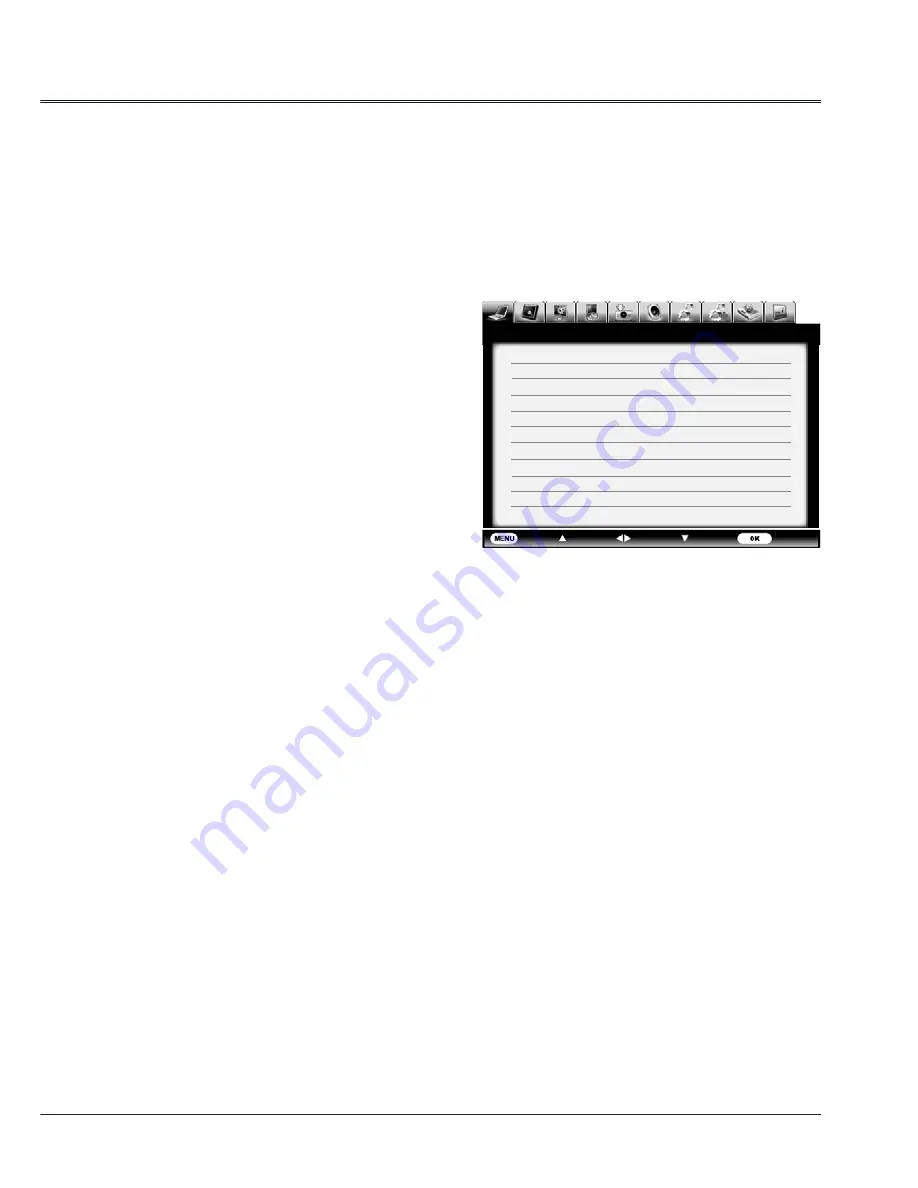
1 Press MENU button to display the on screen 
   menu. Press 



 to select the PC Adjustment 

   icon and press 

 or OK button.

2 Press 



 button to select the item to be 

   adjusted and then OK to pop up the 
   corresponding dialog box. Press 



to set the 

   value.

PC adjustment menu

Exit

Move

Next

Next

- - - -

PC adj.

Auto PC adj.

Fine sync                                                         16

Total dots                                                     1344

Horizontal                                                      296

Vertical                                                            35
Clamp                                                                1
Display area H                                             1024
Display area V                                               768

Reset
Mode free

Stored

Fine sync

To cut off flicker from the image displayed by 
pressing 



 to adjust the value.(from 0 to 31).

Total dots

Press 



 to adjust the total dots for a cycle so 

that it can match the image on computer.

Horizontal

Press 



 to adjust the horizontal picture position.

Vertical

Press 



 to adjust the vertical picture position.

Clamp

Press 



 to adjust the clamp level. When 

the image has dark bars, try this function for 
adjustment.

Display area H

Press



 to adjust the horizontal area displayed 

by the projector.

Display area V

Press



 to adjust the vertical area displayed by 

the projector.

Reset

To reset the adjusted data, select Reset and press 

OK . A confirmation box appears and then select 

Yes. All adjustments will return to their previous 

figures.

Mode free

To clear the adjusted data, select Mode free and 

then press ► or OK .Move ► or OK to highlight 

the Mode you want to clear and then press OK.

Store

To store the adjusted data, select 

Store

 and then 

press ► or OK. Move the red arrow indicator to 

one of the Mode 1 to 5 in which you want to store, 
and then press OK.

√ Note:

   If you select 480i, 576i, 480p, 576p, 720p, 1035i   

  or 1080i from the system menu, the functions of 

  both horizontal image and vertical image will be    
  disabled.

Содержание US1275

Страница 1: ...User s Manual P N 4100530500 LCD Reflecting Shortfocus Projector Model US1275 US1275W US1325 US1315W ...

Страница 2: ...Video Technology Co Ltd shall investigate the criminal responsibilities of the infringing party who have damaged the interests of the copyright owner ASK Proxima Digital Video Technology Co Ltd reserves the right to modify or improve the product without prior notice ASK Proxima Digital Video Technology Co Ltd reserves the right to modify the manual Please consult the company or the dealer for any ...

Страница 3: ...erate the on screen menu 20 Menu bar 21 Auto setup 22 Keystone correction 22 Sound adjust 23 Remote control operation 24 Computer input 26 Input select VGA1 VGA2 26 Computer system select 27 Auto PC adjustment 28 Manual adjustment via PC 29 Image Select 30 Image adjust 31 Screen size adjust 32 Video input 34 Video system select 35 Image Select 36 Image adjust 37 Screen size adjust 38 Setting 39 Se...

Страница 4: ... cause malfunction a fire or other accidents If your projector cannot work properly please read this manual again check the operating methods and cable connection and try the solutions in the part of Troubleshooting If the problem still exists contact the dealer or the service center The lamp of the projector is a wearing part The luminance may decrease after a period of operation and be weaker th...

Страница 5: ...o this projector through cabinet slots as they may touch dangerous voltage points or short out parts that could result in a fire or electric shock Never spill liquid of any kind on the projector Do not install the projector near the ventilation duct of air conditioning equipment This projector should be operated only from the type of power source indicated on the marking label If you are not sure ...

Страница 6: ...rchased from unauthorized dealer even in warranty period Remove the ceiling bracket immediately while not use While installing torque screwdriver is suggested don t use electric or impact type screwdriver Safety Guide Air circulation Vents in the cabinet are provided for ventilation To ensure reliable operation of the product and to protect it from overheating these openings must not be blocked or...

Страница 7: ...Speaker Terminal cover Exhaust vent Lamp cover Remote control receiver back Projector lens Top control and Indicators Anti theft slot Air intake vent Focus ring Adjustable feet Caution Hot air is exhausted from the exhaust vent Do not put heat sensitive objects near this side ...

Страница 8: ...A OUT Output the RGB signal from VGA1 or VGA2 to other monitor LAN Connect wired network cable to this terminal AUDIO IN Video Connect the audio output from video equipment connected to or to this jack For a mono audio signal a single audio jack connect it to L MONO jack HDMI 1 Connect digital output signal from HDMI 1 to this terminal HDMI 2 Connect digital output signal from HDMI 2 to this termi...

Страница 9: ...image in the D Zoom mode MENU button Open or close the screen menu AUTO button Automatically set the display parameter while PC signal input Swicth to search input source automatically when there is no signal input POWER indicator Lights red when the projector is in stand by mode Lights green during operations Flashes green in Power management mode ALERT indicator Flashes red when the internal tem...

Страница 10: ...urce VIDEO Select Video as input source AUTO Enter auto setup mode MUTE Turn off the volume SEARCH Enter SEARCH adjust mode Pointer button Select item or adjust data in screen menu Select the image display area in digital zoom mode OK button Access the menu or select an item in the menu MENU button Open or close screen menu BACK button Back to first menu TIMER POWER HDMI 1 HDMI 2 S VIDEO VIDEO SEA...

Страница 11: ...button Select the screen size Pg Up button Page up when project Word PPT documents BLANK button Temporarily close the image on the screen Pg Dn button Page down when project Word PPT documents D Z button Select the digital zoom mode Freeze button Freeze the project image IMAGE button Select image mode TIMER button Enable the timer function Test pattern button Set the internal signal of the system ...

Страница 12: ...able feet to lift the projector to a certain height During lifting rotate the two feet clockwise To lower or retract the adjustable feet rotate the two feet counterclockwise Keystone distortion of projected images can be corrected by auto settings remote control operation or menu operation Use two 2 AAA or LR03 type alkaline batteries Always replace batteries in sets Do not use a new battery with ...

Страница 13: ...ce m 0 368 0 434 0 500 0 566 0 632 Project distance m 0 068 0 134 0 200 0 266 0 332 Screen size WxH mm 16 10 ratio 60 70 80 90 100 1292x808 1508x942 1723x1077 1939x1212 2154x1346 Project distance m 0 392 0 462 0 532 0 602 0 672 Project distance m 0 092 0 162 0 232 0 302 0 372 0 632m 0 566m 0 500m 0 434m 0 386m Fixed 60 70 80 90 100 A B 13 3 Center Inch Diagona Project distance Project distance Pro...

Страница 14: ...supplied with the projector USB Unplug the power cords of both the projector and external equipment from the AC outlet before connecting the cables Serial output PC output Monitor input PC output HDMI terminal HDMI cable HDMI cable HDMI HDMI Control port Serial crossover cable VGA cable VGA cable VGA cable Analog input Analog input Analog input ...

Страница 15: ...le HDMI cable Cables not supplied with the projector USB Unplug the power cords of both the projector and external equipment from the AC outlet before connecting the cables S VIDEO S VIDEO output Composite video Audio input Video HDMI cable HDMI cable HDMI cable S VIDEO cable RCA cable Video cable HDMI Y Cb Pb Cr Pr HDMI ...

Страница 16: ...R L R L Audio cable Audio cable Audio cable stereo Note The left and right channels are combined when there is only the L mono is inserted Audio input Audio input Audio output Audio output External audio equipment Unplug the power cords of both the projector and external equipment from the AC outlet before connecting the cables ...

Страница 17: ...ed to an outlet with AC power cord it is in stand by mode and consumes a little electric power Note Using incorrect power cord may influence the product performance or even cause hazards like an electric shock or fire To ensure the product performance and security please apply the cable of the same model with the original one Common connecting cables include the AC power cord various VGA cables vi...

Страница 18: ...n a column on page 58 of this manualand keep it properly Should the PIN code be missing or forgotten consult your dealer or service center Enter a PIN code Select a number by pressing button and then press button to fix the number and move the cursor The number changes to If you fixed an incorrect number move the cursor to the number you want to correct by pressing button and then select the corre...

Страница 19: ...n enough If the ALERT indicator flashes or emits a red light see Warning Indicator While the POWER indicator is flashing the lamp is being cooled down and the projector cannot be turned on Wait until the POWER indicator turns red to turn on the projector again The fan rotation will terminate directly if the AC power cord is unplugged immediately after the projector is turned off The projector can ...

Страница 20: ... OK button Point buttons Point buttons Exit Move Next Next PC adj Auto PC adj Fine sync 16 Total dots 1344 Horizontal 296 Vertical 35 Clamp 1 Display area H 1024 Display area V 768 Reset Mode free Stored Menu 1 Press the MENU button on the top control or the remote control to show the on screen menu 2 Press buttons to select an entry in the main menu and then press OK or button to enter the submen...

Страница 21: ...the following image adjusting options are available Contrast Brightness Color temp White balance R G B Sharpness and Gamma If video equipment is selected as a signal source the following image adjusting options are available Contrast Brightness Color Tint White balance R G B Sharpness Gamma Noise reduction and Progressive Input menu Select input source HDMI 1 HDMI 2 VGA 1 VGA 2 Component S Video o...

Страница 22: ...s Keystone adjustment can be stored Reduce the upper width with button Reduce the lower width with button The arrows are white when there is no correction The arrows that are used for correction turns red The arrows disappear at the maximum correction If you press the KEYSTONE button on the remote control once more while the keystone dialog box is being displayed the keystone adjustment is cancell...

Страница 23: ...tton VOL button MUTE button Direct operation Volume Press the VOL button on the top control or on the remote control to adjust the volume Mute Press the MUTE button on the remote control and select On to turn off the audio temporarily To restore the audio to its previous level press the MUTE button again and select Off or press the VOLUME buttons Mute function is also effective for AUDIO OUT jack ...

Страница 24: ...e picture on the screen To cancel the Freeze function press the FREEZE button again or press any other button Note See the next page for the description of other buttons LAMP button Press LAMP button to select a lamp mode to change the brightness of the screen Normal Normal brightness Auto Adjust the lamp brightness according to the input signal ECO Lower brightness reducing the lamp power consump...

Страница 25: ...er press TIMER button Press TIMER button again and then the Timer display disappears IMAGE button Press IMAGE button on the remote control to select your required image mode SCREEN button Press SCREEN button on the remote control to select your required screen mode Blank disappears after 4 seconds if there is no other button operation Timer display Remote control BLANK button SCREEN button IMAGE b...

Страница 26: ...t icon then press button or OK button 2 Press button to select VGA 1 or VGA 2 then press OK button Top control Input menu Remote control INPUT button VGA 1 VGA 1 VGA 2 VGA 2 Component S video Video TIMER POWER HDMI 1 HDMI 2 S VIDEO VIDEO SEARCH YCBCR MUTE AUTO BACK MENU BLANK Pg Dn LAMP VOL D Z D Z SCREEN INFO Pg Up IMAGE VOL VGA 1 VGA 2 OK VGA1 VGA2 button HDMI 1 HDMI 2 Exit Move Next Next Input ...

Страница 27: ...System Menu box and the Auto PC Adjustment function works to display proper images If the image is not projected properly a manual adjustment is required There is no signal input from computer Check the connection between your computer and projector Exit Move Next Next Input HDMI 1 HDMI 2 VGA 1 VGA 2 Component S video Video System 1024x768 60 Exit Move Next Next Input 1024x768 60 1366x768 60 Syste...

Страница 28: ...tton To store the adjusted parameters The system parameters adjusted in the Auto PC Adjustment can be stored in the projector Exit Move Next Next PC adj Auto PC adj Fine sync 16 Total dots 1344 Horizontal 296 Vertical 35 Clamp 1 Display area H 1024 Display area V 768 Reset Mode free Stored Note Total dots and horizontal vertical positions of some computers cannot be fully adjusted with this Auto P...

Страница 29: ...he value from 0 to 31 Total dots Press to adjust the total dots for a cycle so that it can match the image on computer Horizontal Press to adjust the horizontal picture position Vertical Press to adjust the vertical picture position Clamp Press to adjust the clamp level When the image has dark bars try this function for adjustment Display area H Press to adjust the horizontal area displayed by the...

Страница 30: ...uality This is mainly effective on a green colored board instead of a black colored board Colorboard For images projected onto the red blue yellow or green wallpaper User Image Image quality preset by the user in the Image adjustment menu Menu operation 1 Press the MENU button to display the screen menu Press to select the Image select icon and press or OK button 2 Press to select your required im...

Страница 31: ...se it Color temp Press to select your desired color temperature Low Mid and High Red White balance Press to lighten the red tone and to deepen it Green White balance Press to lighten the green tone and to deepen it Blue White balance Press to lighten the blue tone and to deepen it Sharpness Press to decrease the sharpness of an image and to increase it Gamma Press to adjust the gray scale level fo...

Страница 32: ...ected the saved scale is used Reset Reset all the adjusted values Press OK at Reset to display a confirmation box To set press OK at Yes 1 Press MENU button to display the screen menu Press button to select screen icon and then press or OK button 2 Press to select your required item and then press OK button TIMER POWER HDMI 1 HDMI 2 S VIDEO VIDEO SEARCH YCBCR MUTE AUTO BACK MENU BLANK Pg Dn LAMP V...

Страница 33: ... quantities of the projector at vertical direction Image will be segmented by horizontal direction setting value from 1 to 384 WXGA mode 1 400 Position H set the horizontal position of the projector Setting range from 1 to the total quantitiy of projectors at horizontal direction Position V set the vertical position of the projector Setting range from 1 to the total quantitiy of projectors at vert...

Страница 34: ...Press MENU button on remote control to display the screen menu Press button to select Input icon then press button or OK button 2 Press button to select HDMI 1 HDMI 2 Component S video or Video then press OK button Input menu When video signal is connect to HDMI 1 terminal select HDMI 1 When video signal is connect to HDMI 2 terminal select HDMI 2 Select it when the input source is from the video ...

Страница 35: ... an incoming video system and adjusts itself to optimize its performance When Video System is PAL M or PAL N select the system manually PAL SECAM NTSC NTSC4 43 PAL M PAL N If the projector cannot reproduce proper video images select a specific broadcast signal format from PAL SECAM NTSC NTSC 4 43 PAL M and PAL N Component Auto The projector automatically detects an input video system and adjusts i...

Страница 36: ...g the image quality This is mainly effective on a green colored board instead of a black colored board Colorboard For images projected onto the red blue yellow or green wallpaper User Image Image quality preset by the user in the Image adjustment menu Menu operation 1 Press the MENU button to display the screen menu Press to select the Image select icon and press or OK button 2 Press to select you...

Страница 37: ...or 32 Tint 32 Red 32 Green 32 Blue 32 Sharpness 8 Gamma 8 Noise reduction On Progressive L 1 Image adjust 1 Press MENU button to display the screen menu press to select image adjust icon and press or OK button 2 Press to adjust the setting value or press OK button adjust dialogue box appears Press to set the value Contrast Press to decrease the contrast and to increase it Image adjust menu Brightn...

Страница 38: ...t press OK at Yes 1 Press MENU button to display the screen menu Press button to select screen icon and then press or OK button 2 Press to select your required item and then press OK button Exit Move Next Next Screen Normal Wide Custom Advanced Keystone Reset Store Remote control Screen button button OK button TIMER POWER HDMI 1 HDMI 2 S VIDEO VIDEO SEARCH YCBCR MUTE AUTO BACK MENU BLANK Pg Dn LAM...

Страница 39: ...On To enable the blue background for projection Off To disable the blue background 1 Press MENU button to display the screen menu Press button to select Setting icon and then press or OK button 2 Press to select the desired item to be adjusted and then press to switch the items Display Enable to decide whether to display the on start displays On Display startup screen Off Display the input image i...

Страница 40: ...ojector Normal Normal operation 60s Faster and lounder than Normal cooling time is shorter 0s Enable you directly unplug the AC power cord after turning off the projector no cooling period is required High land Enable to control the fan through the Setup menu You can select the running speed of the fan according to the altitude of the location where the projector is installed Off Normal speed Set ...

Страница 41: ...to switch the items Upper left Upper right Center Lower left Lower right Auto setup Allows you to perform input search auto PC adjustment automatically press the AUTO button on the top control or remote control The functions can be switched based on the steps below Note Only the last selected input source can be detected If INPUT button on the top control or the VGA 1 VGA 2 buttons VIDEO or S vide...

Страница 42: ...go PIN code lock Use the Point buttons to enter a number Press the Point button to fix the number and move the red frame pointer to the next box The number changes to If you fixed an incorrect number use the Point button to move the pointer to the number you want to correct and then enter the correct number Repeat this step to complete entering a three digit number After entering the three digit n...

Страница 43: ... for more than 30 seconds the timer display with No signal appears It starts the countdown until the lamp is turned off Press buttons to set the Timer 1 30min Closed Caption Allows the subtitle to be displayed for the audio contents or other information If the input source contains closed caption you can enable this function and change the channel Press to select OFF CC1 CC2 CC3 or CC4 If Closed C...

Страница 44: ...ck use the side control If the side control accidentally becomes locked and you do not have the remote control nearby or there is something wrong with your remote control contact the dealer where you purchased the projector or the service center PIN code lock This function prevents the projector from being operated by unauthorized persons and provides the following setting options for security Off...

Страница 45: ...ncy for the filter cleaning When the projector reached a specified time between cleanings a Filter warning icon appears on the screen notifying the cleaning is necessary After cleaning the filter be sure to select RESET and set the timer The Filter warning icon will not turn off until the filter counter is reset Warning log Records abnormal operations to diagnose errors The log lists the latest 9 ...

Страница 46: ...d As shown in the picture on the right See below for displayed information Input The selected input source is displayed H sync freq The horizontal frequency of the input signal is displayed in KHz or KHz when no signal V sync freq The vertical frequency of the input signal is displayed in Hz or Hz when no signal Numbers of Hz doubles when during Interlace Lamp Mode The selected lamp mode is displa...

Страница 47: ...t or vent of an airconditioning Move the installation of the projector away from the duct or vent Are the air filters clean Clean the air filters periodically Caution Do not leave the projector with the AC power cord connected under an abnormal condition It may result in fire or electric shock The projector is shut down and the ALERT indicator lights red When the projector detects an abnormal cond...

Страница 48: ...put any small objects into the air intake vents Otherwise it may result in malfunction of the projector Recommendation We recommend avoiding dusty smoky environments when you operate the projector Usage in these environments may cause poor image quality When you use the projector under dusty or smoky conditions dust may accumulate on the lens LCD panels or optical elements inside the projector Whe...

Страница 49: ...brasive cleaners solvents or other harsh chemicals might scratch the surface of lens Unplug the AC power cord before cleaning Gently wipe the projector surface with a soft dry cleaning cloth When the cabinet is heavily soiled use a small amount of mild detergent and finish with a soft dry cleaning cloth Avoid using an excessive amount of cleaner Abrasive cleaners solvents or other harsh chemicals ...

Страница 50: ...e ceiling you should stand beside the lamp cover but not under it for the broken glass may fall down to hurt you To do that remove the lamp cover gently to avoid being hurt by the dropped glass If glass drops into your eyes or mouth you should see the doctor immediately For the sake of safety only use the lamp of the same model Never drop the lamp onto the ground nor touch the glass bulb The glass...

Страница 51: ...ntinuous use of the lamp with the LAMP REPLACE indicator lit may increase the risk of lamp explosion A Lamp may explode as a result of vibration shock or degradation as a result of hours of use as its lifetime draws to an end Risk of explosion may differ according to the environment or conditions in which the projector and lamp are being used IF A LAMP EXPLODES THE FOLLOWING SAFETY PRECAUTIONS SHO...

Страница 52: ...f non input mode or lamp mode appears This icon indicates the replacement of lamp or warns for the filter Ambiguous images Adjust the focus Set a more proper projection distance Check whether the lens needs to be cleaned When moved from a environment with low temperature to the one with higher temperature water will be condensed on the lens If so you have to wait till the condensed water disappear...

Страница 53: ...ot enabled Distorted image or no image Check and adjust the PC menu or on screen menu The PIN code dialog box pops up in the startup process A PIN code is set for locking Remote control doesn t work Check the battery Make sure there is no obstacle between the projector and the remote control To use the remote control keep it within 5 meters away from the projector Make sure the code of the remote ...

Страница 54: ...is restored to the normal value and the power indicator is illuminated red you can then power on the projector The ALERT indicator keeps on flashing When the projector is cool enough the temperature is restored to the normal value and the power indicator is illuminated red you can then power on the projector At the time the ALERT indicator stops flashing Can t be powered on because error is detect...

Страница 55: ...60 800x600 65 800x600 72 800x600 75 800x600 85 800x600 120 832x624 75 XGA 1024x768 60 1024x768 65 1024x768 70 1024x768 72 1024x768 75 1024x768 80 1024x768 85 1024x768 120 1152x864 70 1035i 60 1080i 60 1080i 50 Signal format Resolution Field Frequceny Hz SXGA 1152x900 65 1152x900 75 1280x1024 60 1280x1024 65 1280x1024 70 1280x1024 72 1280x1024 75 1280x1024 85 WXGA 1280x768 60 1280x768 75 1280x768 8...

Страница 56: ...A 7 TMDS Data0 17 DDC CEC Ground 8 TMDS Data0 Shield 18 5V Power 9 TMDS Data0 19 Hot Plug Detect 10 TMDS Clock 1 2 RXD 3 TXD 4 5 GND 6 7 8 9 1 TX 5 2 TX 6 RX 3 RX 7 4 8 RS232 terminal D SUB 9 pin HDMI terminal HDMI Type A 19 pin LAN terminal 1 2 4 6 8 9 7 5 3 10 12 14 16 18 19 17 15 13 11 8765 432 1 Content of hazardous substances and elements Name of parts Hazardous substances and elements Pb Hg ...

Страница 57: ...Screw M4 Depth 10 0 0 39 PIN code memorandum Write down the PIN code in the blank below and keep it please contact the repair center PIN code lock Locking startup animation PIN code Factory default PIN code 111 Factory default PIN code 111 If this 3 digit number is changed the factory default number will be ineffective ...

Страница 58: ...e each command end by CR Carriage PC Projector COM Control Port D Sub 9 Pin D Sub 9 Pin Command Item Command Item A00 POWER ON A06 VGA2 A01 POWER OFF Power OFF A07 Component A02 POWER OFF A33 Video A03 HDMI 2 A34 S Video A05 VGA1 A36 HDMI 1 Item Value Method Asynchronous communication Bits per seconds 19200 Data bits 8 Parity none Stop bits 1 Flow control none ...

Страница 59: ...etails Power off the projector immediately Return OK ACK CR NG CR Command A02 CR Hex 41 30 32 0d Details Power off displays for the command resend the command to power off the projector Return OK ACK CR NG CR Command A05 CR Hex 41 30 35 0d Details Select Computer1 as input source Return OK ACK CR NG CR 2 4 HDMI 2 Command A03 CR Hex 41 30 33 0d Details Select HDMI 2 as input source Return OK ACK CR...

Страница 60: ...rn OK ACK CR NG CR Command A33 CR Hex 41 33 33 0d Details Select Video as input source Return OK ACK CR NG CR Command A34 CR Hex 41 33 34 0d Details Select S Video as input source Return OK ACK CR NG CR Command A36 CR Hex 41 33 36 0d Details Select HDMI 1 input source Return OK ACK CR NG CR 2 6 VGA2 Command A06 CR Hex 41 30 36 0d Details Select Computer 2 as input source Return OK ACK CR NG CR ...

Страница 61: ...etwork address DHCP set is displayed as on and obtain network address automatically If familiar with network you can set DHCP as close and obtain network address manually 3 Enter network settings menu 1 Press MENU button on top control or remote control to display screen menu Press button to select network icon 2 Press OK or button to enter the network menu 3 Press button to select Network setting...

Страница 62: ...the IP address into the address bar Format http IP address 6 Set the corresponding items of the projector by the website Standby on off PCAdj PC adjustment Screen adjustment of screen size Image adjustment of image mode Image Adj image selection Input selection of input Sound settings of sound Setting other settings ...

Страница 63: ...63 ...

Страница 64: ......

Отзывы: