Ashley BCAC Скачать руководство пользователя страница 13

© 2021 United States Stove Company

13

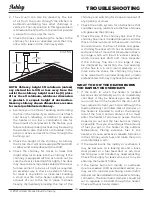
TOP MAY BE 

TILTED OPEN AS 

INDICATED BY 

ARROW

THERMOSTAT 

CONTROL 

KNOB

AIR 

ADJUSTMENT 

SHUTTER

PRESSURE 

RELIEF 

COVER

OPEN

OPEN

5.  When the wood is burning briskly, add 

additional kindling as required to establish a 

good kindling fire.

6. 

When  the  kindling  fire  has  been  established 

and is burning briskly, cover it with a thin layer of 

coal. If you add too much coal you will smother 

the fire, requiring you to start the whole process 

over again. Be patient.

7.  Securely close the heater’s fuel feed door as 

the coal begins burning. CAUTION: OPERATING 

THE HEATER WITH ITS FUEL FEED DOOR 

OR ASH REMOVAL DOOR OPENED CREATES 

AN ABNORMAL FIRING CONDITION WHICH 

CAN OVERHEAT THE HEATER, CHIMNEY AND 

ADJACENT COMBUSTIBLE MATERIALS. THIS 

CAN DRASTICALLY SHORTEN THE HEATER’S 

LIFE AND VOID THE FACTORY WARRANTY.

8.  Wait about ten minutes, or until the coal is 

burning well, then start adding small quantities 

of coal at ten minute intervals until a good coal 

fire is established.

CAUTION:

•  NEVER ADD MORE COAL THAN IS ALREADY 

BURNING AND NEVER ADD MORE THAN 

TEN POUNDS OF FRESH COAL AT ONE TIME.

•  WHEN FRESH COAL IS ADDED, ALWAYS 

LEAVE SOME OF THE GLOWING COALS 

UNCOVERED.

•  NEVER FILL THE HEATER SO THAT THE 

BURNING COAL IS ABOVE THE TOP OF THE 

HEATER’S CHAMBER LINERS. THIS WILL 

CAUSE THE HEATER TO OVERHEAT AND 

WILL SHORTEN ITS LIFE.

9.  MAKE SURE THAT THE HEATER’S FUEL FEED 

DOOR, ASH REMOVAL DOOR, AND CABINET 

DOOR ARE SECURELY CLOSED.

10.  Set the heater’s thermostat control knob to 

a point midway between “HI” and “Lo”. If the 

house or heating situation requires a higher or 

lower setting to obtain the desired amount of 

heat, adjust the heat’s thermostat control knob 

accordingly.

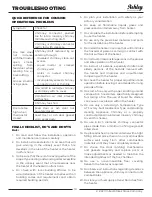
OPENING & CLOSING FUEL FEED DOOR

OPEN:

 When closed and latched, the door and 

handle will be as shown in position number 1. Rotate 

the handle until it is as shown in position number 2. 

Pull the door open until it stops, approximately one 

inch as shown in position 3. Continue to hold the 

door open as the handle is returned to its original 

position. The door will then open completely as 

shown in position number 4.

CLOSED:

 With the handle as shown in position 

number 4, close the door as far as possible. Now 

rotate the handle to position number 3 and 

completely close the door as shown in position 

number 2. Rotate the handle as shown in position 

number  1  and  apply  sufficient  pressure  to  insure 

that the door is sealed.

OPERATION

Содержание BCAC

Страница 1: ...irements in your area NEVER OPERATE THIS PRODUCT WHILE UNATTENDED CAUTION Please read this entire manual before you install or use your new room heater Failure to follow instructions may result in property damage bodily injury or even death Improper Installation Will Void Your Warranty Save These Instructions In A Safe Place For Future Reference CALIFORNIA PROPOSITION 65 WARNING This product can e...

Страница 2: ...N THE DOOR IS SLIGHTLY OPENED DO NOT BURN GARBAGE FLAMMABLE FLUID SUCH AS GASOLINE NAPHTHA OR MOTOR OIL DO NOT CONNECT TO ANY AIR DISTRIBUTION DUCT OR SYSTEM ALWAYS CLOSE THE DOOR AFTER THE IGNITION YOUR CHIMNEY MUST BE INSPECTED PRIOR TO THE INSTALLATION OF YOUR NEW COAL STOVE IN ADDITION YOU SHOULD HAVE YOUR CHIMNEY INSPECTED FOR CREOSOTE DEPOSTS MONTHLY DURING THE HEATING SEASON AND ANNUALLY IN...

Страница 3: ... Brand___________________________________ If no Date of inspection of existing venting system _______________________________________________________ COMMISSIONING Confirm Hearth Pad Installation as per Installation Instructions Confirm proper placement of internal parts Check soundness of door gasket and door seals Confirm clearances to combustibles as per installation instructions in this manual...

Страница 4: ...should check with local building officials to assure compliance with local regulations and codes HOW THIS HEATER OPERATES The chimney draft draws in combustion air through an adjustable air inlet thermostat located inside the cabinet Air flows through and across the bed of fuel causing the fire to progress through the fuel bed Heat is transferred to the air that flows between the cabinet and the f...

Страница 5: ...STIBLE WALLS AND CEILINGS section of this manual for details FLOOR PROTECTION This heater must have a non combustible floor protector with a minimum type 1 ember protection extending beneath the heater if the floor is constructed of combustible material If a floor pad is used it should be UL listed or equal The floor protector should be large enough to extend under the stove and beyond each side a...

Страница 6: ...rature Type HT Factory Built Residential and Building Heating Appliance Chimney is used follow the chimney manufacturer s installation instructions carefully If a masonry chimney is to be used be sure it is constructed to the National Fire Protection Association N F P A and local code standards The Chimney connector pipe from heater to chimney must be 6 in diameter and made from 24 gauge or heavie...

Страница 7: ...ace 2 Use a solid insulated listed factory built chimney UL 103 HT length having an inside diameter of 6 and having 1 or more of solid insulation There must be at least a 9 air space between the outer wall of the chimney length and any combustible materials The inner end of the chimney length shall be flush with the inside of the masonry chimney flue shall be sealed to the flue and to the brick ma...

Страница 8: ...s 3 and 4 connections to facilitate removal of the chimney connector for cleaning The chimney thimble shall be of ASTM C315 fireclay with 5 8 minimum wall thickness or material or equivalent durability The inside diameter of the thimble shall be sized for the proper snug fit of a 6 diameter chimney connector pipe The thimble shall be installed withoutdamagetothechimneyflue Thethimble shall extend ...

Страница 9: ...onnector through a combustible wall for a connection to a masonry chimney Connecting Heater s Chimney Connector to Masonry Chimney When Chimney Connector Does Not Have to Pass Through a Combustible Wall CORRECT CONNECTION OF CHIMNEY CONNECTOR TO MASONRY CHIMNEY INSERT CHIMNEY CONNECTOR TO INSIDE FACE OF MASONRY CHIMNEY S FLUE LINER CHIMNEY THIMBLE INSIDE FACE OF FLUE LINER INCORRECT CONNECTION CHI...

Страница 10: ...e be openings at the top and bottom of these clearance reducers so cool air can enter at the bottom and warm air exit at the top It is the chimney effect whereby when the air in the space is heated it rises exiting from the top and being replaced by cooler air at the bottom that makes these shields effective Masonry or other noncombustible products attached directly to a combustible surface withou...

Страница 11: ...inch diameter holes at the points marked by step 6 8 Apply furnace cement to the inside surface of the heater s flue collar reinstall the first pipe or elbow and fasten in place with No 8 sheet metal screws Apply additional furnace cement to the outside of the chimney connector flue collar joint if an airtight seal was not achieved when the pipe or elbow was installed 9 Assemble the remaining chim...

Страница 12: ...the fire will suffocate smoke and then die out NOTE Softwoods make better kindling than hardwoods because softwoods burn faster than the hardwoods NOTE If the heater tends to smoke when first lit a draft may be induced by holding a torch of rolled up newspaper at the opening of the flue collar Occasionally this must be done two or three times to establish an updraft before proceeding to the follow...

Страница 13: ... TIME WHEN FRESH COAL IS ADDED ALWAYS LEAVE SOME OF THE GLOWING COALS UNCOVERED NEVER FILL THE HEATER SO THAT THE BURNING COAL IS ABOVE THE TOP OF THE HEATER S CHAMBER LINERS THIS WILL CAUSE THE HEATER TO OVERHEAT AND WILL SHORTEN ITS LIFE 9 MAKE SURE THAT THE HEATER S FUEL FEED DOOR ASH REMOVAL DOOR AND CABINET DOOR ARE SECURELY CLOSED 10 Set the heater s thermostat control knob to a point midway...

Страница 14: ...e enough to break apart poorly connected chimney connector pipes If backpuffing is experienced see TROUBLESHOOTING section of this manual Backpuffing is an abnormal condition and a potential hazard Determine and correct the cause 5 TURN THERMOSTAT TO HI FOR 15 MINUTES AFTER ADDING FRESH COAL TO A FIRE This allows the gases to be driven off and shortens the length of time the dense smoke is likely ...

Страница 15: ...good as anthracite Bituminous breaks up more in storage and burns with more smoke than does anthracite One other characteristic of bituminous which differentiates it from anthracite is that as the coal burns it tends to form clinkers whereas anthracite is reduced mainly to ash Clinkers are the misshapen rough gray lumps that form when particles in the coal are heated melt and fuse together When bi...

Страница 16: ...ALS PENDING FINAL DISPOSAL IF THE ASHES ARE DISPOSED OF BY BURIAL IN SOIL OR OTHERWISE LOCALLY DISPERSED THEY SHOULD BE RETAINED IN THE CLOSED CONTAINER UNTIL ALL CINDERS HAVE THOROUGHLY COOLED Ashes should never be placed in wooden or plastic containers or in paper or plastic bags no matter how long the fire has been out Coals have been known to stay hot for several days when embedded in ashes VE...

Страница 17: ... draft is sufficient air will be drawn into the heater through its thermostatically controlled inlet air damper This air supplies the oxygen necessary for the coal to burn If the draft is not sufficient insufficient oxygen will reach the burning fuel and it will burn poorly This condition can also cause smoke and dangerous gases to spill or backpuff from the heater into the room Backpuffing occurs...

Страница 18: ...uctions that could be causing resistance to the flow of smoke and gases up the chimney 8 Check the size of the chimney flue liner If the chimney flue liner s inside dimension is smaller that 6 inches round or 8 inches square it will be too restrictive to the flow of smoke and gases A chimney flue liner which has an inside cross sectional area of more that 85 square inches is too large which will r...

Страница 19: ...s gases and pressurized containers away from heater 7 Do complete the installation before attempting to use the heater 8 Do use only the prescribed materials and parts for the installation of the heater 9 Do install the heater in an area that will minimize the hazards of persons coming in contact with the hot surfaces of the heater 10 Do instruct all responsible persons in the proper and safe oper...

Страница 20: ...eel pipe less than 24 gauge or pipe of a diameter smaller than 6 inches as a chimney connector 6 Don t store ashes in combustible containers not store them near combustible materials nor dispose of them until they have completely cooled 7 Don t use power blowers or air circulation systems with this heater that are not specifically recommended in this manual 8 Don t neglect to inspect regularly and...

Страница 21: ... 2021 United States Stove Company 21 PARTS DIAGRAM ...

Страница 22: ...ch Long 1 34 24837 Hinge Kit Feed Door 1 36 24838 Hinge Kit Ash Door 1 37 25048 Latch Kit For Ash Door 1 38 Refer To Item 32 39 69208 Ash Door Rope Assy 1 40 89930 Handle Kit 2 42 24828 Radiation Shield Kit 1 43 40412 Front Liner 1 45 89142 Knob Thermostat 1 46 851397 Control Plate 1 M 851728 Control Plate 47 24849 Rod And Nut Assy 1 48 69224GO Trim And Screen Assy 1 49 24851 Left Right Top Brace ...

Страница 23: ...07 Date ______________________ Engineer Name ________________________________ License No _____________________________________ Company ______________________________________ Telephone No __________________________________ Stove Inspected Chimney Swept Items Replaced ________________________________ Service 02 Date ______________________ Engineer Name ________________________________ License No ___...

Страница 24: ...24 2021 United States Stove Company NOTES ...

Отзывы: