7
RECAll FACTORy SETUP
1=no, 2=yes, 3=esc
Recalling the Factory Setup allows you to reset
your Endo DTC
®
to factory specifications.
NOTE: Any customized presets will be lost if
you Recall Factory Setup.
• To keep your customized settings, press 1.
• To return the Endo DTC
®
preset buttons to
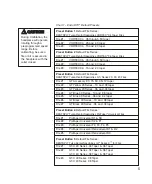
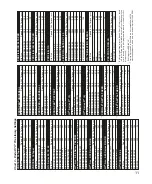
the factory settings (as shown in Chart 1 on
page 5), press 2.
•
CONFIRM RECAll
will appear. Select 2 to
confirm recall or select 1 to reject changes.
• To exit the System Setup Menu and save
changes, press 3.
AUTO STOP REvERSE
1=on, 2=off, 3=esc
When the Auto Stop Reverse (ASR) feature is
enabled, rotation of the handpiece will
automatically stop and reverse when the
selected torque limit is reached. Do not release
the foot pedal when this occurs; keep the foot
pedal activated and the Endo DTC
®
will
automatically alternate between forward and
reverse rotation in an attempt to free the
instrument.
The Auto Stop Reverse setting is saved when
programming Preset Buttons.
• To enable the Auto Stop Reverse feature,
press 1.
This setting is
highly recommended
for
endodontic procedures.
• To disable the Auto Stop Reverse feature,
press 2.
Disabling auto stop reverse is
not
recommended
for endodontic procedures, as
file separation may occur.
• To exit the System Setup Menu without
changes, press 3.
SAvE CHANGES
selection will appear. Select 1 to save
changes and exit or select 2 to reject all
changes and exit.
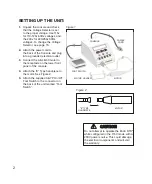
6. CAlIBRATION ANd
SySTEM SETUP BUTTON:
Calibration (CAl):
Press and release the "CAL" button to activate
the Integrated Calibration System. The AEU-25
will automatically run the handpiece and
system through a self test.
Use the Calibration function in the following
circumstances:
• At the beginning of each day
• After changing handpieces
(especially when changing handpiece type)
• After changing files or burs (optional)
System Setup Menu:
Press and hold the "CAL" button until you hear
a double beep to enter the System Setup Menu.
After entering the System Setup Menu, the
following setup options will be displayed on the
Console LCD Display.
PRESET MEMORy lOCK
1=on, 2=off, 3=esc
By default, the Preset Memory Lock is activated
to prevent the user from inadvertently entering
the File Library during a procedure.
To customize the Preset Buttons with other File
Library Settings or User Defined Presets, the
Preset Memory Lock must be disabled.
To protect any customized presets, re-enable
the Preset Memory Lock after programming the
Preset Buttons.
This is a system-wide setting and is not saved
on a Preset Button when programming.
• To enable the Preset Memory Lock,
press 1.
• To disable the Preset Memory Lock,
press 2.
• To exit the System Setup Menu without
changes, press 3.


