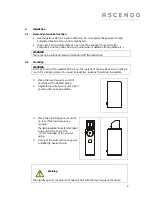
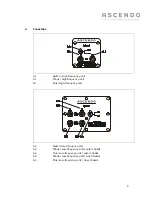
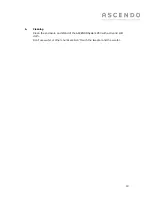
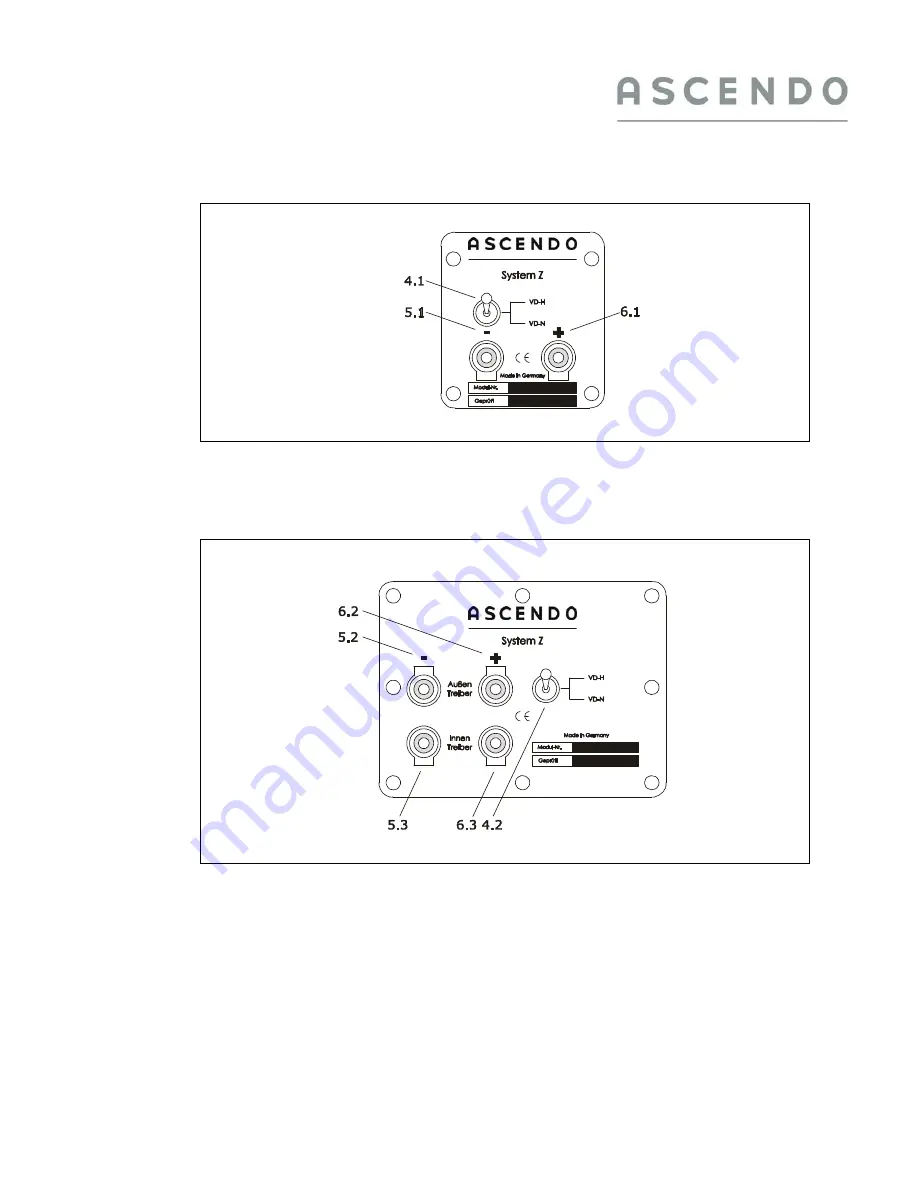
Ascendo ZF-3 Скачать руководство пользователя страница 8


4. Connection 


4.1 

Switch / High-frequency-unit 

5.1  

Minus / High-frequency-unit 

6.1 

Plus / High-frequency-unit 


4.2  

Switch Low-frequency-unit 

5.2 

Minus / Low-frequency-unit / outer chassis 

6.2 

Plus / Low-frequency-unit / outer chassis 

5.3 

Minus / Low-frequency-unit / inner chassis 

6.3 

Plus / Low-frequency-unit / inner chassis 


Содержание ZF-3

Страница 1: ...SYSTEM ZF 3 USER S MANUAL...

Страница 2: ...STALLATION 6 2 1 Demands of speaker location 6 2 2 Mounting 6 3 TRANSPORT 7 4 CONNECTION 8 5 TIME ALIGNMENT FOR THE LISTENER S POSITION 11 5 1 Adjustment of the Time alignment 12 6 CLEANING 14 ASCENDO...

Страница 3: ...ual position of the listener by time alignment consequently mechanical and electrical decoupled more details and transparency very low resonance between loudspeaker and floor The crossover low frequen...

Страница 4: ...rs permanently 1 4 Operating modes You can use the System ZF 3 in a single amp setup one power amplifier for high and low frequency unit or in a bi amp setup one power amplifier for the low frequency...

Страница 5: ...dwich construction of Bitumen and MDF Dimensions 27 108 5 43 cm Weight 43 kg Power 500 W RMS min Impedance 5 Ohm Sensitivity 89 5 dB 1W m High Frequency Unit Driver Ribbon Tweeter Switch for high and...

Страница 6: ...to mount the System ZF 3 alone The weight of the low frequency unit is too much for a single person You need at least two persons to build up the system 1 Place the low frequency unit 3 carefully at t...

Страница 7: ...t all cables of the System ZF 3 2 Pull off the high frequency 1 unit from the low frequency unit 3 Lay it on a soft dry cloth Take care not to touch the diaphragm of the tweeter 3 Lift the low frequen...

Страница 8: ...s High frequency unit 6 1 Plus High frequency unit 4 2 Switch Low frequency unit 5 2 Minus Low frequency unit outer chassis 6 2 Plus Low frequency unit outer chassis 5 3 Minus Low frequency unit inner...

Страница 9: ...uency unit to outer chassis tri wired one cable pair from power amp to outer chassis one cable pair from the power amp to inner chassis one cable pair from the power amp to high frequency unit bi ampe...

Страница 10: ...y unit Switch 4 in position VD N This is recommended for transistor power amps with damping factor falling with frequency Switch 4 in position VD H Standard Recommended for transistor power amps with...

Страница 11: ...NDO Systems The displacement of the high frequency Unit ensures the correct phase in over floor positions between 50 cm and 190 cm 1 Switch off the power amplifiers and disconnect all cables of the Sy...

Страница 12: ...5 1 Adjustment of the time alignment Area of Adjustment The adjustment is measured from the front of the woofer to the front of the tweeter 12...

Страница 13: ...7 4 7 4 5 115 0 6 7 6 6 6 4 6 3 6 2 6 1 5 8 5 7 5 5 5 4 5 3 5 2 5 1 5 1 5 0 5 0 4 9 4 9 4 7 117 5 7 0 6 8 6 7 6 5 6 4 6 3 6 1 5 9 5 8 5 6 5 5 5 4 5 4 5 3 5 2 5 2 5 1 5 1 5 0 120 0 7 2 7 1 6 9 6 8 6 6...

Страница 14: ...14 6 Cleaning Clean the enclosure and stand of the ASCENDO System ZF 3 with a dry and soft cloth Don t use water or other chemicals Don t touch the tweeter and the woofer...

Отзывы: