background image

TGL-Basic 

Montageanleitung


https://www.as-led.de/


Seite 

6

 von 

10


Rev. 27.07.2020


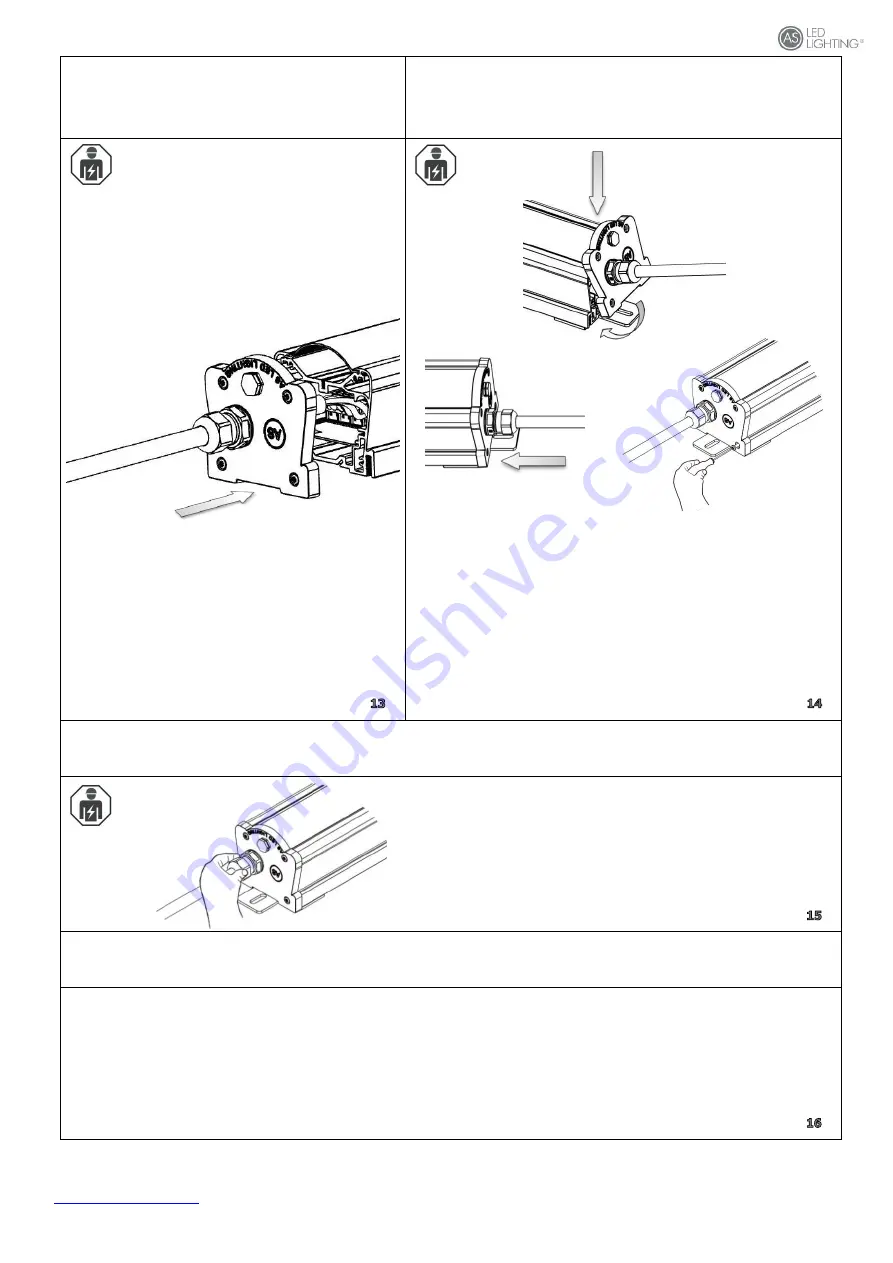
Netzteileinheit in die Leuchte wieder 
zurückschieben 

Move back the power supply unit 

Seitendeckel montieren 
Side cap mounting


IP-Verschraubung aufsetzen 

Screw in the IP Connector


Durchverdrahtung 

Electrical wiring through luminaire 


Seitendeckel  auf  den  Leuchtenkorpus  von  oben  nach  unten  schieben  bis  er  über  das 
Profil rutscht. Anschliessend mit den 4 Blechschrauben (3,5x19) anschrauben.  
Darauf  achten,  dass  die  Scheibe  sauber  unter  dem  überstehenden  Rand  des 
Seitendeckels rutscht. Eventuell mit dem Finger die Scheibe unter den Deckel drücken. 
Zusätzlich darauf achten, dass die innenliegende Dichtung sauber im Seitendeckel liegt 
und nicht unter die Scheibe verrutscht ist.  

Push the side cover onto the luminaire body from top to bottom until it slides over the 
profile. Then screw on with the 4 self-tapping screws (3.5x19).  
Make sure that the pane slides cleanly under the projecting edge of the side  cover. If 
necessary, press the pane under the cover with your finger. In addition, make sure that 
the inner seal lies neatly in the side cover and has not slipped under the disc.  


Aussenschraube  der  IP-Verschraubung  aufsetzen  und  fest 
anziehen bis die Verbindung dicht ist. 

Screw in the IP Connector nut till the connection is sealed.  
 

Bei dieser Leuchte kann die Durchverdrahtung sowohl auf einer Seite gemacht werden, wie auch auf beiden Seiten.  

With this luminaire you can realize an electrical wiring through the luminaire in two ways, one is to make the wiring on one 
side, the other way is to make an electrical wiring through the luminaire on both sides. 
 

Содержание TGL-030010

Страница 1: ...w as led de Keep these instructions for future maintenance work or dismantling For important information of AS luminaires and on maintaining and disposing of luminaires please visit our webpage at www as led de Montageanleitung Mounting instructions TGL Basic AS LED Lighting GmbH Seeshaupter Str 2 82377 Penzberg Tel 49 0 8856 80006 0 Fax 49 0 8856 80006 99 info as led de www as led de ...

Страница 2: ...this luminaire Important Information Regarding Electronic Control Gear ECG Interference to the neutral conductor in a three phase system may result in surge related damage in the lighting installation Only open neutral conductor disconnect terminal when disconnected from power supply and close prior to switching back on The maximum admissible ambient temperature ta of the luminaire may not be exce...

Страница 3: ...0 865 Lieferumfang scope of delivery https www as led de Anbauflansch Beipack mounting flange accessory pack Senkkopfschraube M5x16 Torx T20 Beipack countersunk head screw accessory pack 4x 2x IP 65 Verschraubung Click M20 1x werkseitig montiert 1x Beipack IP 65 cable gland Click M20 1x factory fitted 1x accessory pack 4x 1x Linsen Blechschrauben DIN7981 TORX TX15 C mit 3 5x19 Pan head tapping scr...

Страница 4: ...ohrung A Max Bohrmaß D Min Bohrmaß C Länge L1 Länge L TGL 030010 375 385 360 365 409 TGL 060010 655 665 640 645 689 TGL 090010 935 945 920 925 969 TGL 120010 1215 1225 1200 1205 1249 TGL 150010 1495 1505 1480 1485 1529 Montage Befestigungsflansch Attach the mounting flange 1 1 2 Befestigungsflansch auf Leuchte schrauben Screw the mounting flange on the luminaire ...

Страница 5: ...ing 1 A 1 Dübel und oder Schrauben für die Deckenmontage nicht im Lieferumfang enthalten Dowels and or screws for ceiling mounting are not included in the delivery A 2 2 A 1 Abstand Bohrung A siehe Bild 4 und 5 aus Seite 3 Find dimension A in picture 4 and 5 on page 3 1 2 1 2 Abstand Bohrung A siehe Bild 4 und 5 aus Seite 3 Find dimension A in picture 4 and 5 on page 3 ...

Страница 6: ...Anschlußkabel anschließen Connect cabel Erdschraube mit Zahnscheibe einschrauben Torx T10 Screw in the ground connection screw with lock washer Netzteileinheit aus der Leuchte herausziehen bis die Anschlußklemme 5 polig frei zugänglich ist Pull out the Power Supply Unit until the cage clamp 5 pole is free to use 2 1 Achtung Handfest anziehen Mit Akkuschrauber max Stufe 3 Warning Hand screwed With ...

Страница 7: ... unter die Scheibe verrutscht ist Push the side cover onto the luminaire body from top to bottom until it slides over the profile Then screw on with the 4 self tapping screws 3 5x19 Make sure that the pane slides cleanly under the projecting edge of the side cover If necessary press the pane under the cover with your finger In addition make sure that the inner seal lies neatly in the side cover an...

Страница 8: ...tendeckeln an einem der Logos ein Loch für M20 Verschraubungen mit einem Kegelbohrer ausschneiden Die mitgelieferte IP Verschraubung einsetzen und verschrauben Darauf achten dass die innenliegende Dichtung sauber auf dem Deckel aufliegt Das zweite Kabel durch die IP Verschraubung ziehen und durch die Leuchte durchschieben bis die Anschlüsse bis zur WAGO Klemme reichen Seitlich im Gehäuse ist dazu ...

Страница 9: ... GND PE Grün Gelb Anschlußbelegung 5 polig Pin assignments of the socket 5 pole Anschlußbelegung 5 polig Pin assignments of the socket 5 pole Belegung Kabel Phase L1 L Braun Neutralleiter N Blau GND PE Grün Gelb DALI DA1 Grau DALI DA2 Schwarz Technische Spezifikationen Technical specifications Anschließbare Leiterarten Type of conductors which can be connected Anschließbare Querschnitte mm Connect...

Страница 10: ... 03 MLD DALI 21 28 36 45 13 17 22 27 22 4A 176µs TGL 120010 04 MLH 16 21 26 35 10 13 16 21 32A 240µs TGL 120010 04 MLH DALI 21 28 36 45 13 17 22 27 22 4A 176µs TGL 120010 04 MLD 16 21 26 35 10 13 16 21 30A 253µs TGL 120010 04 MLD DALI 21 28 35 45 13 17 21 27 23A 174µs TGL 120010 04 MLH HT 33 41 53 66 20 25 32 40 5 0A 1000µs TGL 120010 04 MLH DALI HT 25 32 41 50 15 19 24 30 20A 216µs TGL 120010 04 ...

Страница 11: ...e state These instructions assume expert knowledge corresponding to a completed professional education as an electrician Das Symbol der durchgestrichenen Mülltonne auf Rädern bedeutet dass das Produkt in der EG einer getrennten Müllsammlung zugeführt werden muss Dies gilt für das Produkt und alle mit diesem Symbol gekennzeichneten Zubehörteile Gekennzeichnete Produkte dürfen nicht über den normale...

Отзывы: