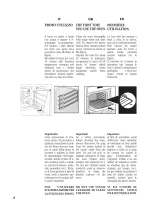
Artusi AO960 Скачать руководство пользователя страница 17

IT

GB

FR

28

DEMONTAGE DE

LA PORTE DU

FOUR

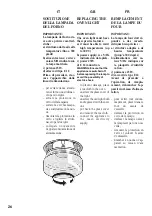
Le  démontage  de  la  porte

du  four  peut  être  effectué

facilement  de  la  manière

suivante :

- ouvrir  complètement  la

porte;

- lever  les  deux  manettes

indiquées sur la fig.;

- refermer  la  porte  sur  le

premier  cran  d’arrêt

déterminé  par  les  deux

manettes  soulevées  au

préalable;

- lever la porte vers le haut

et vers l’extérieur du four

pour l’ôter de son siège;

Pour  remonter  la  porte,

insérer  les  charnières  dans

les  logements  prévus  à  cet

effet, puis remettre les deux

manettes  en  position  de

fermeture.

REMOVING THE

OVEN DOOR

The  oven  door  can  be

removed quickly and easily.

To  do  so,  proceed  as

follows:

- Open the door fully.

- Lift the two levers shown

in fig.

- Close  the  door  as  far  as

the  first  stop  (caused  by

the raised levers).

- Lift  the  door  upwards

and  outwards  to  remove

it from its mountings.

To  replace  fit  the  door,  fit

the 

hinges 

in 

their

mountings  and  lower  the

two levers.

SMONTAGGIO

DELLA PORTA

FORNO

Lo  smontaggio  della  porta

forno può essere facilmente

effettuato  operando  come

segue:

- aprire totalmente la porta;

- sollevare  le  due  levette

indicate in fig.;

- richiudere  la  porta  sul

primo  scatto  di  arresto

determinato  dalle  due

levette 

sollevate 

in

precedenza;

- sollevare  la  porta  verso

l’alto  e  verso  l’esterno

del  forno  per  estrarla

dalle sedi;

Per rimontare la porta, inse-

rire le cerniere nelle apposi-

te sedi e quindi riportare le

due  levette  nella  posizione

di chiusura.

Содержание AO960

Страница 1: ...AO960 OPERATION MANUAL APPLIANCES FOR LIVING...

Страница 2: ...iled information on each of the features your ARTUSI appliance consists of Once you have read this section you will be able to choose the most appropriate settings for your appliance when cooking diff...

Страница 3: ...t teindre d excellents r sultats d s la pr mi re utilisation LE CONSTRUCTEUR IMPORTANT Il est possible d acc der la plaque des caract ristiques du four m me lorsque l appareil est install Cette plaque...

Страница 4: ...WAY BE HELD RESPONSIBLE FOR WHATEVER INJURIES OR DAMAGES ARE CAUSED BY INCORRECT INSTALLATION OR BY UNSUITABLE WRONG OR ABSURD USE DO NOT PLACE TIN FOIL PANS OR SIMILAR IN CONTACT WITH THE INNER BASE...

Страница 5: ......

Страница 6: ...d on to the walls before the side frames are fitted They are coated in a special micro porous catalytic enamel which oxidises and gradually va porises splashes of grease and oil at cooking tempe ratur...

Страница 7: ...PLQXWH FRXQWHU GRHV QRW FRQWURO WKH RYHQ ZKHQ LW ILQLVKHV FRXQWLQJ WKH RYHQ ZLOO FRQWLQXH WR ZRUN 7R VHW SUHVV WKH FHQWUDO EXWWRQ IRU VHFRQGV XQWLO DSSHDUV ILJXUH 3UHVV DQG WR VHW WKH UHTXLUHG WLPH 7R...

Страница 8: ...WKH UHTXLUHG FRRNLQJ WLPH DLW D IHZ VHFRQGV IRU WKH VHWWLQJ WR EH PHPRULVHG 3UHVV WKH FHQWUDO EXWWRQ IRU VHFRQGV 3UHVV LW DQRWKHU WZR WLPHV DQG ZDLW IRU QG WR DSSHDU ILJXUH 3UHVV DQG WR VHW WKH UHTXL...

Страница 9: ...elements with fan Thermo stat setting from 50 C to MAX Circular heating element with fan Thermostat setting from 50 C to MAX Fan for defrosting Thermo stat setting at 0 C Bottom heating element with...

Страница 10: ...open the oven door as little as possible during cooking ISTRUZIONI DI FUNZIONAMENTO COTTURA CONVENZIONALE Sistema classico che utiliz za calore superiore ed infe riore adatto per la cottura di un solo...

Страница 11: ...of cooking a fan positioned at the back allows the circulation of hot air inside the oven creating uniform heat In this way cooking is more rapid than conventional cooking It is a suitable method for...

Страница 12: ...o la parte esteriore del forno raggiunge i 60 C ca Accendendo il forno e im postando il termostato a 200 C il ventilatore entra in funzione dopo 10 min ca Lo spegnimento del ventila tore avviene quand...

Страница 13: ...esired alarm time COOKING TIMER First turn the cooking se lector to the required cook ing function and the ther mostat to the desired cook ing temperature Then to set end of cooking time turn the cook...

Страница 14: ...n key and press the keys to set the duration of cooking A buzzer sounds when the cooking period finishes and the oven switches itself off Turn the thermostat and selector knobs back to 0 position and...

Страница 15: ...s Press any key to silence it ALARM TIMER Press the alarm timer key and press the keys to set the required duration of cooking The buzzer sounds when the cooking time ends Press any key to silence it...

Страница 16: ...dis connect the appliance from the main electricity supply to prevent damage place a tea cloth in the oven unscrew the glass cover of the light unscrew the old light bulb and replace it with the new o...

Страница 17: ...do so proceed as follows Open the door fully Lift the two levers shown in fig Close the door as far as the first stop caused by the raised levers Lift the door upwards and outwards to remove it from...

Страница 18: ...aux termes de la loi Le c ble ne doit en aucun cas atteindre une temp rature sup rieure de plus de 50 C par rapport la temp rature ambiante Si un appareil fixe n a pas de cordon d alimentation et de...

Страница 19: ...conditions de la cat gorie de surtension III ces dispositifs de d connexion doivent tre pr vus dans le r seau d a l i m e n t a t i o n conform ment aux normes d installation La prise ou l interrupteu...

Страница 20: ...Bottom element l ment sole Unteres Heizelement Elemento suelo Element bodem Elemento inferior CARATTERISTICHE TECNICHE TECHNICAL FEATURES CARACT RISTIQUES TECHNIQUES TECHNISCHE DATEN CARACTER STICAS T...

Страница 21: ...35 NOTE Ensure you secure the oven to the kitchen cabinets with the screws provided using the screw holes in the oven cavity...

Страница 22: ...rochure welke geweten kunnen worden aan copie of drukfouten Hij behoudt zich het recht voor aan zijn eigen produkten wijzigingen aan te brengen die hij noodzakelijk of nuttig acht zonder dat de wezenl...

Страница 23: ...d and built in 12 months warranty products Freestanding Cookers Gas and Electric Models in 50cm 54cm and 60cm Widths Portable Appliances Benchtop Models and Portable Gas Models 2 What is not Covered b...

Страница 24: ...iances excludes indirect or consequential loss of any kind including without limitation loss of use of the artusi product and other than expressly provided for in these terms and conditions subject to...

Страница 25: ......

Страница 26: ...e design specifications aesthetics and production techniques of its products As a result alterations to our products and designs take place continually Whilst every effort is made to produce informati...

Отзывы: