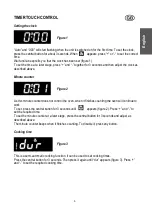
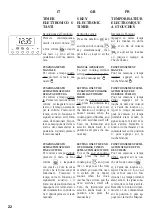
Artusi AO960 Скачать руководство пользователя страница 13

IT

GB

FR

20

THERMOSTAT

Dispositif permettant de ré-

gler la température de cuis-

son  la  plus  indiquée  pour

les aliments et pouvant être

réglé de 50

°

 à 250

°

 C.

MINUTEUR

Signaleur  acoustique  de  0-

60  minutes.  Tourner  le

bouton  dans  le  sens  des

aiguilles  d’une  montre  jus-

qu’à  la  position  maximum,

puis  le  remettre  sur  le

temps désiré.

TEMPORISATEUR

Régler  le  bouton  du  com-

mutateur  et  du  thermostat

sur la position et sur la tem-

pérature désirées.

Pour  les  cuissons  à  temps

défini,

  tourner  le  bouton

vers  la  droite  en  le  réglant

sur  la  durée  préétablie.

Tourner  le  bouton  dans  le

sens  des  aiguilles  d’une

montre  jusqu’à  la  position

maximum,  puis  le  remettre

sur  le  temps  désiré.

Ensuite,  un  signal  sonore

indique que le temps prévu

s’est écoulé et le four cesse

de fonctionner.

Pour la cuisson à temps 

in-

défini, 

  tourner  le  bouton

vers la gauche en le mettant
au niveau du symbole  .

THERMOSTAT

Use  the  thermostat  to  set

the  cooking  temperature

you  need.  The  thermostat

can be adjusted from 50

°

 to

250

°

 C.

ALARM TIMER

You  can  set  this  timer  to

sound a buzzer after 0 to 60

minutes  of  cooking.  First

turn  the  knob  fully  clock-

wise,  then  turn  it  back  to

the desired alarm time.

COOKING TIMER

First,  turn  the  cooking  se-

lector to the required cook-

ing  function,  and  the  ther-

mostat to the desired cook-

ing temperature.

Then, to set 

end of cooking

time

, turn the cooking timer

to  the  right  and  to  the

desired  time.  First  turn  the

knob  fully  clockwise,  then

turn  it  back  to  the  desired

alarm  time.  A  buzzer

sounds  at  the  end  of  the

timed  cooking  period,  and

the oven switches itself off.

To  set  only  the 

start  of

cooking

,  turn  the  cooking

timer  to  the  left  to  the 
symbol.

TERMOSTATO

Dispositivo che permette di

regolare  la  temperatura  di

cottura  più  idonea  ai  cibi

cuocere  e  può  essere  rego-

lato da 50

°

 a 250

°

 C.

CONTAMINUTI

Segnalatore  acustico  da  0-

60  minuti.  Si  deve  ruotare

la manopola in senso orario

fino alla posizione massima

per  poi  riportarla  al  tempo

desiderato.

TEMPORIZZATORE

Impostare  la  manopola  del

commutatore  e  del  termo-

stato nella posizione e tem-

peratura desiderata.

Per cotture a tempo 

definito

ruotare la manopola a destra

posizionandola  nel  tempo

prestabilito. Si deve ruotare

la manopola in senso orario

fino alla posizione massima

per  poi  riportarla  al  tempo

desiderato.  In  seguito,  un

segnale  acustico  segnalerà

che il tempo è trascorso e il

forno cessa di funzionare.

Per  cottura  a  tempo 

indefi-

nito

  ruotare  la  manopola  a

sinistra  portandola  in  corri-
spondenza del simbolo  .

Содержание AO960

Страница 1: ...AO960 OPERATION MANUAL APPLIANCES FOR LIVING...

Страница 2: ...iled information on each of the features your ARTUSI appliance consists of Once you have read this section you will be able to choose the most appropriate settings for your appliance when cooking diff...

Страница 3: ...t teindre d excellents r sultats d s la pr mi re utilisation LE CONSTRUCTEUR IMPORTANT Il est possible d acc der la plaque des caract ristiques du four m me lorsque l appareil est install Cette plaque...

Страница 4: ...WAY BE HELD RESPONSIBLE FOR WHATEVER INJURIES OR DAMAGES ARE CAUSED BY INCORRECT INSTALLATION OR BY UNSUITABLE WRONG OR ABSURD USE DO NOT PLACE TIN FOIL PANS OR SIMILAR IN CONTACT WITH THE INNER BASE...

Страница 5: ......

Страница 6: ...d on to the walls before the side frames are fitted They are coated in a special micro porous catalytic enamel which oxidises and gradually va porises splashes of grease and oil at cooking tempe ratur...

Страница 7: ...PLQXWH FRXQWHU GRHV QRW FRQWURO WKH RYHQ ZKHQ LW ILQLVKHV FRXQWLQJ WKH RYHQ ZLOO FRQWLQXH WR ZRUN 7R VHW SUHVV WKH FHQWUDO EXWWRQ IRU VHFRQGV XQWLO DSSHDUV ILJXUH 3UHVV DQG WR VHW WKH UHTXLUHG WLPH 7R...

Страница 8: ...WKH UHTXLUHG FRRNLQJ WLPH DLW D IHZ VHFRQGV IRU WKH VHWWLQJ WR EH PHPRULVHG 3UHVV WKH FHQWUDO EXWWRQ IRU VHFRQGV 3UHVV LW DQRWKHU WZR WLPHV DQG ZDLW IRU QG WR DSSHDU ILJXUH 3UHVV DQG WR VHW WKH UHTXL...

Страница 9: ...elements with fan Thermo stat setting from 50 C to MAX Circular heating element with fan Thermostat setting from 50 C to MAX Fan for defrosting Thermo stat setting at 0 C Bottom heating element with...

Страница 10: ...open the oven door as little as possible during cooking ISTRUZIONI DI FUNZIONAMENTO COTTURA CONVENZIONALE Sistema classico che utiliz za calore superiore ed infe riore adatto per la cottura di un solo...

Страница 11: ...of cooking a fan positioned at the back allows the circulation of hot air inside the oven creating uniform heat In this way cooking is more rapid than conventional cooking It is a suitable method for...

Страница 12: ...o la parte esteriore del forno raggiunge i 60 C ca Accendendo il forno e im postando il termostato a 200 C il ventilatore entra in funzione dopo 10 min ca Lo spegnimento del ventila tore avviene quand...

Страница 13: ...esired alarm time COOKING TIMER First turn the cooking se lector to the required cook ing function and the ther mostat to the desired cook ing temperature Then to set end of cooking time turn the cook...

Страница 14: ...n key and press the keys to set the duration of cooking A buzzer sounds when the cooking period finishes and the oven switches itself off Turn the thermostat and selector knobs back to 0 position and...

Страница 15: ...s Press any key to silence it ALARM TIMER Press the alarm timer key and press the keys to set the required duration of cooking The buzzer sounds when the cooking time ends Press any key to silence it...

Страница 16: ...dis connect the appliance from the main electricity supply to prevent damage place a tea cloth in the oven unscrew the glass cover of the light unscrew the old light bulb and replace it with the new o...

Страница 17: ...do so proceed as follows Open the door fully Lift the two levers shown in fig Close the door as far as the first stop caused by the raised levers Lift the door upwards and outwards to remove it from...

Страница 18: ...aux termes de la loi Le c ble ne doit en aucun cas atteindre une temp rature sup rieure de plus de 50 C par rapport la temp rature ambiante Si un appareil fixe n a pas de cordon d alimentation et de...

Страница 19: ...conditions de la cat gorie de surtension III ces dispositifs de d connexion doivent tre pr vus dans le r seau d a l i m e n t a t i o n conform ment aux normes d installation La prise ou l interrupteu...

Страница 20: ...Bottom element l ment sole Unteres Heizelement Elemento suelo Element bodem Elemento inferior CARATTERISTICHE TECNICHE TECHNICAL FEATURES CARACT RISTIQUES TECHNIQUES TECHNISCHE DATEN CARACTER STICAS T...

Страница 21: ...35 NOTE Ensure you secure the oven to the kitchen cabinets with the screws provided using the screw holes in the oven cavity...

Страница 22: ...rochure welke geweten kunnen worden aan copie of drukfouten Hij behoudt zich het recht voor aan zijn eigen produkten wijzigingen aan te brengen die hij noodzakelijk of nuttig acht zonder dat de wezenl...

Страница 23: ...d and built in 12 months warranty products Freestanding Cookers Gas and Electric Models in 50cm 54cm and 60cm Widths Portable Appliances Benchtop Models and Portable Gas Models 2 What is not Covered b...

Страница 24: ...iances excludes indirect or consequential loss of any kind including without limitation loss of use of the artusi product and other than expressly provided for in these terms and conditions subject to...

Страница 25: ......

Страница 26: ...e design specifications aesthetics and production techniques of its products As a result alterations to our products and designs take place continually Whilst every effort is made to produce informati...

Отзывы: