background image

USER’S MANUAL

92

HDD INSTALLATION PROCESS

Chapter 10

HDD Installation Process

10.1 Internal HDD installation

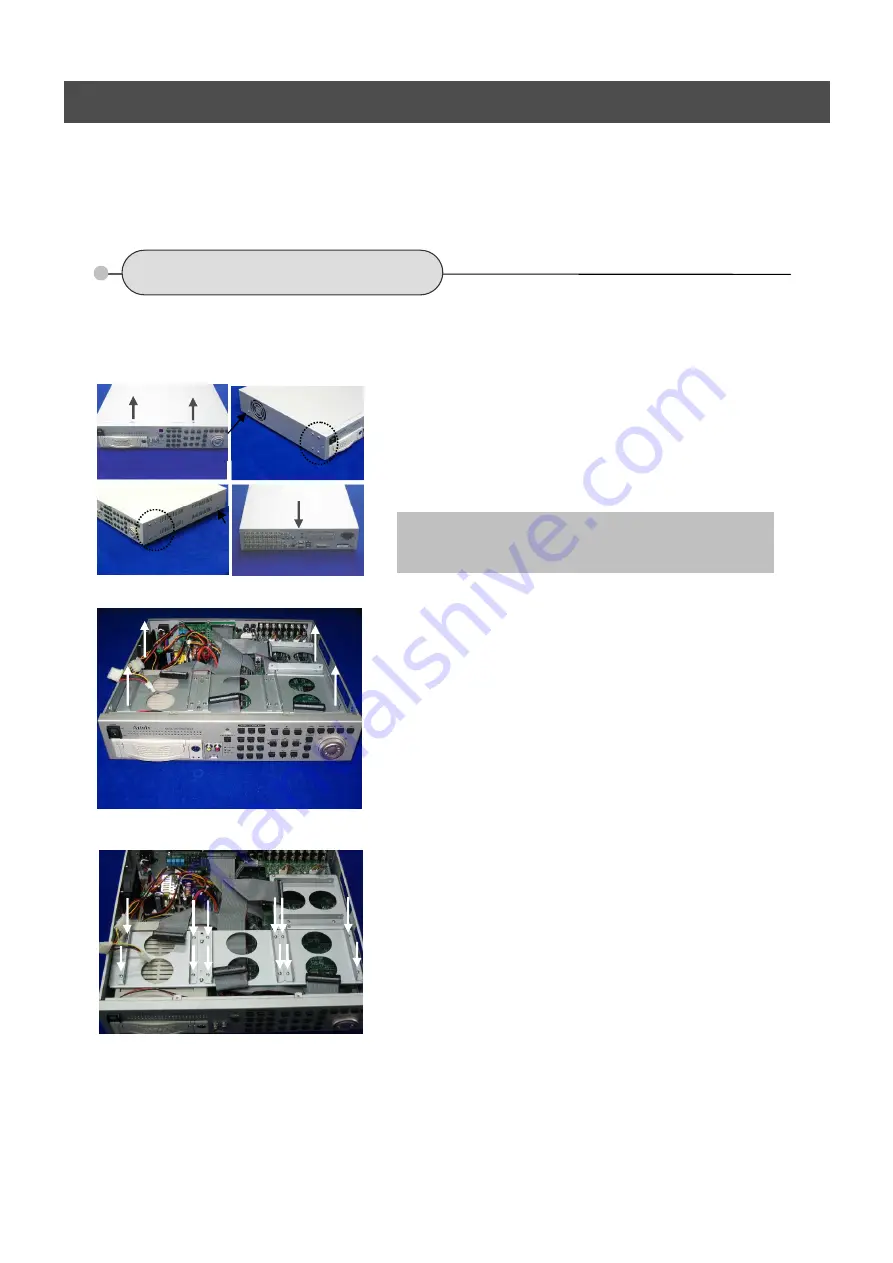
10.1.1   How to install the internal Hard Disk Drive(s).

1) Unscrew on the top, the side and the rear of this

unit as indicated to remove the cover.


2)  Remove  the  upper  cover  from  the  unit  as

indicated

3) Unscrew to remove the rack mounts as indicated.

Caution) Plug out the power cord before addition / removal /
change of HDD

Содержание ANX-16480

Страница 1: ...may cause harmful interference to radio communications Operation of this equipment in a residential area is likely to cause harmful interference in which case the user will be required to correct the...

Страница 2: ...yed at the monitor SYSTEM IS OVERHEATED TURN THE POWER OFF AND CHECK COOLING FAN In this case do the power off right away and check the cooling fan working The HDD is recommended to use enhanced IDE H...

Страница 3: ...rt 5 OPERATION 5 1 FACTORY DEFAULT 5 2 FRONT PANEL CONTROLS 5 2 1 POWER ON OFF 5 2 2 SCREEN DISPLAY 5 2 3 RECORD 5 2 4 SEARCH PLAYBACK 5 2 5 SEARCH BUTTON INFORMATION 5 2 6 JOG SHUTTLE INFORMATION 5 2...

Страница 4: ...EVENT SCREEN MODE 6 4 3 EVENT CHECK 6 4 4 EVENT MESSAGE 6 4 5 EVENT MESSAGE RESET 6 4 6 EVENT BUZZER 6 4 7 SENSOR INPUT 6 4 8 RELAY OUTPUT 6 5 SYSTEM 6 5 1 HDD 6 5 2 CLOCK 6 5 3 PASSWORD 6 5 4 VIDEO...

Страница 5: ...ORK CLIENT VIEWER MANUAL 11 1 INSTALLATION OF NETWORK VIEWER SOFTWARE 11 1 1 SYSTEM REQUIREMENT 11 1 2 NETWORK ENVIRONMENT 11 1 3 INSTALLATION 11 2 CONNECTING TO DVR 11 2 1 ADD A NEW SITE INFORMATION...

Страница 6: ...channel Individual camera frame rate can be set by user The recording speed of max 120 images per second NTSC Manual schedule and event recording Pre Post alarm recording Select of the recording image...

Страница 7: ...X 40HDDs 10TB 500GB X 40HDD 20TB 1TB X 40HDD 40TB Audio 4 channels audio recording in real time MPEG4 16CH 8CH DVR 8 channels audio recording in real time MPEG4 4CH DVR 4 channels audio recording in r...

Страница 8: ...Network Viewer Program CD 5 R HDD Rack Key ack Key 7 Power Cord 6 Rack Mount 9 HDD Screw ack Key 8 Battery ack Key 1 DVR 2 Network Viewer Program CD 3 User s Manual 4 Remote Controller Option 5 R HDD...

Страница 9: ...9 LOCATION AND CONTROL Chapter 3 Location and Control 3 1 FRONT PANEL CONTROLS 3 8...

Страница 10: ...mode decrease the value focus in PTZ mode Button to set the section repetition playback button STATUS HOME Button to enter the next step display the status return to home position in PTZ mode 16 PIP...

Страница 11: ...L mode 10 SERIAL Connector for debugging This DVR can be controlled by the other device through this connector RS 232C 11 422 485 Switch to convert into RS 422 or RS 485 12 TERM ON OFF Switch to use t...

Страница 12: ...USER S MANUAL 12 INSTALLATION Chapter 4 Installation 4 1 TOTAL CONNECTION LAY OUT...

Страница 13: ...NNECTION 4 2 1 Rack mount 4 2 2 Camera Connect a female BNC connector of each camera to a male BNC connector CAMERA IN port Connect the looping BNC output to other inputs as required Adapt the DVR rac...

Страница 14: ...ophone to the AUDIO IN port Audio Output AUDIO OUT Connect the RCA Line output to a monitor with a built in speaker NOTE This DVR can be connected only with a line audio and not support a microphone f...

Страница 15: ...ATION 4 2 4 Monitor Connect the female BNC for monitor output Connect the male Y C cable socket for S VIDEO monitor output 4 2 5 Power Select the correct voltage of power 230 180 265 VAC 115 90 135 VA...

Страница 16: ...D bay 5 Plug the power cord of DVR and external HDD bay 6 Turn the power of DVR on 7 After booting the system automatically press the STATUS button and check the system information of setting the HDD...

Страница 17: ...ying One USB port is on the front panel and the other two are on the rear panel 2 A USB mouse can be connected to one of the ports You can use the mouse to navigate through the screens and menus much...

Страница 18: ...VERTICAL POSITION 0 AUTO SEQUENCE QUAD A E SIX SEVEN NINE A B TEN THIRTEEN SIXTEEN 3SEC ADD AUTO SINGLE OFF AUTO SINGLE CH1 16 3SEC VIDEO LOSS SKIP ON DISPLAY HDD FREE SPACE ON HDD FREE SPACE MODE PE...

Страница 19: ...F AUDIO 5 OFF AUDIO 6 OFF AUDIO 7 OFF AUDIO 8 OFF JPEG MOMELS 4CH audio REPEAT RECORD REPEAT RECORD ON REPEAT RECORD ALARM 5 PLAY MODE FRAME BACKUP MODE OFF HOLIDAY HOLIDAY RECORD OFF HOLIDAY SETUP MM...

Страница 20: ...ARD AUTO LANGUAGE ENGLISH REMOTE CONTROL ID ALL KEY ECHO ON LANGUAGE ENGLISH DVR MENU SETUP MENU INITIALIZE NO LOAD MENU FROM FILE SAVE MENU TO FILE FIRMWARE UPGRADE NO LINK NETWORK DHCP OFF IP ADDRES...

Страница 21: ...H HDD ID NORMAL CHANNEL ALL EVENT SEARCH HDD ID NORMAL CHANNEL ALL EVENT ALL BLOCK SEARCH HDD ID NORMAL FILE SEARCH MEDIA USB_FRONT COPY COPY STATUS COPY START END CUR TIME 2000 00 00 00 00 00 MEDIA F...

Страница 22: ...y a Multi display To change a single camera display to the multi camera press the MULTI button b Full screen display Press the desired camera number button to display on the monitor Before the power o...

Страница 23: ...3 Freeze MULTI SCREEN MODE At the Multi display mode press the FREEZE button and then select the desired camera number Press the FREEZE button again to release the FREEZE mode SINGLE SCREEN MODE Press...

Страница 24: ...n the RECORD setup page 44 5 2 4 SEARCH PLAYBACK Press the SEARCH button the SEARCH menu screen appears TIME SEARCH If you press the PLAY button in the real time screen mode playback will be executed...

Страница 25: ...he CALENDAR SEARCH screen appears Move the cursor to the desired position using the buttons and select the desired HDD channel and date using the buttons And then press the ENTER button and the follow...

Страница 26: ...s the ENTER button and you can playback Move the cursor to START COPY and then press the ENTER button to copy Press the ESC button to exit this menu 5 2 4 3 TIME SEARCH At the SEARCH menu Move the cur...

Страница 27: ...tton or turn the JOG DIAL and the event list searched appears When the event list appears on the screen select the desired list using buttons or JOG DIAL and press the ENTER button for the playback Wh...

Страница 28: ...Press the ENTER or turn the JOG DIAL and the list searched appears When the list appears on the screen select the desired list using buttons or JOG DIAL and press the ENTER button for the playback 5...

Страница 29: ...the PB PAUSE button to playback Find the desired image using shuttle ring Press the PB PAUSE button to see the still picture of the desired image Press the PTZ button to add the BOOKMARK list 5 2 4 8...

Страница 30: ...utton to set up the A position starting position and A will be displayed on upper right of the screen And then press the FREEZE button to set up the B position ending position and A B will be displaye...

Страница 31: ...or playback of consecutive frames Press the PB PAUSE button again to return to the previous mode 5 2 6 3 Digital Zoom of PTZ camera Select a pre set single camera and then press the PTZ button Turn th...

Страница 32: ...e in SPOT of SCREEN MENU before executing the SPOT mode 5 2 9 1 MANUAL MODE Press the SPOT button on the front panel to toggle SPOT mode indicated on the main monitor Press a camera button to display...

Страница 33: ...he cursor to HDD ID using the buttons and select the desired HDD to copy among HDD IDs using the buttons or jog dial Move the cursor to the desired position of COPY START TIME COPY END TIME using the...

Страница 34: ...E or to the left to move the cursor of COPY START TIME and the cursor will be yellow And then turn the Jog dial to move the cursor to the desired time It can operate with just Mouse click Press the EN...

Страница 35: ...he shuttle ring to the right to move the cursor of COPY END TIME or to the left to move the cursor of COPY START TIME and the cursor will be yellow And then turn the Jog dial to move the cursor to the...

Страница 36: ...buttons and select YES or NO and then press the ENTER button 5 2 10 2 COPY STATUS At the COPY menu Move the cursor to COPY STATUS using the buttons Press the ENTER button to see the current copying st...

Страница 37: ...NG will be displayed while formatting You can see a password input message You need this password when opening the file in network viewer 5 2 11 DVR STATUS Press the STATUS button or double click the...

Страница 38: ...e Please refer to 6 2 8 PTZ setup of SCREEN menu page 47 5 2 12 2 PTZ PRESETTING Press the PTZ button to enter PTZ mode Press the PRESET button to enter PRESET mode and PTZ PRESET MOVE OSD will be dis...

Страница 39: ...PIP screen and use the buttons to move the position of PIP screen Press the ESC button to exit this mode 5 2 15 AUDIO SELECT Audio select You can select audio channels regardless of monitoring screen...

Страница 40: ...l of PTZ 11 FREEZE F Freeze Up going value Focus control of PTZ 12 SEARCH PRESET Display the search menu Enter the preset mode of PTZ 13 COPY AF Display the copy menu Auto focus of PTZ 14 BOOKMARK PTZ...

Страница 41: ...USER S MANUAL 41 OPERATION You can click the below keys on the MENU screen with a mouse...

Страница 42: ...using the buttons or jog dial to use the QUICK SETUP setting 6 1 2 IMAGE SIZE Select the desired IMAGE SIZE for recording using the buttons or jog dial 6 1 3 RECORD FRAME Select the desired frame rate...

Страница 43: ...desired time for post recording using the buttons or jog dial When video loss alarm or motion is detected the DVR will store post recorded data during the selected period The post recording time can...

Страница 44: ...the ENTER button when the cursor is on the POSITION and the following items appear Change the value of the HORIZONTAL POSITION using the buttons or jog dial to adjust the horizontal position of the sc...

Страница 45: ...AUTO SEQUENCE At the SCREEN menu Move the cursor to the AUTO SEQUENCE using buttons Press the ENTER button when the cursor is on the AUTO SEQUENCE and the following 4 pages screen appears 4CH DVR 8CH...

Страница 46: ...menu Move the cursor using the buttons to select the HDD FREE SPACE Use the buttons or jog dial to choose ON or OFF The default is ON 6 2 3 2 HDD FREE SPACE MODE At the DISPLAY menu Move the cursor u...

Страница 47: ...At the DISPLAY menu Move the cursor using the buttons to select the TITLE MODE Use the buttons or jog dial to choose TEXT or BITMAP The default is TEXT 6 2 3 8 BORDER COLOR At the DISPLAY menu Move t...

Страница 48: ...ose ON or OFF The default is OFF 6 2 4 TITLE At the SCREEN menu Move the cursor to the TITLE using buttons Press the ENTER button when the cursor is on the TITLE and the following 2 pages screen appea...

Страница 49: ...EN menu press the ESC button 6 2 5 1 MULTI 4E MULTI 6 MULTI 7 MULTI 9B MULTI 10 MULTI 13 Press the ENTER button after selecting the desired item using the buttons Set the desired number of camera in e...

Страница 50: ...the next page 6 2 7 SPOT At the SCREEN menu Move the cursor to the SPOT using buttons Press the ENTER button when the cursor is on the SPOT and the following screen appears ON Selected channel will be...

Страница 51: ...ng and displaying in sequence 6 2 7 2 SPOT SEQ TIME Use the buttons or jog dial to set the SPOT SEQ TIME The duration of spot sequence can be set from 1SEC to 60SEC 6 2 7 3 ADD SPOT MULTI Use the butt...

Страница 52: ...the cursor to the RECORD SETUP using buttons Press the ENTER button when the cursor is on the RECORD SETUP and the following screen appears Move the cursor to choose the desired time using the button...

Страница 53: ...SC button to exit this RECORD SETUP menu or press the ENTER button to enter the RECORD PROGRAM menu 6 3 2 RECORD PROGRAM At the RECORD menu Move the cursor to the RECORD PROGRAM using buttons Press th...

Страница 54: ...more recording frame rate for one channel This type is good for the place where the event is rarely happened COMPLEX All event channels will be recorded by max event recording frame rate N channel num...

Страница 55: ...event All channels will be recorded by 1fps An event Only event channels will be recorded by 5 fps and the others will be recorded by 1 fps ON ON ON COMPLEX ALL CH 1 0 5 No event All channels will be...

Страница 56: ...otion detection Video loss Alarm or not O means that the event recording is ON and means that the event recording is OFF PROGRAM DEFAULT These are 10 kinds of program and you can change the program se...

Страница 57: ...ON V Loss ON V Loss ON V Loss ON V Loss ON V Loss ON V Loss ON V Loss ON V Loss ON PROGRAM 0 1 2 3 4 5 6 7 8 9 RECORD TYPE COMPLEX SINGLE SINGLE COMPLEX SINGLE SINGLE COMPLEX SINGLE SINGLE COMPLEX IMA...

Страница 58: ...u press the ESC button 6 3 4 AUDIO RECORD At the RECORD menu Move the cursor to the AUDIO RECORD using the buttons Press the ENTER button when the cursor is on the AUDIO RECORD and the following scree...

Страница 59: ...ton 6 3 6 PLAY MODE At the RECORD menu Move the cursor to the PLAY MODE using buttons Select the PLAY MODE using the buttons or jog dial ON The recorded data will be overwritten when it is a point of...

Страница 60: ...rsor to the HOLIDAY using buttons Press the ENTER button to set up HOLIDAY and the HOLIDAY menu screen appears Set up ON or OFF of HOLIDAY RECORD using the buttons or jog dial Move the cursor using bu...

Страница 61: ...cursor is on the EVENT icon and the following items appear 6 4 1 MOTION DETECTION At the EVENT menu Move the cursor to the MOTION DETECTION using buttons Press the ENTER button when the cursor is on t...

Страница 62: ...his AREA SETUP press the ESC button 6 4 1 4 TEST MOTION At the MOTION DETECTION menu Move the cursor to TEST MOTION using the buttons Press the ENTER button to test the motion detection To exit this T...

Страница 63: ...OR INPUT At the EVENT menu Move the cursor to the SENSOR INPUT using the buttons Press the ENTER button when the cursor is on the SENSOR INPUT and the following 2 pages screen appears Select the desir...

Страница 64: ...NOTE It is possible to set the RELAY OUTPUT of each channel in the type of event Relay output is from 1 to 4 and it is possible to set the period of the relay output RELAY 4 SELECT There are POWER USE...

Страница 65: ...screen Press the ENTER button when the cursor is on the SYSTEM icon and the following items appear 6 5 1 HDD At the SYSTEM menu Move the cursor to the HDD using the buttons Press the ENTER button when...

Страница 66: ...N and the following screen appears Use the buttons to move the cursor and use the buttons or jog dial to change the value 6 5 1 2 REC HDD INITIALIZE At the HDD menu Move the cursor to REC HDD INITIALI...

Страница 67: ...IZE using the buttons Press the ENTER button when the cursor is on the BACKUP HDD INITIALIZE and the following screen appears If you want to initialize move the cursor to YES and then press the ENTER...

Страница 68: ...At the CLOCK menu Move the cursor to the TIME ADJUST using the buttons Press the ENTER button when the cursor is on the TIME ADJUST and the following screen appears Select ON or OFF using the buttons...

Страница 69: ...reen appears To exit this PASSWORD menu press the ESC button 6 5 3 1 MASTER PASSWORD At the PASSWORD menu Move the cursor to the MASTER PASSWORD using the buttons Press the ENTER button when the curso...

Страница 70: ...sert the same numbers again to verify the password after entering the NEW PASSWORD To exit this SUPERVISOR PASSWORD menu press the ESC button 6 5 3 3 MENU DISPLAY CHECK At the PASSWORD menu Move the c...

Страница 71: ...t the REMOTE CONTROL ID using the buttons or jog dial 6 5 7 KEY ECHO At the SYSTEM menu Move the cursor to the KEY ECHO using the buttons Set ON or OFF using the buttons or jog dial If REC PLAY CHECK...

Страница 72: ...e buttons Press the ENTER button when the cursor is on the MENU INITIALIZE and the following screen appears If you want to initialize move the cursor to YES and then press the ENTER button If not move...

Страница 73: ...buttons Press the ENTER button when the cursor is on the FIRMWARE UPDATE and the following screen appears If you want to update firmware using the USB port move the cursor to YES and then press the EN...

Страница 74: ...reen Press the ENTER button when the cursor is on the LINK icon and the following items appear 6 6 1 NETWORK At the LINK menu Move the cursor to the NETWORK using the buttons Press the ENTER button wh...

Страница 75: ...6 1 5 DNS At the NETWORK menu Move the cursor to the DNS using the buttons Select the desired position using the buttons and set the data value using the buttons or jog dial 6 6 1 6 PORT At the NETWO...

Страница 76: ...USER S MANUAL 76 MENU Please refer to the below image in case of a PPPOE type 6 6 1 8 NETWORK LIVE IMAGE SIZE Only for MPEG4 16480 At the NETWORK menu...

Страница 77: ...al to set the data value To exit this RS232 menu press the ESC button 6 6 3 RS422 485 At the LINK menu Move the cursor to the RS422 485 using the buttons Press the ENTER button when the cursor is on t...

Страница 78: ...uttons or jog dial to select the right model of installed PTZ camera Press the button to set up a ID of the PTZ camera Use the buttons or jog dial to select the desired ID Press the button to see the...

Страница 79: ...ress the ENTER button and the following screen appears Select the character using the buttons and then press the ENTER button To exit this CHARACTER TABLE screen press the ESC button 6 6 5 3 USER ID A...

Страница 80: ...he character using the buttons and then press the ENTER button To exit this CHARACTER TABLE screen press the ESC button 6 6 5 5 DVR E MAIL ADDR At the E MAIL menu Move the cursor to the DVR E MAIL ADD...

Страница 81: ...the MENU screen Press the ENTER button when the cursor is on the SEARCH icon and the following items appear Please refer to Search Playback of Chapter 5 Operation 6 8 COPY To set up the COPY menu Mov...

Страница 82: ...the EXIT icon and the following items appear Move the cursor to the desired item using the buttons and press the ENTER button SAVE ONLY Select this item if you want only to save the changed setup SAVE...

Страница 83: ...ternal controller 7 2 T ADJ DESCRIPTION No TERM OFF TERM ON 1 TX RS422 Transmit data RS485 Transmit data 2 TX RS422 Transmit data RS485 Receive data 3 GND 4 RX RS422 Receive data RS485 Receive data 5...

Страница 84: ...7 4 ALARM NO DESCRIPTION NO DESCRIPTION 1 NO Normal Open 7 NO Normal Open 2 CM Common 8 CM Common 3 NC Normal Close ALARM 9 NC Normal Close MD 4 NO Normal Open 10 NO Normal Open 5 CM Common 11 CM Com...

Страница 85: ...M 6 INPUT 7 EXTERNAL ALARM 7 INPUT 8 EXTERNAL ALARM 8 INPUT G ALARM IN COMMON GND 9 EXTERNAL ALARM 9 INPUT 10 EXTERNAL ALARM 10 INPUT 11 EXTERNAL ALARM 11 INPUT 12 EXTERNAL ALARM 12 INPUT G ALARM IN C...

Страница 86: ...t 6 DSR Data Set Ready 2 RxD Receive data 7 RTS RS232C RX TX data 3 TxD Transmit data 8 CTS RS232C RX TX data 4 DTR Data Terminal Ready 9 RI Ring Indicator 5 GND Signal Ground No DESCRIPTION 1 N C Not...

Страница 87: ...GA Analogue non interlaced RGB This DVR is compatible with TFT LCD monitor that support 50Hz VGA mode in PAL 2 AUDIO LINE Input Level 0 5 1 4Vp p 20k Output Level 10dB 1K 3 RECORDING 1 Compression Met...

Страница 88: ...nal block Alarm Output 4 Relay out Programmable Terminal block Motion Detection Available per each camera Multi detection level 6 CONNECTORS Main BNC 16 8 4 ports Video Input Spot 4 8 CH only BNC 1 po...

Страница 89: ...1 HDD 10 BACKUP COPY Digital Backup Event Backup Mirroring Copy External HDD CD RW DVD RW USB Stick 2 0 11 SEARCHING PLAYBACK Searching Method Time Event File Bookmark Log file 12 MULTI REMOTE SURVEIL...

Страница 90: ...lor Bar NTSC 16120 LOW 5600 Bytes x x 59 Hours 118 Hours The NTSC signal mode is used for most of televisions produced in the U S The figures in the Recording Time Table were estimated under ideal rec...

Страница 91: ...91 HDD INSTALLATION PROCESS Chapter 9 256 Camera Integration system Block Diagram...

Страница 92: ...1 1 How to install the internal Hard Disk Drive s 1 Unscrew on the top the side and the rear of this unit as indicated to remove the cover 2 Remove the upper cover from the unit as indicated 3 Unscre...

Страница 93: ...on the HDD plate and screw as indicated Set the master or slave of HDD before fixing the HDD s into DVR Refer to HDD jumper setting information Set up no 1 and 3 by master and no 2 and 4 by slave 6 Co...

Страница 94: ...removable HDD rack 1 Grip the strap of removable HDD rack and pull it out 2 Remove the cover of removable HDD rack and connect the HDD with the cables as indicated 3 Put the HDD into the rack and clos...

Страница 95: ...ew to remove the HDD plate as indicated If you want to install DVD RW or CD RW you have to purchase the board for DVD RW or CD RW and install it into the DVR 2 Disconnect the cables of fixed HDDs to r...

Страница 96: ...vable HDD rack from DVR set as the picture 5 Unscrew to remove the HDD rack mount as indicated 6 Screw to fix the rack mount on DVD RW or CD RW as indicated 5 7 Put the DVD RW or CD RW into the unit a...

Страница 97: ...s please read the jumper setting information on the label If the jumper is not set properly the system will be disordered Jumper setting is different according to HDD model Please visit following web...

Страница 98: ...han 3Mbps More than 3Mbps Transfer rate of image varies with the number of client accessed to DVR 11 1 3 Installation To start the installation 1 Start Windows 2000 or XP 2 Insert Network Client Softw...

Страница 99: ...k the Delete button to erase the information on the list 11 2 4 Connect to a DVR Select the desired DVR that you want to connect in the DVR list Select the necessary Information according to the conne...

Страница 100: ...one of the SEARCH buttons and SEARCH window will appear on the PC screen Click the Play button after select of the desired Channel and Search Time in Time Search window Click the Search button after...

Страница 101: ...C and click the File Search button and the File Search window will appear Click the Folder Select button and then select the desired folder and then click the OK button Select the desired list and the...

Страница 102: ...he desired Option and then click the OK button Channel Title If you check Channel Title the title of each channel will be displayed on the viewer screen Event If you check Event red OSD will be indica...

Страница 103: ...ed b Multi screen display Click the MULTI button and the multi screen will be displayed Click the MULTI button again to view other multi screen c Auto Sequence display Click the AUTO button to view th...

Страница 104: ...ing pan and tilt zoom and focus commands The DVR has programming capacity for 16 preset locations Program a preset Move the camera to a desired position using the PTZ control buttons After setting the...

Страница 105: ...es from connected DVR Once the setup values are modified click the Update to DVR button to update those values into the DVR 11 8 5 1 How to download firmware Click the SETUP button on the control menu...

Страница 106: ...e control menu bar to print the desired image And the preview window will be displayed as the above picture Set up the desired option and then click the Print button of the preview window 11 8 7 COPY...

Страница 107: ...ntrol menu bar to output the audio You can hear the DVR sound from the speaker of your PC 11 8 10 TIME SEARCH You can search and playback the images by the time After connecting the view screen Click...

Страница 108: ...Time And then click the Search button When the recorded event list appears select the desired list Click the Play button to display the images on the screen 11 8 12 BLOCK SEARCH You can search and pla...

Страница 109: ...h window Set the Search Time and then click the Search button Click the Next button to search the next list NOTE When the DVR is in Setup mode this search function will not be performed Normal HDD Har...

Страница 110: ...1 9 3 SLOW Reverse Forward Use these buttons to playback images faster than normal speed in either direction Multiple clicks of these buttons will decrease the fast forward the reverse speed Various s...

Отзывы: