background image

Mounting Instructions

DB2 & DB1Twin

AHDB2DOC01

-

Mounting Guide Pg. 2-8

-

Veneer Guide (Optional) Pg.9-15

Содержание DB1Twin

Страница 1: ...Mounting Instructions DB2 DB1Twin AHDB2DOC01 Mounting Guide Pg 2 8 Veneer Guide Optional Pg 9 15 ...

Страница 2: ...biral Display Solution S L shall not be held liable for any loss or injury incurred as a result of modifications made to goods by anyone other than the supplier or the supplier s authorised representative without the supplier s written permission Such modifications shall be deemed to terminate any further guarantee obligations Compensation will not be paid for wages loss of profit waste of time pa...

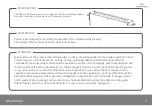
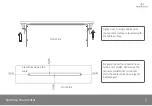
Страница 3: ...e using the holes indicated on the corresponding Pattern Hole drawing The screws x6 are not supplied The weight of the monitor is up to 25Kg PAY ATTENTION THAT THE BRACKETS ARE MOUNTED IN THEIR CORRESPONING SIDE Front Side 3 View from below the table Table Bracket B View from below the table ...

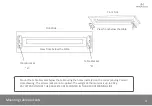
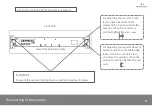
Страница 4: ...ing the supplied screws Mount the vertical adjustment screws 2 2 on to the monitor bracket so that the tip of the screw is flushed with the upper side of the monitor bracket 4 x4 Vertical Adjustment Screws Right Monitor bracket 1 Left Monitor bracket 2 Front Side X4 Screw M6x20 X4 washer ...

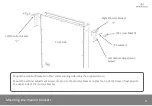
Страница 5: ...kets must be the same 1mm If adjustment is necessary loosen 3 3 Table bracket screws keeping always symmetry regarding to the monitor hole in the table Subsequently tighten the table bracket screws Front Side View from below the table View from above the monitor 5 Front Side ...

Страница 6: ...Hanging the monitor Mount 2 2 nuts on to both table brackets as indicated on the drawing Hang the monitor above nuts 6 Front Side ...

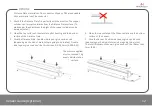
Страница 7: ...r have to be 2mm 0 08 Otherwise the monitor could come in contact with the table while opening and be damaged Tighten each nut gradually until the monitor surface is levelled with the table surface Front Side View from above the table 7 Front Side ...

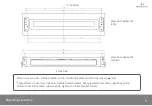
Страница 8: ...monitor is centred tighten the four nuts IMPORTANT To secure the monitor tighten the four vertical adjustment screws Front Side For adjusting the monitor to the left or right loosen the table screws half a turn and centre the monitor When the monitor is centred tighten the six screws 8 In case fine centering of the monitor is necessary View from below the table ...

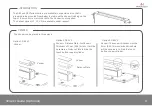
Страница 9: ...n V1 V2 V3 are available under request The Veneer can be placed in three ways VENEER INTRODUCTION 9 Veneer The veneer thickness must be 5mm 0 19 A mechanized blind hole will be necessary to hide the touch button copper cylinder Veneer Distance Plate For Veneers Thickness of 1mm 0 04 or less It will be necessary a Distance Plate to hide the touch button copper cylinder Veneer Distance Plate Option2...

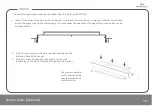
Страница 10: ...can be used depending on the kind of materials are going to be jointed 1 Check if the Veneer fits perfectly with the monitor To join both parts correctly it is important that the two surfaces are touching each other in the whole length To make easier the adjustment the hight of the touch button can be barely adjusted The pressure applied must not exceed 1 Kg evenly distributed on monitor surface V...

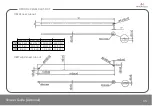
Страница 11: ...EER CUT OUT DB2 Veneer cut out Veneer Guide Optional AH10DB2 AH17DB2 AH22DB2 AH24DB2 A 258 10 15 424 16 7 518 20 39 559 2 22 B 17 0 67 20 0 78 20 0 78 20 0 78 C 8 0 31 7 5 0 29 7 5 0 29 10 0 39 DB1Twin Veneer cut out ...

Страница 12: ...25mm 0 008 0 01 1 Check if the Distance Plate fits perfectly with the monitor The copper cylinder can t project outwards from the Distance Plate surface To make easier the adjustment the hight of the copper cylinder can be barely adjusted 4 Clean the top surface of the Distance Plate and the bottom surface of the Veneer 5 Glue the Veneer Double side tape or glue can be used depending on the kind o...

Страница 13: ...e cut out Veneer Guide Optional AH10DB2 AH17DB2 AH22DB2 AH24DB2 A 258 10 15 424 16 7 518 20 39 559 2 22 B 17 0 67 20 0 78 20 0 78 20 0 78 C 8 0 31 7 5 0 29 7 5 0 29 10 0 39 DB1Twin Distance plate cut out DB2 Veneer cut out DB1Twin Veneer cut out ...

Страница 14: ... thicker than 0 2 0 25mm 0 008 0 01 1 Check if the Veneer fits perfectly with the monitor To join both parts correctly it is important that the two surfaces are touching each other in the whole length If there is a gap between the Veneer and the monitor check if the hole depth in the Veneer is correct To make easier the adjustment the hight of the copper cylinder can be barely adjusted The pressur...

Страница 15: ...EER CUT OUT DB2 Veneer cut out Veneer Guide Optional AH10DB2 AH17DB2 AH22DB2 AH24DB2 A 258 10 15 424 16 7 518 20 39 559 2 22 B 17 0 67 20 0 78 20 0 78 20 0 78 C 8 0 31 7 5 0 29 7 5 0 29 10 0 39 DB1Twin Veneer cut out ...

Страница 16: ...w w w a r t h u r h o l m c o m ...

Отзывы: