background image

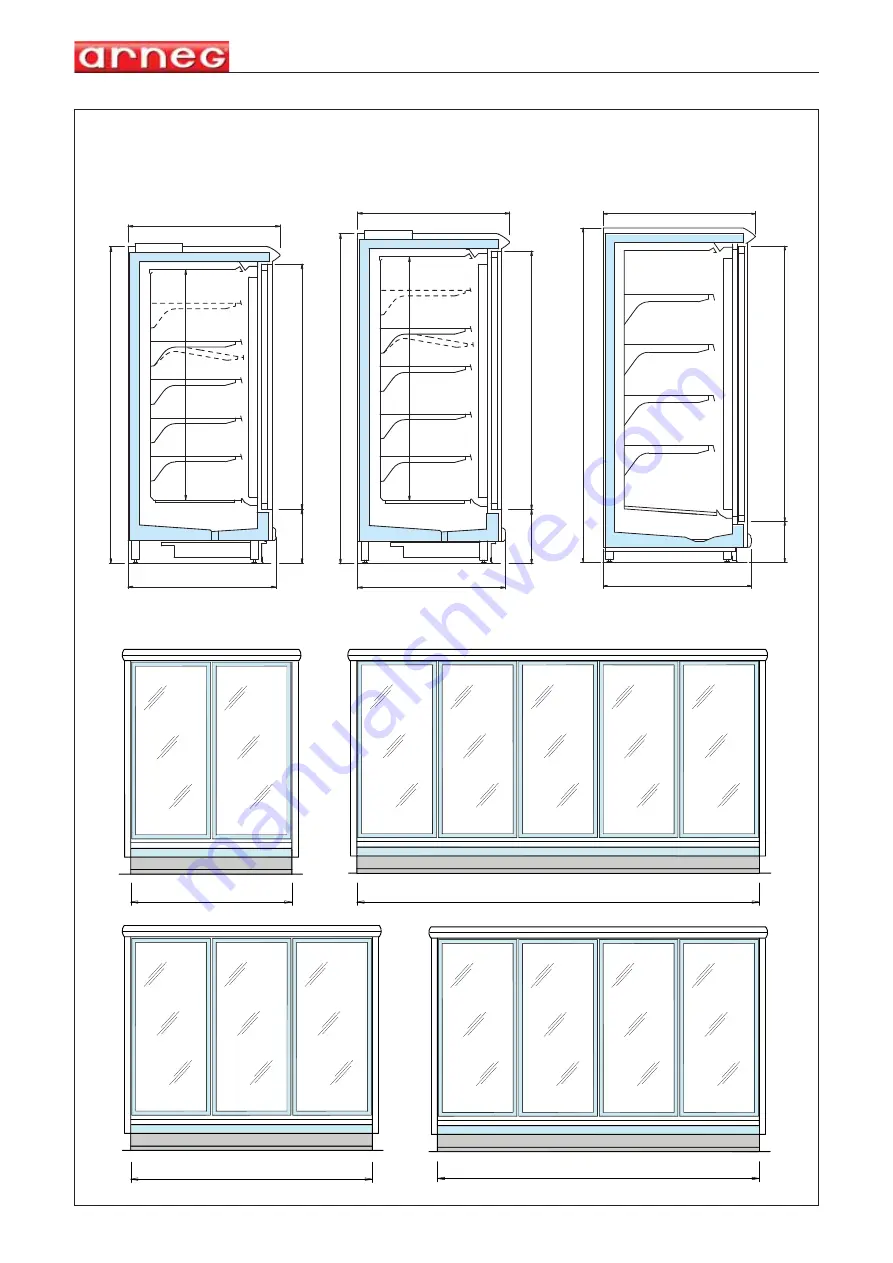
Brema 5 - Brema LF

05060047  03  24/02/2010

1

ILLUSTRAZIONI
ILLUSTRATIONS
ABBILDUNGEN
ILLUSTRATIONS
ILLUSTRACIONES

ɂɅɅɘɋɌɊȺɐɂɂ

1

354

1701

1607

 994

2168

 966

600

605

354

1601

 994

 2068

 966

605

600

1507

1562

3898

2343

3124

994

2188

966

610

600 

1805

268

BREMA 5

BREMA LF

Содержание BREMA 5

Страница 1: ...4 02 2010 1 ILLUSTRAZIONI ILLUSTRATIONS ABBILDUNGEN ILLUSTRATIONS ILLUSTRACIONES ɂɅɅɘɋɌɊȺɐɂɂ 1 354 1701 1607 994 2168 966 600 605 354 1601 994 2068 966 605 600 1507 1562 3898 2343 3124 994 2188 966 610 600 1805 268 BREMA 5 BREMA LF ...

Страница 2: ...M MATRICOLA S N SBRINAMENTO DEFROSTING SUPERF ESP DISPLAY AREA REFRIGERANTE REFRIGERANT CLASSE CLASS ILLUMINAZIONE LIGHTING MASSA WEIGHT COMMESSA W SCHED ORDINE W ORD ANNO YEAR W m2 IP kg V Hz W A 1 2 3 5 9 12 14 16 17 18 11 4 7 15 13 10 6 8 W Max 25mm 10 mm comp def fan al aux PRG mute aux def SEL O P T I O N A L Rif 1 Rif 3 Rif 4 Rif 5 Rif 6 Rif 9 Rif 7 Rif 8 Rif 2 ...

Страница 3: ...Brema 5 Brema LF 05060047 03 24 02 2010 3 5 6 wat e r CHEMICALS NO ȅȀ CAUTION ...

Страница 4: ...H O 2 R404 H O 2 R404 H O 2 R404 H O 2 3898 5 porte 985 1949 896 3124 4 porte 985 896 1562 2343 3 porte 985 1171 5 896 1562 2 porte 985 281 641 1014 1214 1404 1605 1791 1992 205 335 205 335 335 205 205 335 205 60 55 150 57 5 57 5 205 57 5 57 5 205 335 1562 254 254 254 254 1949 921 205 205 105 ...

Страница 5: ...APORATOR FANS VENTILATORI EVAPORATORE M PE PE N 2 PE 5A 5B NOT USED NON UTILIZZATO CAVO DI COLLEGAMENTO ILLUMINAZIONE PORTE DOOR LIGHTING CONNECTION CABLE S TRASDUTTORE DI PRESSIONE PRESSURE TRANSDUCER 1 2 3 4 5 1 2 3 4 5 1 2 5 6 6 SONDA SURRISCALDAMENTO SUPERHEATING PROBE END DEFROST PROBE SONDA FINE SBRINAM AIR OUTLET PROBE SONDA MANDATAARIA SONDA RIPRESAARIA AIR INLET PROBE Ssh Sdef Sin Sout SO...

Страница 6: ...NNELLO REATTORI BRM 2P 3x58W 3P 4x58W 4P 5x58W 5P 6x58W 7 8 9 GRIGIO GREY 1 ROSSO RED NERO BLACK BIANCO WHITE G VERDE Y GREEN GRIGIO GREY 5 ROSSO RED NERO BLACK BIANCO WHITE 6 5 4 3 1 2 6 5 4 3 1 2 1 2 4 3 6 5 GRIGIO GREY 3 ROSSO RED NERO BLACK BIANCO WHITE 6 BIANCO WHITE NERO BLACK ROSSO RED GRIGIO GREY BIANCO WHITE 4 NERO BLACK ROSSO RED GRIGIO GREY BIANCO WHITE 2 NERO BLACK ROSSO RED GRIGIO GRE...

Страница 7: ...wer Kühlleistung Puissance frigorifique Potencia frigorígena ɏɨɥɨɞɢɥɶɧɚɹ ɦɨɳɧɨɫɬɶ W 1140 1710 2281 2846 1218 1828 2437 3040 1220 1830 2440 3044 Refrigerante Refrigerant Kühlmittel Réfrigérant Refrigerante ɏɥɚɞɚɝɟɧɬ R404A Massima pressione ammissibile Max allowed pressure Maximal zulässiger Druck Pression maximale admissible Máxima presión admitida Ɇɚɤɫɢɦɚɥɶɧɨ ɞɨɩɭɫɬɢɦɨɟ Ⱦɚɜɥɟɧɢɟ Ps 97 23 CE bar 29 ...

Страница 8: ...izia 10 Installazione e condizioni ambientali Fig 3 10 Unione dei mobili 11 Collegamento elettrico 11 Controllo e regolazione della temperatura Fig 4 11 Il caricamento del mobile Fig 4 Fig 6 11 Sbrinamento e scarico acqua Fig 7 12 Anticondensa e antiappannamento 12 Illuminazione 12 Sostituzione lampade 12 Manutenzione e pulizia 12 Pulizia delle porte EVERCLEAR optional Fig 5 13 Smantellamento del ...

Страница 9: ...rice remota adatti alla conservazione e ven dita self service di Surgelati e Gelati Disponibili in più versioni quali 2 Porte 3 Porte 4 Porte 5 Porte Le porte sono disponibili in alluminio o serigrafate 3 Norme e certificazioni Tutti i modelli di mobili refrigerati descritti in questo manuale d uso della serie Brema 5 Brema LF rispondono ai requisiti essenziali di sicurezza salute e protezione ric...

Страница 10: ...zia Al ricevimento del mobile Assicurarsi che l imballo sia integro e non presenti danni evidenti Curare l operazione di disimballo per non danneggiare il mobile Verificare l integrità dei componenti del mobile In caso si riscontrino dei danneggiamenti chiamare immediatamente la società di fornitura Procedere ad una prima pulizia utilizzando prodotti neutri asciugare con un panno morbido non usare...

Страница 11: ...trata ed uscita del mobile L interruttore automatico magnetotermico deve essere tale da non aprire il circuito sul neutro senza contemporaneamente aprirlo sulle fasi ed in ogni caso la distanza di apertura dei contatti deve essere di almeno 3 mm N B Tutte queste operazioni devono essere eseguite solo da personale tecnico specializzato 10 Controllo e regolazione della temperatura Fig 4 Il controllo...

Страница 12: ...parti più soggette al fenomeno come vetrate termoisolanti delle porte telai e cornici vetri laterali ecc 14 Illuminazione L illuminazione interna del mobile è ottenuta mediante lampade a fluorescenza 58W 4000K posizio nate verticalmente dietro ai montanti del telaio del mobile L interruttore luci è posizionato nel cassetto del quadro elettrico i reattori gli starter e i condensatori sono posiziona...

Страница 13: ...inare l alimentazione elettrica Una volta raggiunta la temperatura interna di funzionamento è possibile ricaricare il mobile con i prodotti da esporre N B Evitare che ventilatori plafoniere cavi elettrici e tutte le apparecchiature elettriche in genere vengano bagnate durante le operazioni di pulizia 17 Pulizia delle porte EVERCLEAR optional Fig 5 ATTENZIONE Le porte EVERCLEAR sono porte a vetro r...

Страница 14: ...erfici irraggianti che sono presenti nel punto vendita per esempio isolando i soffitti Escludere l uso di faretti con lampade ad incandescenza orientati direttamente sul mobile Introdurre nel mobile solamente merce già raffreddata alla temperatura che normalmente caratterizza la catena del freddo Verificare che il mobile sia sempre in grado di mantenere tale temperatura Rispettare il limite di car...

Страница 15: ...modo da incli nare il mobile verso il muro di almeno 10 mm per assicurare una perfetta chiusura delle porte pag 2 Fig 4 Rif 6 3 Svuotare il mobile dai particolari imballati senza danneggiarli 4 Individuare e recuperare il blister kit di canalizzazione A 3 5 6 4 7 3 6 3 6 2 1 3 3 5 5 6 6 Rif Codice Q tà Descrizione 1 02940652 1 Spina allineamento profilo D 4 2 02940045 1 Spina allineamento profilo D ...

Страница 16: ...ellamento dei mobili 6 Togliere gli schienali dai lati di canalizzazione 7 Siliconare lungo tutto il perimetro del fianco di uno dei due mobili 8 Aprire il blister che contiene il materiale in dotazione e prelevare le spine 9 Inserire le spine nel profilo fascia superiore ...

Страница 17: ...azione 11 Allineare le asole dei montanti intervenendo sui piedini mantenendo comunque l inclinazione verso il muro di circa 10mm 12 Unire la base fissando la staffa unione A 13 Fissare le viti di unione sul tetto del mobile 14 Fissare le viti di unione tra i montanti controllando l allineamento delle asolature A ...

Страница 18: ...evono richiudersi anche senza l ausilio della molla di chiusura La molla di chiusura è già preimpostata in fabbrica Se necessario regolare la carica della molla in questo modo a Inserire la chiave di carica molla A in uno dei fori del perno inferiore b Ruotare il perno in senso antiorario per sfilare il perno di sicurezza B c Ruotare il perno inferiore in senso orario e posizionare il perno di sic...

Страница 19: ...lle porte attenersi alle seguenti indicazioni 1 Staccare la chiave di carica molla dalla sede 2 A Inserire la chiave di carica molla su uno dei fori del perno inferiore Ruotare come indicato per liberare il perno B Mantenendo la chiave ferma nella posizione indicata estrarre il perno di carica molla e porre sia il perno che la chiave in un posto sicuro 1 Perno di carica 2 Chiave di carica molla 3 ...

Страница 20: ...sare una leva di legno o simile per non dan neggiare la porta Alzare delicatamente di pochi millime tri la stessa in modo da sfilare il perno della cerniera inferiore Non forzare in modo esagerato 7 Togliere la porta e appoggiarla su di un piano orizzontale per poter eseguire l operazione di inversione in modo ottimale Estrarre completamente tutto il blocco cerniera inferiore A Togliere le viti 1 ...

Страница 21: ...affa e inserire la bronzina D Staffa sinistra 10 A Estrarre dalla parte superiore della porta la cerniera superiore con estrema delicatezza evitando di sollecitare troppo l accoppiamento tra il perno e la boccola di plastica B Smontare la forcella antisfilamento 1 11 Rimontare il gruppo cerniera inferiore ora diventato sinistro seguendo a ritroso le fasi 8 9 e inserirlo al posto della cerniera sup...

Страница 22: ... 16 1 C Battere delicatamente fino al completo inserimento della cerniera superiore D Evitare assolutamente di battere direttamente sul perno inox 13 Smontare il gruppo piastra inferiore 14 Porre il gruppo piastra inferiore appena smontato su un piano togliere la piastra superiore 1 togliere i nottolini di arresto 2 e posizionarli nelle nuove sedi come indicato in figura B Ruotare la molla 3 di 18...

Страница 23: ...to punto rimontare la porta resa sinistra avendo cura di inserire prima la cerniera superiore nel foro appena creato e successivamente adagiarla lentamente in modo da inserire il perno inferiore nell apposito foro del gruppo piastra inferiore 18 Ripristinare il collegamento elettrico avendo cura di ruotare di 180 la piastrina 1 in modo che sulla parte superiore della stessa si legga la scritta lef...

Страница 24: ...Bussola inferiore guida perno 6 Staffa fermaporta universale 7 Vite 8 Vite 9 Bronzina inferiore 10 Anello seeger universale zincato 11 Perno inferiore molla quadra fori radiali 12 Perno di carica molla GRUPPO PIASTRA 1 Molla fermaporta 2 Vite inox fissaggio piastra 3 Piastra tranciata 4 Nottolino di arresto piolo 5 Perno per molla fermaporta 6 Sottopiastra nylon 2 4 1 3 5 6 7 8 9 10 11 12 1 2 2 3 ...

Страница 25: ...rst cleaning 27 Installation and environmental conditions Fig 3 27 Multiplexing of cabinets 28 Electric connections 28 Control and adjustment of temperature Fig 4 28 Cabinet loading Fig 4 Fig 6 28 Defrosting and water discharge Fig 7 29 Anticondensation and antifogging device 29 Illumination 29 Lamp replacement 29 Maintenance and cleaning 29 Cleaning the EVERCLEAR doors optional Fig 5 30 Disposal ...

Страница 26: ... cabinets come in several versions 2 Doors 3 Doors 4 Doors 5 Doors The doors can be supplied in aluminum or silk screen decor 3 Standards and certifications All the refrigerated unit models described in this user s manual for the Brema 5 Brema LF series meet basic health safety and protection requirements set out by the following European laws and directives Machines Directive 2006 42 EC harmonise...

Страница 27: ...gns of damage Unpack carefully so as not to damage the cabinet Make sure all parts of the cabinet are intact If anything is found to be damaged immediately call the supplying company Proceed with a first cleaning using neutral products dry with a soft cloth do not use abrasive substances or metal sponges DO NOT use alcohol to clean parts in metacrylate plexiglas For correct packaging disposal reme...

Страница 28: ... at least 3 mm N B All these operation should be performed by specialized technical personnel only 10 Control and adjustment of temperature Fig 4 The refrigeration temperature is controlled with the mechanical thermometer Rif 7 or electronic con trol device Rif 9 Normally the controller is set in the factory during testing but it is possible to alter programming To do so please refer to the instru...

Страница 29: ...l The reactors starters and condensers are located on the roof of the cabinet Brema 5 Brema LF 2 Doors no 3 lamps Brema 5 Brema LF 3 Doors no 4 lamps Brema 5 Brema LF 4 Doors no 5 lamps Brema 5 Brema LF 5 Doors no 6 lamps OPTIONAL For greater energy savings the cabinet can be ordered complete with low consumption LED lighting This allows for 70 savings on lighting consumption reduced refrigerator ...

Страница 30: ...are glass doors with a special transparent interior cover that prevents condensation from forming To clean EVERCLEAR doors keep to the following instructions open and block the door carefully clean the interior with a soft damp cloth appropriate to cleaning parts that may come into contact with food products use neural detergents or soap and water change the cloth frequently close the door clean t...

Страница 31: ...that the cabinet is always capable of maintaining such a temperature Respect the loading limit and never overload the cabinet Rotate food products by loading the cabinet in such a way that the goods displayed for longest are sold before new arrivals Periodically check the operating temperature of the cabinet and that of the foodstuffs that it displays at least twice a day including week ends In th...

Страница 32: ...tilting the cabinet at least 10 mm towards the wall This will ensure perfect door closure pag 2 Fig 4 Rif 6 3 Empty the cabinet of any packaged parts without damaging them 4 Identify and recover the channelling kit blister pack A 3 5 6 4 7 3 6 3 6 2 1 3 3 5 5 6 6 Rif Codice Q tà Descrizione 1 02940652 1 Alignment plug profile D 4 2 02940045 1 Alignment plug profile D 3 3 04711065 5 Screw TCEI M8X120...

Страница 33: ...inet is level 6 Remove the back panels from the channelling sides 7 Apply silicone along the whole perimeter of the side of one of the two cabinets 8 Open the blister pack containing the material supplied and remove the plugs 9 Insert the plugs into the upper band profile ...

Страница 34: ...hat the channelling points line up 11 Align the rise slots by adjusting the feet keeping the cabinet approx 10 mm tilted towards the wall 12 Join the base fixing the joint bracket A 13 Fix the joining screws to the cabinet top 14 Fix the joining screws between the rises checking that the slots line up A ...

Страница 35: ...re opened they should close again even without the help of the spring closer The spring closer is factory prepared If necessary adjust the spring load as follows a Insert the spring loading spanner A into one of the holes of the lower pin b Rotate the pin anti clockwise to remove the safety pin B c Rotate the lower pin clockwise and position the safety pin in the next hole 17 Assemble the PVC prof...

Страница 36: ...rewdriver Metal pipe spacer In order to invert the doors follow the indications below 1 Detach the spring loading spanner from its housing 2 A Insert the spring loading spanner into one of the holes ofthe lower pin Insert the spring loading spanner into one of the holes ofthe lower pin B Keeping the spanner still in the position indicated remove the spring loading pin and place both the pin and th...

Страница 37: ...se a lever in wood or other similar material so not to damage the door itself Delicately lift the door a few millimetres so as to withdraw the pin of the lower hinge Do not exert unneccessary force 7 Remove the door and place it on a flat horizontal surface so as to carry out the inversion operation in the best way possi ble Fully remove the entire lower hinge unit A Remove the screws 1 and 2 usin...

Страница 38: ...side down and insert the brass D Left hand bracke 10 A With the utmost delicacy remove the upper hinge from the upper part of the door making sure not to exert excess stress on the coupling between the pin and the plastic bush B Also dismantle the anti fraying fork 1 11 Re mount the lower hinge unit having now become a left hand unit following phases 8 9 backwards and insert it in place of the upp...

Страница 39: ...lly inserted D ABSOLUTELY DO NOT BEAT DIRECTLY 13 Dismantle the lower plate unit 14 Place the previously dismantled lower plat unit on a flat surface remove the upper plate 1 remove the ratchets 2 and place them in their new housing as indicated in figure B Rotate the spring 3 by 180 A B C D 1 1 STAINLESS STEEL PIN Block in plastic Only beat on the circular crown in plastic as indicated Frame in a...

Страница 40: ...nded door making sure to first insert the upper hinge in the hole previously created and to subsequently position it slowly in such a way as to insert the lower pin in the respective hole of the lower plate unit As in dismantling if difficulties are encountered 18 Restore the electric connection taking care to rotate the plaque 1 by 180 so that the words left door appear on the upper part of the p...

Страница 41: ...on spring 5 Lower pin guide sleeve 6 Universal door block bracket 7 Screw 8 Screw 9 Lower brass 10 Universal galvanised Seeger ring 11 Square spring lower pin w radial holes 12 Spring loading pin PLATE UNIT 1 Door blocking spring 2 Plate fixing stainless steel screws 3 Blanked plate 4 Ratchet for peg 5 Pin for door blocking spring 6 Nylon under plate 2 4 1 3 5 6 7 8 9 10 11 12 1 2 2 3 6 4 4 5 ...

Страница 42: ... und erste Reinigung 44 Installation und Raumbedingungen Fig 3 44 Zusammenbau der Möbel 45 Elektrischer Anschluss 45 Kontrolle und Einstellung der Temperatur Fig 4 45 Das Beladen des Möbels Fig 4 Fig 6 46 Abtauung und Wasserabfluss Fig 7 46 Kondens und Anlaufschutz 46 Beleuchtung 46 Auswechseln der Lampen 47 Wartung und Reinigung Fig 5 47 Reinigung der Türen EVERCLEAR Option Fig 5 47 Abrüstung des...

Страница 43: ...aus vertikalen Wandausstellelementen die an der Vorderseite geschlossen sind und mit einem Fernaggregat ausgestattet sind sie sind für die Konser vierung und den Selbstbedienungsverkauf von Tiefkühlprodukten und Speiseeis geeignet Lieferbare Ausführungen 2 Türen 3 Türen 4 Türen 5 Türen Es sind Aluminium bzw Siebdrucktüren erhältlich 3 Vorschriften und Zertifizierungen Alle in dieser Betriebsanleit...

Страница 44: ... oder Gabelstapler zum Handling des Kühlmöbels benutzen seine Nenntragfähigkeit muss größer oder gleich 1000 kg sein 6 Empfang und erste Reinigung Bei Erhalt des Möbels Sich vergewissern dass die Verpackung unversehrt ist und keine augenfälligen Schäden aufweist Das Kühlmöbel vorsichtig auspacken um Beschädigungen zu vermeiden Prüfen ob die Möbelkomponenten unbeschädigt sind Bei Beschädigungen umg...

Страница 45: ...s 4 5 m sind den Kabelquerschnitt entsprechend verlängern Bei Unterbrechungen der Stromversorgung muss man sich vergewissern dass sämtliche Geräte des Ladens in der Lage sind sich wieder einzuschalten ohne den Eingriff der Überlastschutzvorrichtungen auszulösen andernfalls die Anlage ändern um die Einschaltung der Geräte zu verschiedenen Zeitpunkten zu ermöglichen Der Installateur muss die Veranke...

Страница 46: ...rten elektrischen Widerständen Zum Ablassen des Abtauwassers muss man Einen leicht geneigten Bodenabfluss vorsehen Einen Siphon zwischen der Abflußleitung des Möbels und dem Bodenanschluß vorsehen Den Bodenabflußbereich hermetisch versiegeln Somit können übler Geruch im Möbel der Kühlluftverlust und auf die Feuchtigkeit zurückzuführende Betriebsstörungen des Möbels vermieden werden Anmerkung Regel...

Страница 47: ...ren Reinigung eines Möbels bzw eines Möbelteils muss man Die darin enthaltene Ware herausnehmen Die Spannungszufuhr des Möbels über den Hauptschalter unterbrechen Alle entfernbaren Teile herausnehmen z B die Ausstellteller Gitter usw mit lauwarmem Wasser und einem Desinfektionsreiniger waschen und anschließend gründlich trocknen Die Bodenauslage gründlich reinigen und sämtliche Fremdkörper die dur...

Страница 48: ...rt werden 19 Nützliche Ratschläge Das Installations und Bedienungshandbuch sollte aufmerksam durchgelesen werden damit der Bediener bei Störungen in der Lage ist dem technischen Kundendienst möglichst genaue telefoni sche Informationen zu liefern Vor Durchführung von Wartungsarbeiten am Möbel muss man sich vergewissern dass die Stromver sorgung unterbrochen wurde Sollte der Kunde eine Betriebsstör...

Страница 49: ...vorliegen sich in diesem Fall sofort an einen Kühlschranktechniker wenden Die vorbeugenden Wartungsarbeiten unbedingt in regelmäßigen Abständen durchführen BEI GASAUSTRITT BZW BRÄNDEN Falls das Kühlmöbel nicht korrekt gelüftet wurde darf man sich auf keinen Fall mit dem Kopf in dem Bereich befinden wo das Möbel aufgestellt wurde Die Stromversorgung des Möbels unterbrechen indem man den Hauptschalt...

Страница 50: ...ner Höhe von maximal 25 mm wieder anschrauben N B Die vorderen Füße erhöhen damit das Möbel mindestens 10 mm in Richtung Wand geneigt wird wodurch eine perfekte Türschließung gewährleistet ist pag 2 Fig 4 Rif 6 3 5 6 4 7 3 6 3 6 2 1 3 3 5 5 6 6 Bez Code St z Beschreibung 1 02940652 1 Profilanpassungsstift D 4 2 02940045 1 Profilanpassungsstift D 3 3 04711065 5 Schraube TCEI M8X120 4 04715048 5 Schra...

Страница 51: ...ackte Zubehör vorsichtig aus dem Möbel entfernen 4 Die Blisterverpackung Kanalbausatz A bereitstellen 5 Die Nivellierung der Möbel prüfen 6 Die Rückwände von den Kanalseiten entfernen 7 Silikon auf den gesamten Umfang der Seite eines der beiden Möbel auftragen A ...

Страница 52: ...l des oberen Bereichs einführen 10 Die Möbel zueinander ausrichten und darauf achten dass die Kanalpunkte miteinander übereinstimmen 11 Die Ösen der Pfosten mithilfe der Füße ausrichten wobei die Neigung in Richtung Mauer von etwa 10 mm beizubehalten ist 12 Die Basis zusammenbauen indem der Bügel der Einheit A befestigt wird 13 Die Verbindungsschrauben am Möbeldach befestigen A ...

Страница 53: ...ieren N B Sicherstellen dass sich die Türen öffnen lassen Offene Türen müssen sich auch ohne Schließfeder wieder schließen Die Schließfeder ist bereits werkseitig eingestellt Die Federlast gegebenenfalls folgenderweise anpassen a Den Federladeschlüssel A in eine der Öffnungen des unteren Stiftes einführen b Den Stift nach links drehen um den Sicherheitsstift B entfernen zu können c Den unteren Sti...

Страница 54: ...ung des Öffnungssinns der Türen wie folgt vorgehen 1 Den Federladeschlüssel aus seinem Sitz nehmen 2 A Den Federladeschlüssel in eine der Öffnungen des unteren Stiftes einführen Wie angezeigt drehen um den Stift zu befreiene B Den Schlüssel in der angezeigten Position halten den Federladestift herausziehen und sowohl den Stift als auch den Schlüssel an einem sicheren Ort aufbewahren 1 Ladestift 2 ...

Страница 55: ...htig um einige Millimeter anheben um den Stift des unteren Scharniers herauszu ziehen KEINENÜBERMÄS SIGENDRUCKAUSÜBEN DieTürwirdbeginnendmi tdemunterenScharnierau sihremSitzherausgenomm en 7 Die Tür entfernen und auf eine waagrechte Fläche stellen um die Arbeiten für die Änderung des Öffnungssinns auf optimale Weise durchführen zu können Den gesamten unteren Scharnierblock herausnehmen A Die Schra...

Страница 56: ... und die Bronzebuchse einführen D Linker Bügel 10 A Das obere Scharnier mit äußerster Vorsicht vom oberen Türteil herausziehen wobei man die Verbindung zwischen Stift und Kunststoffbuchse nicht allzusehr belasten darf B Auch die Ausziehschutzgabel 1 abmontieren 11 Die untere Scharniergruppe die nun für die linke Türöffnung geeignet ist wieder einbauen indem man die Phasen 8 9 in umgekehrter Reihe ...

Страница 57: ... oberen Scharniers vorsichtig klopfen D AUF KEINEN FALL AUF DEN EDELSTAHLSTIFT KLOPFEN 13 Die untere Plattengruppe abmontieren 14 Die soeben abmontierte untere Plattengruppe auf eine Ebene legen die obere Platte 1 und die Sperrzähne 2 entfernen und wie in Abb B gezeigt in die neuen Sitze einführen Der Feder 3 um 180 drehen A B C D 1 1 EDELSTAHLSTIFT Kunststoffblock Nur wie angegeben auf die runde ...

Страница 58: ...it linkem Öffnungssinn wieder anmontieren wobei man zuerst das obere Scharnier in die soeben erhaltene Öffnung einführen muss und langsam positionieren um den unteren Stift in die entsprechende Öffnung der unteren Plattengruppe einzuführen Wie für die Demontage bei Einführungsschwierigkeiten einen Hebel zur Hilfe nehmen 18 Den elektrischen Anschluss wiederherstellen und das Plättchen 1 um 180 dreh...

Страница 59: ... Stiftführungsbuchse 6 Universeller Türfestellbügel 7 Schraube 8 Schraube 9 Untere Bronzebuchse 10 Verzinkter universeller Seeger Ring 11 Unterer Stift Vierkantfeder mit Radiallöcher 12 Federladestift PLATTENGRUPPE 1 Türfeststellfeder 2 Edelstahlschraube für die Plattenbefestigung 3 Geschnittene Platte 4 Hakensperrklinke 5 Stift für Türfeststellfeder 6 Nylon Unterplatte 2 4 1 3 5 6 7 8 9 10 11 12 ...

Страница 60: ...on et premier nettoyage 62 Installation et conditions ambiantes Fig 3 62 Mise en linéaire des meubles 63 Branchement électrique 63 Contrôle et réglage de la température Fig 4 63 Le remplissage du meuble Fig 4 Fig 6 64 Dégivrage et écoulement eau Fig 7 64 Anti condensation et antibuée 64 Éclairage 64 Remplacement lampes 65 Entretien et nettoyage Fig 5 65 Nettoyage des portes EVERCLEAR option Fig 5 ...

Страница 61: ...frontalement fermés par des portes à vitres avec unité de condensation extérieure aptes à la conser vation et à la vente libre service de Surgelés et Glaces Disponibles en plusieurs versions 2 Portes 3 Portes 4 Portes 5 Portes Les portes sont disponibles en aluminium ou sérigraphiées 3 Normes et certifications Tous les modèles de meubles réfrigérés décrits dans ce manuel d utilisation de la série ...

Страница 62: ...à fourche Toujours positionner les fourches dans le point indiqué sur le support en bois pour éviter tout risque de renversement Utiliser un chariot élévateur manuel ou électrique en mesure de soulever le meuble avec une capacité nominale supérieure ou égale à 1000 kg 6 Réception et premier nettoyage A la réception du meuble S assurer que l emballage est intègre et qu il ne présente pas de dégâts ...

Страница 63: ...50Hz triphasé Pour garantir un fonctionnement régulier il est nécessaire que la variation maximale de tension soit comprise entre 6 de la valeur nominale Vérifier si la ligne d alimentation a des câbles de diamètre adéquat Vérifier si elle est protégée contre les surcharges de courant et les dispersions vers la masse en conformité avec les normes en vigueur Pour des lignes d alimentation de longue...

Страница 64: ...on de résistances électriques blin dées Pour l évacuation de l eau de dégivrage il est nécessaire de Prévoir un écoulement au sol avec une légère pente Installer un siphon entre la conduite d écoulement du meuble et le branchement à plancher Plomber hermétiquement la zone d écoulement à plancher De cette manière on évite les mauvaises odeurs à l intérieur du meuble la dispersion de l air réfrigéré...

Страница 65: ...lvants qui peuvent dégrader les surfaces du meuble NE PAS pulvériser de l eau ou de détergent sur les parties électriques du meuble NE PAS utiliser d alcool pour nettoyer les parties en méthacrylate plexiglas Le nettoyage des parties internes Tous les mois Le nettoyage des parties internes du meuble a pour but de détruire les microorganismes pathogènes pour assurer la protection des marchandises A...

Страница 66: ...orifique installation électrique et châssis portes Tôle galvanisée Socle moteur panneaux inférieurs et vernis structure base Polyuréthane expansé R134a Isolement thermique Verre trempé Portes Bois Châssis latéraux bac à isolement mousse PVC Pare chocs Laminé plastique Joues N B Toutes ces opérations le transport et le traitement des déchets doivent être exécutés exclusivement par un personnel spéc...

Страница 67: ...t éliminer tout inconvénient relevé vis dévissées lampes grillées etc Périodiquement vérifier le fonctionnement du dégivrage automatique des meubles fréquence durée température de l air restauration du fonctionnement normal etc Vérifier l écoulement de l eau formée par le dégivrage libérer les égouttes nettoyer les filtres éventuels contrôler les siphons etc contrôler le bac d évaporation de l eau...

Страница 68: ...avant de façon à incliner le meuble vers le mur d au moins 10 mm pour garantir la fermeture parfaite des portes pag 2 Fig 4 Rif 6 3 Vider le meubles des pièces emballées qu il contient sans les abîmer 4 Chercher et prendre le blister kit de canalisation A 3 5 6 4 7 3 6 3 6 2 1 3 3 5 5 6 6 Réf Code Q té Description 1 02940652 1 Axe alignement profil D 4 2 02940045 1 Axe alignement profil D 3 3 047110...

Страница 69: ...sont bien à niveau 6 Retirer les panneaux de fond des côtés de canalisation 7 Sceller tout le pourtour du côté de l un des meubles avec de la silicone 8 Ouvrir le blister qui contient le matériel fourni et prendre les axes 9 Insérer les fiches dans le profil de la bande supérieure ...

Страница 70: ...les œillères des montants en alignement en agissant sur les pieds et en maintenant toujours l inclinaison vers le mur à 10 mm environ 12 Unir la base en fixant la bride d assemblage A 13 Fixer les vis d assemblage sur le toit du meuble 14 Fixer les vis d assemblage entre les montants en s assurant que les œillères sont bien alignées A ...

Страница 71: ...essort de fermeture Le ressort de fermeture est déjà préréglé en usine Si besoin est régler la charge du ressort en suivant la démarche indiquée ci dessous a Insérer la clé de remontage du ressort A dans l un des trous du pivot inférieur b Tourner le pivot dans le sens inverse à celui des aiguilles d une montre pour extraire le pivot de sécurité B c Tourner le pivot inférieur dans le sens des aigu...

Страница 72: ...ter l inversion des portes suivre ce qui suit 1 Enlever la clef de remontage du ressort de son siège 2 A Insérer la clef de remontage du ressort dans un des trousdu pivot inférieur Tourner comme indiqué pour libérer la goupille B En tenant la clef bloquée dans la position indiquée extraire la goupille de remontage du ressort et mettre la clef et lagoupille dans un lieu sûr 1 Goupille de remontage ...

Страница 73: ...traction utiliser un levier de bois ou un outil semblable pour ne pas endommager la porte Lever légère ment la porte de quelques milli mètres de façon à faire sortir le pivot de la charnière inférieure NE PAS FORCER DE MANIERE EXA GEREE 7 Enlever la porte et la poser sur un plan horizontal pour pouvoir exécuter à la perfection l opération d inversion Extraire entièrement tout le bloc charnière inf...

Страница 74: ...ussinet D Etrier gauche 10 A Extraire de la partie supérieure de la porte la charnière supérieure très soigneusement en évitant de trop fatiguer l accouplement entre le pivot et la bague en plastique B Démonter la fourchette anti enlèvement aussi 1 11 Remonter le groupe charnière inférieure qui est maintenant devenu gauche en suivant dans le sens inverse les stades 8 9 et l insérer à la place de l...

Страница 75: ... ABSOLUMENT EVITER DE FRAPPER DIRECTEMENT SUR LE PIVOT INOX 13 Démonter le groupe plaque inférieure 14 Poser le groupe plaque inférieure que l on vient de démonter sur un plan enlever la plaque supérieure 1 enlever les cliquets d arrêt 2 et les placer dans les nouveaux sièges comme indiqué dans la figure B Tourner le ressort 3 de 180 A B C D 1 1 PIVOT INOX Bloc en plastique Ne frapper que sur la c...

Страница 76: ...emonter la porte devenue gauche en faisant attention à insérer d abord la charnière supérieure dans le trou que l on vient de percer et puis la poser lentement de façon à insérer le pivot inférieur dans le trou appropriédu groupe plaque inférieure 18 Restaurer le branchement électrique en faisant attention de tourner de 180 la plaquette 1 de façon que sur sa partie supérieure on puisse lire l écri...

Страница 77: ...eur pivot 6 Etrier arrête porte universel 7 Vis 8 Vis 9 Coussinet inférieur 10 Bague Seeger universelle zinguée 11 Pivot inférieur ressort section carrée avec trous radiaux 12 Goupille de remontage du ressort GROUPE PLAQUE 1 Ressort arrête porte 2 Vis inox de fixation plaque 3 Plaque tranchée 4 Cliquet d arrêt pieu 5 Pivot pour ressort arrête porte 6 Sous plaque en Nylon 2 4 1 3 5 6 7 8 9 10 11 12...

Страница 78: ...limpieza 80 Instalación y condiciones ambientales Fig 3 80 Unión de los muebles 81 Conexión eléctrica 81 Control y regulación de la temperatura Fig 4 81 Carga del mueble Fig 4 Fig 6 81 Descongelación y desagüe Fig 7 82 Anti condensación y anti empañamiento 82 Iluminación 82 Sustitución lámparas 82 Mantenimiento y limpieza Fig 5 83 Limpieza de las puertas EVERCLEAR opcional Fig 5 83 Desmantelamient...

Страница 79: ...nservación y venta self service de Congelados y Helados Disponibles en varias versiones como 2 Puertas 3 Puertas 4 Puertas 5 Puertas Las puertas se encuentran a disposición en aluminio o serigrafiadas 3 Normas y certificaciones Todos los modelos de muebles refrigerados descritos en este manual de uso de la serie Losanna 2 cumplen con los requisitos esenciales de seguridad salud y protección requer...

Страница 80: ...ecuada para el levantamiento del mueble en cue stión con capacidad de carga nominal igual o mayor de 1000 kg 6 Recepción y primera limpieza Al recibir el mueble Verificar la integridad del embalaje y que a simple vista no se adviertan daños Prestar atención cuando se realizan las operaciones de desembalaje para no estropear el mueble Verificar la integridad de los componentes del mueble Si se advi...

Страница 81: ...obrecarga si esto se verifica modificar la instalación para diferenciar los diferentes dispositivos de arranque El instalador tiene que suministrar los dispositivos de anclaje para todos los cables en entrada y salida del mueble El interruptor automático magnetotérmico no deberá abrir el circuito sobre el neutro sin ser simultáneamente abierto también sobre las fases y en todo caso la distancia de...

Страница 82: ...ible mal funcionamiento del mueble debido a la humedad N B Verificar periódicamente la perfecta eficiencia de las conexiones hidráulicas llamando a un instalador especializado 13 Anti condensación y anti empañamiento Para impedir el empañamiento debido a la condensación se han previsto resistencias eléctricas de baja potencia en las partes que se encuentran más sometidas a dicho fenómeno como por ...

Страница 83: ...e aspiración Si se verificara la formación de hielo anormal contactar un Técnico Especializado en instalaciones frigoríficas Para proteger las manos durante estas operaciones se aconseja utilizar guantes de trabajo Una vez finalizadas las operaciones de limpieza montar nuevamente los elementos amovibles secos y conectar la alimentación eléctrica Cuando se obtiene la temperatura interna de funciona...

Страница 84: ...ar enseguida el Servicio de Asistencia es importante controlar los siguientes puntos Verificar que los valores de la temperatura y de la humedad ambiental no se superen los especificados Por este motivo es indispensable mantener siempre al máximo la eficiencia de los acondicionadores la ventilación y la calefacción del local de venta La velocidad del aire acondicionada deberá mantenerse por debajo...

Страница 85: ...i éste no ha sido adecuadamente ventilado Desconectar el mueble con el interruptor general aguas arriba de la instalación NO UTILIZAR AGUA PARA APAGAR EL INCENDIO USAR SOLAMENTE EXTINTOR SECO TODO USO NO EXPLICITAMENTE INDICADO EN ESTE MANUAL SE CONSIDERA PELIGROSO POR LO TANTO EL FABRICANTE NO SE RESPONSABILIZA DE EVENTUALES DAÑOS CAUSADOS POR UTILIZACIÓN INDEBIDA ERRÓNEA Y DESCUIDADA NÚMEROS ÚTI...

Страница 86: ...nteriores inclinando el mueble hacia la pared al menos 10 mm para garantizar un cierre perfecto de las puertas pag 2 Fig 4 Rif 6 3 Vaciar el mueble de los elementos embalados sin dañarlos 4 Localizar y coger el blíster kit de canalización A 3 5 6 4 7 3 6 3 6 2 1 3 3 5 5 6 6 Ref Código Cód Descripción 1 02940652 1 Clavija de alineación perfil D 4 2 02940045 1 Clavija de alineación perfil D 3 3 047110...

Страница 87: ...de los muebles 6 Quitar los respaldos de los lados de canalización 7 Siliconar por todo el perímetro del lateral de uno de los dos muebles 8 Abrir el blíster que contiene el materiale en dotación y recoger las clavijas 9 Introducir las clavijas en el perfil de la banda superior ...

Страница 88: ...ión 11 Alinear los orificios de los montantes con los pies pero manteniendo la inclinación hacia el muro de unos 10 mm 12 Unir la base fijando el soporte de unión A 13 Fijar los tornillos de unión en el techo del mueble 14 Fijar los tornillos de unión entre los montantes comprobando la alineación de los orificios A ...

Страница 89: ...tienen que volver a cerrar incluso sin la ayuda del resorte de cierre El resorte de cierre ya está pre montado de fábrica Si es necesario regular la carga del resorte de esta manera a Introducir la llave de carga de resorte A en uno de los orificios del perno inferior b Girar el perno en sentido antihorario para quitar el perno de seguridad B c Girar el perno inferior en sentido horario y colocar ...

Страница 90: ...ón de inversión Martillo Espátula Taladro Punta Dmax 9 mm Llaves hexagonales 2 3 4 Para inversión de las puertas efectuar lo siguiente 1 Quitar la llave de carga del muelle de su alojamiento 2 Manteniendo la llave en la posición indicada extraer el perno de carga del muelle y colocar la llave y el perno en un lugar seguro 1 Perno de carga 2 Llave de carga muelle 3 montante central A Quitar los tor...

Страница 91: ... similar para no dañarla Levantar cuidadosamente algunos milímetros la misma para poder quitar el perno de la bisagra infe rior NO FORZAR DEMASIADO La puerta sale de su alojamiento por la bisagra inferior 7 Quitar la puerta y apoyarla sobre una plataforma horizontal para poder efectuar la inversión en forma correcta Extraer completamente todo el bloque de la bisagra inferior A Quitar los tornillos...

Страница 92: ...el anillo e introducir el buje D Anillo izquierdo 10 A Extraer de la parte superior de la puerta la bisagra superior con cuidado sin forzar demasiado el acople del perno con el forro de plástico B Desmontar también la horquillaantideslizamiento 1 11 Volver a montar el grupo de la bisagra inferior ahora izquierda siguiendo en forma invertidalas fases 8 9 e introducirlo en lugar de la bisagra superi...

Страница 93: ...n D NO GOLPEAR DIRECTAMENTE SOBRE EL PERNO INOX 13 Desmontar el grupo de la placa inferior 14 Colocar las partes de la placa inferior desmontada sobre una superficie quitar la placa superior 1 quitar los dientes metálicos de bloqueo 2 y colocarlos en los nuevos alojamientos como indicado en la figura B Girar el muelle 3 de 180 A B C D 1 1 PERNO INOX Bloque de plástico Golpear solamente sobre la co...

Страница 94: ...a a la izquierda introduciendo antes la bisagra superior en el orificio nuevo y luego apoyarla lentamente e introducir el perno inferior en su respectivo orificio del grupo de la placa inferior Durante elmontaje si se verificara dificultad en la introducción de la puerta utilizar una palancade madera como en el desmontaje 18 Restablecer la conexión eléctrica girando la placa de 180 1 de manera tal...

Страница 95: ... guía perno 6 Estribo fijación puerta universal 7 Tornillo 8 Tornillo 9 Buje inferior 10 Anillo seeger universal galvanizado 11 Perno inferior muelle cuadrado orificios radiales 12 Perno de carga muelle GRUPO PLACA 1 Muelle fijación puerta 2 Tornillo inox fijación placa 3 Placa troquelada 4 Diente metálico bloqueo de la espiga 5 Perno para muelle fijación de la puerta 6 Contraplaca de nylo 2 4 1 3...

Страница 96: ...ɨɫɬɚɜɤɚ ɢ ɩɟɪɜɚɹ ɱɢɫɬɤɚ 98 ɍɫɬɚɧɨɜɤɚ ɢ ɭɫɥɨɜɢɹ ɜ ɩɨɦɟɳɟɧɢɢ Fig 3 99 ɋɨɟɞɢɧɟɧɢɟ ɜɢɬɪɢɧ ɜ ɤɚɧɚɥ 99 ɗɥɟɤɬɪɢɱɟɫɤɢɟ ɩɨɞɫɨɟɞɢɧɟɧɢɹ 99 ɉɪɨɜɟɪɤɚ ɢ ɪɟɝɭɥɢɪɨɜɤɚ ɬɟɦɩɟɪɚɬɭɪɵ Fig 4 100 Ɂɚɝɪɭɡɤɚ ɜɢɬɪɢɧɵ Fig 4 Fig 6 100 Ɉɬɬɚɢɜɚɧɢɟ ɢ ɫɥɢɜ ɜɨɞɵ Fig 7 100 Ɂɚɳɢɬɚ ɨɬ ɤɨɧɞɟɧɫɚɰɢɢ ɢ ɨɬ ɡɚɩɨɬɟɜɚɧɢɹ 101 Ɉɫɜɟɳɟɧɢɟ 101 Ɂɚɦɟɧɚ ɥɚɦɩ 101 Ɍɟɯɧɢɱɟɫɤɨɟ ɨɛɫɥɭɠɢɜɚɧɢɟ ɢ ɱɢɫɬɤɚ Fig 5 101 ɑɢɫɬɤɚ ɞɜɟɪɟɣ EVERCLEAR ɞɨɩɨɥɧɢɬɟɥɶɧɨ Fig 5 ...

Страница 97: ... Ʌɢɧɢɹ ɯɨɥɨɞɢɥɶɧɵɯ ɜɢɬɪɢɧ Brema 5 Brema LF ɫɨɫɬɨɢɬ ɢɡ ɩɪɢɫɬɟɧɧɵɯ ɜɟɪɬɢɤɚɥɶɧɵɯ ɜɢɬɪɢɧ ɮɪɨɧɬɚɥɶɧɨ ɡɚɤɪɵɜɚɸɳɢɯɫɹ ɡɚɫɬɟɤɥɟɧɧɨɣ ɞɜɟɪɶɸ ɨɫɧɚɳɟɧɧɵɯ ɜɵɧɟɫɟɧɧɵɢ ɤɨɧɞɟɧɫɚɬɨɪɨɦ ɫɥɭɠɚɳɢɯ ɞɥɹ ɯɪɚɧɟɧɢɹ ɢ ɩɪɨɞɚɠɢ ɜ ɨɬɞɟɥɚɯ ɫɚɦɨɨɛɫɥɭɠɢɜɚɧɢɹ Ɂɚɦɨɪɨɠɟɧɧɵɯ ɩɪɨɞɭɤɬɨɜ ɢ Ɇɨɪɨɠɟɧɨɝɨ ȼɢɬɪɢɧɵ ɩɨɫɬɚɜɥɹɸɬɫɹ ɜ ɫɥɟɞɭɸɳɢɯ ɢɫɩɨɥɧɟɧɢɹɯ 2 ɞɜɟɪɢ 3 ɞɜɟɪɢ 4 ɞɜɟɪɢ 5 ɞɜɟɪɟɣ Ⱦɜɟɪɢ ɦɨɝɭɬ ɛɵɬɶ ɢɡ ɚɥɸɦɢɧɢɹ ɢɥɢ ɫ ɫɟɬɱɚɬɨɣ ɩɟɱɚɬɶɸ 3 ɋɬɚɧɞɚɪ...

Страница 98: ...ɧɢɟ ɢɡɞɟɥɢɹ Fig 2 2 ɡɚɜɨɞɫɤɨɣ ɧɨɦɟɪ Fig 2 4 ɧɨɦɟɪ ɡɚɤɚɡɚ Fig 2 16 5 Ɍɪɚɧɫɩɨɪɬɢɪɨɜɤɚ Fig 3 Ⱦɚɧɧɚɹ ɦɟɛɟɥɶ ɫɧɚɛɠɟɧɚ ɩɪɢɤɪɟɩɥɟɧɧɵɦ ɤ ɨɫɧɨɜɚɧɢɸ ɞɟɪɟɜɹɧɧɵɦ ɩɨɞɞɨɧɨɦ ɩɪɟɞɧɚɡɧɚɱɟɧɧɵɦ ɞɥɹ ɩɟɪɟɦɟɳɟɧɢɹ ɜɢɥɨɱɧɵɦɢ ɩɨɝɪɭɡɱɢɤɚɦɢ ȼɨ ɢɡɛɟɠɚɧɢɟ ɪɢɫɤɚ ɨɩɪɨɤɢɞɵɜɚɧɢɹ ɜɫɟɝɞɚ ɡɚɜɨɞɢɬɟ ɝɪɭɡɨɩɨɞɴɟɦɧɵɟ ɜɢɥɵ ɜ ɬɨɱɤɟ ɨɛɨɡɧɚɱɟɧɧɨɣ ɧɚ ɞɟɪɟɜɹɧɧɨɦ ɩɨɞɞɨɧɟ ɂɫɩɨɥɶɡɭɣɬɟ ɪɭɱɧɭɸ ɬɟɥɟɠɤɭ ɫ ɩɨɞɴɟɦɧɨɣ ɩɥɚɬɮɨɪɦɨɣ ɢɥɢ ɷɥɟɤɬɪɨɩɨɝɪɭɡɱɢɤ ɩɨɞ...

Страница 99: ...ɭɠɧɨ ɫɥɟɞɨɜɚɬɶ ɭɤɚɡɚɧɢɹɦ ɢɡ ɪɚɡɞɟɥɚ page 105 9 ɗɥɟɤɬɪɢɱɟɫɤɢɟ ɩɨɞɫɨɟɞɢɧɟɧɢɹ Ⱦɥɹ ɡɚɳɢɬɵ ɨɛɨɪɭɞɨɜɚɧɢɹ ɩɟɪɟɞ ɧɢɦ ɧɟɨɛɯɨɞɢɦɨ ɩɪɟɞɭɫɦɨɬɪɟɬɶ ɚɜɬɨɦɚɬɢɱɟɫɤɢɣ ɷɥɟɤɬɪɨɦɚɝɧɢɬɧɵɣ ɜɫɟɩɨɥɸɫɧɵɣ ɜɵɤɥɸɱɚɬɟɥɶ ɫ ɫɨɨɬɜɟɬɫɬɜɭɸɳɢɦɢ ɯɚɪɚɤɬɟɪɢɫɬɢɤɚɦɢ ɤɨɬɨɪɵɣ ɛɭɞɟɬ ɜɵɩɨɥɧɹɬɶ ɢ ɮɭɧɤɰɢɢ ɝɟɧɟɪɚɥɶɧɨɝɨ ɪɭɛɢɥɶɧɢɤɚ ɞɥɹ ɨɛɟɫɬɨɱɢɜɚɧɢɹ ɥɢɧɢɢ Ɉɩɟɪɚɬɨɪ ɞɨɥɠɟɧ ɯɨɪɨɲɨ ɡɧɚɬɶ ɝɞɟ ɧɚɯɨɞɢɬɫɹ ɜɵɤɥɸɱɚɬɟɥɶ ɱɬɨɛɵ ɛɵɫɬɪɨ ɟɝɨ ɧɚɣɬɢ ɜ ɫɥɭɱɚɟ ȺȼȺɊɂ...

Страница 100: ...ɵ ɯɨɥɨɞɢɥɶɧɨɣ ɜɢɬɪɢɧɵ ɨɫɬɚɜɥɹɬɶ ɩɪɨɫɥɨɣɤɭ ɜɨɡɞɭɯɚ ɜ 30 ɦɦ ɦɟɠɞɭ ɩɪɨɞɭɤɬɚɦɢ ɢ ɜɵɲɟɪɚɫɩɨɥɨɠɟɧɧɨɣ ɩɨɥɤɨɣ ɧɟɨɛɯɨɞɢɦɨ ɫɬɪɟɦɢɬɶɫɹ ɜɫɟɝɞɚ ɩɪɨɞɚɬɶ ɫɧɚɱɚɥɚ ɬɟ ɩɪɨɞɭɤɬɵ ɤɨɬɨɪɵɟ ɛɵɥɢ ɩɨɥɨɠɟɧɵ ɜ ɯɨɥɨɞɢɥɶɧɭɸ ɜɢɬɪɢɧɭ ɪɚɧɶɲɟ ɩɨɫɥɟɞɧɢɯ ɩɪɨɞɭɤɬɨɜ ɨɛɨɪɨɬ ɩɢɳɟɜɵɯ ɩɪɨɞɭɤɬɨɜ ɦɚɤɫɢɦɚɥɶɧɵɣ ɨɛɴɟɦ ɡɚɝɪɭɡɤɢ ɜɚɧɧɵ ɫɨɫɬɚɜɥɹɟɬ ɨɤɨɥɨ 300 kg m2 ɩɨɥɤɢ ɦɨɠɧɨ ɧɚɤɥɨɧɹɬɶ ɢ ɡɚɤɪɟɩɥɹɬɶ ɜ ɞɜɭɯ ɩɨɥɨɠɟɧɢɹɯ 0 10 ȼɧɢɦɚɧɢɟ Ɂɚɩɪɟɳɚɟɬɫɹ ɤɥɚɫɬ...

Страница 101: ...ɞɨɣ ɞɜɟɪɢ ɢ ɜ ɥɸɛɨɣ ɦɨɦɟɧɬ ɜɪɟɦɟɧɢ ɭɥɭɱɲɟɧɢɟ ɨɫɜɟɳɟɧɢɹ ɩɪɢ ɫɧɢɠɟɧɢɢ ɬɟɦɩɟɪɚɬɭɪɵ 15 Ɂɚɦɟɧɚ ɥɚɦɩ ɉɪɢ ɧɟɨɛɯɨɞɢɦɨɫɬɢ ɜɵɩɨɥɧɢɬɶ ɡɚɦɟɧɭ ɥɚɦɩɵ ɧɭɠɧɨ ɞɟɣɫɬɜɨɜɚɬɶ ɫɥɟɞɭɸɳɢɦ ɨɛɪɚɡɨɦ Ɉɬɤɥɸɱɢɬɶ ɜɢɬɪɢɧɭ ɨɬ ɩɨɞɚɱɢ ɷɥɟɤɬɪɨɷɧɟɪɝɢɢ ɋɧɹɬɶ ɜɢɧɬɵ Ⱥ ɩɪɢ ɩɨɦɨɳɢ ɤɨɬɨɪɵɯ ɤɪɟɩɢɬɫɹ ɡɚɳɢɬɧɚɹ ɨɛɨɥɨɱɤɚ ɋɧɹɬɶ ɤɨɥɩɚɱɤɢ ȼ ɢ ɡɚɳɢɬɧɭɸ ɨɛɨɥɨɱɤɭ ɋ ɉɨɜɟɪɧɭɬɶ ɥɚɦɩɭ D ɧɚ ɩɪɢɛɥɢɡɢɬɟɥɶɧɨ 90 ɞɨ ɳɟɥɱɤɚ ɢ ɫɧɹɬɶ ɟɟ ɫ ɩɚɬɪɨɧɚ Ɂɚɦɟɧɢɬɶ ɥɚɦɩɭ ɋ...

Страница 102: ...ɡɨɜɚɧɢɸ ɤɨɧɞɟɧɫɚɬɚ ɑɢɫɬɤɚ ɞɜɟɪɟɣ EVERCLEAR ɨɫɭɳɟɫɬɜɥɹɟɬɫɹ ɫɥɟɞɭɸɳɢɦ ɨɛɪɚɡɨɦ ɨɬɤɪɵɬɶ ɢ ɡɚɛɥɨɤɢɪɨɜɚɬɶ ɞɜɟɪɶ ɨɫɬɨɪɨɠɧɨ ɨɱɢɫɬɢɬɶ ɜɧɭɬɪɟɧɧɸɸ ɱɚɫɬɶ ɦɹɝɤɨɣ ɜɥɚɠɧɨɣ ɬɪɹɩɤɨɣ ɛɟɡɨɩɚɫɧɨɣ ɞɥɹ ɩɢɳɟɜɵɯ ɩɪɨɞɭɤɬɨɜ ɢɫɩɨɥɶɡɨɜɚɬɶ ɧɟɣɬɪɚɥɶɧɵɟ ɦɨɸɳɢɟ ɫɪɟɞɫɬɜɚ ɢɥɢ ɦɵɥɶɧɵɣ ɪɚɫɬɜɨɪ ɱɚɫɬɨ ɦɟɧɹɬɶ ɬɪɹɩɤɭ ɡɚɤɪɵɬɶ ɞɜɟɪɶ ɜɵɦɵɬɶ ɜɧɟɲɧɸɸ ɫɬɟɧɤɭ ɞɜɟɪɢ ɢɫɩɨɥɶɡɭɹ ɧɟɣɬɪɚɥɶɧɵɟ ɛɵɬɨɜɵɟ ɦɨɸɳɢɟ ɫɪɟɞɫɬɜɚ ɢɥɢ ɦɵɥɶɧɵɣ ɪɚɫɬɜɨɪ ɫɩɨɥɨɫɧɭɬɶ ɱɢ...

Страница 103: ...ɪ ɩɨɬɨɥɤɢ ɂɫɤɥɸɱɢɬɶ ɫɜɟɬɢɥɶɧɢɤɢ ɫ ɥɚɦɩɚɦɢ ɧɚɤɚɥɢɜɚɧɢɹ ɤɨɬɨɪɵɟ ɧɚɩɪɚɜɥɟɧɵ ɧɟɩɨɫɪɟɞɫɬɜɟɧɧɨ ɧɚ ɜɢɬɪɢɧɭ Ʉɥɚɫɬɶ ɜ ɜɢɬɪɢɧɭ ɦɨɠɧɨ ɬɨɥɶɤɨ ɩɪɨɞɭɤɬɵ ɩɪɟɞɜɚɪɢɬɟɥɶɧɨ ɨɯɥɚɠɞɟɧɧɵɟ ɞɨ ɬɟɦɩɟɪɚɬɭɪɵ ɯɚɪɚɤɬɟɪɢɡɭɸɳɟɣ ɰɟɩɶ ɯɨɥɨɞɚ ɉɪɨɜɟɪɹɬɶ ɜ ɫɨɫɬɨɹɧɢɢ ɥɢ ɯɨɥɨɞɢɥɶɧɚɹ ɜɢɬɪɢɧɚ ɜɫɟɝɞɚ ɩɨɞɞɟɪɠɢɜɚɬɶ ɬɚɤɭɸ ɬɟɦɩɟɪɚɬɭɪɭ ɋɨɛɥɸɞɚɬɶ ɨɝɪɚɧɢɱɟɧɢɹ ɩɨ ɡɚɝɪɭɡɤɟ ɜɢɬɪɢɧɵ ɢ ɜ ɥɸɛɨɦ ɫɥɭɱɚɟ ɧɟ ɩɟɪɟɝɪɭɠɚɬɶ ɟɟ ɋɨɛɥɸɞɚɬɶ ɨɛɨɪɨɬ ɩɢɳɟɜɵɯ ɩɪɨɞɭɤ...

Страница 104: ...Ɇ ɈȽɇȿɌɍɒɂɌȿɅȿɆ ɅɘȻɈȿ ȾɊɍȽɈȿ ɂɋɉɈɅɖɁɈȼȺɇɂȿ ȼɂɌɊɂɇɕ ɈɌɅɂɑȺɘɓȿȿɋə ɈɌ ɉȿɊȿɑɂɋɅȿɇɇɈȽɈ ȼ ɇȺɋɌɈəɓɂɏ ɂɇɋɌɊɍɄɐɂəɏ ɋɑɂɌȺȿɌɋə ɈɉȺɋɇɕɆ ɂ ɂɁȽɈɌɈȼɂɌȿɅɖ ɇȿ ɇȿɋȿɌ ɈɌȼȿɌɋɌȼȿɇɇɈɋɌɂ ɁȺ ȼɈɁɆɈɀɇɕɃ ɍɓȿɊȻ ȼɕɁȼȺɇɇɕɃ ɂɋɉɈɅɖɁɈȼȺɇɂȿɆ ɇȿ ɉɈ ɇȺɁɇȺɑȿɇɂɘ ɇȿɉɊȺȼɂɅɖɇɕɆ ɂɅɂ ɂɊɊȺɐɂɈɇȺɅɖɇɕɆ ɂɋɉɈɅɖɁɈȼȺɇɂȿɆ ɄɈɇɌȺɄɌɇɕȿ ɇɈɆȿɊȺ ɄɈɆɆɍɌȺɌɈɊ 39 0499699333 ɎȺɄɋ 39 969944 CALL CENTER 848 800225 ...

Страница 105: ...ɟɞɧɢɟ ɧɨɠɤɢ ɬɚɤɢɦ ɨɛɪɚɡɨɦ ɱɬɨɛɵ ɧɚɤɥɨɧɢɬɶ ɜɢɬɪɢɧɭ ɤ ɫɬɟɧɟ ɧɚ 10 ɦɦ ɞɥɹ ɬɨɱɧɨɝɨ ɡɚɤɪɵɬɜɚɧɢɹ ɞɜɟɪɟɣ pag 2 Fig 4 Rif 6 3 ɋ ɜɢɬɪɢɧɵ ɫɧɹɬɶ ɭɩɚɤɨɜɤɭ ɧɟ ɧɚɪɭɲɚɹ ɟɟ 4 Ⱦɨɫɬɚɬɶ ɤɨɪɨɛɤɭ ɤɨɦɩɥɟɤɬ ɫɢɫɬɟɦɵ ɬɪɭɛɨɤ A 3 5 6 4 7 3 6 3 6 2 1 3 3 5 5 6 6 Äåò Êîä Ê âî Îïèñàíèå 1 02940652 1 Óñòàíîâî íûé øòèôò äëÿ âûðàâíèâàíèÿ D 4 2 02940045 1 Óñòàíîâî íûé øòèôò äëÿ âûðàâíèâàíèÿ D 3 3 04711065 5 Âèíò TCEI M8X120 4 04715...

Страница 106: ...ɢɬɶ ɜɵɪɚɜɧɢɜɚɧɢɟ ɜɢɬɪɢɧ 6 ɋɧɹɬɶ ɫɩɢɧɤɢ ɫ ɛɨɤɨɜɵɯ ɱɚɫɬɟɣ ɫɢɫɬɟɦɵ ɬɪɭɛɨɤ 7 Ȼɨɤɨɜɭɸ ɫɬɨɪɨɧɭ ɨɞɧɨɣ ɢɡ ɞɜɭɯ ɜɢɬɪɢɧ ɨɛɪɚɛɨɬɚɬɶ ɫɢɥɢɤɨɧɨɦ ɩɨ ɜɫɟɦɭ ɩɟɪɢɦɟɬɪɭ 8 Ɉɬɤɪɵɬɶ ɹɳɢɤ ɫ ɩɪɢɥɚɝɚɟɦɵɦ ɤ ɩɨɫɬɚɜɤɟ ɦɚɬɟɪɢɚɥɨɦ ɢ ɞɨɫɬɚɬɶ ɪɚɡɴɟɦɵ 9 ȼɫɬɚɜɢɬɶ ɪɚɡɴɟɦ ɜ ɜɟɪɯɧɸɸ ɱɚɫɬɶ ɩɪɨɮɢɥɹ ...

Страница 107: ...ɚɥɢ ɬɨɱɤɢ ɩɪɨɯɨɠɞɟɧɢɹ ɫɢɫɬɟɦɵ ɬɪɭɛɨɤ 11 ȼɵɪɨɜɧɹɬɶ ɩɟɬɥɢ ɫɬɨɟɤ ɩɪɢ ɭɩɨɪɟ ɧɚ ɧɨɠɤɢ ɫɨɯɪɚɧɹɹ ɧɚɤɥɨɧ ɤ ɫɬɟɧɟ ɨɤɨɥɨ 10 ɦɦ 12 ɋɨɟɞɢɧɢɬɶ ɛɚɡɭ ɮɢɤɫɢɪɭɹ ɫɤɨɛɭ ɫɨɟɞɢɧɟɧɢɹ Ⱥ 13 Ɂɚɮɢɤɫɢɪɨɜɚɬɶ ɛɨɥɬɵ ɫɨɟɞɢɧɟɧɢɹ ɧɚ ɤɪɵɲɟ ɜɢɬɪɢɧɵ 14 Ɂɚɮɢɤɫɢɪɨɜɚɬɶ ɛɨɥɬɵ ɫɨɟɞɢɧɟɧɢɹ ɦɟɠɞɭ ɫɬɨɣɤɚɦɢ ɤɨɧɬɪɨɥɢɪɭɹ ɜɵɪɚɜɧɢɜɚɧɢɟ ɩɟɬɟɥɶ A ...

Страница 108: ...ɹ ɞɚɠɟ ɛɟɡ ɩɨɦɨɳɢ ɡɚɤɪɵɜɚɸɳɟɣ ɩɪɭɠɢɧɵ Ɂɚɤɪɵɜɚɸɳɚɹ ɩɪɭɠɢɧɚ ɭɠɟ ɭɫɬɚɧɨɜɥɟɧɚ ɧɚ ɡɚɜɨɞɟ ɢɡɝɨɬɨɜɢɬɟɥɟ ɉɪɢ ɧɟɨɛɯɨɞɢɦɨɫɬɢ ɨɬɪɟɝɭɥɢɪɨɜɚɬɶ ɡɚɜɨɞ ɩɪɭɠɢɧɵ ɫɥɟɞɭɸɳɢɦ ɨɛɪɚɡɨɦ a ȼɫɬɚɜɢɬɶ ɤɥɸɱ ɞɥɹ ɡɚɜɨɞɚ ɩɪɭɠɢɧɵ A ɜ ɨɞɧɨ ɢɡ ɨɬɜɟɪɫɬɢɣ ɧɢɠɧɟɝɨ ɩɚɥɶɰɚ b ɉɨɜɟɪɧɭɬɶ ɩɚɥɟɰ ɩɪɨɬɢɜ ɱɚɫɨɜɨɣ ɫɬɪɟɥɤɢ ɱɬɨɛɵ ɫɧɹɬɶ ɩɪɟɞɨɯɪɚɧɢɬɟɥɶɧɵɣ ɲɬɢɮɬ B c ɉɨɜɟɪɧɭɬɶ ɧɢɠɧɢɣ ɩɚɥɟɰ ɩɨ ɱɚɫɨɜɨɣ ɫɬɪɟɥɤɟ ɢ ɭɫɬɚɧɨɜɢɬɶ ɩɪɟɞɨɯɪɚɧɢɬɟɥɶɧɵɣ ɲɬɢɮɬ ɜ ɫɥɟɞ...

Страница 109: ...ɦɦ ɒɟɫɬɢɝɪɚɧɧɵɟ ɝɚɟɱɧɵɟ ɤɥɸɱɢ 2 3 4 ɉɪɢ ɜɵɩɨɥɧɟɧɢɢ ɢɧɜɟɪɫɢɢ ɞɜɟɪɟɣ ɧɭɠɧɨ ɫɥɟɞɨɜɚɬɶ ɫɥɟɞɭɸɳɢɦ ɢɧɫɬɪɭɤɰɢɹɦ 1 ɋɧɹɬɶ ɫɨ ɫɜɨɟɝɨ ɦɟɫɬɚ ɤɥɸɱ ɞɥɹ ɡɚɜɨɞɚ ɩɪɭɠɢɧɵ 2 A ȼɫɬɚɜɢɬɶ ɤɥɸɱ ɞɥɹ ɡɚɜɨɞɚ ɩɪɭɠɢɧɵ ɜ ɨɞɧɨ ɢɡ ɨɬɜɟɪɫɬɢɣ ɧɢɠɧɟɝɨ ɩɚɥɶɰɚ B ɉɨɜɟɪɧɭɬɶ ɤɚɤ ɷɬɨ ɭɤɚɡɚɧɨ ɱɬɨɛɵ ɨɫɜɨɛɨɞɢɬɶ ɩɚɥɟɰ ɉɨɞɞɟɪɠɢɜɚɹ ɤɥɸɱ ɜ ɭɤɚɡɚɧɧɨɦ ɩɨɥɨɠɟɧɢɢ ɜɵɧɭɬɶ ɡɚɜɨɞɹɳɢɣ ɩɪɭɠɢɧɭ ɩɚɥɟɰ ɢ ɭɛɪɚɬɶ ɜ ɧɚɞɟɠɧɨɟ ɦɟɫɬɨ ɤɚɤ ɩɚɥɟɰ ɬɚɤ ɢ ɤɥɸɱ 1 Ɂɚɜɨɞ...

Страница 110: ...ÚÓ Ì ÔÓ ð ËÚ Âð ŒÒÚÓðÓÊÌÓ ÔÓ Ì Ú Ì ÌÂÒÍÓÎ ÍÓ ÏËÎÎËÏÂÚðÓ Âð Ú Í ÚÓ ÒÌ Ú Ô Îˆ Ò ÌËÊÌÂ Ó ðÌËð Õs œ xÀ ƒø À ÿxŒÃ ŒÀ ÿŒqŒ À ƒ Âð ÒÌËÏ ÂÚÒ ÒÓ Ò ÓÂ Ó ÏÂÒÚ Ì ÌËÊÌÂÏ ðÌËð 7 ɋɧɹɬɶ ɞɜɟɪɶ ɢ ɩɨɥɨɠɢɬɶ ɟɟ ɧɚ ɝɨɪɢɡɨɧɬɚɥɶɧɭɸ ɩɨɜɟɪɯɧɨɫɬɶ ɱɬɨɛɵ ɢɦɟɬɶ ɜɨɡɦɨɠɧɨɫɬɶ ɜɵɩɨɥɧɢɬɶ ɨɩɟɪɚɰɢɢ ɩɨ ɢɧɜɟɪɫɢɢ ɨɩɬɢɦɚɥɶɧɵɦ ɨɛɪɚɡɨɦ ɋɧɹɬɶ ɜɟɫɶ ɭɡɟɥ ɧɢɠɧɟɝɨ ɲɚɪɧɢɪɚ A Ɉɬɜɢɧɬɢɬɶ ɢ ɫɧɹɬɶ ɜɢɧɬɵ 1 ɢ 2 ɫɨɨɬɜɟɬɫɬɜɭɸɳɢɦɢ ɤɥɸɱɚɦɢ B ɋɧɹɬɶ ɭɡɟɥ...

Страница 111: ...ɤɨɛɭ ɢ ɜɫɬɚɜɢɬɶ ɛɪɨɧɡɨɜɭɸ ɜɬɭɥɤɭ D Ʌɟɜɚɹ ɫɤɨɛɚ 10 A ɋɧɹɬɶ ɫ ɜɟɪɯɧɟɣ ɱɚɫɬɢ ɞɜɟɪɢ ɜɟɪɯɧɢɣ ɲɚɪɧɢɪ ɩɪɢ ɷɬɨɦ ɧɟɨɛɯɨɞɢɦɨ ɞɟɣɫɬɜɨɜɚɬɶ ɨɱɟɧɶ ɨɫɬɨɪɨɠɧɨ ɱɬɨɛɵ ɧɟ ɤ ɫɨɟɞɢɧɟɧɢɸ ɦɟɠɞɭ ɩɚɥɶɰɟɦ ɢ ɩɥɚɫɬɦɚɫɫɨɜɨɣ ɜɬɭɥɤɨɣ ɧɟ ɩɪɢɥɨɠɢɬɶ ɫɥɢɲɤɨɦ ɛɨɥɶɲɨɝɨ ɭɫɢɥɢɹ B ɋɧɹɬɶ ɩɪɟɞɨɯɪɚɧɢɬɟɥɶɧɭɸ ɜɢɥɤɭ 1 11 Ɂɚɧɨɜɨ ɫɨɛɪɚɬɶ ɭɡɟɥ ɧɢɠɧɟɝɨ ɲɚɪɧɢɪɚ ɤɨɬɨɪɵɣ ɬɟɩɟɪɶ ɫɬɚɥ ɥɟɜɵɦ ɜɵɩɨɥɧɹɹ ɜ ɨɛɪɚɬɧɨɦ ɩɨɪɹɞɤɟ ɮɚɡɵ 8 9 ɢ ɜɫɬɚɜɢɬɶ ɟɝɨ ɧɚ ɦɟɫɬɨ ...

Страница 112: ...ɱɟɫɤɢ ɡɚɩɪɟɳɚɟɬɫɹ ɭɞɚɪɹɬɶ ɧɟɩɨɫɪɟɞɫɬɜɟɧɧɨ ɩɨ ɩɚɥɶɰɭ ɢɡ ɧɟɪɠɚɜɟɸɳɟɣ ɫɬɚɥɢ inox 13 ɋɧɹɬɶ ɭɡɟɥ ɧɢɠɧɟɣ ɩɥɚɫɬɢɧɵ 14 ɉɨɥɨɠɢɬɶ ɫɧɹɬɵɣ ɭɡɟɥ ɧɢɠɧɟɣ ɩɥɚɫɬɢɧɵ ɧɚ ɫɬɨɥ ɫɧɹɬɶ ɜɟɪɯɧɸɸ ɩɥɚɫɬɢɧɭ 1 ɫɧɹɬɶ ɫɬɨɩɨɪɧɭɵɣ ɫɨɛɚɱɤɢ 2 ɢ ɫɦɨɧɬɢɪɨɜɚɬɶ ɢɯ ɧɚ ɧɨɜɵɟ ɦɟɫɬɚ ɤɚɤ ɷɬɨ ɩɨɤɚɡɚɧɨ ɧɚ ɪɢɫɭɧɤɟ B ɉɨɜɟɪɧɭɬɶ ɩɪɭɠɢɧɭ 3 ɧɚ 180 A B C D 1 1 ПАЛЕЦ ИЗ НЕРЖАВЕЮЩЕЙ СТАЛИ INOX Пластмассовый блок Ударять можоно только по крглому пластм...

Страница 113: ...ɭɸɳɢɦ ɜɢɧɬɨɦ 17 Ɍɟɩɟɪɶ ɧɭɠɧɨ ɭɫɬɚɧɨɜɢɬɶ ɞɜɟɪɶ ɤɨɬɨɪɚɹ ɩɪɟɜɪɚɬɢɥɚɫɶ ɜ ɥɟɜɭɸ ɞɜɟɪɶ ɩɪɢ ɷɬɨɦ ɫɧɚɱɚɥɚ ɧɭɠɧɨ ɜɫɬɚɜɢɬɶ ɜɟɪɯɧɢɣ ɲɚɪɧɢɪ ɜ ɬɨɥɶɤɨ ɱɬɨ ɩɪɨɞɟɥɚɧɧɨɟ ɨɬɜɟɪɫɬɢɟ ɚ ɡɚɬɟɦ ɧɭɠɧɨ ɦɟɞɥɟɧɧɨ ɭɫɬɚɧɨɜɢɬɶ ɟɟ ɬɚɤ ɱɬɨɛɵ ɧɢɠɧɢɣ ɩɚɥɟɰ ɩɨɩɚɥ ɜ ɫɩɟɰɢɚɥɶɧɨɟ ɨɬɜɟɪɫɬɢɟ ɧɚ ɛɥɨɤɟ ɧɢɠɧɟɣ ɩɥɚɫɬɢɧɵ 18 ȼɨɫɫɬɚɧɨɜɢɬɶ ɷɥɟɤɬɪɢɱɟɫɤɨɟ ɩɨɞɫɨɟɞɢɧɟɧɢɟ ɩɨɜɟɪɧɭɜ ɧɚ 180 ɩɥɚɫɬɢɧɭ 1 ɬɚɤ ɱɬɨɛɵ ɧɚ ɜɟɪɯɧɟɣ ɫɬɨɪɨɧɟ ɩɥɚɫɬɢɧɵ ɦɨɠɧɨ ɛɵɥɨ ɩɪ...

Страница 114: ...ɪɫɚɥɶɧɚɹ ɫɤɨɛɚ ɞɥɹ ɞɜɟɪɧɨɝɨ ɭɩɨɪɚ 7 ȼɢɧɬ 8 ȼɢɧɬ 9 ɇɢɠɧɹɹ ɛɪɨɧɡɨɜɚɹ ɜɬɭɥɤɚ 10 ɍɧɢɜɟɪɫɚɥɶɧɨɟ ɨɰɢɧɤɨɜɚɧɧɨɟ ɡɚɠɢɦɧɨɟ ɤɨɥɶɰɨ 11 ɇɢɠɧɢɣ ɩɚɥɟɰ ɞɥɹ ɤɜɚɞɪɚɬɧɨɣ ɩɪɭɠɢɧɵ ɫ ɪɚɞɢɚɥɶɧɵɦɢ ɨɬɜɟɪɫɬɢɹɦɢ 12 ɉɚɥɟɰ ɞɥɹ ɡɚɜɨɞɚ ɩɪɭɠɢɧɵ ɍɁȿɅ ɉɅȺɋɌɂɇɕ 1 ɉɪɭɠɢɧɚ ɞɥɹ ɞɜɟɪɧɨɝɨ ɭɩɨɪɚ 2 ȼɢɧɬ ɢɡ ɧɟɪɠɚɜɟɸɳɟɣ ɫɬɚɥɢ inox ɞɥɹ ɤɪɟɩɥɟɧɢɹ ɩɥɚɫɬɢɧɵ 3 Ɉɛɪɟɡɚɧɧɚɹ ɩɥɚɫɬɢɧɚ 4 ɋɬɨɩɨɪɧɚɹ ɫɨɛɚɱɤɚ ɞɥɹ ɛɥɨɤɢɪɨɜɤɢ ɫɬɟɪɠɧɹ 5 ɉɚɥɟɰ ɞɥɹ ɩɪɭɠɢɧɵ ɞɜɟ...

Страница 115: ...ɨɠɟɧɧɚɹ ɩɨ ɚɞɪɟɫɭ Via Venezia 58 35010 Campo San Martino PD ɩɨɞ ɫɜɨɸ ɨɬɜɟɬɫɬɜɟɧɧɨɨɫɬɶ ɡɚɹɜɥɹɟɬ ɱɬɨ ɨɛɨɪɭɞɨɜɚɧɢɟ ɨɩɢɫɚɧɢɟ ɤɨɬɨɪɨɝɨ ɩɪɢɜɨɞɢɬɫɹ ɜ ɧɚɫɬɨɹɳɢɯ ɢɧɫɬɪɭɤɰɢɹɯ ɫɟɪɬɢɮɢɰɢɪɨɜɚɧɨ Ɉɪɝɚɧɨɦ ɋɟɪɬɢɮɢɤɚɰɢɢ ɊɈɋɌȿɌ Ɇɨɫɤɜɚ ɊɈɋɋ RU 000110 Ⱥə 46 Ⱥə 1 Ⱦɟɤɥɚɪɚɰɢɹ ɨ ɫɨɨɬɜɟɫɬɜɢɢ ɊɈɋɌȿɋɌ ...

Страница 116: ...re ausdrückliche Genehmigung weder vervielfältigt noch an Dritte weitergegeben werden und sie ist ausschließlich für unsere Kunden bestimmt Nous nous réservons le droit d apporter à tout moment des modification aux spécifiques et aux caractéristiques contenues danse cette publication sans aucune obligation de préavis de notre part Cette publication ne peut être reproduite et ou communiquée â des t...

Отзывы:

Похожие инструкции для BREMA 5