owner’s manual
7
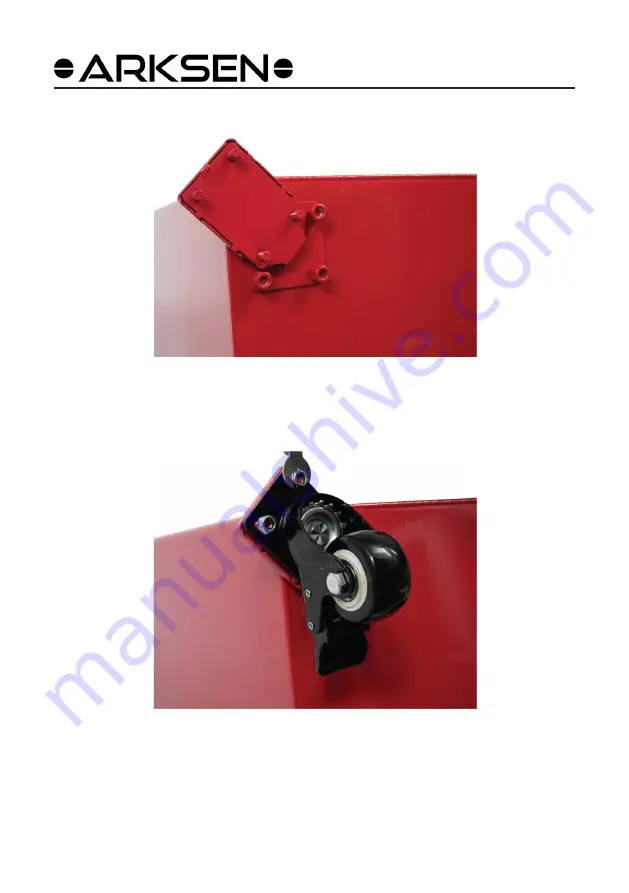
STEP 3
Remove the nuts from the bottom of the caddy. Attach the foot, then secure using the removed nuts.
STEP 4
Assemble the 3” universal wheel on the foot. Secure the wheels on the foot using M8 nuts.
Страница 1: ...and understand all ASSEMBLY AND OR OPERATION INSTRUCTION before using the product Failure to follow the safety rules and other basic safety precautions may result in serious personal injury WARNING CAUTION 35 Gallon Gas Caddy OWNER S MANUAL ...
Страница 2: ... understand all instruction before using the product All information in this publication is based on the latest product information available at the time of approval for printing We reserve the right to make changes at any time without notice and without any obligation Table of Contents 03 04 06 Safety Instruction Parts and Features Assembly Guide ...
Страница 3: ...ics or mobile communications devices such as mobile phones when pumping flammable liquids Attach ground wire and bond containers that are being pump from and into Ground all containers to a known ground source to dissipate static electricity before pumping liquids Gasoline vapors can expode Harmful or fatal if swallowed Avoid breath in fuel vapors Do not smoke near or while using the gas caddy Thi...
Страница 4: ... with clip E Plastic nut F Fuel measure gauge G Oil pump H Plastic dome I Metal floater J Lock nut K 10 solid rubber wheel L Wheel axel M Metal washer N M18 cap nut O M8 nut P 3 universal wheel with brake Q Oil cap R Oil filter S Handle T Steel body U Pump handle V Foot A D G E F B I K L M N O P Q U V R S ...
Страница 5: ...owner s manual 5 A D Q G E H P V I F B S T U K J C ...
Страница 6: ...Y GUIDE STEP 1 Insert the wheel axle to the caddy Put a washer to the end of the axle STEP 2 Put the rubber wheel to the end of the wheel axle Secure it in place with washer and cap nut Repeat the same step for the other wheel ...
Страница 7: ...s manual 7 STEP 3 Remove the nuts from the bottom of the caddy Attach the foot then secure using the removed nuts STEP 4 Assemble the 3 universal wheel on the foot Secure the wheels on the foot using M8 nuts ...
Страница 8: ... s manual 8 STEP 5 Screw the oil pump on the pump pipe Make sure they are aligned before screwing to prevent cross threading STEP 6 Screw the pump connector on the oil pump Careful to prevent cross threading ...
Страница 9: ...owner s manual 9 STEP 7 Attach the pump handle to the oil pump STEP 8 Attach the wired tube to the connector Secure it by tightening the hose clamp ...
Страница 10: ...owner s manual 10 STEP 9 Attach the plastic dome and fuel measure gauge to the gas caddy STEP 10 Insert the oil filter into the oil inlet then cover it with the fuel cap ...
Страница 11: ...owner s manual 11 STEP 11 Attach the handle to the gas caddy and lock it in place ...
Страница 12: ...owner s manual 12 FINISHED ...