Ariston PK 640 RL GH AG Скачать руководство пользователя страница 11

GB

11

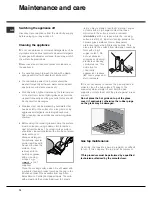
Precautions and tips

!

 This appliance has been designed and manufactured

in compliance with international safety standards. The
following warnings are provided for safety reasons and
must be read carefully.

General safety

This is a class 3 built-in appliance.

Gas appliances require regular air exchange to

maintain efficient operation. When installing the
hob, follow the instructions provided in the
paragraph on “Positioning” the appliance.

These instructions are only valid for the countries

whose symbols appear in the manual and on the
serial number plate.

• The appliance was designed for domestic use inside

the home and is not intended for commercial or
industrial use.

• The appliance must not be installed outdoors, even in

covered areas. It is extremely dangerous to leave the
appliance exposed to rain and storms.

• Do not touch the appliance with bare feet or with wet

or damp hands and feet.

The appliance must be used by adults only for the

preparation of food, in accordance with the
instructions outlined in this booklet. Any other
use of the appliance (e.g. for heating the room)
constitutes improper use and is dangerous. The
manufacturer may not be held liable for any
damage resulting from improper, incorrect and
unreasonable use of the appliance.

• Ensure that the power supply cables of other

electrical appliances do not come into contact with
the hot parts of the oven.

• The openings used for ventilation and dispersion of

heat must never be covered.

• Always make sure the knobs are in the “

”/“

position when the appliance is not in use.

• When unplugging the appliance always pull the plug

from the mains socket, do not pull on the cable.

• Never carry out any cleaning or maintenance work

without having detached the plug from the mains.

• In case of malfunction, under no circumstances

should you attempt to repair the appliance yourself.
Repairs carried out by inexperienced persons may
cause injury or further malfunctioning of the
appliance. Contact a Service Centre (

see

Assistance

).

• Always make sure that pan handles are turned

towards the centre of the hob in order to avoid
accidental burns.

• Do not close the glass cover (if present) when the gas

burners or electric hotplates are still hot.

• Do not leave the electric hotplate switched on without

a pan placed on it.

• Do not use unstable or deformed pans.

Remove any liquid from the lid before

opening it.

• Prevent children and the disabled from coming into

contact or having access at the ceramic glass
cooking surface (if present) immediately before and
after use, as the cooking surface will remain hot for at
least a half hour after being turned off;

• Contact service centers authorized by the

manufacturer in the event the ceramic glass cooking
surface breaks.

• It is recommended that you follow the guidelines

below:

• Disconnect the appliance from the electrical supply in

the event the ceramic glass cooking surface
breakds.

• The appliance should not be operated by people

(including children) with reduced physical, sensory or
mental capacities, by inexperienced individuals or by
anyone who is not familiar with the product. These
individuals should, at the very least, be supervised
by someone who assumes responsibility for their
safety or receive preliminary instructions relating to
the operation of the appliance.

• Do not let children play with the appliance.

The appliance is not intended to be operated by

means of an external timer or separate remote-
control system.

Disposal

• When disposing of packaging material: observe local

legislation so that the packaging may be reused.

• The European Directive 2002/96/EC on Waste

Electrical and Electronic Equipment (WEEE), requires
that old household electrical appliances must not be
disposed of in the normal unsorted municipal waste
stream. Old appliances must be collected separately
in order to optimise the recovery and recycling of the
materials they contain and reduce the impact on
human health and the environment. The crossed out
“wheeled bin” symbol on the product reminds you of
your obligation, that when you dispose of the
appliance it must be separately collected.
Consumers may take their old appliance to public
waste collection areas, other communal collection
areas, or if national legislation allows return it to a
retailer when purchasing a similar new product.
All major household appliance manufacturers are
active in the creation of systems to manage the
collection and disposal of old appliances.

Содержание PK 640 RL GH AG

Страница 1: ...ons Description of the appliance 7 Overall view Start up and use 8 10 Practical advice on using the burners Practical advice on using the the Ceramic Glass Module Precautions and tips 11 General safety Disposal Maintenance and care 12 Switching the appliance off Cleaning the appliance Gas tap maintenance Troubleshooting 13 Operating Instructions Español 14 Português 29 English 1 ES PT GB ...

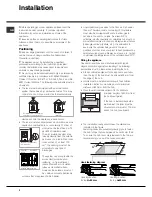
Страница 2: ...to the floor as it is heavier than air Therefore rooms containing LPG cylinders must also be equipped with vents to allow gas to escape in the event of a leak As a result LPG cylinders whether partially or completely full must not be installed or stored in rooms or storage areas that are below ground level cellars etc It is advisable to keep only the cylinder being used in the room positioned so t...

Страница 3: ...ust not come into contact with surfaces with temperatures higher than 50 C The installer must ensure that the correct electrical connection has been made and that it is compliant with safety regulations Before connecting to the power supply make sure that The appliance is earthed and the plug is compliant with the law The socket can withstand the maximum power of the appliance which is indicated o...

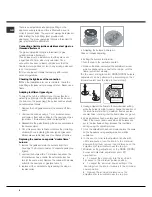
Страница 4: ...their housings The burner consists of 2 separate parts see figure 2 unscrew the burers with a 7 mm wrench spanner The internal burner has a nozzle the external burner has two of the same size Replace the nozzle with models suited to the new type of gas see table 1 3 replace all the components by repeating the steps in reverse order Adjusting the burners primary air Does not require adjusting Setti...

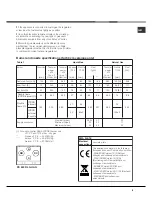
Страница 5: ... 37 25 45 20 17 25 Reduced Fast RR Semi Fast S Auxiliary A 100 75 55 0 70 0 40 0 40 2 60 1 65 1 00 39 28 28 80 64 50 189 120 73 186 118 71 2 60 1 65 1 00 122 H 96 Y 79 6 248 157 95 Double flame DCDR internal 1 30 0 30 0 90 27 44 65 64 0 90 74 86 Double flame 1 DCDR internal DCDR external 2 nozzle 130 1 50 3 60 27 44 262 257 3 60 74 343 55 60x2 100x 2 Burner and nozzle specifications for 60 cm vers...

Страница 6: ...1 65 1 00 1 50 0 90 4 10 39 28 28 39 28 61 80 64 50 60 44 70x2 189 120 73 109 65 298 186 118 71 107 64 293 2 60 1 65 1 00 1 50 0 90 4 10 122 H 96 Y 79 6 88 70 114x2 248 157 95 143 86 390 Double flame DCDR internal 1 30 0 30 0 90 27 44 65 64 0 90 69 86 Double flame 1 DCDR internal DCDR external 2 nozzle 130 1 50 4 60 27 44 334 329 5 00 69 476 55 70 x 2 113 x 2 Burner and nozzle specifications for 7...

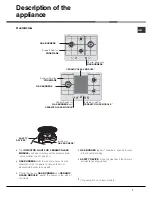
Страница 7: ...k with Control Knobs for GAS BURNERS and CERAMIC GLASS MODULE adjust the power or the size of the flame GAS BURNER ignition enables a specific burner to be lit automatically SAFETY DEVICE stops the gas flow if the flame is accidentally extinguished SAFETY DEVICES Ignition for GAS BURNERS Support Grid for COOKWARE CERAMIC GLASS MODULE Control Knobs for GAS BURNERS and CERAMIC GLASS MODULE Control K...

Страница 8: ...s indicated by the corresponding symbol symbols and on hobs equipped with a display by the LEDs that turn on 5 max power 1 min power The system guarantees accurate flame adjustment and uniform cooking results by facilitating selection of the desired power level The double flame burner This gas burner consists of two concentric flame rings that can operate jointly or independently in case of dual c...

Страница 9: ...iary A Semi Fishburner SP Double Flame DCDR internal Double Flame DCDR external Ø Cookware Diameter cm 24 26 16 20 10 14 16 20 10 14 26 28 Pans to be used on 75 cm hobs Burner Rapid R Semi Rapid S Auxiliary A Double Flame DCDR internal Double Flame DCDR external Ø Cookware Diameter cm 24 26 16 20 10 14 10 14 24 26 Pans to be used on 60 cm hobs On the models supplied with a reducer shelf remember t...

Страница 10: ...erfectly Always use pans with a diameter that is large enough to cover the hotplate fully in order to use all the available heat Make sure that the bottom of the cookware is always dry and clean to guarantee correct adherence and long life not only for the cooking zones but also for the cookware itself Avoid using the same cookware that is used on gas burners the heat concentration on gas burners ...

Страница 11: ...close the glass cover if present when the gas burners or electric hotplates are still hot Do not leave the electric hotplate switched on without a pan placed on it Do not use unstable or deformed pans Remove any liquid from the lid before opening it Prevent children and the disabled from coming into contact or having access at the ceramic glass cooking surface if present immediately before and aft...

Страница 12: ... be used to clean the surface First remove all food buildup or grease with a cleaning scraper e g not supplied Clean the cooking surface when it is still warm with a suitable cleaning product such as the one in the Solutions product line available from any After Sales Service Centre and paper towels Then rub with a damp cloth and dry Aluminum foil plastic Maintenance and care items objects made of...

Страница 13: ...pliance You pressed the knob all the way in You keep the knob pressed in long enough to activate the safety device The gas holes are not blocked in the area corresponding to the safety device The gas holes are not blocked There are no draughts near the appliance The minimum setting has been adjusted properly The bottom of the cookware is perfectly flat The cookware is positioned correctly at the c...

Страница 14: ... Vista de conjunto Puesta en funcionamiento y uso 23 25 Consejos prácticos para el uso de los quemadores Consejos prácticos para el uso de la placa Vitrocerámica Precauciones y consejos 26 Seguridad general Eliminación Mantenimiento y cuidados 27 Cortar la corriente eléctrica Limpiar el aparato Mantenimiento de las llaves de gas Placa de características Anomalías y soluciones 28 Manual de instrucc...

Страница 15: ...anto los ambientes que contienen botellas de GPL deben tener aberturas hacia el exterior para permitir la evacuación desde abajo de eventuales escapes de gas Además las botellas de GPL vacías o parcialmente llenas no deben ser instaladas o depositadas en ambientes o espacios a un nivel más bajo del suelo sótanos etc Es conveniente conservar en el ambiente sólo la botella que se está utilizando col...

Страница 16: ... red Instale en el cable un enchufe normalizado para la carga indicada en la placa de características En el caso de conexión directa a la red es necesario interponer entre el aparato y la red un interruptor omnipolar con una distancia mínima entre los contactos de 3 mm dimensionado para esa carga y que responda a las normas vigentes el conductor de tierra no debe ser interrumpido por el interrupto...

Страница 17: ... los quemadores 2 desenrosque los inyectores utilizando una llave tubular de 7mm y sustitúyalos por los que se adapten al nuevo tipo de gas ver tabla 1 Características de los quemadores e inyectores 3 vuelva a colocar las piezas realizando las operaciones en sentido contrario 4 al finalizar la operación sustituya la anterior etiqueta de calibrado con la correspondiente al nuevo gas que se va a uti...

Страница 18: ...r la operación sustituya la anterior etiqueta de calibrado con la correspondiente al nuevo gas que se va a utilizar disponible en nuestros Centros de Asistencia Técnica Cuando la presión del gas utilizado sea distinta de la prevista o variable es necesario instalar en la tubería de entrada un regulador de presión conforme con las Normas Nacionales en vigencia Conexiones eléctricas PLACA DE CARACTE...

Страница 19: ...ALAR EN LUGARES SIN VENTILACION PERMANENTE ESTE ARTEFACTO DEBE SER INSTALADO DE ACUERDO CON LAS NORMASY REGLAMENTACIONES EN VIGENCIA FOR UN INSTALADOR MATRICULADO CONSULTAR LAS INSTRUCCIONES ANTES DE INSTALAR Y UTILIZAR ESTE ARTEFACTO AV EDUARDO MANDERO 900 PISO 18 BUENOS AIRES TEL 011 4131 1513 Este artefacto esta preparado para trabajar con gas natural 18mb para gas natural Se provee el juego de...

Страница 20: ...ores sólo modelo PK 741 RQO GH AG Doble llama DCDR Interno 2 Doble llama DCDR Externo 2 Pico 2 HORNALLA Presión de trabajo para Gas Natural 180 mm c a Preparado para GN convertible a GPL Presión de trabajo para Gas Licuado 280 mm c a N IN Y GAS LICUADO GAS NATURAL KW KCAL H Inyector 1 100 mm KW KCAL H Inyector 1 100 mm AUXILAR 1 1 00 860 50 860 79 SEMI RÁPIDO 2 1 65 1419 64 1419 106 RÁPIDO 1 2 60 ...

Страница 21: ... 312 1 Sólo para DCDR monomando IMPORTANTE NO INSTALAR EN LUGARES SIN VENTILACION PERMANENTE ESTE ARTEFACTO DEBE SER INSTALADO DE ACUERDO CON LAS NORMASY REGLAMENTACIONES EN VIGENCIA FOR UN INSTALADOR MATRICULADO CONSULTAR LAS INSTRUCCIONES ANTES DE INSTALAR Y UTILIZAR ESTE ARTEFACTO AV EDUARDO MANDERO 900 PISO 18 BUENOS AIRES TEL 011 4131 1513 Este artefacto esta preparado para trabajar con gas n...

Страница 22: ...ITROCERÁMICA para la regulación de la llama o de la potencia Bujía de encendido de los QUEMADORES A GAS permite el encendido automático del quemador DISPOSITIVO DE SEGURIDAD si se apaga accidentalmente la llama interrumpe la salida de gas DISPOSITIVO DE SEGURIDAD Bujía de encendido de los QUEMADORES A GAS Parrillas de apoyo de RECIPIENTES DE COCCIÓN PLACA VITROCERÁMICA Mandos de selección de los Q...

Страница 23: ...o correspondiente Para pasar de un nivel a otro basta girar el mando hacia el nivel elegido Un disparo clic advierte el paso de un nivel a otro La visualización del nivel seleccionado se produce a través del símbolo correspondiente símbolos y en las encimeras que poseen pantalla a través del encendido de los LED 5 máx potencia 1 mín potencia El sistema garantiza una perfecta regulación de la llama...

Страница 24: ... los recipientes utilice siempre recipientes con el fondo plano y con tapa cuando se produce la ebullición gire el mando hasta la posición de mínimo Quemador Rápido Reducido RR Semi Rápido S Auxiliar A Semi Pescadera SP Doble llama DCDR Interno Doble llama DCDR Externo Ø Diámetro Recipientes cm 24 26 16 20 10 14 16 20 10 14 26 28 Ollas que deben utilizarse en placas de 75 cm Quemador Rápido R Semi...

Страница 25: ...e pueden usar todo tipo de ollas Lo importante es que tengan fondo perfectamente plano las cacerolas de fondo espeso son las mejores porque aseguran mejor distribución del calor Usar ollas con diámetro suficiente para ocupar toda la zona recalentada para garantizar el uso de todo el calor disponible Comprobar que la base de las ollas esté siempre limpia y bien seca se consigue mejor contacto y lar...

Страница 26: ...ca eléctrica todavía están calientes No deje encendida la placa eléctrica sin ollas No utilice ollas inestables o deformadas Elimine el líquido que se podría encontrar sobre la tapa antes de abrirla Tratándose de fuentes de peligro evitar que los niños se pongan en contacto con la vitrocerámica cuando existe mientras funciona e inmediatamente después debido a que la misma permanece recalentada has...

Страница 27: ...eparación adecuada como el de la línea Solutions disponible en todos los Centros de Asistencia Técnica y papel de cocina pasar un trapo húmedo y secar bien Las hojas de aluminio objetos de material plástico o sintético que se hayan disuelto accidentalmente o el azúcar o Mantenimiento y cuidados substancias almibaradas se limpiarán inmediatamente con un raspador mientras la zona no se ha enfriado L...

Страница 28: ...del mínimo es correcta El fondo del recipiente es perfectamente plano El recipiente está centrado en el quemador o en la placa eléctrica Las parrillas fueron invertidas Si aún cuando se han realizado todos los controles la encimera no funciona y el inconveniente detectado persiste llame al Centro de Asistencia Técnica Comunique el modelo de la máquina Mod el número de serie S N Esta información se...

Страница 29: ... do aparelho 35 Vista de conjunto Início e utilização 36 38 Conselhos práticos para utilização dos queimadores Conselhos práticos para a utilização da chapa vidro cerâmica Precauções e conselhos 39 Segurança geral Eliminação Manutenção e cuidados 40 Desligar a corrente eléctrica Limpeza do aparelho Manutenção das torneiras do gás Anomalias e soluções 41 Instruções para utilização Português 29 Engl...

Страница 30: ...e o ar estagnam se embaixo Portanto as salas que contiverem cilindros de GLP devem possuir aberturas para fora de maneira que possibilitem o escoamento para baixo dos eventuais escapes de gás Portanto os cilindros de GLP mesmo vazios ou parcialmente cheios não devem ser instalados nem guardados em lugares ou vãos a nível mais baixo do que o solo caves etc É oportuno deixar na cozinha apenas o cili...

Страница 31: ... conformidade com as normas para a carga indicada na placa de identificação No caso de uma ligação directa à rede será necessário interpor entre o aparelho e a rede um interruptor omnipolar com abertura mínima entre os contactos de 3 mm na dimensão certa para a carga e em conformidade com as normas em vigor a ligação à terra não deve ser interrompida pelo interruptor O cabo de alimentação deve ser...

Страница 32: ...s bicos dos queimadores mediante as seguintes operações 1 tire as grades do plano e solte os queimadores do lugar 2 desparafusar os bicos utilizando uma chave a tubo de 7mm e substituí los com aqueles apropriados para o novo tipo de gás ver tabela 1 Características dos queimadores e dos bicos 3 Monte outra vez as partes realizando estas operações na ordem contrária 4 no final da operação troque a ...

Страница 33: ...to Gás natural Queimador Diâmetro Poténcia Potenza By pass Bico Capacid Poténcia Bico Capacid térmica termica 1 100 1 100 g h térmica 1 100 l h kW kW kW p c s p c s p c s mm Reduz Nomin mm mm Nomin mm Pressões de alimentação Nominal mbar Minima mbar Màxima mbar 28 30 20 35 37 25 45 20 17 25 Ràpido Reduz RR Semi Ràpido S Auxiliar A 100 75 55 0 70 0 40 0 40 2 60 1 65 1 00 39 28 28 80 64 50 189 120 7...

Страница 34: ...a Duplas DCDR Externo 2 bico 2 100 75 55 30 130 0 70 0 40 0 40 0 70 0 40 1 50 2 60 1 65 1 00 1 50 0 90 4 10 39 28 28 39 28 61 80 64 50 60 44 70x2 189 120 73 109 65 298 186 118 71 107 64 293 2 60 1 65 1 00 1 50 0 90 4 10 122 H 96 Y 79 6 88 74 110x2 248 157 95 143 86 390 Chamas Duplas 1 DCDR Interno 130 1 50 4 60 30 0 30 0 90 27 44 27 44 334 329 5 00 65 64 0 90 69 69 476 86 DCDR Externo 2 bico 57 70...

Страница 35: ...ara a regulação da chama ou da potência Vela para acender os QUEIMADORES A GÁS permite o acendimento automático do queimador escolhido DISPOSITIVO DE SEGURANÇA no caso em que a chama se apague acidentalmente interrompe a saída do gás DISPOSITIVO DE SEGURANÇA Vela para acender os QUEIMADORES A GÁS Grelhas de apoio para RECIPIENTES PARA COZEDURA VIDRO CERÂMICA Manípulos de comando dos QUEIMADORES DE...

Страница 36: ... nível para outro basta rodar o botão até ao nível seleccionado A passagem de um nível para outro é assinalada por um clique A visualização do nível Início e utilização Há somente em alguns modelos seleccionado ocorre através do símbolo correspondente símbolos e nos planos equipados com display através da ligação dos LED 5 potência máxima 1 potência mínima O sistema garante uma perfeita regulação ...

Страница 37: ...tes adequados para cada um dos queimadores veja a tabela com o objectivo de evitar que as chamas ultrapassem o fundo dos recipientes utilize sempre recipientes de fundo chato e com tampa no momento em que começar a ferver rode o botão para a posição de mínimo Queimador Rápido Reduzido RR Semi Rápido S Auxiliar A Semi Peixeira SP Chamas Duplas DCDR Interno Chamas Duplas DCDR Externo Ø Diâmetro Reci...

Страница 38: ...eguinte Na chapa de vidro cerâmica podem ser utilizados todos os tipos de panelas É importante que o fundo seja perfeitamente chato panelas com fundo mais grosso proporcionam uma melhor distribuição do calor Utilizar panelas de diâmetro suficiente para coprir totalmente a zona de cozedura de maneira que assegure a utilização de todo o calor disponível Certificar se que o fundo da panela esteja sem...

Страница 39: ...Assistência Técnica veja a Assistência técnica Certifique se que as pegas das panelas fiquem sempre viradas para o lado interno do plano de cozedura para evitar batidas acidentais Não feche a tampa de vidro se presente com os queimadores ou a chapa eléctrica ainda estiverem quentes Não deixe acesa a chapa eléctrica sem panelas Não utilize panelas instáveis ou deformadas Não é previsto que este apa...

Страница 40: ...edura quando estiver morna utilizar um produto de limpeza adequado como o da linha Solutions disponível em todos os Centros de Assistência Técnica e toalha de papel Manutenção e cuidados esfregar com um pano húmido e enxugar Folhas de papel alumínio objectos de matéria plástica ou materiais sintéticos que tenham derretido e também açúcar ou alimentos com alto conteúdo de açúcar devem ser removidos...

Страница 41: ...idades do plano O botão não foi premido até o fundo Não foi mantido premido até o fundo o botão durante um tempo suficiente para activar o dispositivo de segurança Estão entupidos os furos de saída do gás em correspondência ao dispositivo de segurança Estão entupidos os furos de saída do gás Há correntes de ar nas proximidades do plano A regulação do mínimo não está correcta O fundo do recipiente ...

Страница 42: ...PT 42 02 2012 195097699 00 XEROX FABRIANO ...

Отзывы: