Ariston AQUALTIS AQ9L 29 U Скачать руководство пользователя страница 2

AUS

2

!

 This instruction manual should be kept in a safe place 

for future reference. If the washing machine is sold, given 
away or moved, please ensure the manual is kept with 
the machine, so that the new owner may benefit from the 
advice contained within it.

!

 Read these instructions carefully: they contain vital 

information relating to the safe installation and operation of 
the appliance.

!

 Inside the pack containing this manual, you will also find 

the guarantee and all the details necessary for installation.

Unpacking and levelling

Unpacking

1. Once you have removed all the packaging from the 
washing machine, make sure it has not been damaged 
during transportation. 
If it has been damaged, contact the retailer and do not 
proceed any further with the installation process.

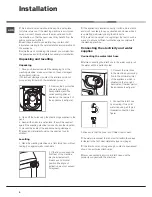
2. Remove the 4 protective 
screws (used during 
transportation) and the 
corresponding spacer, 
located on the rear part of 
the appliance (

see figure

). 

3. Close off the holes using the plastic plugs supplied in the 
pack.
4. Keep all the parts in a safe place; they will be needed 
again if the washing machine is moved to another location, 
to prevent the inside of the appliance being damaged.

!

 Packaging materials should not be used as toys for 

children.

Levelling

1. Place the washing machine on a flat sturdy floor, without 
resting it up against walls or cabinets.

2. If the floor is uneven, the 
front feet of the machine 
may be adjusted until 
it reaches a horizontal 
position (the angle of 
inclination must not exceed 
2 degrees). 

!

 If the appliance is levelled correctly, it will be more stable 

and much less likely to cause vibrations and noise while it 
is operating, particularly during the spin cycle.

!

 If it is placed on carpet or a rug, adjust the feet in such a 

way as to allow a sufficient ventilation space underneath 
the washing machine. 

Connecting the electricity and water 

supplies

Connecting the water inlet hose

!


Before connecting the inlet hose to the water supply, run 

the water until it is perfectly clear.

1. Connect the inlet hose 
to the machine by screwing 
it onto the cold water inlet 
of the appliance, which is 
situated on the top right-
hand side of the rear part of 
the appliance

 (see figure)

.

2. Connect the inlet hose 
by screwing it to a cold 
water tab using a 3/4 gas 
threaded connection 

(see 

figure)

.

3. Make sure that the hose is not folded over or bent.

!

 The water pressure at the tap must fall within the values 

indicated in the Technical data table 

(see next page).

!

 If the inlet hose is not long enough, contact a specialised 

shop or an authorised technician.

!

 Never use second-hand or old inlet hoses; use the 

products supplied with the machine.

Installation

Содержание AQUALTIS AQ9L 29 U

Страница 1: ...tergent Preparing the laundry Washing recommendations Load balancing system Precautions and advice 9 General safety Disposal Opening the porthole door manually Care and maintenance 10 Cutting off the...

Страница 2: ...Levelling 1 Place the washing machine on a flat sturdy floor without resting it up against walls or cabinets 2 If the floor is uneven the front feet of the machine may be adjusted until it reaches a...

Страница 3: ...er weather conditions Once the machine has been installed the electricity socket should be easily accessible Avoid using any extension cord or multiple socket outlet CAUTION if this appliance is suppl...

Страница 4: ...oved 2 main wash compartment use powder or liquid detergent If using the latter type of detergent we recommend it is poured into the drawer immediately before you start the washing machine 3 extra com...

Страница 5: ...time will be identified by the indicator lights above see Running a wash cycle OPTION buttons with indicator lights press to select the available options The indicator light corresponding to the selec...

Страница 6: ...to customise the wash cycle in accordance with your own requirements Press the button to activate the option the corresponding indicator light will switch on Press the button again to disable the opt...

Страница 7: ...optimal residual detergent removal is guaranteed It is particularly useful for skin which is sensitive to detergents We recommend this option is used with a full load of washing or when a large amoun...

Страница 8: ...using a greater quantity of water and optimising the effect of special disinfecting additives added to the detergent At the end of the wash cycle the machine will slowly rotate the drum to end the cy...

Страница 9: ...o ensure that they do not play with the appliance Do not touch the machine when barefoot or with wet or damp hands or feet Do not pull on the power supply cable when unplugging the appliance from the...

Страница 10: ...ctricity supplies Turn off the water tap after every wash cycle This will limit wear on the hydraulic system in the machine and help to prevent leaks Unplug the appliance when cleaning it and during a...

Страница 11: ...n the water so that the laundry may be removed press the START PAUSE button or the Easy iron button The drain hose is not fitted at a height between 65 and 100 cm from the floor see Installation The f...

Страница 12: ...nformation can be found on the data plate located on the appliance itself Assistance AUSTRALIA ARISIT PTY LIMITED 40 44 Mark Anthony Drive Dandenong South VIC 3175 Australia Fax Service Sales 03 9768...

Отзывы: