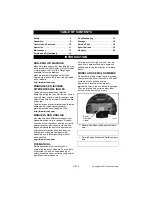
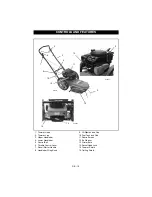
Ariens 946150 Скачать руководство пользователя страница 3

GB - 5

PRODUCT REGISTRATION

The Ariens dealer must register the product at 
the time of purchase. Registering the product 
will help the company process warranty claims 
or contact you with the latest service 
information. All claims meeting requirements 
during the limited warranty period will be 
honored, whether or not the product 
registration card is returned. Keep a proof of 
purchase if you do not register your unit. 
Customer Note: If the Dealer does not 
register your product, please fill out, sign and 
return the product registration card to Ariens 
or go to www.ariens.com on the internet.

UNAUTHORIZED REPLACEMENT 
PARTS

Use only Ariens replacement parts. Replacing 
any part on this vehicle with anything other 
than an Ariens authorized replacement part 
may adversely affect the performance, 
durability, or safety of this unit and may void 
the warranty. Ariens disclaims liability for any 
claims or damages, whether warranty, 
property damage, personal injury or death 
arising out of the use of unauthorized 
replacement parts. To locate your nearest 
Ariens Dealer, go to www.ariens.com on the 
internet.

DELIVERY

Customer Note: If you have purchased this 
product without complete assembly and 
instruction by your retailer, it is your 
responsibility to:

• Read and understand all assembly 

instructions in this manual. If you do not 
understand or have difficulty following the 
instructions, contact your nearest Ariens 
Dealer for assistance. To locate your 
nearest Ariens Dealer, go to 
www.ariens.com on the internet.

• Do not operate the unit unless all controls 

function as described in this manual.

Before attempting to operate your 
unit:

1. Make sure all assembly has been 

properly completed.

2. Understand all Safety Precautions 

provided in the manuals.

3. Review control functions and operation of 

the unit.

4. Review recommended lubrications, 

maintenance and adjustments.

5. Review Limited Warranty Policy.
6. Fill out Original Purchaser Registration 

Card and return the card to Ariens 
Company or go to www.ariens.com.

DISCLAIMER 

Ariens reserves the right to discontinue, 
change, and improve its products at any time 
without notice or obligation to the purchaser. 
The descriptions and specifications contained 
in this manual were in effect at printing. 
Equipment described within this manual may 
be optional. Some illustrations may not be 
applicable to your unit.

SAFETY ALERTS

Look for these symbols to point 
out important safety precautions. 
They mean:

Attention!

Personal Safety Is Involved!

Become Alert! 

Obey The Message!

The safety alert symbols above and signal 
words below are used on decals and in this 
manual.

Read and understand all safety messages.

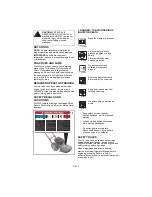
WARNING: Improper assembly or 
adjustments can cause serious 
injury. 

SAFETY

DANGER: 

IMMINENTLY 

HAZARDOUS SITUATION! If 
not avoided, WILL RESULT in 
death or serious injury. 

WARNING: POTENTIALLY 
HAZARDOUS SITUATION! If not 
avoided, COULD RESULT in death 
or serious injury. 

Содержание 946150

Страница 1: ...Owner Operator Manual Model 946150 ST622 CARB String Trimmer 01284000 11 07 Printed in USA ENGLISH...

Страница 2: ...tre revendeur Rendez vous chez votre revendeur ou allez sur le site www ariens com pour consulter la liste des langues disponibles pour votre quipement Les manuels imprim s dans des langues diff rente...

Страница 3: ...lty following the instructions contact your nearest Ariens Dealer for assistance To locate your nearest Ariens Dealer go to www ariens com on the internet Do not operate the unit unless all controls f...

Страница 4: ...is to be used by someone other than original purchaser loaned rented or sold ALWAYS provide this manual and any needed safety training before operation Read understand and follow all safety practices...

Страница 5: ...ndals or canvas shoes NEVER wear loose clothes long hair or jewelry that may get caught in rotating parts Protect eyes face and head from objects that may be thrown from unit ALWAYS stand clear of dis...

Страница 6: ...ner rather than from a gasoline dispenser nozzle Keep the nozzle in contact with the rim of the fuel tank or container opening at all times until fueling is complete Do not use a nozzle lock open devi...

Страница 7: ...se Oil Fill engine crankcase with proper amount and viscosity of oil Refer to Engine Manual for specific information CHECKLIST Please complete the following checklist before proceeding All assembly in...

Страница 8: ...tle Control Lever 7 Recoil Starter Handle 8 Handlebar Wing Knob 9 Oil Dipstick and Cap 10 Fuel Tank and Cap 11 Debris Screen 12 Air Cleaner 13 Primer Bulb 14 Swivel Head Lock 15 Trimmer Shield 16 Trai...

Страница 9: ...left side of the trimmer Point the front of the unit to the right if trimming with the right side of the trimmer To adjust see Service and Adjustments FILLING FUEL TANK To add fuel to Fuel Tank 1 Put...

Страница 10: ...ER 1 Start the engine 2 Set throttle control to Fast 3 Hold the control bail against the handlebar to engage the trimmer head 4 When trimmer head is rotating at full speed move unit forward to trim TO...

Страница 11: ...when the bail handle is released Adjust bail travel if necessary See Adjustments CHECK ENGINE OIL See Engine Manual for specific information on checking engine oil CLEAN DEBRIS SCREEN Remove all grass...

Страница 12: ...way from the spark plug 2 Remove the worn trimmer line from the cutter disk 3 Thread the two ends of the trimmer line up from the bottom through the two holes in the cutter disk 4 Cross the line and t...

Страница 13: ...k washer and capscrew Tighten securely NOTE The minimum cutting height may be lowered to 1 3 16 3 cm by using one spacer below the cutter disk and installing the cutter disk upside down on the hex sha...

Страница 14: ...ward toward the control bail 3 Tighten the upper cable nut onto the mounting bracket to lock the conduit in place 4 Turn nuts against mount to lock in position DRIVE BELT REPLACEMENT 1 Control Cable 2...

Страница 15: ...sher Tighten securely 3 Slide the belt between the idler and belt finger on the idler bracket 4 Install the four tapping screws in the holes in the frame from the top side of the frame 5 Install the f...

Страница 16: ...s before attempting to start 6 Replace or regap spark plug 7 Drain fuel tank and refill with fresh gasoline 8 Clean debris screen and cooling fins 9 Clean carburetor or fuel line See Engine Manual 10...

Страница 17: ...e genuine Ariens parts to keep your String Trimmer running like new Part no Qty Description 07236900 1 Drive Belt 04641800 1 Trimmer Line Pkg of 6 04641100 1 Height Guide 04645000 1 Long Life Height G...

Страница 18: ...nd parts except as noted below The duration of this warranty shall be ninety 90 days after the date of purchase or 1000 hours of use whichever comes first if any product is rented or leased 3 Year Lim...

Страница 19: ...rranty Except as specifically warranted normal maintenance services and normal replacement items such as spark plugs oil oil filters air filters mufflers belts tires shoes runners scraper blades shear...

Страница 20: ...Ariens Company 655 W Ryan St Brillion WI 54110 1072 920 756 2141 www ariens com ALW2 62905...

Страница 21: ...Street Brillion WI 54110 1072 920 756 2141 Fax 920 756 2407 www ariens com The engine exhaust from this product contains chemicals known to the State of California to cause cancer birth defects or oth...

Отзывы: