


GB - 16
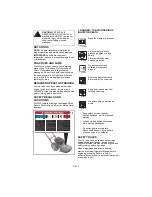
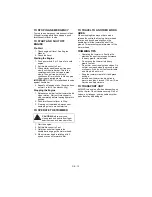
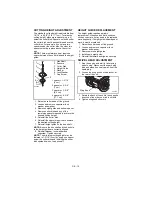
CONTROL BAIL TRAVEL
ADJUSTMENT
Control Bail must disengage trimmer head as
control is released. There should be a slight
amount of slack in the control cable wire when
bail is fully released. If the trimmer head does
not disengage completely when the control
bail is released, increase the amount of slack
in the control cable wire as follows:
1. Loosen the bottom cable nut.
2. Push the cable conduit upward toward the
control bail.
3. Tighten the upper cable nut onto the
mounting bracket to lock the conduit in
place.
4. Turn nuts against mount to lock in
position.
DRIVE BELT REPLACEMENT
1. Control Cable
2. Control Cable
Wire
3. Control Bail
4. Handlebar
5. Cable Nuts
6. Cable Conduit
2
4
5
1
OX0120
3
6
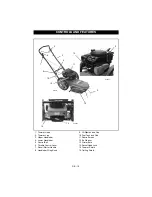
1. Six hex washer
head screws
2. Trimmer shield
3. Four hex
washer head
screws
4. Trimmer frame
5. Jackshaft
assembly
6. Jackshaft
spacers
7. Jackshaft
pulley belt
fingers
8. V-belt
9. Jackshaft
pulley
10.Engine sheave
11. Capscrew
12.Lock washer
13.Engine sheave
belt fingers
OX0020
1
2
3
7
8
9
4
5
6
10
11
12
13
1
1


