background image


3 CONGLOMKB .COM

Please contact 

[email protected]

 or 

1-877-333-0098

 for further assistance .

ENGLISH

Safety Information (continued)

COOKING SAFETY INFORMATION

1 .  Never leave the range hood unattended when in use . 

2 . 

Never cook over open flames under the range hood.

3 .  Always turn the range hood on when cooking at high heat  

or when cooking flaming foods.

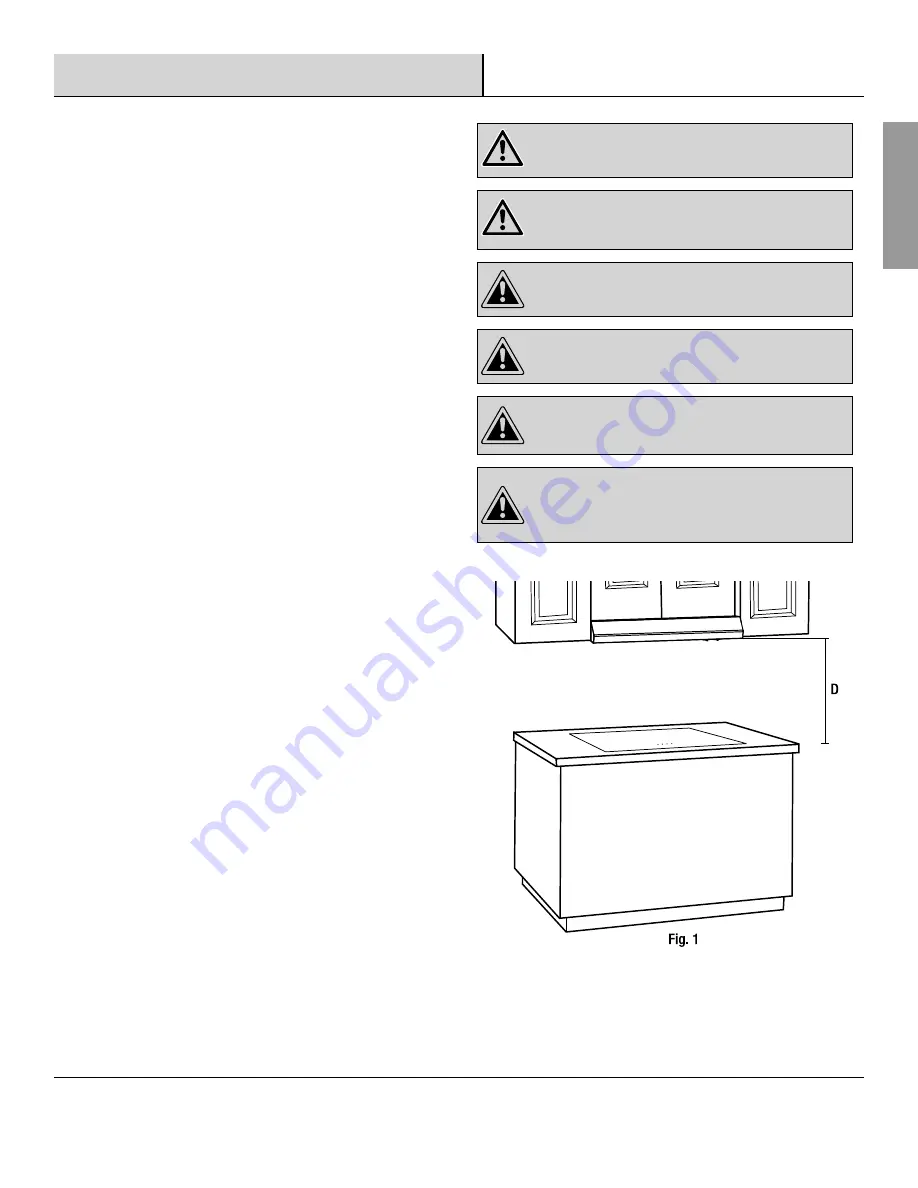
4 .  If you choose to hang the range hood as below (Fig . 1) distance 

(D) from the cooktop surface, use extra caution as the surface 
of range hood may be extremely hot to the touch . For this unit, 
(D in Fig . 1) is 

458 mm - 710


mm (18 in - 28 in). If you choose 

an 18 inch installation, the temperature of the unit surface will 
be high if the unit is operated under high power cooking for a 
certain amount of time .

5 . 

Use caution when cooking with oil or with deep-fryers. 
Overheating may cause oil to reach its flash point and ignite. 

Used oil will ignite at lower temperatures more readily than 
fresh oil . Heat oils slowly on low to medium setting .

6 .  Avoid boil overs, as they may cause smoking and greasy 

spillovers that could ignite .

7 . 

To prevent burns or fires, always use cookware appropriate to 

the size of the heating element that you are using .

8 . 

In event of a cooking fire, observe the following:


-

Be careful to avoid burns . 


- Smother flames with a close-fitting lid, cookie sheet, or 

metal tray, then turn off the burner. If the flames do not go 
out immediately, evacuate and call the fire department.


- Never pick up a flaming pan.


-

Do not use water, including wet dishcloths or towels, as you 
could cause a steam explosion .


-

Use an extinguisher only if: (a) you have a class ABC 

extinguisher and you know how to operate it, (b) the fire is 
small and contained in the area where it started, (c) the fire 
department is being called, and (d) you can fight the fire with 

your back to the exit .

CLEANING SAFETY INFORMATION

1 . 

The fan and filters must be cleaned periodically and kept free 
from accumulation of cooking residue. Old and worn filters must 

be replaced immediately .

2 .  Never disassemble parts to clean . Parts should be disassembled 

by qualified persons only.

3 . 

Charcoal filter, if used, must be replaced periodically as needed.

WARNING:


To reduce the risk of fire, use only metal duct 

work . Never use plastic duct work .

WARNING:


To reduce the risk of fire or electric shock, do 

not use this range hood with with any external solid state 
speed control device .

CAUTION: 

For general ventilation use only . Do not use the 

range hood fans to exhaust hazardous or explosive vapours .

CAUTION:


Never dispose of cigarette ashes, ignitable 

substances, or any foreign objects in fans .

CAUTION:


At least two people are needed to move and 

safely install the unit . Failure to properly lift the range hood 
could result in product damage or personal injury .


CAUTION:


To reduce risk of fire and to properly exhaust 

air, be sure to duct air outside-do not vent exhaust air into 

spaces within walls or ceilings or into attics, crawl spaces, 
or garage .

Содержание QR242B

Страница 1: ... QR242B QR242S QR242W UNDER CABINET RANGE HOOD HOTTE DE CUISINIÈRE POUR DESSOUS D ARMOIRE CAMPANA EXTRACTORA PARA INSTALACIÓN BAJO GABINETE OWNER S MANUAL MANUEL DE L UTILISATEUR MANUAL DEL USARIO ...

Страница 2: ...ineers ASHRAE and the local code authorities 5 When cutting or drilling into a wall or ceiling do not damage electrical wiring and other hidden utilities 6 Ducted fans must always be vented to the outdoors WARNING FUEL GAS BURNING RANGES MUST BE VENTED OUTDOORS USING AT MINIMUM METAL DUCTWORK AND RANGE HOODS OF SUFFICIENT CAPACITY Follow your fuel burning equipment manufacturer s guidelines as wel...

Страница 3: ...o not go out immediately evacuate and call the fire department Never pick up a flaming pan Do not use water including wet dishcloths or towels as you could cause a steam explosion Use an extinguisher only if a you have a class ABC extinguisher and you know how to operate it b the fire is small and contained in the area where it started c the fire department is being called and d you can fight the ...

Страница 4: ...s incurred for labour or materials removal and installation of replacement units or any other incidental or consequential damages Costs relating to obtaining access for repair or replacement are the responsibility of the user Our obligation shall be limited to the repair or replacement of a unit at our discretion that may prove by our sole examination to be defective under normal use and service d...

Страница 5: ...for further assistance ENGLISH Pre Installation TOOLS MATERIALS REQUIRED NOT SUPPLIED Measuring tape Level Utility knife Pencil Duct Tape Adjustable wrench Phillips screwdriver Flathead screwdriver Needle nose pliers Hammer Electric drill Safety goggles Safety gloves ...

Страница 6: ...rvice team at cs conglomkb com or 1 877 333 0098 Service available in English and French Monday Friday from 8 30 am 5 00 pm EST Please do not dispose of packaging before you are satisfied with your new product Part Description Quantity A Range hood 1 B Aluminum charcoal filter 1 C Retangular damper located inside the hood 1 HARDWARE INCLUDED NOTE Parts not shown in actual size AA BB CC Part Descri...

Страница 7: ...ut consult a qualified installer to verify that the supplied screws are suitable for your cabinets Put a thick protective covering over your counter cooktop or range to protect it from damage and dirt during installation Remove any hazardous objects around the area WARNING Always wear safety goggles and gloves during installation Fig 2 VENTING OPTIONS Determine if your existing venting system is t...

Страница 8: ... 18 in of straight vent between each elbow Install first elbow as far away from the range hood s exhaust opening as possible Cap the exterior of the duct with a wall cap 15 or roof cap 16 Never use 102 mm 4 in laundry type wall caps Use caulking to seal exterior wall or roof opening around the cap The venting system must have a damper If the roof or wall cap has a damper do not use the damper supp...

Страница 9: ... be sanded until smooth A hole through metal must have a grommet 8 When cutting or drilling into the wall or ceilling do not damage electrical wiring and other hidden utilities 9 Wire size must conform to all local codes and ordinances The latest edition requirements of the National Electrical Code ANSI NFPA 70 or the latest edition CSA Standards C22 1 94 Canadian Electrical Code Part 1 and C22 2 ...

Страница 10: ... Carefully remove the cover 3 or 5 of the appropriate venting hole using a flat head screwdriver or needle nose pliers refer Fig 11 Be careful not to leave any debris inside the range hood A FOR INTERIOR VENTING If you are venting indoors unscrew the 2 screws holding cover 6 in place and remove the cover as per Fig 12 DO NOT REMOVE ANY OTHER VENTING HOLE COVER 5 BB BB INSTALLING THE DAMPER SKIP TH...

Страница 11: ...rews all the way leave the screw heads about 7 mm 0 28 in from the cabinet surface Lift the range hood A into position feeding the power cable and the electrical wires through the power access opening Allow some slack in the cable and wires so that the appliance can be moved if servicing is ever necessary Position the range hood A so the large end 2 of the keyhole mounting slots 1 are over the scr...

Страница 12: ...NTING NOTE The charcoal filter should only be installed if you are not using an external venting system Turn the filter clip to either side and remove the aluminum filter Place the charcoal filter B in place ensuring that it covers the fan guard area Reinstall the aluminum filter and lock it securely in place with the filter clip ...

Страница 13: ...E FAN ON OFF To turn on the fan press the appropriate speed control switch Low Speed 3 High Speed 1 to select the desired level of power Once a button is pressed the previous speed mode will be cancelled Press the power switch 2 to turn off the fan TURNING THE LIGHTS ON OFF Press the light switch 4 to turn on the lights Press the light switch 5 to turn off the lights 4 1 2 3 5 ...

Страница 14: ...at the lights are cool Turn the bulb counter clockwise and pull it out to remove it Push in the new bulb and turn it clockwise Do not release the bulb until you are sure the bulb has been securely installed Then reconnect the power If new bulbs do not operate ensure that they are inserted correctly DANGER Turn off the power circuit breaker or the power switch on the junction box before performing ...

Страница 15: ... compounds salt solutions disinfectants or bleaches to remain in contact with the product for extended periods of time Do not allow any deposits to remain for long periods of time on the range hood Rinse with water immediately and wipe dry with a clean cloth Do not let plaster dust or any other construction residue enter the hood During construction or renovation cover the hood Combustible product...

Страница 16: ...rotection system detects if the motor is too hot to operate and shuts the motor down In this case the motor will function properly after the thermal protection system cools down after approximately 10 min Check that the fan isn t jammed or scraping the bottom If nothing else works the motor may be defective or seized If so replace the motor The range hood is not venting properly Check that no bird...

Страница 17: ...ulb Wattage Venting Options QR242B QR242S QR242W 758 mm 29 8 in W 120 V 60 Hz 1 3 A Rocker Switches 185 10 High 1 x 40 W Incandescent E26 base light bulb Top venting Back venting Recirculating Inside venting 468 mm 18 4 in D Low 100 mm 4 in H WIRING DIAGRAM BLACK RED II I I O O BLUE BLACK BLACK BLACK L N 120 60Hz 6uF 250V GRAY YELLOW YELLOW GREEN WHITE WHITE L 1 40W E26 WHITE ...

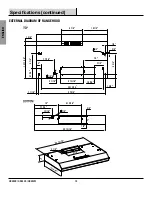
Страница 18: ...ontinued EXTERNAL DIAGRAM OF RANGE HOOD 10 3 1 8 1 2 1 4 3 8 8 3 4 6 1 4 4 1 16 13 11 16 1 5 8 1 9 16 27 3 4 25 13 16 9 13 16 2 1 16 1 1 16 7 8 7 7 16 1 5 8 8 7 8 10 9 13 16 29 13 16 1 2 3 3 8 7 8 7 7 16 13 16 10 1 2 2 29 13 16 9 7 8 3 1 8 18 7 16 4 ...

Страница 19: ... the required part s and have the part number s ready Part Description Code Quantity A Rectangular Damper QHR186 1 B Rocker Switches Left Right QHR212 1 C Capacitor QHR213 1 D Motor QHR224 1 E Filter Clip QHR168 1 F Blower QHR191 1 G Light Cover QHR192 1 H Blade QHR215 1 J Bulb Holder QHR203 1 K Bulb QHR174 1 L Reflector QHR194 1 M Internal vent cover QHR195 1 N Charcoal Filter QHR216 1 P Aluminum...

Страница 20: ... fils électriques ou les conduites qui y sont dissimulées 6 Les ventilateurs à conduit doivent toujours être ventilés à l extérieur AVERTISSEMENT L ÉVACUATION DES GAZ D UN APPAREIL DE CUISSON ALIMENTÉ PAR UN COMBUSTIBLE GAZ DOIT ÊTRE FAITE VERS L EXTÉRIEUR EN UTILISANT AU MOINS UN CONDUIT MÉTALLIQUE ET UNE HOTTE D UNE CAPACITÉ SUFFISANTE Respectez les directives du fabricant de votre appareil de c...

Страница 21: ...lez le service des incendies Ne jamais prendre une casserole en flammes avec vos mains Ne jamais utiliser d eau pour éteindre un feu non plus qu un linge ou une serviette humide qui risque de provoquer une explosion de vapeur Utilisez un extincteur seulement si a vous savez que votre extincteur est de catégorie ABC et que vous savez l utiliser b l incendie est mineur et limité à la zone où il a dé...

Страница 22: ...un incident ou accessoire Les coûts encourus pour obtenir l accès pour la réparation ou le remplacement sont la responsabilité de l utilisateur Nos obligations se limitent à la réparation ou au remplacement de l unité selon notre choix qui peut s avérer selon notre examen unique être défectueuse sous l utilisation et le service normaux pendant la période de garantie Nous pouvons émettre un crédit ...

Страница 23: ...oute assistance supplémentaire FRANÇAIS Préinstallation OUTILS REQUIS NON INCLUS Ruban à mesurer Niveau Couteau tout usage Crayon Ruban adhésif Clé à molette Tournevis Phillips Tournevis plat Pinces à bec effilé Marteau Tournevis électrique Lunettes de sécurité Gants de sécurité ...

Страница 24: ...allation Dans le cas de dommages ou de pièces manquantes communiquer avec le service à la clientèle au cs conglomkb com ou 1 877 333 0098 service en anglais et français du lundi au vendredi 8 h 30 et 17 h HNE Ne pas vous débarrasser de l emballage avant d être satisfait de ce produit QUINCAILLERIE INCLUSE REMARQUE La quincaillerie montrée n est pas de taille réelle AA BB CC ...

Страница 25: ...pour vérifier que les vis fournies sont appropriées pour vos armoires Placer une protection épaisse sur le comptoir et la surface de cuisson pour éviter de les endommager ou de les salir Retirer tous objets qui risque de gêner lors de l installation AVERTISSEMENT Toujours porter des lunettes et des gants de sécurité pendant l installation Fig 2 OPTIONS DE VENTILATION Déterminer si votre système de...

Страница 26: ...ssible de l ouverture de sortie d air de la hotte de cuisinière Placer un capuchon à l extémité extérieure du conduit à l aide d un capuchon mural 15 ou d un capuchon de toit 16 Ne pas utiliser de capuchons de 4 po 102 mm pour le sèche linge Utiliser un produit calfeutrant pour sceller les ouvertures extérieures autour du capuchon sur le toit ou le mur Le système de ventilation devrait être muni d...

Страница 27: ... à ce que la surface soit lisse tandis que vous devez installer un passe câble dans l ouverture pratiquée dans le métal 8 Lorsque vous faites une ouverture dans un mur ou un plafond veillez à ne pas endommager les fils électriques ou les conduites qui y sont dissimulées 9 Le gabarit du câble doit respecter les exigences fixées par le National Electrical Code ANSI NFPA 70 ou les normes CSA C22 1 94...

Страница 28: ... doucement le couvercle 3 ou 5 du trou de ventilation approprié en utilisant un tournevis à tête plate ou d une pince à bec effilé voir Fig 11 Faire très attention de ne pas laisser de morceaux à l intérieur de la hotte A POUR VENTILATION INTÉRIEURE Si vous avez choisi une ventilation intérieure dévisser les deux vis qui retiennent le couvercle 6 et enlever le couvercle comme sur la Fig 12 NE RETI...

Страница 29: ...tête de vis d environ 7 mm 0 28 po de la surface de l armoire Soulever la hotte A en position en passant le câble d alimentation et les fils électriques à travers l ouverture d accès électrique Prévoir une quantité suffisante de câble pour permettre le déplacement de l appareil lors de toute réparation si nécessaire Positionner la hotte de cuisinière A de sorte que la partie plus large 2 des encoc...

Страница 30: ...QUE Le filtre au charbon devrait être utilisé seulement si vous n utilisez pas la ventilation extérieure Tourner la clip du filtre dans un sens ou dans l autre et enlever le filtre d aluminium Replacer le filtre au charbon B en veillant à ce qu il couvre la grille de protection Réinstaller le filtre en aluminium et le maintenir en place solidement avec le support du filtre ...

Страница 31: ...ttre le ventilateur en fonction appuyer sur le commutateur de contrôle de vitesse basse vitesse 3 haute vitesse 1 pour sélectionner le niveau de puissance souhaité Lorsque vous appuyez sur un bouton le mode de vitesse précédent est annulé Appuyer sur l interrupteur 2 pour éteindre le ventilateur ALLUMER FERMER LA LUMIÈRE Appuyer sur le bouton d éclairage 4 pour allumer les lumières Appuyer sur le ...

Страница 32: ...ue l ampoule ait refroidie Tourner l ampoule dans le sens antihoraire et tirer pour l enlever Pousser la nouvelle ampoule en place et la tourner dans le sens horaire Ne pas relâcher l ampoule jusqu à ce que vous soyez sûr que l ampoule soit fermement installée Si la nouvelle ampoule ne fonctionne pas s assurer que celle ci soit insérée correctement DANGER Éteignez le disjoncteur électrique ou l in...

Страница 33: ...ont rapidement détériorer la surface Ne pas permettre aux produits de nettoyage solutions salines désinfectants ou agents de blanchiment de rester en contact avec l unité pour de longues périodes Ne pas laisser les dépôts rester pendant de longues périodes de temps Rincer avec de l eau après l exposition et essuyer avec un chiffon propre Lors de travaux de construction ou de rénovation recouvrir l...

Страница 34: ...pe le circuit électrique Dans ce cas le moteur redémarrera lorsque le système de protection thermique se sera refroidi après approximativement 10 minutes Vérifier que le ventilateur ne soit pas bloqué et ne racle pas le fond Si rien d autre ne fonctionne le moteur peut être défectueux ou saisi Un changement de moteur est nécessaire La hotte de cuisinière n évacue pas l air correctement Assurez vou...

Страница 35: ...ue Option de ventilation QR242B QR242S QR242W 758 mm 29 8 po W 120 V 60 Hz 1 3 A Interrupteur à bascule 185 10 Haute 1 x ampoules 40 W à incandescence à culot E26 Ventilation par le haut Ventilation par l arrière Recirculation Ventilation à l intérieur 468 mm 18 4 po D Basse 100 mm 4 po H SCHÉMA ÉLECTRIQUE NOIR ROUGE II I I O O BLEU NOIR NOIR NOIR L N 120 60Hz 6uF 250V GRIS JAUNE JAUNE ET VERT BLA...

Страница 36: ...uite SCHÉMA EXTERNE DE LA HOTTE 10 3 1 8 1 2 1 4 3 8 8 3 4 6 1 4 4 1 16 13 11 16 1 5 8 1 9 16 27 3 4 25 13 16 9 13 16 2 1 16 1 1 16 7 8 7 7 16 1 5 8 8 7 8 10 9 13 16 29 13 16 1 2 3 3 8 7 8 7 7 16 13 16 10 1 2 2 29 13 16 9 7 8 3 1 8 18 7 16 4 DESSUS DESSOUS ...

Страница 37: ...s codes à portée de main Pièce Description Code Quantité A Clapet rectangulaire QHR186 1 B Interrupteur à bascule Gauche Droite QHR212 1 C Condensateur QHR213 1 D Moteur QHR224 1 E Support du filtre QHR168 1 F Ventilateur QHR191 1 G Couvercle de lumière QHR192 1 H Lame QHR215 1 J Support d ampoule QHR203 1 K Ampoule QHR174 1 L Déflecteur QHR194 1 M Couvercle du conduit d aération interne QHR195 1 ...

Страница 38: ...los códigos de las autoridades locales 5 Al cortar o perforar en una pared o techo evite dañar el cableado eléctrico u otros materiales ocultos 6 Los ventiladores con conductos siempre deben tener salida al exterior ADVERTENCIA LAS HORNILLAS DE GAS DEBEN VENTILARSE EN EXTERIORES UTILIZANDO POR LO MENOS CONDUCTOS METÁLICOS Y CAMPANAS EXTRACTORAS DE CAPACIDAD SUFICIENTE Siga las especificaciones del...

Страница 39: ... lámina para hornear galletas o una bandeja metálica posteriormente apague el hornillo o quemador Si las llamas no se apagan de inmediato evacue y llame a los bomberos Nunca levante una sartén en llamas No use agua trapos de cocina húmedos ni toallas ya que puede ocasionar una explosión de vapor Use un extintor únicamente si a es tipo ABC y sabe cómo manejarlo b el fuego es pequeño y está contenid...

Страница 40: ...nstalación de unidades de remplazo ni ningún otro daño incidental o consecuente Costos relacionados con la obtención de acceso para la reparación o el reemplazo son la responsabilidad del usuario Nuestra obligación se limita a la reparación o reemplazo de una unidad a nuestra discreción que pueda comprobarse únicamente al examinarla nosotros que tiene defectos bajo un uso y servicio normal durante...

Страница 41: ...yuda Preinstalación HERRAMIENTAS MATERIALES NECESARIOS NO INCLUIDOS Cinta métrica Nivel Navaja Marcador o lápiz Cinta adhesiva Llave inglesa Destornillador de estrella Phillips Destornillador plano Pinzas de punta Martillo Taladro eléctrico o destornillador eléctrico Gafas de seguridad Guantes de seguridad ...

Страница 42: ...cesita repuestos comuníquese con nuestro equipo de servicio al cliente No deseche el embalaje antes de que esté satisfecho con su nuevo producto Pieza Descripción Cantidad A Campana 1 B Filtro de carbón y aluminio 1 C Regulador cuadrado ubicado dentro de la campana 1 ACCESORIOS INCLUIDOS NOTA Las piezas no se muestran en su tamaño real AA BB CC Pieza Descripción Cantidad AA Tornillo autorroscante ...

Страница 43: ...n sus muebles Coloque una protección gruesa sobre el mostrador y la superficie de cocción para evitar que se dañen o ensucien Retire cualquier objeto que pueda interferir con la instalación PRECAUCIÓN Use guantes y gafas de seguridad en todo momento para evitar lesiones personales Fig 2 OPCIONES DE VENTILACIÓN Determine si su sistema de ventilación existente es de ventilación superior o posterior ...

Страница 44: ...rtura de escape de la campana de extracción Coloque una tapa en el tubo exterior con una tapa para pared 15 o una tapa para tejado 16 Nunca use tapas para pared tipo lavandería de 102 mm 4 pulgadas Utilice masilla a prueba de agua para sellar la apertura exterior de la pared o el tejado alrededor de la tapa El sistema de ventilación debe tener un regulador Si la tapa del techo o la pared tienen un...

Страница 45: ... del metal deberá tener un ojal 8 Al cortar o perforar en la pared o el techo no dañe el cableado eléctrico ni ningún material oculto 9 El tamaño del cable debe cumplir con todos los códigos y normas locales Los requerimientos de la última edición del Código Eléctrico Nacional National Electrical Code ANSI NFPA 70 o la última edición de las normas de la CSA C22 1 94 o el Código Eléctrico Canadiens...

Страница 46: ...erior 5 para una instalación de ventilación por la parte posterior Retire con cuidado la tapa 3 o 5 del orificio de ventilación adecuado utilizando un destornillador plano o pinzas de punta de aguja consulte la Fig 11 Tenga cuidado de no dejar restos dentro de la campana extractora A PARA VENTILACIÓN EN INTERIORES Si está utilizando ventilación interior retire los 2 tornillos que sujetan la tapa 6...

Страница 47: ...adas de la superficie de la alacena Levante la campana de extracción A hasta su posición introduciendo el cable de alimentación y los cables eléctricos a través de la apertura de acceso de la alimentación eléctrica Permita que los cables tengan suficiente holgura de modo que el aparato pueda ser movido si alguna vez fuera necesario realizar labores de mantenimiento Coloque la campana de extracción...

Страница 48: ... de carbón activado sólo debe instalarse si no se utiliza ningún sistema de ventilación Gire el clip del filtro hacia cualquier lado y levante el filtro de aluminio Coloque el filtro de carbón B en su lugar asegurándose de que cubra la rejilla de protección Vuelva a colocar el filtro de aluminio y manténgalo firmemente en su lugar con ayuda del soporte del filtro ...

Страница 49: ...A UNIDAD Encienda el ventilador presione el control de velocidad apropiado Velocidad baja 3 velocidad alta 1 para seleccionar el nivel de potencia deseado Al presionar un botón se cancela el modo de velocidad anterior Presione el interruptor 2 para apagar el ventilador ENCENDIDO Y APAGADO DE LAS LUCES Presione el botón de la luz 4 para encender las luces Presione el botón de luz 5 para apagar las ...

Страница 50: ... dirección indicada y jale para sacarla Coloque la nueva bombilla empujándola y girándola en la dirección indicada hasta que se enganche en el zócaloj No suelte la bombilla hasta que esté seguro de que está firmemente instalada Si las nuevas bombillas no funcionan asegúrese de que esté insertadas correctamente PELIGRO Desconecte el disyuntor de alimentación o apague interruptor de la caja de deriv...

Страница 51: ...productos de limpieza las soluciones de sal los desinfectantes o los blanqueadores permanezcan en contacto con el producto durante mucho tiempo No permita que permanezcan depósitos en la campana extractora durante mucho tiempo Enjuague con agua inmediatamente y seque con un paño limpio No deje que entre en la campana polvo de yeso ni ningún residuo de construcción Durante una obra de construcción ...

Страница 52: ...el motor está demasiado caliente para operar y lo apaga En este caso el motor funcionará correctamente después de que el sistema de protección térmica se enfríe después de aproximadamente 10 minutos Verifique que el ventilador no esté atorado o rozando con la parte inferior Si ninguna de estas soluciones funciona el motor puede estar defectuoso o atorado Si así fuera reemplace el motor La campana ...

Страница 53: ...lación QR242B QR242S QR242W 758 mm 29 8 pulg de ancho 120 V 60 Hz 1 3 A Interruptor de balancín 185 10 Alta 1 x 40w bombilla incandescente con base de tipo E26 Ventilación superior Ventilación posterior Recirculación Ventilación interior 468 mm 18 4 pulg de profundidad Baja 100 mm 4 pulg de alto DIAGRAMA DE CABLEADO NEGRO ROJO II I I O O AZUL NEGRO NEGRO NEGRO L N 120 60Hz 6uF 250V GRIS AMARILLO A...

Страница 54: ...A EXTERNO DE LA CAMPANA EXTRACTORA 10 3 1 8 1 2 1 4 3 8 8 3 4 6 1 4 4 1 16 13 11 16 1 5 8 1 9 16 27 3 4 25 13 16 9 13 16 2 1 16 1 1 16 7 8 7 7 16 1 5 8 8 7 8 10 9 13 16 29 13 16 1 2 3 3 8 7 8 7 7 16 13 16 10 1 2 2 29 13 16 9 7 8 3 1 8 18 7 16 4 PARTE SUPERIOR PARTE INFERIOR ...

Страница 55: ... y tenga lista su descripción Pieza Descripción Código Cantidad A Regulador cuadrado QHR186 1 B Interruptor de balancín izquierda derecha QHR212 1 C Condensador QHR213 1 D Motor QHR224 1 E Soporte de filtro QHR168 1 F Ventilador QHR191 1 G Tapa de la luz QHR192 1 H Aspa QHR215 1 J Portalámpara QHR203 1 K Bombilla QHR174 1 L Reflector QHR194 1 M Tapa del conducto de ventilación interna QHR195 1 N F...

Страница 56: ...available in English and French Monday Friday from 8 30 am 5 pm EST service disponible en anglais et français du lundi au vendredi 8h30 à 17h H N E servicio disponible en inglés y francés de lunes a viernes de 8 30 am a 5 00 pm hora del Este www conglomkb com Made in China Fabriqué en Chine Hecho en China ...

Отзывы: