background image

CW-210 User Manual

23

www.arec.com

1.


Mode: 

Set the exposure mode (the default automatic, manual, shutter priority, aperture priority,

    Brightness priority optional) 


2.


EV: 

Exposure compensation setting is active when it is auto status (default is off).

3.


EV Level: 

Set the exposure compensation value, valid when it is set for auto(default 0, -7 to 7 

    optional).

4.


BLC: 

Set back light compensation, valid when it is auto status (default is off).

5.


Flicker: 

Set up anti-flicker mode, valid when status of automatic, aperture or brightness priority 

    (default 50Hz, closed, 60Hz optional).

6.


G.Limit: 

Set the gain limits, auto, active when it is status of aperture or brightness priority(default 4, 

     0-15 optional).   


7.


DRC: 

Set the dynamic range (default 4, Off, 1-8 optional).

8.


Shutter speed: 

Active when it is status of manual or shutter-priority (default 1/100, 1/25, 1/30, 1/50, 

    1/60, 1/90, 1/100, 1/120, 1/180, 1/250, 1/350, 1/500, 1/1000, 1/2000, 1/3000, 1/4000, 1/6000, 
    1/10000 optional).

9.


Aperture value: 

Set the aperture value, active when it is status of manual or aperture-priority(default

    F1.8, closed, F11.0, F9.6, F8.0, F6.8, F5.6, F4.8, F4.0, F3.4, F2.8, F2.4, F2.0, F1.8 optional).

10.


Brightness: 

Set the brightness value, active when it is a state of brightness priority (default 11,0-23

       optional).

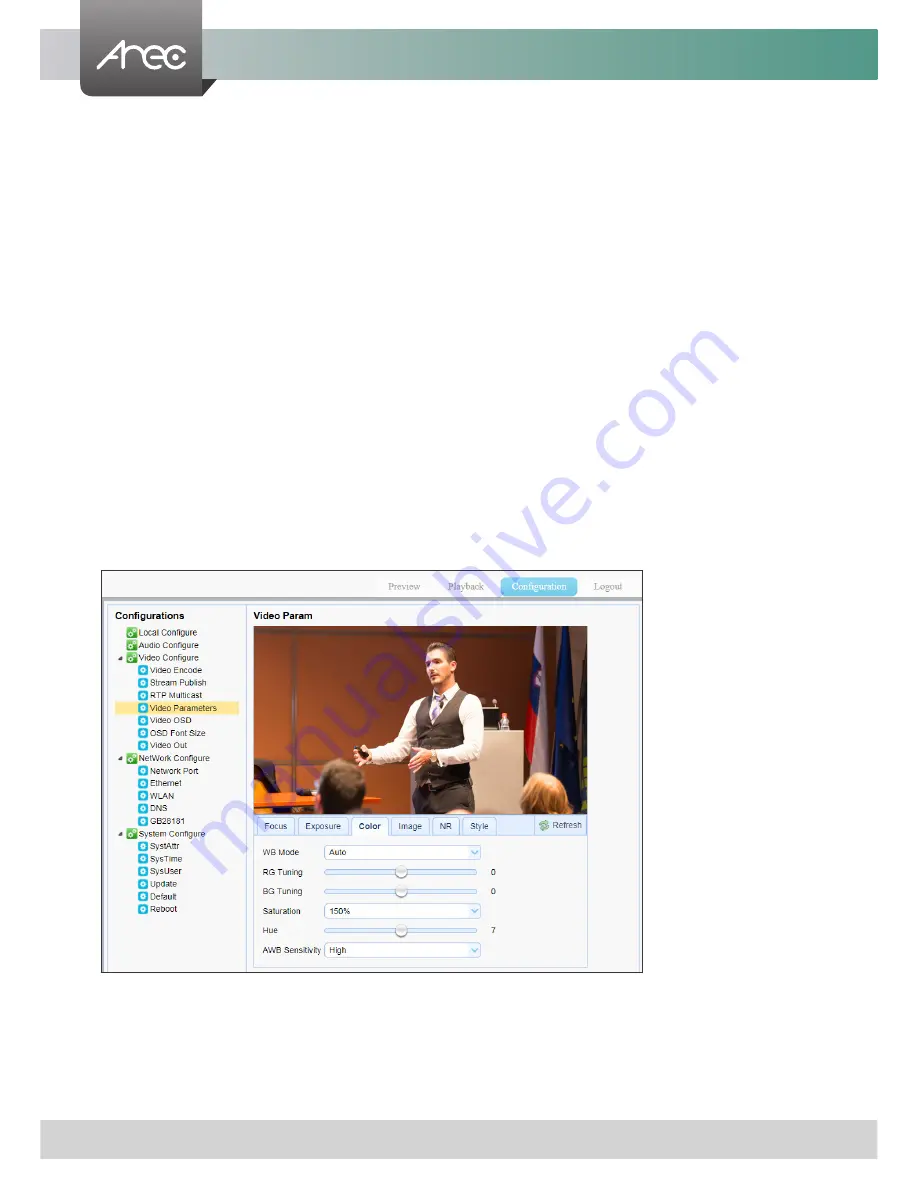
1. WB Mode: 

Set the white balance mode (the default automatic, 3000K, 3500K, 4000K, 4500K, 5000K,

    5500K, 6000K, 6500K, 7000K, manual, Onepush optional). 
    

Note: Click the “Adjust” button when selected the One-push white balance mode.

2. RG Tuning: 

Set red fine tuning, Only effective when white balance mode is manual (default 0, -10~10

    optional).

(c) Color: This page include the following settings:

Содержание CW-210

Страница 1: ...AREC Inc All Rights Reserved 2017 l www arec com All information contained in this document is Proprietary CW 210 Wireless Full HD Network Camera User Manual English...

Страница 2: ...cuffing 2 Electric Safety Installation and operation must accord with electric safety standard 3 Caution to transport Avoid stress vibration and soakage in transport storage and installation 4 Polarit...

Страница 3: ...l configure 4 3 2 Audio configure 4 3 3 Video configure 4 3 3 1 Video Encode 4 3 3 2 Stream Publish 4 3 3 3 Video Parameters 4 3 3 4 Video OSD 4 3 3 5 OSD Font Size 4 3 3 6 Video Out 4 3 4 Network Con...

Страница 4: ...erface 1 2 3 4 5 6 7 8 9 10 11 12 13 15 14 1 Lens 6 Battery tray 11 LAN interface 2 Power indicator 7 Power interface DC 5V charging interface 12 Bluetooth pairing button built in bluetooth 3 Audio in...

Страница 5: ...ration etc 2 Wireless network output a Wireless network configuration Wired network login First configure the wireless network in the network configuration check the network port enable WiFi hotspot s...

Страница 6: ...introduction 2 1 1 Dimension 2 1 2 Accessory When you unpack please check the package containing the following items listed below Table2 1 Accessories Pic2 1 Camera dimension 148 65 75 85 28 181 Item...

Страница 7: ...WiFi module support wireless router bridging AP etc Built in microphone Built in high sensitivity digital audio microphone no external audio equipment required Omnidirectional and multi angle orientat...

Страница 8: ...ance Auto Manual One Push 3000K 3500K 4000K 4500K 5000K 5500K 6000K 6500K 7000K Exposure Auto Manual Shutter priority Aperture priority Brightness priority Focus Auto Manual Iris Auto Manual Electroni...

Страница 9: ...ter and Battery Specifications self buy Output DC5V 1A Battery powered Time Standard cell capacity 5000mAh rated capacity 3300mAh 3 hours Larger cell capacity 10050mAh rated capacity 6400mAh 6 hours W...

Страница 10: ...See below for details 3 1 Direct connection To access the camera for the first time connect the camera and computer by network connecting cable The computer must have the network segment where the ca...

Страница 11: ...Internet Protocol Configuration TCP IPv4 option c Type IP 192 168 11 1XX in Use the following IP address field Figure 1 Enter the static IP address of your CW 210 192 168 11 202 in your browser s URL...

Страница 12: ...ed information Double click on the founded camera c An access window will pop up and ask for user name and password Enter account ID and password admin admin for the first time Note Please do not put...

Страница 13: ...the upper right corner shows Chinese English click to select the web interface language Note Web access supported browsers IE 360 browser and other regular browser 1 Login in as administrator The defa...

Страница 14: ...cluding Local configuration audio configuration video configuration network configuration system configuration and so on Note The normal user login does not have configuration rights Logout Log out of...

Страница 15: ...rch click the search to search for a recording file d Click Play to playback the video file 2 Playback the picture file Firstly record snapshot and save the file when previewing Click Playback to ente...

Страница 16: ...preview mode video packaging time video file packaging type settings etc Audio configure Including audio compressing format sampling frequency sampling precision compressing code rate settings etc Vid...

Страница 17: ...ue real time normal 2 real time best 1 real time normal 2 fluency normal 3 fluency good 4 and fluency best 5 optional Video Packaging Time Minutes Set recording video packaging time default is 10 rang...

Страница 18: ...Set sampling frequency and the device will reboot automatically after change default 16000 Sample Bit Set sampling precision default 16 bits Bit rate Set audio compressing bit rate default 64kbps 32 4...

Страница 19: ...econdary stream Stream Publish Can turn on or off the Main Sub stream and make the relevant settings RTP Multicast Can turn on or off the RTP Multicast of Main Sub stream and make the relevant setting...

Страница 20: ...H 265 encode format and the device will reboot automatically H 264 encode format default HP H 265 encode format default BP BP MP HP optional 4 Image Size Set resolution then device will restart automa...

Страница 21: ...key frame min QP Default 10 10 51 optional 11 Stream Name User can revise the name of stream Main stream default h264 Sub stream default h264_2 Click on the Save button to display the Save successful...

Страница 22: ...op bottom and all optional 3 AF Sensitivity Set the focus sensitivity default is low high and middle optional Video Parameters page provide the settings of Focus Exposure Color Image NR and Style a Fo...

Страница 23: ...ange default 4 Off 1 8 optional 8 Shutter speed Active when it is status of manual or shutter priority default 1 100 1 25 1 30 1 50 1 60 1 90 1 100 1 120 1 180 1 250 1 350 1 500 1 1000 1 2000 1 3000 1...

Страница 24: ...e mode is manual default 84 0 255 optional 8 Blue Gain Set Blue Gain Only effective when white balance mode is manual default 73 0 255 optional 1 Bright Set the brightness default 3 0 14 optional 2 Co...

Страница 25: ...se reduction level default 5 1 8 and Off optional 3 Dynamic Hot Pixel Set Dynamic dead pixel correction default Off 1 8 and Off optional Note Click the Refresh to make revision of the a b c d e f valu...

Страница 26: ...low red blue optional 4 Title font color Set the title font color default white black yellow red blue optional 5 Moving characters Set the date time and title display position click on the up down lef...

Страница 27: ...2 Slave Stream OSD Font Size Set the character size of the display the device will restart automatically after changed and saved default 48 8 200 optional Click on the Save button to display Parameter...

Страница 28: ...to below sheet Set Option Explanation Network port Set the network port including data web onvif etc Ethernet Set whether to open to obtain IP automatically or set the ip address WLAN Enable wireless...

Страница 29: ...t Soap Set Soap port default 1936 0 65535 optional 5 Port RTMP Set RTMP port default 1935 0 65535 optional 6 Port Rtsp Set RTSP port the device will restart automatically after changed default 554 0 6...

Страница 30: ...y after changes default 192 168 11 202 Note Here is the IP address of the web page of the sign in address 3 Subnet Mask Set the subnet mask default 255 255 5 0 4 Default Gateway Set the default gatewa...

Страница 31: ...tically generated the connection wifi password after connected to the wifi hotspot default 12345678 Click on the Save button to display the Save successfully message then the set is to take effect Not...

Страница 32: ...DNS 1 Preferred DNS Server Set the preferred DNS server Default 0 0 0 0 2 Alternative DNS Server Alternative DNS server settings Default 0 0 0 0 Click on the Save button to display the Save successfu...

Страница 33: ...0 Range 1 65535 6 Register ID 34020000001320000001 7 Register Name IPC 8 Register Password 12345678 9 Equipment Belong Users can add their own 10 Administrative Region Users can add their own 11 Alarm...

Страница 34: ...e detailed description refer to below sheet Set Option Explanation System Attribute Set the device name ID and change the system language System Time Set the system date and time User Set Set the user...

Страница 35: ...user can add their own 2 Device ID Set the device ID default 1 Read Only 3 Language Set the system language default Simplified Chinese English optional Need to re login after modify and save the setti...

Страница 36: ...ime types default 24 hours optional 12 hours 5 NTP Enable Set whether open NTP can check 6 Update interval Set the NTP server automatic updated time interval Valid after setting NTP server synchroniza...

Страница 37: ...time mode to choose the computer time synchronization NTP server time synchronization or set manually 2 Computer Time Set the computer synchronization valid 3 Set the time manually Click the calendar...

Страница 38: ...ord Select User Administrator default admin select a user1 default user1 to select a user 2 default user2 user can modify their own 4 Confirm Password Confirm the input passwords are the same or not C...

Страница 39: ...on the upgrade dialog will appear the device will reboot automatically after update successfully Note Make sure the power and network is keeping connected during the process or the upgrade will fail R...

Страница 40: ...imes a Check whether the camera power supply is connected the voltage is normal the power indicator is lit b Check whether the video output or video display interfaces are normal c Check whether the v...

Страница 41: ...in this document is Proprietary AREC have the right to change or improve product specifications without obligation to notify any user Go to www arec com get the latest information related to the prod...

Отзывы: