Ardo TL107SA Скачать руководство пользователя страница 18

18

SM3086 

INSTALLING THE  MACHINE

EN

WATER CONNECTION

The mains water pressure must be between 0.05 and 1.00 MPa 

(0,5 - 10 bar.)

  Before connection, open the tap and let the water run in order to clean the pipes 

from impurities like sand and rust. (This operation is very important when the 
washing machine has been inactive for a long time or when connected to new 
piping). 

  The water supply hose must be connected to the cold water outlet with a 3/4” 

threaded opening.

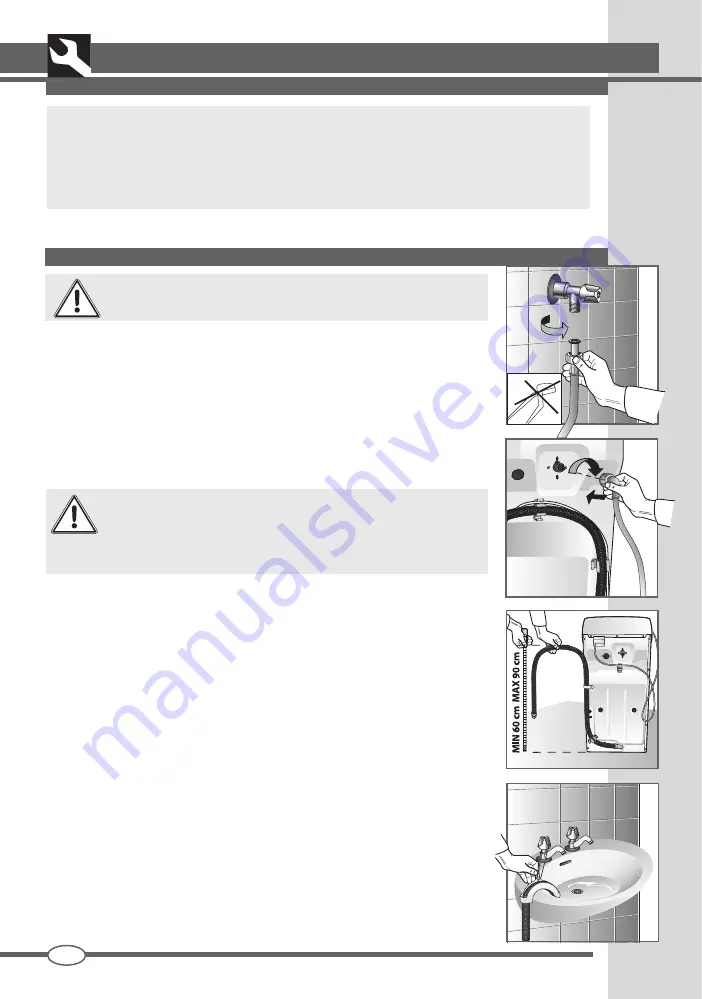
  Connect the supply hose (fig. 12/13).

Use the new hose provided with the machine. Do not reuse the 

old one. 


Do not connect to the hot water supply.

  The water supply tap must be completely open during washing.

  Connect the drain hose to a drain piping or wall drain between 60 and 90 cm 

from the ground without squeezing it (fig.14).

  If the water drains directly into the drain piping, the free end of the machine 

hose must be inserted in the piping with an inside diameter no smaller than 40 
mm.

  If water is drained into the  washbasin or another drain, the free end of the hose 

must be previously reinforced at the bending with an appropriate hook, provided 
with the washing machine. Then place the hose at the edge of the washbasin 
and fix the hook to prevent the hose from falling (fig. 15). The washbasin must 
have its drain clean to allow water to drain freely.

12

13

14

15


INSTALLING THE  MACHINE

Do not insert or remove the plug from the mains socket with wet hands.

If the power supply cable is damaged in any way, contact the appropriate specialised service centre.

The plug used to connect the machine to the power supply must never be fixed behind the machine, 

but must be in a position easily accessible in an emergency.

Содержание TL107SA

Страница 1: ...IT LIBRETTO ISTRUZIONI EN INTRUCTION BOOK...

Страница 2: ...ITALIANO 3 12 ENGLISH 13 22 EN IT...

Страница 3: ...llo e la vasca 11 Pulizia del filtro 11 Soluzione dei problemi 12 MODELLO DATA D ACQUISTO NUMERO DI FABBRICAZIONE IT Consigliamo di avere sempre a portata di mano i seguenti dati Il simbolo del cestin...

Страница 4: ...one Durante il funzionamento dell apparecchio evitare il contatto con l acqua che fuoriesce dal tubo di scarico in quanto potrebbe avere una temperatura elevata Lavare esclusivamente tessuti destinati...

Страница 5: ...di corrente elettrica provvista di messa a terra e conforme alle norme di sicurezza E vietato collegare la lavatrice alla presa elet trica utilizzando prolun ghe o spine multiple Terminato il lavaggi...

Страница 6: ...trovano nella parte posteriore della lavatrice non devono essere in nessun modo schiacciati La lavatrice deve essere sistemata su una superficie piana e solida Si sconsiglia di installare la macchina...

Страница 7: ...nnipolare La presa di corrente alla quale viene allacciata la macchina deve essere munita di messa a terra In caso contrario il produttore declina qualsiasi responsabilit per eventuali incidenti fig 1...

Страница 8: ...rlo ad una conduttura di scarico o a uno scarico a muro posto tra 60 e 90 cm da terra fig 14 Se previsto lo scarico dell acqua direttamente nella conduttura di scarico l estremit libera del tubo della...

Страница 9: ...ncheria si consiglia di eseguire un breve ciclo di lavaggio senza panni e senza detersivo per pulire il cestello Attenzione importante che l operazione d apertura chiusura del ce stello sia effettuata...

Страница 10: ...un cubetto di ghiaccio sul tessuto sfregare il pi possibile e poi passare con un panno di cotone imbevuto di acetone Vernice non lasciare asciugare la vernice Passare sulla zona sporca il solvente in...

Страница 11: ...no Aprire lo sportellino del filtro svitare e togliere quest ultimo girando in senso antiorario Per aprire lo sportellino pu essere necessario l uso di un utensile fig 25 Sciacquare il filtro sotto l...

Страница 12: ...one di esclu sione della centrifuga 5 Non sia stata selezionata la funzione di stop con acqua La lavatrice vibra e fa rumore assicurarsi che 1 Tutte le protezioni per il trasporto siano state tolte 2...

Страница 13: ...symbols for clothing treatment MAINTENANCE 21 22 Cleaning the washing machine 21 Recovering fallen items between drum and basin 21 Cleaning the filter 21 Problem solving 22 MODEL DATE OF PURCHASE SER...

Страница 14: ...ct with the water coming out of the drain hose and this may be hot Only wash clothes that are machine washable In case of doubt check the manufacturer s instructions found on the label attached to the...

Страница 15: ...with the safety requirements Extension leads or mul tiple adapters must not be used to connect the washing ma chine to the mains supply After the end of each washing cycle it is ad visable to unplug t...

Страница 16: ...machine must not be crushed The washing machine must be placed on a flat and solid surface Do not install the machine in a room where the temperature could go below 3 C Place the machine in the chosen...

Страница 17: ...e mains supply to which the appliance is connected must be fitted with an earthing system If this is not the case the manufacturer will not be held liable for any incidents that may occur fig 11 If th...

Страница 18: ...cm from the ground without squeezing it fig 14 If the water drains directly into the drain piping the free end of the machine hose must be inserted in the piping with an inside diameter no smaller tha...

Страница 19: ...ashing laundry for the first time it is advised to run a brief wash cycle without laundry or detergent in order to clean the drum Attention it is important to open and close the drum carefully to avoi...

Страница 20: ...itten on the packet Chewing gum rub ice over the fabric scrape away as much chewing gum as possible and then rub with a piece of cotton soaked in acetone INTERNATIONAL CLOTHING CARE SYMBOLS Before pla...

Страница 21: ...are on the right side slide the blade from right to left until it engages In the presence of the screw to match the mounting holes and proceed to the tightening of the screw itself fig 24 8 Close the...

Страница 22: ...ower supply The washing machine continuously fills and drains the water check that 1 The drain hose has been installed at the proper height 60 90 cm 2 The end of the drain hose is not under water The...

Страница 23: ......

Страница 24: ...J P Industries S p A Via Dante 284 60044 Fabriano AN Tel 39 0732 6161 Fax 39 0732 616900 www ardo it 461308612 CA SM3086 01 18 04 2017 IT EN...

Страница 25: ...IT GUIDA PROGRAMMI LAVAGGIO EN WASHING GUIDE...

Страница 26: ...ITALIANO 3 6 ENGLISH 7 10 IT EN...

Страница 27: ...all apposito simbolo 5 Selezionare il programma di lavaggio adatto alla tipologia di tessuti tramite la manopola A seguendo le indicazioni riportate nella tabella programmi Uno dei LED della barra fun...

Страница 28: ...posita vaschetta 1 La lavabiancheria effettua un prelavaggio a 40 C max Il prelavaggio indicato nel caso di indumenti sporchi di polvere terra sabbia o in presenza di macchie partico larmente resisten...

Страница 29: ...AVVIO PAUSA Per confermare le scelte ed avviare il ciclo di lavaggio toccare il simbolo AVVIO PAUSA il relativo led dopo alcuni secondi si accender di colore verde confer mando l avvio del ciclo A pro...

Страница 30: ...gio e la velocit di centrifuga vengono regolate elettronicamente per diminuire la formazione di pieghe e facilitare la stiratura di bluse e camicie Il programma sport pensato per gli indumenti sportiv...

Страница 31: ...ogram most suitable to the type of fabrics by using knob A following the instructions in the programs table One of the LEDs on the function bar will light up to indicate which wash phase the program w...

Страница 32: ...TEMPERATURE symbol until all LEDs are off The machine will automatically prevent from setting a temperature higher than the temperature expected for each program PROGRAM PHASE INDICATOR LEDs The progr...

Страница 33: ...00 7 0 TL148SW A B X TL128SW A B X 40 0 90 0 60 0 1000 8 0 TL108SW A B X TL107SW A B X 40 0 90 0 60 0 1200 7 0 TL127SW A B X START PAUSE To confirm your selection and start the wash cycle press the ST...

Страница 34: ...y of washing and spin speed are adjusted electronically to prevent creases and making ironing of blouses and shirts easier The sportswear program is designed for sports and casual wear The 40 C wash c...

Страница 35: ......

Страница 36: ...J P Industries S p A Via Dante 284 60044 Fabriano AN Tel 39 0732 6161 Fax 39 0732 616900 www ardo it 461000012 SM3187 19 02 2018 IT EN...

Отзывы: