background image

ENGLISH

19

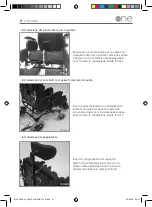
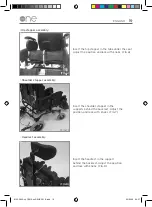
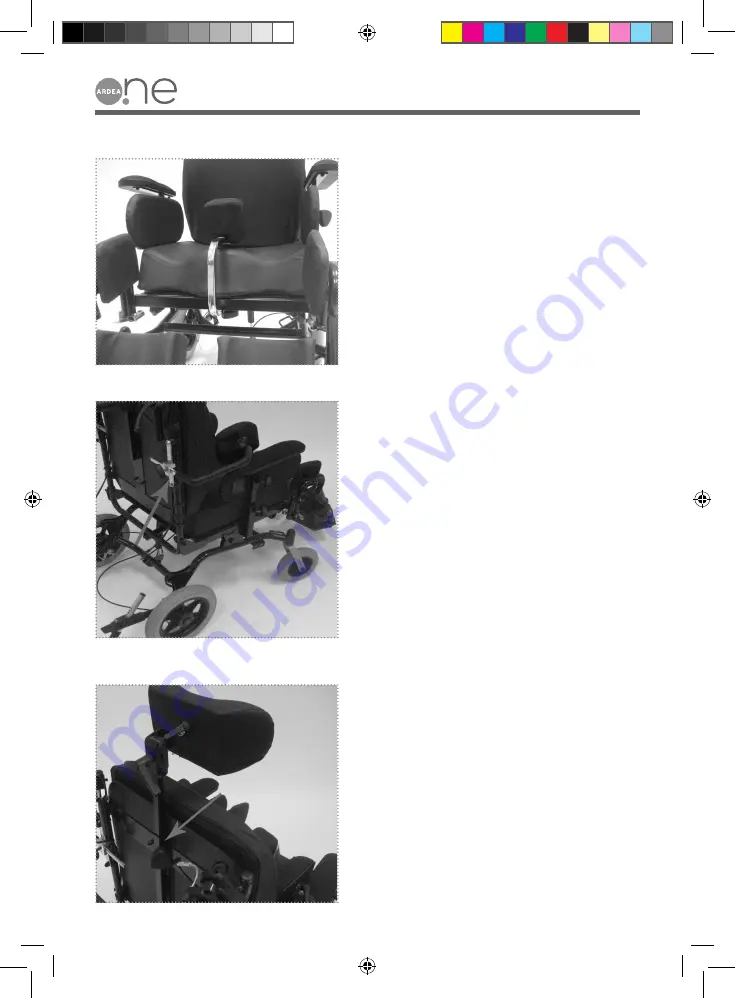
-Hip stopper assembly

Insert the hip stopper in the tube under the seat. 
Adjust the position and lock with knobs  (FIG.6)

- Shoulder stopper assembly

Insert the shoulder stopper in the 
supports behind the backrest. Adjust the 
position and lock with  knobs  (FIG.7)

- Headrest assembly

Insert the headrest in the support 
behind the backrest. Adjust the position 
and lock with knobs  (FIG.8)

(FIG.6)

(FIG.7)

(FIG.8)

MA CP900-xx_CP910-xx RELIEF 01 B.indd   19

02/02/18   09:27

Содержание CP900-40

Страница 1: ...CARROZZINA RELIEF MANUALE DI ISTRUZIONI RELIEF WHEELCHAIR INSTRUCTION MANUAL MA CP900 xx_CP910 xx RELIEF 01 B 02 2018 MA CP900 xx_CP910 xx RELIEF 01 B indd 1 02 02 18 09 27...

Страница 2: ...8 Uso dello schienale reclinabile pag 9 Uso della seduta basculante pag 9 Uso del piano seduta scorrevole pag 9 Uso del divaricatore per le gambe pag 9 Uso delle ruote posteriori grandi pag 9 Uso dell...

Страница 3: ...unque necessario l intervento di un operatore DICHIARAZIONE DI CONFORMIT CE Moretti S p A dichiara sotto la sua esclusiva responsabilit che il prodotto fabbricato ed im messo nel commercio dalla stess...

Страница 4: ...parti in movimento che potrebbero causare intrappolamenti degli arti e lesioni personali Prestare sempre attenzione alla presenza di bambini Non sollevare la carrozzina da parti amovibili che potrebbe...

Страница 5: ...one per fissarli definitivamente FIG 3 Installazione dei braccioli Inserire i braccioli come illustrato FIG 4 e dopo aver trovato l altezza ideale bloccarli con le manopole A e B Installazione delle p...

Страница 6: ...i di supporto laterale del busto Inserire questi elementi di contenimento laterale nei relativi supporti dietro allo schienale e bloccarli con la manopola dopo aver trovato la regolazione ideale FIG 7...

Страница 7: ...riori per agevolare al massimo la salita sulla carrozzina si consiglia di togliere il bracciolo dal lato dove si effettuano queste operazioni 3 Appoggiarsi alla struttura del telaio facendo forza sull...

Страница 8: ...in larghezza Successivamente bloccare la manopola Uso delle pedane Le pedane possono essere regolate in lunghezza inclinazione larghezza e profondit Regolazione in lunghezza Svitare la manopola di blo...

Страница 9: ...il continuo contatto degli arti inferiori Pu essere regolato in profondit agendo sulla manopola di bloccaggio presente sulla parte anteriore centrale sotto la seduta Dopo aver regolato correttamente...

Страница 10: ...testa Grazie al supporto realizzato con doppio snodo possibile regolare contemporaneamente sia la profondit che l inclinazione del poggiatesta Successivamente bloccare la manopola di bloccaggio Regola...

Страница 11: ...lle viti e dei dadi di tutte le parti meccaniche in modo speciale quelle che riguardano le ruote e l impianto frenante In caso di riparazione devono essere utilizzati soltanto ricambi ed accessori ori...

Страница 12: ...timento Ecopelle Rivestimenti Tessuto di cotone Imbottitura schienale seduta poggiatesta PU stampato Imbottitura braccioli divaricatore cuscinetti di contenimento del busto poggia polpacci Gommapiuma...

Страница 13: ...putarsi al nor male utilizzo del prodotto RIPARAZIONI Riparazione in garanzia Nel caso in cui un prodotto Moretti presenti difetti di materiale o fabbricazione durante il periodo di garanzia Moretti v...

Страница 14: ...a durata di una garanzia implicita oppure l esclusione o la limitazione di danni accidentali o indiretti in relazione a prodotti per i consumatori In tali stati o paesi alcune esclusioni o limitazioni...

Страница 15: ...t pag 21 Use the legrest pag 21 Use the reclining backrest pag 22 Use the seat pag 22 Use the sliding seat pag 22 Use the hip stopper pag 22 Use rear big wheels pag 22 Use rear small wheels pag 22 Use...

Страница 16: ...at the products manufactured and sold by Moretti S p A and belonging to the wheelchair category are in compliance with the applicable provisions outlined in the Medical Devices Directive 93 42 EEC and...

Страница 17: ...e wheelchair use limit is defined by the wear of the parts ALWAYS keep hands and fingers clear of moving parts to avoid injury DO NOT allow children to play on or operate the wheelchair Close the whee...

Страница 18: ...m with a bit pressure FIG 3 Armrest assembly Insert the armrest as shown in FIG 4 adjust the height as your needs and lock with A and B knobs Footrest assembly Insert the legrest on the hinge on the f...

Страница 19: ...Shoulder stopper assembly Insert the shoulder stopper in the supports behind the backrest Adjust the position and lock with knobs FIG 7 Headrest assembly Insert the headrest in the support behind the...

Страница 20: ...he armrest to ease the patient getting in the wheelchair 3 Lean on the frame with arms and slowly go down towards the seat Get out of the wheelchair 1 Position the wheelchair as close as possible alon...

Страница 21: ...ck and adjust the height Adjust the width unscrew the knob under the seat and adjust the width Use the legrest The legrests can be adjusted in length inclination width and depth Adjust the length Unsc...

Страница 22: ...can be adjusted by using the knob under the seat Use the rear big wheels The rear 60cm wheels are used when self propelled Grasp the handrail and wheel through the desired direction Use the rear small...

Страница 23: ...oriented Use the handle bar The handle bar is intended to wheel the wheelchair or to adjust the backrest and the seat inclination The handle bar can be adjusted in height by unloosing the knobs on th...

Страница 24: ...LEANING AND DISINFECTION Cleaning Cover The cover is in artificial leather and they all can be removed Clean with warm water and mild soap Cleaning pad Clean with warm water and mild soap Cleaning fra...

Страница 25: ...5 65 46 Technical specifics Frame Powder coated steel External cover Synthetic leather Internal cover Cotton Backrest seat headrest pad PU Armrest hip and shoulder stoppers legrest pad Foam Front whee...

Страница 26: ...components subject to wear and tear during the correct use of the device REPAIRING Warranty repairing If a Moretti item presents material or manufacturing faults during the warranty period Mo retti w...

Страница 27: ...cidental damages In such countries some of those exclusions or limitation may not be applied to the user The present warranty may be modi fied without prior notification MORETTI S P A Via Bruxelles 3...

Страница 28: ...MA CP900 xx_CP910 xx RELIEF 01 B indd 28 02 02 18 09 27...

Отзывы: