background image


PMX-4EX-SA Manual 

page 23 

Rev 3.11


5. Communication Interface


5.1. USB Communication 

PMX-4EX-SA USB communication is USB 2.0 compliant. 


In order to communicate with PMX-4EX-SA via USB, the proper software driver 
must be first installed.  Before connecting the PMX-4EX-SA 4-axis controller, or 
running any programs, please go to the Arcus web site, download the Arcus 
Drivers and Tools Setup, and run the installation. 
 
All USB communication will be done using an ASCII command protocol. 
 

5.1.1. Typical USB Setup 

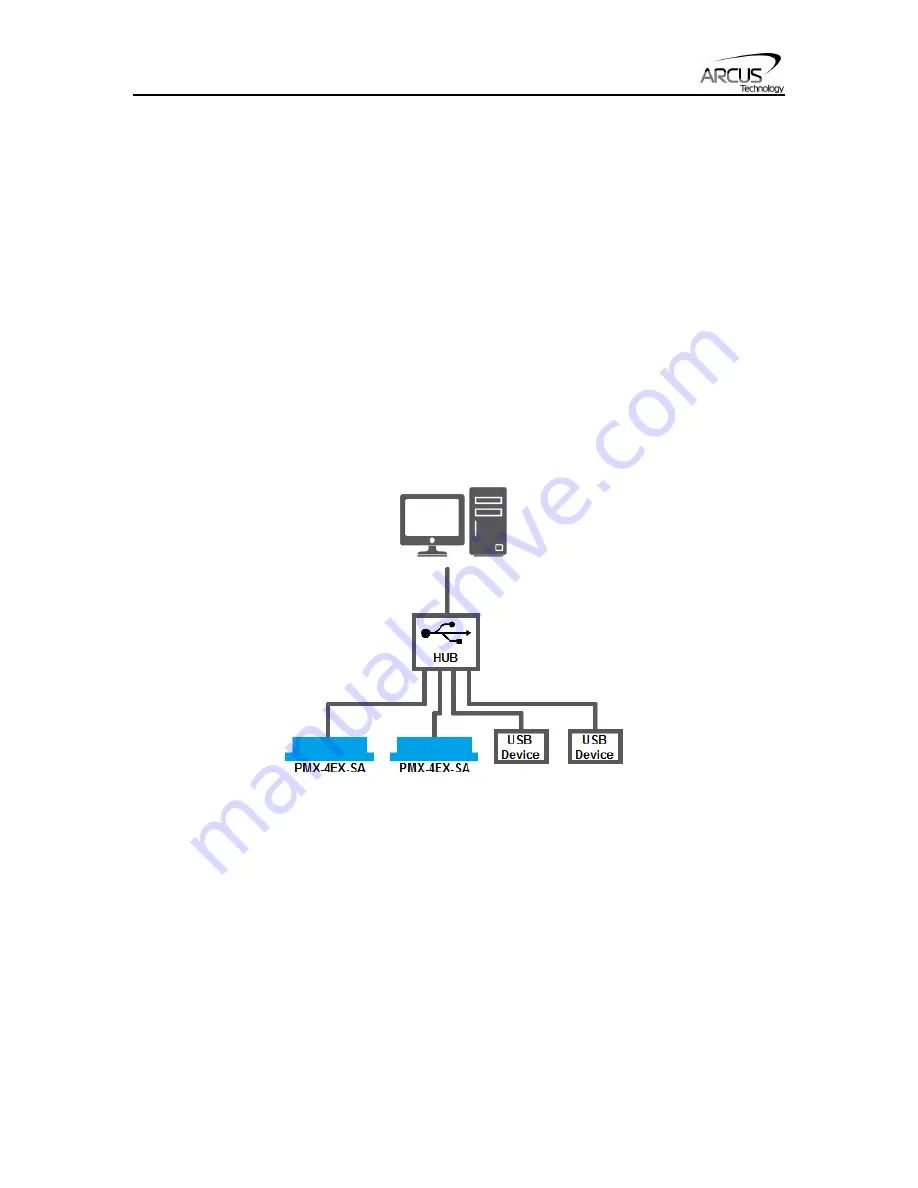
The PMX-4EX-SA can be connected to a PC directly via USB or through a USB 
hub. All USB cables should have a noise suppression choke to avoid 
communication loss or interruption. See a typical USB network setup in figure 
5.0. 


Figure 5.0 

5.1.2. USB Communication API 

Communication between the PC and PMX-4EX-SA is done using the Windows 
compatible DLL API function calls shown below.  Windows programming 
languages such as Visual BASIC, Visual C++, LabView, or any other 
programming language that can use a DLL can be used to communicate with the 
PMX-4EX-SA. 
 
Typical communication transaction time between PC and PMX-4EX-SA for 
sending a command from a PC and getting a reply from the controller using the 

fnPerformaxComSendRecv

() API function is in single digit milliseconds.  This 

value will vary with CPU speed of PC and the type of command. 


For USB communication, following DLL API functions are provided. 

Содержание PMX-4EX-SA

Страница 1: ...PMX 4EX SA Manual page 1 Rev 3 11 PMX 4EX SA Advanced 4 Axis Stepper Motion Controller ...

Страница 2: ...ssion from ARCUS ARCUS makes no representations or warranties regarding the content of this document We reserve the right to revise this document any time without notice and obligation Revision History 1 00 1st Revision 2 10 2nd Revision 3 00 3rd Revision 3 01 4th Revision 3 02 5th Revision 3 10 6th Revision 3 11 7th Revision Firmware Compatibility V180BL If your module s firmware version number i...

Страница 3: ...ERFACE CIRCUIT 19 4 12 PULSE DIRECTION AND ENABLE OUTPUTS 20 4 13 LIMIT HOME AND DIGITAL INPUTS 21 4 14 DIGITAL OUTPUTS 22 4 15 ENCODER INPUT CONNECTION 22 5 Communication Interface 23 5 1 USB COMMUNICATION 23 5 1 1 Typical USB Setup 23 5 1 2 USB Communication API 23 5 1 3 USB Communication Issues 24 5 2 SERIAL COMMUNICATION 25 5 2 1 Typical RS 485 Setup 25 5 2 2 Communication Port Settings 26 5 2...

Страница 4: ...tion 55 6 25 2 Standalone Control 55 6 25 3 Standalone Status 55 6 25 4 Standalone Subroutines 56 6 25 5 Error Handling 56 6 25 6 Standalone Variables 56 6 25 7 Standalone Run on Boot Up 57 6 26 STORING TO FLASH 57 7 Software Overview 59 7 1 MAIN CONTROL SCREEN 61 7 1 1 Status 61 7 1 2 Control 63 7 1 3 On The Fly Speed Control 65 7 1 4 On The Fly Position Control 66 7 1 5 Sync Outputs 66 7 1 6 Dig...

Страница 5: ...mple Program 2 Single Thread 90 9 2 3 Standalone Example Program 3 Single Thread 90 9 2 4 Standalone Example Program 4 Single Thread 91 9 2 5 Standalone Example Program 5 Single Thread 91 9 2 6 Standalone Example Program 6 Single Thread 92 9 2 7 Standalone Example Program 7 Multi Thread 93 9 2 8 Standalone Example Program 8 Multi Thread 94 A Speed Settings 95 A 1 ACCELERATION DECELERATION RANGE 95...

Страница 6: ...ximum pulse output rate of 6M PPS Advanced Motion features Trapezoidal or s curve acceleration On the fly speed change XYZU linear coordinated motion XY circular coordinated motion XY arc coordinated motion Continuous linear coordinated buffered move for XYZ axes for smooth contouring A B Z differential encoder inputs Max frequency of 5 MHz StepNLoop closed loop control position verification Opto ...

Страница 7: ...ls for X Y Z U pulse dir enable outputs and alarm inputs The DB9 top board consists of DB9 female headers for X Y Z U pulse dir enable outputs The DB9 headers on these top boards are pin to pin compatible with the Arcus series motor driver DMX A2 DRV Contacting Support For technical support contact support arcus technology com Or contact your local distributor for technical support PMX 4EX SA Top ...

Страница 8: ...V 3 01 A Pulse Direction Enable Open Collector 24 V 40 mA Alarm Input Forward Diode Current 40 mA Digital Input Forward Diode Current 40 mA Digital Output Source Current 90 mA Operating Temperature 2 20 80 C Storage Temperature 2 55 150 C Table 2 0 1Only applicable to the TB9 top board option Current requirement is dependent on the driver settings 2Based on component ratings ...

Страница 9: ...PMX 4EX SA Manual page 9 Rev 3 11 3 Dimensions 3 1 PMX 4EX SA TBS Dimensions Figure 3 0 ...

Страница 10: ...PMX 4EX SA Manual page 10 Rev 3 11 3 2 PMX 4EX SA TB9 Dimensions Figure 3 1 ...

Страница 11: ...onnector Description 2 pin 0 2 5 08mm connector Mating Connector Manufacturer On Shore Mating Connector Manufacturer Part 1EDZ950 2 1 Other 5 08mm compatible connectors can be used 4 2 3 Pin RS 485 Connector 3 81mm Figure 4 1 Pin In Out Name Description 1 I G Ground 2 I O 485 RS 485 minus signal 3 I O 485 RS 485 plus signal Table 4 1 Mating Connector Description 3 pin 0 15 3 81mm connector Mating ...

Страница 12: ...ut 1 10 I AI2 Analog Input 2 Table 4 2 Mating Connector Description Female 10 pin 2mm dual row Mating Connector Manufacturer HIROSE Mating Connector Manufacturer Part DF11 10DS 2C 10 pin female connector DF11 2428SC female socket pin 4 4 10 Pin DI Connector 3 81mm Figure 4 3 Pin In Out Name Description 1 I VS Opto Supply 12V to 24 VDC for digital IO 2 I VG Opto Ground for digital IO 3 I DI1 Digita...

Страница 13: ...ompatible connectors can be used 4 5 8 Pin DO Connector 3 81mm Figure 4 4 Pin In Out Name Description 1 O DO1 Digital Output 1 2 O DO2 Digital Output 2 3 O DO3 Digital Output 3 4 O DO4 Digital Output 4 5 O DO5 Digital Output 5 6 O DO6 Digital Output 6 7 O DO7 Digital Output 7 8 O DO8 Digital Output 8 Table 4 4 Mating Connector Description 8 pin 0 15 3 81mm connector Mating Connector Manufacturer O...

Страница 14: ... HU Home U Axis 5 I LU Limit U Axis 6 I LZ Limit Z Axis 7 I HZ Home Z Axis 8 I LZ Limit Z Axis 9 I LY Limit Y Axis 10 I HY Home Y Axis 11 I LY Limit Y Axis 12 I LX Limit X Axis 13 I HX Home X Axis 14 I LX Limit X Axis Table 4 5 Mating Connector Description 14 pin 0 15 3 81mm connector Mating Connector Manufacturer On Shore Mating Connector Manufacturer Part 1EDZ1550 14 1Other 3 81 compatible conne...

Страница 15: ...r Input 4 I Z Z Index Encoder Input 5 I B B Channel Encoder Input 6 I B B Channel Encoder Input 7 I A A Channel Encoder Input 8 I A A Channel Encoder Input Table 4 6 Mating Connector Description 8 pin 0 15 3 81mm connector Mating Connector Manufacturer On Shore Mating Connector Manufacturer Part 1EDZ1550 8 1Other 3 81 compatible connectors can be used 1 ...

Страница 16: ...G Ground 2 O 5V 5V 3 I Al Alarm 4 NC NC No Connection 5 NC NC No Connection 6 O E Enable 7 O D Direction 8 O P Pulse Table 4 7 Mating Connector Description 8 pin 0 15 3 81mm connector Mating Connector Manufacturer On Shore Mating Connector Manufacturer Part 1EDZ1550 8 1Other 3 81 compatible connectors can be used 1 ...

Страница 17: ...ion 1 O V Driver Power 2 O P Pulse 3 O E Enable 4 I ALM Alarm Input 5V TTL 5 NC NC Reserved Do not make connection 6 O G Driver Ground 7 O D Direction 8 NC NC Reserved Do not make connection 9 O 5V 5V Table 4 8 The pins on the DB9 headers can be connected directly to a DMX A2 DRV module pin to pin compatible ...

Страница 18: ...Connector Description 2 pin 0 2 5 08mm connector Mating Connector Manufacturer On Shore Mating Connector Manufacturer Part 1EDZ950 2 1 Other 5 08mm compatible connectors can be used There are two separate driver power inputs The right side is for axes X Z The left side is for axes Y U The power requirement will be dependent on the driver specifications for each axis 1 ...

Страница 19: ...PMX 4EX SA Manual page 19 Rev 3 11 4 11 PMX 4EX SA Interface Circuit Figure 4 10 ...

Страница 20: ... top boards are all open collector outputs Figure 4 11 shows the detailed schematic of these outputs Each output is capable of sinking up to 40mA of current Figure 4 11 Figure 4 12 shows an example wiring diagram between the pulse direction and enable outputs on the PMX 4EX SA and the corresponding input on a typical stepper driver Figure 4 12 ...

Страница 21: ... Figure 4 13 The opto supply must be connected to 12 to 24VDC in order for the limit home and digital inputs to operate When the digital input is pulled to ground current will flow from the opto supply to ground turning on the opto isolator and activating the input To de activate the input the digital input should be left unconnected or pulled up to the opto supply preventing current from flowing ...

Страница 22: ... The maximum sink current for digital outputs is 45mA Take caution to select the appropriate external resistor so that the current does not exceed 45mA When deactivated the opto isolator will break the connection between the digital output and the opto supply 4 15 Encoder Input Connection Both single ended and differential quadrature encoder inputs are accepted When using single ended encoders use...

Страница 23: ...hould have a noise suppression choke to avoid communication loss or interruption See a typical USB network setup in figure 5 0 Figure 5 0 5 1 2 USB Communication API Communication between the PC and PMX 4EX SA is done using the Windows compatible DLL API function calls shown below Windows programming languages such as Visual BASIC Visual C LabView or any other programming language that can use a D...

Страница 24: ... Performax USB module BOOL fnPerformaxComSetTimeouts IN DWORD dwReadTimeout DWORD dwWriteTimeout This function is used to set the communication read and write timeout Values are in milliseconds This must be set for the communication to work Typical value of 1000 msec is recommended BOOL fnPerformaxComSendRecv IN HANDLE pHandle IN LPVOID wBuffer IN DWORD dwNumBytesToWrite IN DWORD dwNumBytesToRead ...

Страница 25: ...ver installer A sample of how to use this function along with this newest DLL is available for download on the website 2 USB Cable Another source of USB communication issues may come from the USB cable Confirm that the USB cable being used has a noise suppression choke See figure 5 1 Figure 5 1 5 2 Serial Communication The PMX 4EX SA has the ability to communicate over an RS 485 interface using an...

Страница 26: ... desired baud rate by using the DB command Return Value Description 1 9600 2 19200 3 38400 4 57600 5 115200 Table 5 1 To write the values to the device s flash memory use the STORE command After a complete power cycle the new baud rate will be written to memory Note that until a power cycle is completed the settings will not take effect By default the PMX 4EX SA has a baud rate setting of 9600 bps...

Страница 27: ...lowing techniques can be used to help reduce noise issues Daisy Chaining For a multi drop RS 485 network be sure that the network uses daisy chain wiring Figure 5 2 shows an example of a daisy chain network Number of Nodes The maximum number of nodes recommended is 32 Increasing beyond this number will require special attention Twisted Pair Wiring To reduce noise it is recommended to use twisted p...

Страница 28: ...ber using the DN command Note that this value must be within the range 4EX00 4EX99 For example to change the device number the command DN 4EX02 can be sent The device name can also be changed through the Setup window of the standard PMX 4EX SA software See section 8 for details By default all PMX 4EX SA start with device number 4EX00 To save a modified device number to the flash memory of the PMX ...

Страница 29: ...mmunicating over USB Standalone commands are used when writing a standalone program onto the PMX 4EX SA 6 1 Motion Profile By default the PMX 4EX SA uses trapezoidal velocity profile as shown in figure 6 0 Figure 6 0 S curve velocity profile can also be achieved by using the SCV axis command Setting this command to 1 will enable s curve for the indicated axis See figure 6 1 for details Figure 6 1 ...

Страница 30: ...to set get the deceleration value The EDEC command can be used if the acceleration and deceleration are symmetrical Set this command to 0 to use the ACC and ACC axis commands for both the acceleration and deceleration The minimum and maximum acceleration values depend on the high speed and low speed settings Refer to Table A 0 and Figure A 0 in Appendix A for details By default moves made by a sin...

Страница 31: ... fly speed change can be achieved at any point while the motor is in motion In order to perform an on the fly speed change s curve velocity profile must be disabled Before an on the fly speed change is performed the correct speed window must be selected To select a speed window use the SSPDM axis command Choosing the correct speed window will depend on the initial target speed and the final target...

Страница 32: ... encoder position of an individual axis use the E axis command When StepNLoop closed loop control is enabled the encoder counter commands return the encoder position and the pulse position commands return the real time target position of the motor When StepNLoop closed loop control is disabled the encoder counter commands return the encoder position and the pulse position commands return the step ...

Страница 33: ...turned See table 8 1 for details on error responses ASCII J axis Standalone JOG axis 6 7 Stopping When the motor is performing any type of move motion can be stopped abruptly or with deceleration It is recommended to use decelerated stops so that there is less impact on the system The ABORT axis command will immediately stop an individual axis Use the ABORT command to immediately stop ALL axes To ...

Страница 34: ...ill use the X Y Z and U commands and can consist of up to 4 target positions one for each axis At least two axis must be referenced in order to perform linear interpolation For example the X1000Y1000Z100U800 will move all for axis to position 1000 1000 100 800 Additionally the X1000Y 1000Z500 will move the X Y and Z axis to position 1000 1000 500 while the U axis remains idle ASCII X target Y targ...

Страница 35: ... X Y Standalone CIRP X Y CIRN X Y 6 11 Arc Interpolation Moves PMX 4EX SA supports arc interpolation moves using the ARCP and ARCN commands Arcs are drawn using X Y axes only The Z and U axis are not support for arc interpolation ARCP X Y θ Draw arc in CW direction where X Y signifies X Y position of the arc center and θ signifies the absolute arc angle ARCN X Y θ Draw arc in CCW direction where X...

Страница 36: ... the absolute angle parameter would be 45000 The absolute angle locations can be found in figure 6 3 Figure 6 3 Figure 6 4 will show the difference between issuing the ARCP0 0 90000 and the ARCN0 0 90000 command if both cases have the same starting point at the 0 Figure 6 4 ASCII ARCP X Y θ ARCN X Y θ Standalone ARCP X Y θ ARCN X Y θ ...

Страница 37: ...ommands will not be processed by the controller In standalone mode the buffered move command will have the syntax X pos Y pos Z pos and the speed for the move command will use the current global high speed setting If buffered mode is not enabled these standalone commands will be process as regular linear interpolation commands Circular and arc interpolation moves can also be added to the buffer Th...

Страница 38: ...tead an error response is returned See table 9 1 for details on error responses The PMX 4EX SA has five different homing routines In ASCII mode use the H command to perform a home move The syntax for the home command in ASCII mode can be found below H axis direction or homing mode 0 1 2 3 4 MODE 0 Home Input Only High speed only MODE 1 Limit Input Only MODE 2 Home Input and Z Index MODE 3 Z Index ...

Страница 39: ... Limit Only Use the H axis 1 command for ASCII mode or the LHOME axis command for standalone mode Figure 6 6 shows the homing routine Figure 6 6 A Issuing the command starts the motor from low speed and accelerates to high speed in search of the specified limit input B As soon as the relevant limit input is triggered the motor immediately stops motion Depending on the high speed it is possible tha...

Страница 40: ...re 6 7 shows the homing routine Figure 6 7 A Issuing the command starts the motor from low speed and accelerates to high speed in search of the home input B As soon as the home input is triggered the motor decelerates to low speed C After the home input is triggered the motor begins to search for the z index pulse D Once the z index pulse is found the motor immediately stops and the position is se...

Страница 41: ...this homing routine an encoder must be used on the specified axis Figure 6 8 shows the homing routine Figure 6 8 A Issuing the command starts the motor at low speed The motor will not use the high speed setting when performing this homing routine B Once the z index pulse is found the motor stops and the position is set to zero ASCII H axis 3 Standalone ZOME axis ...

Страница 42: ... and encoder counter to zero ASCII H axis 4 Standalone HLHOME axis 6 14 Limits and Alarm Switch Function Triggering the limit switch while the axis is moving will stop the motion immediately For example if the positive limit switch is triggered while moving in positive direction the motor will immediately stop and the motor status bit for positive limit error is set The same will apply for the neg...

Страница 43: ... input status 4 Plus limit input switch status 5 Minus limit input switch status 6 Home input switch status 7 Plus limit error This bit is latched when plus limit is hit during motion This error must be cleared using the CLR command before issuing any subsequent move commands 8 Minus limit error This bit is latched when minus limit is hit during motion This error must be cleared using the CLR comm...

Страница 44: ...uts and 8 digital outputs 6 16 1 Digital Inputs The digital input status of all 8 available inputs can be read with the DI command Digital input values can also be referenced one bit at a time by using the DI 1 8 commands Note that the indexes are 1 based for the bit references For example DI1 refers to bit 0 not bit 1 See table 6 3 for details Bit Description Bit Wise Command 0 Digital Input 1 DI...

Страница 45: ... on the corresponding bit of the DO command is 1 Otherwise the bit status is 0 The voltage level of the digital output when it is on or off is determined by the polarity setting See section 6 21 for details The initial state of the digital outputs can be defined by setting the DOBOOT register to the desired initial digital output value The DOBOOT value must be within the range of 0 255 The value i...

Страница 46: ...n standalone mode Similarly the triggered encoder position can be retrieved using the LT axis E command in ASCII mode or the LTE axis command in standalone mode When StepNLoop mode is enabled the position value should be ignored ASCII LT axis LT axis S LT axis P LT axis E Standalone LT axis LTS axis LTP axis LTE axis 6 18 Sync Outputs PMX 4EX SA has a designated synchronization digital output for ...

Страница 47: ...n the encoder position is EQUAL to sync position 2 Trigger when the encoder position is LESS than the sync position 3 Trigger when the encoder position is GREATER than sync position Table 6 8 The pulse width of the synchronization output can be set using the ASCII command SYN axis T or the standalone command SYNTIME axis The pulse width time is defined by milliseconds with a maximum length or 10ms...

Страница 48: ... value For example digital output value of 15 1111 in binary or 0xF in hex means joystick feature is enabled on all axes If joystick control is enabled StepNLoop is automatically disabled The JMAX axis command can be used to define the maximum analog input value for the specified axis This parameter has units of millivolts and a range of 0 to 5000 This value will define the analog input value in w...

Страница 49: ...is set using the ASCII commands JV1 JV2 JV3 and JV4 respectively For standalone mode the JOYHS axis command should be used This parameter will define the speed of the axis at the maximum and minimum analog input values The maximum allowable speed change delta for the X Y Z and U axis is set using the ASCII commands JV5 JV6 JV7 and JV8 respectively For standalone mode the JOYDEL axis command should...

Страница 50: ...tick speed at 5000 mV and 0 mV JV3 Z axis maximum joystick speed at 5000 mV and 0 mV JV4 U axis maximum joystick speed at 5000 mV and 0 mV JV5 X axis maximum speed change JV6 Y axis maximum speed change JV7 Z axis maximum speed change JV8 U axis maximum speed change JV9 X axis zero tolerance range for analog input JV10 Y axis zero tolerance range for analog input JV11 Z axis zero tolerance range f...

Страница 51: ...ASCII JE JMAX axis JMIN axis JV 1 4 JC 5 8 JL 1 16 Standalone JOYENA JOYHS axis JOYDEL axis 6 21 Polarity Using the PO axis command the polarity of the following signals can be configured Bit Description 0 Home 1 Alarm 2 Limit X axis limit input setting controls limit switch polarity for all axes 3 Pulse Direction 4 Encoder Direction Table 6 12 The polarity can also be set for the digital inputs a...

Страница 52: ...pe micro stepping encoder resolution and decoding multiplier Value must be in the range 0 001 999 999 SLR axis Tolerance Maximum error between target and actual position that is considered In Position In this case no correction is performed Units are in encoder counts SLT axis Error Range Maximum error between target and actual position that is not considered a serious error If the error exceeds t...

Страница 53: ...Limit homing Table 6 14 See Table 6 15 for SNL behavior within different scenarios Condition SNL behavior motor is moving SNL behavior motor is idle δ SLT Continue to monitor the DX axis In Position No correction is performed δ SLT AND δ SLE Continue to monitor the DX axis Out of Position A correction is performed δ SLT AND δ SLE Stall Error Motor stops and signals an error Error Range Error Motor...

Страница 54: ...is set it begins to count down to 0 Read and write to the timer register using the TR command The units are in milliseconds ASCII TR Standalone TR 6 24 Communication Time out Watchdog PMX 4EX SA allows for the user to trigger an alarm if a master has not communicated with the device for a set period of time When an alarm is triggered bit 11 of the MSTX parameter is turned on The time out value is ...

Страница 55: ...or examples of multi threading please refer to section 9 The following assignments can be used for the SR 0 3 command Value Description 0 Stop standalone program 1 Start standalone program 2 Pause standalone program 3 Continue standalone program Table 6 16 6 25 3 Standalone Status The SASTAT 0 3 command can be used to determine the current status of the specified standalone program Table 6 17 deta...

Страница 56: ...into error state If SUB 31 is defined by the user the code within SUB 31 will be executed Typically the code within subroutine 31 will contain the standalone command ECLEARX in order to clear the current error Section 9 contains examples of using subroutine 31 to perform error handling The return jump from subroutine 31 will be determined by the ASCII command SAP Write a 0 to this setting to have ...

Страница 57: ...gram 0 1 Standalone Program 1 2 Standalone Program 2 3 Standalone Program 3 Table 6 19 Standalone programs can also be configured to run on boot up using the Windows GUI See section 7 for details ASCII SR 0 3 SASTAT 0 3 SPC 0 3 GS 0 31 V 0 99 SLOAD Standalone SR 0 3 GOSUB 0 31 V 0 99 6 26 Storing to Flash The following items can be stored to flash by issuing the STORE command ASCII Command Descrip...

Страница 58: ...is S curve enable SL axis SLR axis SLE axis SLT axis SLA axis StepNLoop parameters SLOAD Standalone program run on boot up parameter TOC Time out counter reset value V50 V99 Note that on boot up V0 V49 are reset to value 0 Table 6 20 When a standalone program is downloaded the program is immediately written to flash memory ...

Страница 59: ...r a USB connection make sure that the PMX 4EX SA is connected to one of the available ports on the PC To communicate over RS485 make sure that the PMX 4EX SA is connected to the COM port Startup the PMX 4EX SA GUI program and you will see the following screen in figure 7 0 This will allow the user to search for all the motors that are currently connected to the USB network or RS485 bus Figure 7 0 ...

Страница 60: ...24VDC Check communication wiring The 485 from PMX 4EX SA is connected to 485 of the master and 485 from PMX 4EX SA is connected to 485 of the master Confirm that the device name is set correctly Default factory device name setting is 00 If this name has been changed and stored to flash enter the new name Once the correct serial settings have been determined the RS 485 button can be used to open th...

Страница 61: ...ll the available functions on the PMX 4EX SA All features can be tested and verified Figure 7 2 7 1 1 Status Figure 7 3 1 Position X Y Z U displays the current pulse position counter If StepNLoop is enabled this shows the real time target position 2 Encoder X Y Z U displays the current encoder position counter ...

Страница 62: ...s Z HOMING homing using Z index channel in progress ERR STALL StepNLoop has stalled ERR LIM plus minus limit error 6 Delta X Y Z U valid only for StepNLoop Displays the difference between the target positions and the actual position 7 Limit Home Alarm Input Status X Y Z U axes Indicators for the limit home and alarm inputs 8 Move Mode displays the current move mode for positional moves ABS absolut...

Страница 63: ...cles 5 ABS Set absolute move mode 6 INC Set incremental move mode 7 RP Reset pulse counter for the specified axis Not allowed if StepNLoop is enabled 8 RE Reset encoder counter for the specified axis 9 SP Set pulse counter for the specified axis This will use the value in the Target position field 10 SE Set encoder counter for the specified axis This will use the value in the Target position field...

Страница 64: ...he user with an interface to load buffer move commands to the PMX 4EX SA Figure 7 5 a Buffer Array List Enter the desired list of buffer commands here Once the list is loaded if the number of commands is greater than 36 max buffer size the program will automatically send the remaining commands to the PMX 4EX SA as spaces clears up in the buffer b Buffer enable Enable Disable buffer move mode c Loa...

Страница 65: ...the user with an interface to perform Arc Circle XY moves This will bring up the window shown in figure 7 6 Figure 7 6 Note that after an arc or circle move is started the position speed values of the main control window will not begin to update until the above window is closed 7 1 3 On The Fly Speed Control Figure 7 7 1 Select X Y Z U axis 2 Speed configure the destination speed of the axis 3 Acc...

Страница 66: ...ration 7 1 4 On The Fly Position Control Figure 7 8 1 Position set the new target position for the specified axis 2 SP Perform and on the fly position change Only valid during single axis position moves 7 1 5 Sync Outputs Figure 7 9 1 Sync output status X Y Z U displays the current sync output status OFF WAITING TRIGGERED 7 1 6 Digital Input Output Figure 7 10 ...

Страница 67: ...o turn on off a digital output click on the corresponding circle 7 1 7 Analog Inputs Figure 7 11 1 Analog Inputs displays the analog input status of AI1 AI8 Units are in mV 7 1 8 Program File Control Figure 7 12 1 Open Open standalone program 2 Save Save standalone program 3 New Clear the standalone program editor 4 View View the compiled program 1 ...

Страница 68: ...ng and editing a standalone program 2 Clear Code Space Clear the code space on the PMX 4EX SA 7 1 10 Standalone Program Control Figure 7 14 1 Run run the standalone program PRG 0 2 Stop stop the standalone program PRG 0 3 Pause pause the standalone program PRG 0 4 Cont continue the paused standalone program PRG 0 ...

Страница 69: ...ng executed 7 Status the current status of the standalone program PRG 0 Idle Program is not running Running Program is running Paused Program is paused Error Program is in an error state 7 1 11 Standalone Program Compile Download Upload Figure 7 15 1 Compile Compile the standalone program 2 Download Download the compiled program 3 Upload Upload the standalone program from the controller ...

Страница 70: ...X Y Z U set the home alarm pulse direction and encoder direction polarity b S crv X Y Z U set s curve enable disable for each axes c Limit set the limit polarity Note that the limit polarity is fixed either high low for all axes d DOP set the digital output polarity e DIP set the digital input polarity ...

Страница 71: ...RS485 set baud rate used for RS 485 communication 5 Bootup Parameters a Auto Run N start the selected standalone program on bootup b DOBOOT EOBOOT set the digital and enable output configuration status on boot up 6 Miscellaneous Settings a IERR enable disable the ignore limit alarm error feature b IACC enable disable I move acceleration used with buffered I commands c EDEC enable disable unique de...

Страница 72: ...responding response 2 Device Name Device name of the PMX 4EX SA In USB communication mode the field is fixed In RS 485 communication mode this field can be modified so that the user can communicate with a specific device 3 Command line ASCII command line 4 Save Save the current contents of the Response Box to file ...

Страница 73: ... the current latch status ON Latch has been triggered OFF Latch is disabled WAITING Latch is enabled and is waiting to be triggered 3 Position Latched position value Note that this is reset to 0 each time that the latch is enabled 4 Encoder Latched encoder value Note that this is reset to 0 each time that the latch is enabled ...

Страница 74: ... 74 Rev 3 11 7 1 15 Variable Status Figure 7 19 1 Volatile Variables status of volatile variable V0 V49 2 Non volatile Variables status of non volatile variable V50 V99 3 Command line set variables using V 0 99 value syntax ...

Страница 75: ... 75 Rev 3 11 7 2 DXF Converter The DXF Converter allows a 2D DXF file to be converted to a standard Arcus A Script standalone program The program can be downloaded to the PMX 4EX SA to allow for easy development Figure 7 20 ...

Страница 76: ...d DXF file The Load DXF File button can be used to load a 2D file 7 2 2 Status Figure 7 22 1 Current inch mm position X Y axes 2 Current speed X Y axes 3 Motor status X Y axes Idle motor is not moving Accel motor is accelerating Const motor is running in constant speed Decel motor is decelerating 1 2 3 4 5 ...

Страница 77: ...ng circle 7 2 3 Control Figure 7 23 1 Home X homes the X axis in the negative direction using only the home input 2 Home Y homes the Y axis in the negative direction using only the home input 3 Abort immediately stops all movement 7 2 4 DXF Action Figure 7 24 1 Parameter Setup allows the user to setup the scaling of the DXF conversion Once the button is clicked the following screen appears ...

Страница 78: ...celeration settings d Pen Up Routine The routine when the XY axis is not in position e Pen Down Routine The routine when the XY axis is in position f Save Close parameters and exit setup 2 Load DXF File browse your PC for a 2D DXF file to load into the DXF Viewer 3 Convert File Convert the loaded DXF file into PMX 4EX SA compatible motion commands The result will be loaded into the Motion Conversi...

Страница 79: ...ating a compatible DXF file Margins Many times a DXF file may have extra text or margins describing the project These should be removed The only elements in the DXF file should be the picture that is desired to be drawn Radius Size PMX 4EX SA does not allow a radius larger than 134216773 pulses on arc or circular moves To keep your radius moves smaller than 134 216 773 decrease the Length Pulse Fa...

Страница 80: ... example Figure 7 28 In this case the window is zoomed out too much To zoom in increase the Max Stroke Length parameter In the case where you do not see any picture or the picture is cut off the window is zoomed in too much See below for an example Figure 7 29 To zoom out decrease the Max Stroke Length parameter When creating a DXF file the scaling is maintained when you load it into the DXF conve...

Страница 81: ...seconds OK AI 1 8 Return the analog input status in milli volts 0 5000 ARCP X Y θ XY Arc interpolation move CW direction OK ARCN X Y θ XY Arc interpolation move CCW direction OK BF Disable buffered mode OK BO Enable buffer mode OK CIRP X Y XY Circular interpolation move CW direction OK CIRN X Y XY Circular interpolation move CCW direction OK CLR axis Clear the axis limit alarm or StepNLoop error s...

Страница 82: ...s or minus direction using the specified homing mode OK I X axis Y axis Z axis speed XYZ interpolated move Target move values are separated by character Last value is the constant speed that will be used in the move Buffer mode must be enabled OK IACC Return the automatic acceleration setting during buffered interpolated move status 0 1 IACC 0 1 Set the automatic acceleration setting during buffer...

Страница 83: ...tandalone program status Refer to Table 6 17 0 4 SCV axis Returns the s curve acceleration deceleration setting 0 1 SCVX 0 1 Returns the s curve acceleration deceleration setting OK SLA axis Return the StepNLoop maximum attempt value 32 bit number SLA axis value Set the StepNLoop maximum attempt value OK SLE axis Return the StepNLoop error range value 32 bit number SLE axis value Set the StepNLoop...

Страница 84: ...ister value in milliseconds milliseconds TR value Set the timer register value in milliseconds OK V 0 99 Return the standalone variable value 32 bit number V 0 99 value Set the standalone variable value OK VER Return the controller firmware version V X target X Y target Y Z target Z U target U Perform an individual interpolated move OK Table 8 0 8 2 Error Codes If an ASCII command cannot be proces...

Страница 85: ...v 3 11 Sub not Initialized Call to a subroutine using the GS command is not valid because the specified subroutine has not been defined Timer Running An attempt to set the timer register while it is running has been made Table 8 1 ...

Страница 86: ...C move in CCW direction using the X and Y axis X and Y represent the arc center move CCW to angle 90 degrees ARCN1000 0 90000 BUFOFF W Turn the buffer move mode setting off BUFOFF BUFON W Turn the buffer move mode setting on BUFON CIRP X Y W Perform circle move in CW direction using the X and Y axis X and Y represent the circle center Perform CW circle around 0 0 CIRP0 0 CIRN X Y W Perform circle ...

Страница 87: ...DZ V1 IF ELSEIF ELSE ENDIF Perform a standard IF ELSEIF ELSE conditional Any command with read ability can be used in a conditional ENDIF should be used to close off an IF statement Conditions are available IF DI1 0 DO 1 Turn on DO1 ELSEIF DI2 0 DO 2 Turn on DO2 ELSE DO 0 Turn off DO ENDIF INC W Set the move mode to incremental mode INC X1000 increment by 1000 JOG axis W Move the motor indefinitel...

Страница 88: ...UB 0 31 ENDSUB Defines the beginning of a subroutine ENDSUB should be used to define the end of the subroutine SUB 1 DO 4 ENDSUB SYNCFG axis W Set the sync output configuration See Table 6 8 for details SYNCFGX 2 Equal to setting SYNOFF axis W Disable the sync output configuration SYNOFFX Turn off sync SYNON axis W Enable the sync output configuration SYNONX Turn on sync SYNPOS axis W Set the sync...

Страница 89: ...0Y2000 X1000Y2000U4000 X1000Z3000 Y position W If in absolute mode move the Y motor to position If in incremental mode move the motor to current position position Y1000 ZHOME axis W Home the motor using the home input and Z index See section 6 13 3 for details ZHOMEX positive X home WAITX ZOME axis W Home the motor using the Z index only See section 6 13 4 for details ZOMEX negative X home WAITX Z...

Страница 90: ...ITX Wait for X axis move to complete ENDWHILE Go back to WHILE statement END 9 2 3 Standalone Example Program 3 Single Thread Task Move the motor back and forth 10 times between position 1000 and 0 HSPD 20000 Set the high speed to 20000 pulses sec LSPD 1000 Set the low speed to 1000 pulses sec ACC 300 Set the acceleration to 300 msec EO 1 Enable the motor power V1 0 Set variable 1 to value 0 WHILE...

Страница 91: ...NDIF ENDWHILE Go back to WHILE statement END 9 2 5 Standalone Example Program 5 Single Thread Task Using a subroutine increment the motor by 1000 whenever the DI1 rising edge is detected HSPD 20000 Set the high speed to 20000 pulses sec LSPD 1000 Set the low speed to 1000 pulses sec ACC 300 Set the acceleration to 300 msec EO 1 Enable the motor power V1 0 Set variable 1 to zero WHILE 1 1 Forever l...

Страница 92: ...wer WHILE 1 1 Forever loop IF DI1 1 If digital input 1 is on X1000 Move to 1000 WAITX Wait for X axis move to complete ELSEIF DI2 1 If digital input 2 is on X2000 Move to 2000 WAITX Wait for X axis move to complete ELSEIF DI3 1 If digital input 3 is on X3000 Move to 3000 WAITX Wait for X axis move to complete ELSEIF DI5 1 If digital input 5 is on HOMEX Home the motor in negative direction WAITX Wa...

Страница 93: ...00 Set low speed to 500 pulses sec ACC 500 Set acceleration to 500 msec WHILE 1 1 Forever loop X0 Move to position 0 WAITX Wait for the move to complete X1000 Move to position 1000 WAITX Wait for the move to complete ENDWHILE Go back to WHILE statement END End Program 0 PRG 1 Start of Program 1 WHILE 1 1 Forever loop IF DI1 1 If digital input 1 is triggered ABORTX Stop movement SR0 0 Stop Program ...

Страница 94: ...es sec LSPD 500 Set low speed to 500 pulses sec ACC 500 Set acceleration to 500 msec TOC 5000 Set time out alarm to 5 seconds EO 1 Enable motor WHILE 1 1 Forever loop X0 Move to position 0 WAITX Wait for the move to complete X1000 Move to position 1000 WAITX Wait for the move to complete ENDWHILE Go back to WHILE statement END End Program 0 PRG 1 Start of Program 1 WHILE 1 1 Forever loop V1 MSTX 2...

Страница 95: ...e acceleration deceleration values depend on the LS and HS settings The minimum acceleration deceleration setting for a given high speed and low speed is shown in Table A 0 The maximum acceleration deceleration setting for a given high speed and low speed can be calculated using the formula Note The ACC parameter will be automatically adjusted if the value exceeds the allowable range Max ACC HS LS...

Страница 96: ...osition where the controller begins deceleration is less than L 2 the acceleration value is used for both ramp up and ramp down This is regardless of the EDEC setting 2 ACC vs DEC 2 If the theoretical position where the controller begins constant speed is greater than L 2 the acceleration value is used for both ramp up and ramp down This is regardless of the EDEC setting 3 Triangle Profile If eith...

Страница 97: ...act Information Arcus Technology Inc 3159 Independence Dr Livermore CA 94551 925 373 8800 www arcus technology com The information in this document is believed to be accurate at the time of publication but is subject to change without notice ...

Отзывы: