


XL35R
3
rev. 07/28/08
SETUP
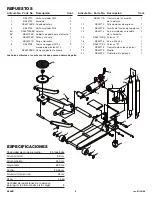
1. Remove the 2-piece handle from box. Insert narrow portion of top section (17) into bottom section (15) and secure with
bolt (16) provided.
2. Grease the inside of the handle yoke (11) and remove the handle set screw (13) from the yoke (11). Insert the handle (15)
all the way in the handle yoke (11) until it engages the release valve hexagonal linkage (18). Secure the handle (15) to the
handle yoke (11) with the handle set screw (13).
3.
Before Use:
Air may become trapped in the hydraulic system.
PURGING AIR FROM THE HYDRAULIC SYSTEM:
a. Open release valve by turning handle counterclockwise two full turns.
b. Pump the handle ten full pump strokes.
c. Close the release valve by turning the handle in a clockwise direction until tight.
d. Pump the jack until the lift arm is raised to maximum height.
e. If the pumping condition seems better, repeat steps "a" through "d" until all the air is purged from the system.
OPEraTing inSTrUcTiOnS
This is the safety alert symbol used for the OPERATING INSTRUCTIONS section of this manual to alert you to
potential personal injury hazards. Obey all instructions to avoid possible injury or death.
IMPORTANT:
Before attempting to raise any vehicle, check vehicle service manual for recommended lifting surfaces.
OPEraTiOn:
1.
To raise load:
Close release valve tightly (by turning handle clockwise).
DO NOT OVERTIGHTEN.
Position jack under
load so that saddle will contact load firmly and load is centered so it cannot slip. Operate jack handle until saddle
approaches the load. Once again, check to see that saddle is correctly positioned. Raise load to desired height. Place
jack stands of appropriate capacity under the vehicle.
DO NOT CRAWL UNDER VEHICLE WHILE LIFTING VEHICLE
OR PLACING OR REMOVING JACK STANDS!
Place jack stands at vehicle manufacturer’s recommended support
areas that provide stable support for the raised vehicle. Once jack stands are positioned, open the release valve VERY
SLOWLY (by turning the handle counterclockwise). Lower the load to rest on the jack stands. Then, make sure that the
release valve on the jack is closed tightly (by turning the handle clockwise).
2.
To lower load:
Re-check to make sure release valve is tightly closed. Then, operate the jack handle until the load
is raised enough to remove the jack stands.
DO NOT CRAWL UNDER VEHICLE WHILE LIFTING VEHICLE OR
REMOVING THE JACK STANDS!
Once jack stands are removed, open release valve very slowly to lower the vehicle.
Lower jack completely so that the vehicle is securely resting on the ground and the jack no longer makes contact with
vehicle.
CAUTION:
Keep hands and feet away from the hinge mechanism of the jack.
PrEVEnTaTiVE MainTEnancE
This is the safety alert symbol used for the PREVENTATIVE MAINTENANCE section of this manual to alert you to
potential personal injury hazards. Obey all instructions to avoid possible injury or death.
1. Always store the jack in a well protected area where it will not be exposed to inclement weather, corrosive vapors,
abrasive dust, or any other harmful elements. The jack must be cleaned of water, snow, sand or grit before using.
2. The jack must be lubricated periodically in order to prevent premature wearing of parts. A general purpose grease must
be applied to all grease zerk fittings, caster wheels, front axle wheels, elevator arm, handle base pivot bolts, release
mechanism and all other bearing surfaces.
3. It should not be necessary to refill or top off the reservoir with hydraulic fluid unless there is an external leak. An
external leak requires immediate repair which must be performed in a dirt-free environment by qualified hydraulic repair
personnel who are familiar with this equipment.
IMPORTANT:
In order to prevent seal damage and jack failure, never use alcohol, hydraulic brake fluid or transmission oil
in the jack.
4. Every jack owner is responsible for keeping the jack labels clean and readable. Use a mild soap solution to wash
external surfaces of the jack but not any moving hydraulic components.
5. Inspect the jack before each use. Do not use the jack if any component is cracked, broken, bent, shows signs of
damage or leaks hydraulic fluid. Do not use the jack if it has loose or missing hardware or components, or is modified in
any way. Take corrective action before using the jack again.
6. Do not attempt to make any hydraulic repairs unless you are a qualified hydraulic repair person that is familiar with this
equipment.
Содержание XL35R
Страница 1: ...Owner s Manual Manual del usuario...


