Arbor Technology Gladius G1052C Скачать руководство пользователя страница 54

- 40 -

Getting Started

2. 

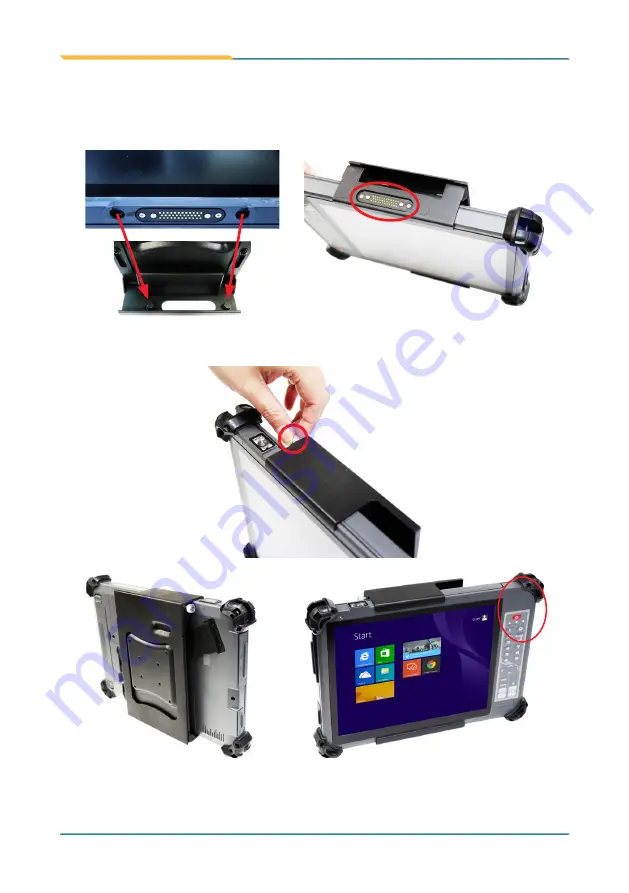
When mounting the computer, align the two holes at the computer’s bottom with the 

two positioning columns on the VESA-mount bracket. After the computer is mounted, 

turn the computer over and check if the access to the POGO connector is clear.

3. 

Rotate the knob tightly to fix the computer to the VESA-mount bracket.

Содержание Gladius G1052C

Страница 1: ...Gladius G1052C CS R 10 4 Intel Celeron N2930 Rugged Tablet PC User s Manual Version 1 1 P N 4012105200110P 2019 04...

Страница 2: ...II This page is intentionally left blank...

Страница 3: ...AN MSR Smart Card Reader and GPS to be BTO service Modified camera as optional module 1 4 Inside the Package Added G1052R stylus and removed driver CD 1 5 2 Configure to Order Build to Order Service M...

Страница 4: ...ii This page is intentionally left blank...

Страница 5: ...age 6 1 5 Ordering Information 7 1 5 1 Optional Accessories 7 1 5 2 Configure to Order Build to Order Service 8 Chapter 2 Getting Started 11 2 1 System Overview 12 2 1 1 Dimensions 12 2 1 2 Tour the C...

Страница 6: ...3 1 2 2 Handwriting Recognition 50 3 2 Use Physical Function Keys 51 3 3 Use Wi Fi 52 3 4 Use Bluetooth 54 3 4 1 Launch Bluetooth 54 3 4 2 Bluetooth Device Name 55 3 4 3 Hide Expose Computer 55 3 4 4...

Страница 7: ...uration 85 5 2 2 PCI Express Configuration 85 5 2 3 USB Configuration 85 5 2 4 Miscellaneous Configuration 86 5 2 5 SATA Configuration 86 5 3 Security 87 5 4 Power 88 5 4 1 Advanced CPU Control 89 5 5...

Страница 8: ...shielded cables This kind of cable is available from ARBOR Please contact your local supplier for ordering information FCC Class B This device complies with Part 15 of the FCC Rules Operation is subj...

Страница 9: ...or all terminations Sn 96 96 5 Ag 3 0 3 5 and Cu 0 5 SVHC REACH To minimize the environmental impact and take more responsibility to the earth we live Arbor hereby confirms all products comply with th...

Страница 10: ...equipment has obvious signs of breakage 17 The sound pressure level at the operator s position according to IEC 704 1 1982 is no more than 70dB A 18 Keep this User s Manual for later reference 19 DO N...

Страница 11: ...Vacuum cleaner Absorb the dust dirt hair cigarette particles and other particles out of the device can be one of the best cleaning methods Over time these items can restrict the airflow in a device a...

Страница 12: ...n properly maintained You may choose to replace your battery when it no longer holds sufficient charge to meet your needs Disposing of Your Old Computer Within the European Union EU wide legislation a...

Страница 13: ...r it at no additional charge except as set forth in the following terms This warranty does not apply to products damaged by misuse modifications accident or disaster Vendor assumes no liability for an...

Страница 14: ...xii This page is intentionally left blank...

Страница 15: ...1 1 Chapter 1 Introduction Chapter 1 Introduction...

Страница 16: ...low power consumption Fully rugged for mobile POS or warehousing application Meeting MIL STD 810G IP54 4 ft drop resistance High mobility multiple connectivity Bluetooth WLAN WWAN Identification devi...

Страница 17: ...FC Reader distance 3 5cm speed 5 cards sec optional WWAN HSUPA HSPA LTE BTO Barcode Scanner 1 x 1D 2D Barcode scanner optional MSR 1 x Magnetic Stripe Reader BTO Smart Card Reader 1 x Smart Card Reade...

Страница 18: ...l external battery pack 1 x 1880mAh 3 cell internal battery pack optional Battery Life Up to 8 hours depends on configuration and use Mechanical Environmental Operating Temp 20 45 C 4 113 F Storage Te...

Страница 19: ...5022 class B FCC 47 CFR Part 15 Subpart B OS Support Windows Embedded 7 Windows 7 Professional Windows Embedded Standard 8 0 Windows Embedded 8 1 Industry Pro Windows 8 1 Professional Windows 10 IoT E...

Страница 20: ...tor The package should contain the following items 1 x G1052 computer 1 x User s Manual Power Adapter 1 x Europe Standard cordset 1 x American Standard cordset 1 x 19V 3 42A 65W AC DC adapter eBAT 105...

Страница 21: ...N2930 rugged tablet PC with resistive touch battery pack WLAN and Bluetooth 1 5 1 Optional Accessories The following items are normally optional but some vendors may include them as a standard package...

Страница 22: ...cting one or more components from the list below to be fabricated to the computer Note that the GRS SRS and MSR CANNOT co exist on the computer as they occupy the same installation position Please sel...

Страница 23: ...9 Introduction RFID NFC 1050 13 56MHz RFID NFC Kit CAM 1052 5 0M Rear CMOS Camera Kit LTE 1052 4G LTE Wireless Kit BTO...

Страница 24: ...10 This page is intentionally left blank...

Страница 25: ...11 2 Chapter 2 Getting Started Chapter 2 Getting Started...

Страница 26: ...System Overview Understanding the computer help you jump seamlessly from component to component when using the computer This section will quickly familiarize you with the computer 2 1 1 Dimensions 294...

Страница 27: ...on keys Esc key Full stop key Touch screen Barcode Scanner configure to order 2 1 2 1 Front Side Power Button Use the Power Button to power on off the computer or to put the computer to Sleep or Hiber...

Страница 28: ...Three status LED lights are built on the front side of the computer to draw users prompt awareness of the computer s contiguous events such as power charging and wireless activity Power LED ALL Green...

Страница 29: ...s are activated Bluetooth WWN Blue Lights blue and starts blinking when the Bluetooth is activated Green Lights green when the WWAN is activated Touch Screen The computer comes with either a resistive...

Страница 30: ...op Bottom Sides Barcode Scanner configure to order 35 pin Pogo Connector for connection with desktop cradle 2 1 2 3 Left Right Sides Power Jack USB 2 0 port SD SDHC Slot USB 2 0 port Audio out Jack Ex...

Страница 31: ...Auto Focus Camera External Hot swappable Battery Integrated 2W Speaker Hand Strap Stylus Battery Latch Battery Latch To install batteries see 2 2 3 Instructions for Rechargeable Battery Pack on page 2...

Страница 32: ...1 Install Replace External Battery To replace the external battery 1 Disconnect the computer from the external power 2 Remove any peripheral devices connected to the computer 3 Find the external batte...

Страница 33: ...xternal battery out of the battery bay 6 Slide another battery into the battery bay 7 Slide the two battery latches back to the lock positions Slide the battery latch to the lock position Slide the ba...

Страница 34: ...y follow the guide below 1 Turn off the computer and disconnect the computer from the external power 2 Remove any peripheral devices connected to the computer 3 Find the internal battery chamber on th...

Страница 35: ...internal battery inside the battery chamber as illustrated above Have an internal battery Plug the internal battery s power cable to the said power connector Connect the power cable 7 Fit the interna...

Страница 36: ...y of the battery When charging finishes the power status LED on the front panel will stop blinking light to steady green and then it s recommended to remove the adapter from the computer It s recommen...

Страница 37: ...a car or near fire Don t disassemble the battery or the battery leakage might cause skin or eye injury If electrolyte leaking from the battery contacts your skin or clothing immediately flush it with...

Страница 38: ...a SIM card to the computer so it can network with 3G 1 Turn off the computer and disconnect the computer from the external power 2 Remove any peripheral devices connected to the computer 3 Find the i...

Страница 39: ...above Have an SIM card Position the SIM card as the graphic inside the chamber directs Then insert the SIM card into the slot Insert the SIM card into the slot 7 Restore the internal battery into the...

Страница 40: ...26 Getting Started 2 4 Install Hand Strap Attach the hand strap to the rear of the computer to make it easier to hold the computer in one hand Find the four holes and fasten the strap onto the compute...

Страница 41: ...rap the computer also provides a shoulder strap SST 0720 for shoulder carrying the computer Install as below 1 Press one clasp against one upper bumper as illustration until it hooks on the computer t...

Страница 42: ...e neck strap Thread it through one of the upper corner bumpers of the computer and re tie the end 2 Repeat the same action in step 1 to the other end of the neck strap Wear the neck strap around your...

Страница 43: ...fications Features Peripherals Color Material Gray Plastic I O Ports 3 x USB 1 x RJ 45 1 x DC Plug Back side Mechanical Environmental Operating Temp 20 45 C 4 113 F Charging Temp 0 40 C 32 104 F Stora...

Страница 44: ...30 Getting Started 2 7 3 Dimensions 177 1 100 6 99 3 33 6 177 1 100 6 99 3 33 6 Unit mm...

Страница 45: ...at the Computer Follow the guide below to seat the computer into the cradle 1 Seat the computer into the cradle with a slanted angle 2 Make sure the 35 pin POGO connector on the computer meet the dock...

Страница 46: ...poles near the POGO connector on the cradle These will help you fit the computer into the cradle After you connect the cradle to the computer and power on the computer the system will detect the LAN...

Страница 47: ...Use USB cables to connect the computer with the external devices such as CD ROM hard disk drives camera or card reader Plug a LAN cable of RJ 45 type to the LAN port for connecting with the network d...

Страница 48: ...al This optional battery charger features two channels to charge two 4S1P external batteries for the computer Go through this section to find out more about this battery charger 2 8 1 Overview Power J...

Страница 49: ...35 Getting Started 2 8 2 Dimensions 42 6 45 1 168 87 123 7 45 1 37 53 Unit mm...

Страница 50: ...1 x 123 7 mm 6 64 x 1 77 x 4 87 Weight Net 0 34 kg 0 75 lb Vibration 1 Grms 5 500Hz random operation Shock 10G peak acceleration 11 ms duration Power Requirement 19V 3 4A 65W Note In practice the cha...

Страница 51: ...al power by plugging the power cable with the power adapter to the charger s power jack 2 Put the first battery into one battery channel Be sure the metallic parts meet each other 3 During charging th...

Страница 52: ...light 2 8 5 Status LED The battery charger comes with two status LED lights When a battery is placed into one battery channel the responsible LED will light the color according to the battery level as...

Страница 53: ...1052 the computer can be further connected to the wall mount or RAM ball mount for easier operation The outer four screw holes are VESA 75 compliant 2 9 1 Overview connect RAM ball mount 2 9 2 Install...

Страница 54: ...es at the computer s bottom with the two positioning columns on the VESA mount bracket After the computer is mounted turn the computer over and check if the access to the POGO connector is clear 3 Rot...

Страница 55: ...t VSB 100 to make the computer compatible with VESA 100 To use the adapter bracket lock the bracket unto the VESA mount bracket as illustrated below Note the adapter bracket mustn t be used without th...

Страница 56: ...ed Connect Service to enable Intel Trusted Execution Engine Interface DPTF Required Install the Intel Dynamic Platform and Thermal Framework component MBI Required Install the driver for Intel Sideban...

Страница 57: ...eader driver if your computer comes with the smart card reader Function Keys Recommended Install the ARBOR System Suite to associate a function key with a specific feature or application program Power...

Страница 58: ...install the chipset driver first Then install other drivers listed on the menu For Windows 7 you also need to install the USB 3 0 and Net 4 0 driver Just follow the on screen instructions to proceed...

Страница 59: ...Power Saving AP The installation process of each driver is basically the same Just follow the on screen instructions to proceed 6 If your computer comes with optional modules like RS 232 barcode scann...

Страница 60: ...46 Getting Started To identify your 3G 4G model tap Start Control Panel Hardware and Sound Device Manager Other devices...

Страница 61: ...47 3 Chapter 3 Use the Computer Chapter 3 Use the Computer...

Страница 62: ...will walk you through the basic operations for these two kinds of touch 3 1 1 Projected Capacitive Touch Unlike the resistive touch the projected capacitive touch works by the change of capacitance wh...

Страница 63: ...the O S featured handwriting recognition 3 1 2 1 Onscreen Keyboard An onscreen keyboard is a virtual keyboard with all the standard keys The operating system has a native onscreen keyboard to facilit...

Страница 64: ...ing pad to get the job done To launch the O S featured writing pad 1 Open the onscreen keyboard as mentioned in Approach 1 on page 49 The onscreen keyboard opens 2 From the onscreen keyboard tap the k...

Страница 65: ...driver is installed an ARBOR System Suite shortcut will appear in the notification area and also at Start button All Programs Arbor Arbor System Suite v2 0 Arbor System Suite v2 0 ARBOR System Suite s...

Страница 66: ...the computer to a WiFi hotspot 1 Assign a function key to launch the WiFi as described in 4 1 ARBOR System Suite on page 78 for more details about ARBOR System Suite 2 Launch the WiFi module by hittin...

Страница 67: ...alog will open and request for the password If it is an open network it will be connected in a few seconds 5 Enter the password to access the Wi Fi network The Wi Fi network will be connected in a few...

Страница 68: ...For the Bluetooth module to work install the driver as described in 2 11 Driver Installation on page 42 3 4 1 Launch Bluetooth To be able to use Bluetooth launch the Bluetooth module first 1 Assign a...

Страница 69: ...e at Control Panel System and Security System 3 4 3 Hide Expose Computer By default the computer is NOT discoverable by other Bluetooth devices To hide or expose the computer 1 Launch the Bluetooth mo...

Страница 70: ...Select Open Settings from the context menu The O S featured Bluetooth Settings then open and show the Options tabbed page 4 On the Options tabbed page find the Discovery group box 5 Select or deselect...

Страница 71: ...tooth devices it has to pair with them To pair connect with other Bluetooth devices 1 Launch the Bluetooth module as described in 3 4 1 Launch Bluetooth on page 54 The Bluetooth launches 2 From the no...

Страница 72: ...is necessary to see the document of the Bluetooth device to connect and follow the onscreen instructions to proceed Note On the computer the Bluetooth exchanged files are save to local disk e g C User...

Страница 73: ...e camera is ready to use without driver To launch the camera 1 Assign a function key to launch the camera as described in 4 1 ARBOR System Suite on page 78 for more details about ARBOR System Suite Th...

Страница 74: ...at C Users your username My Documents ccd 3 5 3 Shoot A Video To shoot a video 1 Launch the camera also the camcorder as described in 3 5 1 Launch Camera on page 59 The camera application program aut...

Страница 75: ...ication program auto launches And the camera LED lights blue 2 From the camera application program s tool bar tap the configuration icon The Properties sheet opens 3 Make the configuration 4 Click the...

Страница 76: ...the operating system The operating system restarts And the AirCard Watcher automatically launches upon the OS startup In case the AirCard Watcher doesn t automatically launch manually launch it by cl...

Страница 77: ...mobile network is discovered the AirCard Watcher shows the name of the service provider and a 3G gauge in its screen with the signal strength bars in green The network is discovered To disconnect fro...

Страница 78: ...stallation on page 42 to install the drivers and the utility To use the GPS 1 After the drivers are installed for the GPS RS232 module two USB Serial Ports will be generated in the system Check it up...

Страница 79: ...u center by Start button All Programs u blox u center u center u center then opens onscreen 5 When u center is started for the 1st time the COM port needs to be initialized Find the Receiver Toolbar f...

Страница 80: ...ports the COM settings listed below Parity None Data Bits 8 Stop Bits 1 Flow Control None 6 Click the down arrow besides the Connect disconnect button A list of available COM ports opens 7 Select the...

Страница 81: ...ill change to green color and the software s screen will start to show the information about the satellite constellation signal to noise ratio time etc If the baud rate are not correctly set the Commu...

Страница 82: ...er To view the NMEA text click View Text Console from the menu bar of the u center Then a small window Text Console will open and show the NMEA text To conserve power always power off the GPS module w...

Страница 83: ...our daily work install your own application To test the RFID reader 1 Launch the RFID Demo AP by double clicking the shortcut icon on the desktop or clicking Start button All Programs RFID NFC_Demo De...

Страница 84: ...group box select USB_HID and then click the Connect button The Status column then changes to a green Connected message meaning that the RFID reader COM port is opened 5 From the menu bar click Mode R...

Страница 85: ...The Inventory tabbed page opens 7 Click the Start button The table on the Inventory tabbed page starts to show the column titles including UID No Read Count and Protocol And the RFID reader is ready...

Страница 86: ...tilities 8 Find the RFID reader at the upper right of the computer s front side RFID reader 9 Tap slightly contact the RFID reader with the RFID tag The read and decoded data will be displayed in the...

Страница 87: ...rcode scanner is ready to use without driver Follow the guide below to capture barcode data 1 Assign a function key to trigger scanning See 4 1 ARBOR System Suite on page 78 for more details about ARB...

Страница 88: ...ed printed barcode within the reach of the scanning light If the printed barcode is successfully read the barcode will be encoded and the encoded data will be shown in the text editor that you have la...

Страница 89: ...R Code Code 39 Micro QR Code Code 93 and 93i Postal Code 2 of 5 Intelligent Mail Barcode EAN formerly 4 state customer Interleaved 2 of 5 Australian Post Label Code British Post Matrix 2 of 5 Canadian...

Страница 90: ...76 This page is intentionally left blank...

Страница 91: ...77 4 Chapter 4 Utilities Chapter 4 Utilities...

Страница 92: ...Arbor System Suite installed on your computer tap the Arbor System Suite shortcut in the notification area to launch and use Arbor System Suite The ARBOR System Suite then opens on screen Function key...

Страница 93: ...n on off Wi Fi Associates a function key to trigger barcode scanning Associates a function key to turn on off Bluetooth Associates a function key to turn on off the camera Associates a function key to...

Страница 94: ...open close on screen keyboard Associates a function key to open close a program installed in the system When tapping the icon you will be prompted to select a program to associate with Browse the Wind...

Страница 95: ...81 5 Chapter 5 BIOS Chapter 5 BIOS...

Страница 96: ...er TXE FW Version displays the current version of the TXE firmware Build Date displays the date of building the BIOS Processor auto detected if installed System Bus Speed displays the processor speed...

Страница 97: ...creen Move to highlight previous next item Enter Select and access a setup item field Esc On the Main Menu Quit the setup and not save changes into CMOS a message screen will display and ask you to se...

Страница 98: ...up Utility Rev 5 0 Configures Boot Settings Advanced Security Power Boot Exit Main Boot Configuration PCI Express Configuration USB Configuration Miscellaneous Configuration Thermal Configuration SATA...

Страница 99: ...the USB ports and configure USB features The featured settings are Setting Description XHCI Pre Boot Mode Support Enables Disables XHCI Pre Boot mode support xHCI Mode Set the mode of operation of xH...

Страница 100: ...t 0 Hot Plug Capability Available only when Chipset SATA Mode is set to AHCI Enables disables hot pluggable feature for the SATA port Enabled is the default SATA Port 0 Connected to an ODD If enabled...

Страница 101: ...nter Select Item Select Menu F1 Exit ESC Help Setup Defaults F9 Save and Exit F10 Install or Change the password and the length of password must be greater than one character The featured setting is S...

Страница 102: ...lity Rev 5 0 Power Change Values F5 F6 Select SubMenu Enter Select Item Select Menu F1 Exit ESC Help Setup Defaults F9 Save and Exit F10 The featured setting is Setting Description Advanced CPU Contro...

Страница 103: ...F6 Select SubMenu Enter Select Item Select Menu F1 Exit ESC Help Setup Defaults F9 Save and Exit F10 Enable processor idel power saving states C States Setting Description C States Enables default di...

Страница 104: ...F9 Save and Exit F10 Allows InsydeH20 to skip certain tests while booting This will decrease the time needed to boot the system The featured settings are Setting Description Quick Boot Allow InsydeH2...

Страница 105: ...F6 Select SubMenu Enter Select Item Select Menu F1 Exit ESC Help Setup Defaults F9 Save and Exit F10 Normal Boot Menu Sets the boot option priority When set to Normal the submenu will allow configuri...

Страница 106: ...g Changes Exit Discarding Changes Load Optimal Defaults Change Values F5 F6 Select SubMenu Enter Select Item Select Menu F1 Exit ESC Help Setup Defaults F9 Save and Exit F10 The features settings are...

Отзывы: