background image

- 57 -

Getting Started

2.11.14. Install RS232 Driver (Configure-to-Order)

If the computer has the  RS232 / GPS 2-in-1 module or the RS-232 /Smart Card reader 

2-in-1 module, install the RS232 driver prior to make it run.

To install the RS232 driver:

1.  Launch the driver installer as described in 

2.11.2. Start to Install

 on page 

43

 and 

open the driver list.

The driver list then opens onscreen.

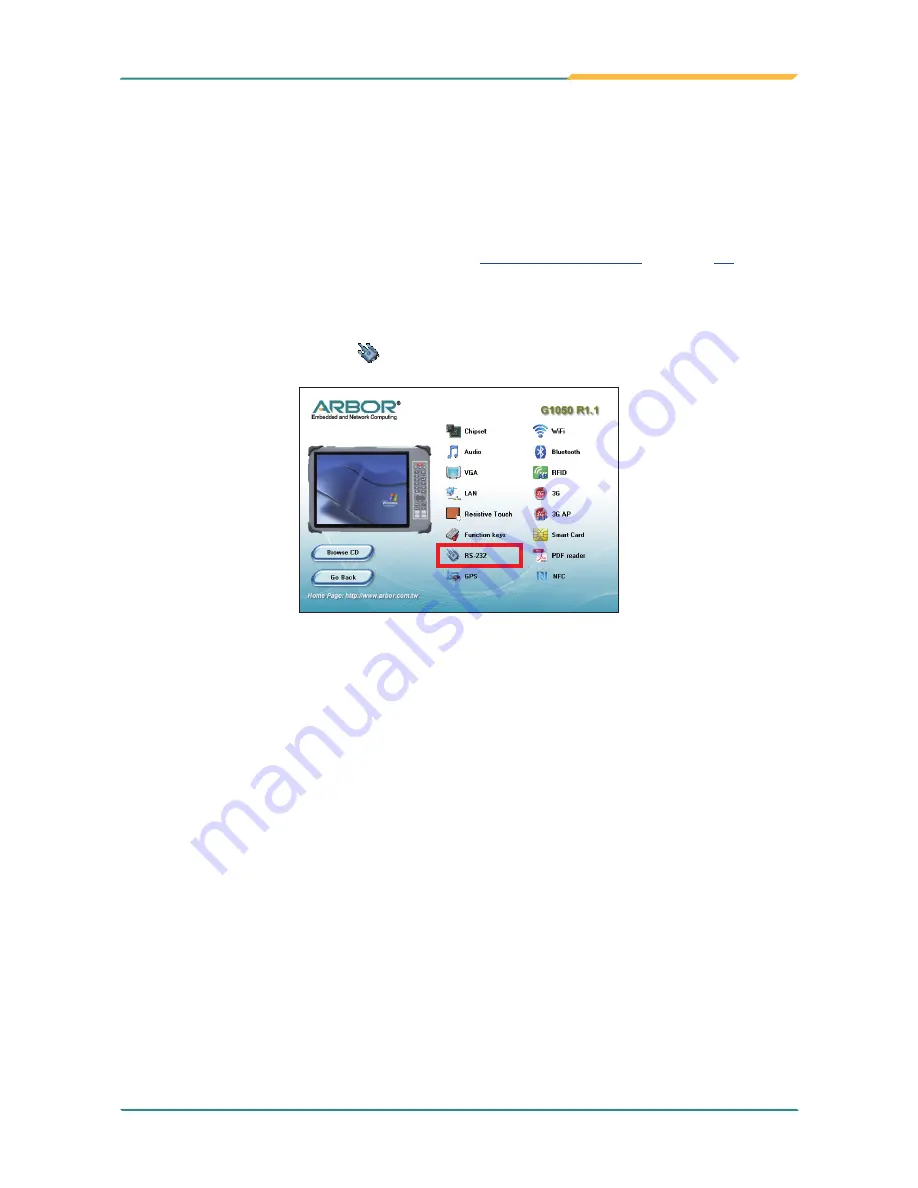
2.  Click/tap the 

RS-232

 icon  .

3.  Follow the onscreen instructions to proceed.

Содержание Gladius G1050 Series

Страница 1: ...Gladius G1050 Series 10 4 Intel Atom Z530P Rugged Tablet PC User s Manual Version 1 2 P N 4012105000120P 2013 06...

Страница 2: ...II This page is intentionally left blank...

Страница 3: ...allation steps in Section 2 6 8 option name in Section 1 2 1 1 2012 02 17 insert G1050S after G1050 expand Ordering Info add G1050S spec in LCD Display Power Supply Mechanical Environmental 1 1 2012 0...

Страница 4: ...ii This page is intentionally left blank...

Страница 5: ...tions 3 1 4 Inside the Package 6 1 5 Ordering Information 7 1 5 1 Optional Accessories 7 1 5 2 Configure to Order Service 8 Chapter 2 Getting Started 11 2 1 System Overview 12 2 1 1 Dimensions 12 2 1...

Страница 6: ...0 2 11 10 Install 3G Driver Utility Configure to Order 51 2 11 11 Install Cradle LAN Driver Optional 52 2 11 12 Install RFID Reader Driver Configure to Order 54 2 11 12 1 Program Your Own RFID Applica...

Страница 7: ...0 4 1 2 Use ARBOR System Suite 91 4 1 3 Customize Function Keys 94 4 2 PenMount Utilities Resistive Touch Only 95 4 2 1 PenMount Control Panel 95 4 2 1 1 Launch PenMount Control Panel 95 4 2 1 2 Devic...

Страница 8: ...shielded cables This kind of cable is available from ARBOR Please contact your local supplier for ordering information FCC Class B This device complies with Part 15 of the FCC Rules Operation is subj...

Страница 9: ...or all terminations Sn 96 96 5 Ag 3 0 3 5 and Cu 0 5 SVHC REACH To minimize the environmental impact and take more responsibility to the earth we live Arbor hereby confirms all products comply with th...

Страница 10: ...equipment has obvious signs of breakage 17 The sound pressure level at the operator s position according to IEC 704 1 1982 is no more than 70dB A 18 Keep this User s Manual for later reference 19 DO N...

Страница 11: ...the dust dirt hair cigarette particles and other particles out of the device can be one of the best cleaning methods Over time these items can restrict the airflow in a device and cause circuitry to c...

Страница 12: ...n properly maintained You may choose to replace your battery when it no longer holds sufficient charge to meet your needs Disposing of Your Old Computer Within the European Union EU wide legislation a...

Страница 13: ...at no additional charge except as set forth in the following terms This warranty does not apply to products damaged by misuse modifications accident or disaster Vendor assumes no liability for any da...

Страница 14: ...xii This page is intentionally left blank...

Страница 15: ...1 1 Chapter 1 Introduction Chapter 1 Introduction...

Страница 16: ...onal sunlight readable feature Ultra low power consumption Fully rugged for mobile POS or warehousing application Meeting MIL STD 810F IP54 122cm drop resistance High mobility multiple connectivity Bl...

Страница 17: ...Professional Peripherals Devices Camera 1 x 2 0 megapixels Auto Focus CMOS camera RFID Integrated 13 56MHz ISO 15693 14443A 14443B RFID Reader distance 3 5cm speed 5 cards sec optional Wi Fi Integrat...

Страница 18: ...Resolution 1024 x 768 XGA w 262 144 colors Luminance 340 cd m typ 800 cd m typ only for G1050S G1050S Lite Contrast Ratio 600 1 View Angle U D R L 89 89 89 89 Backlight Type LED Touch Screen Type Anal...

Страница 19: ...ng Humidity 10 95 45 C non condensing Dimensions W x D x H 205 x 294 x 25 mm 8 07 x 11 57 x 0 98 Gross Weight 1 1 kg 2 42 lb for G1050 Lite or G1050S Lite Vibration 3 Grms 5 500Hz random operation Sho...

Страница 20: ...dealer or distributor The package should contain the following items 1 x G1050 Series computer 1 x Driver CD 1 x User s Manual Power Adapter 1 x Europe Standard cordset 1 x American Standard cordset 1...

Страница 21: ...camera Bluetooth WiFi HSUPA RFID reader barcode scanner and sunlight readable display G1050S Lite 10 4 Intel Atom Z530P rugged tablet PC with resistive touch screen external battery pack WiFi and sun...

Страница 22: ...e computer more tailored to your needs by selecting one or more components from the list below to be fabricated to the computer Note that the GRS SRS and MSR CANNOT co exist on the computer as they oc...

Страница 23: ...9 Introduction SRS 1050 Smart Card Reader and RS 232 2in1 Kit MSR 1050 MSR Module Kit...

Страница 24: ...10 This page is intentionally left blank...

Страница 25: ...11 2 Chapter 2 Getting Started Chapter 2 Getting Started...

Страница 26: ...mlessly from component to component when using the computer This section will quickly familiarize you with the computer 2 1 1 Dimensions The following illustration shows the dimensions of the computer...

Страница 27: ...keys Esc key Full stop key Touch screen Barcode Scanner configure to order 2 1 2 1 Front Side Power Button Use the Power Button to power on off the computer or to put the computer to Sleep or Hiberna...

Страница 28: ...ase decrease the display brightness Status LED Three status LED lights are built on the front side of the computer to draw users prompt awareness of the computer s contiguous events such as power char...

Страница 29: ...and green when both modules are activated Bluetooth Blue Lights blue and starts blinking when the Bluetooth is activated Touch Screen The computer comes with either a resistive or a projected capaciti...

Страница 30: ...Barcode Scanner configure to order 35 pin Pogo Connector for connection with desktop cradle 2 1 2 3 Left Right Sides Power Jack 1 port of USB 2 0 default or ExpressCard 34 SD SDHC Slot USB 2 0 port A...

Страница 31: ...s Camera External Hot swappable Battery Integrated 2W Speaker Hand Strap Stylus Battery Latch Battery Latch To install batteries see 2 2 3 Instructions for Rechargeable Battery Pack on page 22 To use...

Страница 32: ...1 Install Replace External Battery To replace the external battery 1 Disconnect the computer from the external power 2 Remove any peripheral devices connected to the computer 3 Find the external batte...

Страница 33: ...xternal battery out of the battery bay 6 Slide another battery into the battery bay 7 Slide the two battery latches back to the lock positions Slide the battery latch to the lock position Slide the ba...

Страница 34: ...y follow the guide below 1 Turn off the computer and disconnect the computer from the external power 2 Remove any peripheral devices connected to the computer 3 Find the internal battery chamber on th...

Страница 35: ...internal battery inside the battery chamber as illustrated above Have an internal battery Plug the internal battery s power cable to the said power connector Connect the power cable 7 Fit the interna...

Страница 36: ...y of the battery When charging finishes the power status LED on the front panel will stop blinking light to steady green and then it s recommended to remove the adapter from the computer It s recommen...

Страница 37: ...a car or near fire Don t disassemble the battery or the battery leakage might cause skin or eye injury If electrolyte leaking from the battery contacts your skin or clothing immediately flush it with...

Страница 38: ...a SIM card to the computer so it can network with 3G 1 Turn off the computer and disconnect the computer from the external power 2 Remove any peripheral devices connected to the computer 3 Find the i...

Страница 39: ...above Have an SIM card Position the SIM card as the graphic inside the chamber directs Then click the SIM card into the slot Click the SIM card into the slot 7 Restore the internal battery into the c...

Страница 40: ...26 Getting Started 2 4 Install Hand Strap Attach the hand strap to the rear of the computer to make it easier to hold the computer in one hand Find the four holes and fasten the strap onto the compute...

Страница 41: ...rap the computer also provides a shoulder strap SST 0720 for shoulder carrying the computer Install as below 1 Press one clasp against one upper bumper as illustration until it hooks on the computer t...

Страница 42: ...e neck strap Thread it through one of the upper corner bumpers of the computer and re tie the end 2 Repeat the same action in step 1 to the other end of the neck strap Wear the neck strap around your...

Страница 43: ...ower jack 35 pin POGO connector 2 7 2 Specifications Features Peripherals Color Material Gray Plastic I O Ports 3 x USB 1 x RJ 45 1 x DC Plug Back side Mechanical Environmental Operating Temp 20 45 C...

Страница 44: ...30 Getting Started 2 7 3 Dimensions 177 1 100 6 99 3 33 6 177 1 100 6 99 3 33 6 Unit mm...

Страница 45: ...at the Computer Follow the guide below to seat the computer into the cradle 1 Seat the computer into the cradle with a slanted angle 2 Make sure the 35 pin POGO connector on the computer meet the dock...

Страница 46: ...rted Note You may notice that there are two small holes beside the POGO connector on the tablet and two small bulging poles near the POGO connector on the cradle These will help you fit the computer i...

Страница 47: ...s Use USB cables to connect the computer with the external devices such as CD ROM hard disk drives camera or card reader Plug a LAN cable of RJ 45 type to the LAN port for connecting with the network...

Страница 48: ...al This optional battery charger features two channels to charge two 4S1P external batteries for the computer Go through this section to find out more about this battery charger 2 8 1 Overview Power J...

Страница 49: ...35 Getting Started 2 8 2 Dimensions 42 6 45 1 168 87 123 7 45 1 37 53 Unit mm...

Страница 50: ...123 7 x 45 1 mm 6 64 x 4 87 x 1 77 Weight Net 0 34 kg 0 75 lb Vibration 1 Grms 5 500Hz random operation Shock 10G peak acceleration 11 ms duration Power Requirement 19V DC In Note In practice the char...

Страница 51: ...al power by plugging the power cable with the power adapter to the charger s power jack 2 Put the first battery into one battery channel Be sure the metallic parts meet each other 3 During charging th...

Страница 52: ...light 2 8 5 Status LED The battery charger comes with two status LED lights When a battery is placed into one battery channel the responsible LED will light the color according to the battery level as...

Страница 53: ...1050 the computer can be further connected to the wall mount or RAM ball mount for easier operation The outer four screw holes are VESA 75 compliant 2 8 1 Overview connect RAM ball mount 2 8 2 Install...

Страница 54: ...es at the computer s bottom with the two positioning columns on the VESA mount bracket After the computer is mounted turn the computer over and check if the access to the POGO connector is clear 3 Rot...

Страница 55: ...t VSB 100 to make the computer compatible with VESA 100 To use the adapter bracket lock the bracket unto the VESA mount bracket as illustrated below Note the adapter bracket mustn t be used without th...

Страница 56: ...i Fi The other drivers and software can be installed by random sequence as long as the aforesaid drivers are installed first Please note Windows 7 doesn t need driver for projected capacitive touch G1...

Страница 57: ...r by the power cable and adapter included in the accessory box power outlet power cable power adapter the computer 2 Have the USB CD ROM drive Connect the CD ROM drive to the computer and sometimes th...

Страница 58: ...the CD ROM drive Insert the driver CD to the CD ROM drive In a few seconds a dialog opens asking whether to auto run the driver CD or open the CD contents in Windows Explorer 5 Click tap Run AUTORUN E...

Страница 59: ...driver to install it Always follow the sequence described in 2 11 1 Installation Sequence on page 42 to install the drivers 2 11 3 Install Chipset Driver To install the chipset driver 1 Launch the dri...

Страница 60: ...list The driver list then opens onscreen 2 Click tap the VGA icon 3 Follow the onscreen instructions to proceed 2 11 5 Install Audio Driver To install the audio driver 1 Launch the driver installer as...

Страница 61: ...is needed For Windows XP click tap the Resistive Touch icon if the computer is powered by resistive touch or click tap the Capacitive Touch icon if the computer is powered by projected capacitive tou...

Страница 62: ...to Install on page 43 and open the driver list The driver list then opens onscreen 2 Click tap the Function keys icon from the driver list 3 Follow the onscreen instructions to proceed After the func...

Страница 63: ...iver To install WiFi driver 1 Launch the driver installer as described in 2 11 2 Start to Install on page 43 and open the driver list The driver list then opens onscreen 2 Click tap the WiFi icon 3 Fo...

Страница 64: ...nstall on page 43 and open the driver list The driver list then opens onscreen 2 Click tap the Bluetooth icon 3 Follow the onscreen instructions to proceed Once the Bluetooth driver is installed a Blu...

Страница 65: ...e onscreen instructions to proceed 4 Once the 3G driver installation is through proceed to install the application program the utility for 3G connection Click tap the 3G AP icon from the driver list 5...

Страница 66: ...work with the cradle s LAN port To install the cradle LAN driver 1 Connect the cradle to power supply power outlet power cable power adapter cradle 2 Seat the computer in the cradle The pogo contact p...

Страница 67: ...5 Follow the onscreen instructions to proceed Once the driver is installed the computer is able to connect to a local area network LAN by the cradle s LAN port See also 2 7 Desktop Cradle Optional on...

Страница 68: ...2 Start to Install on page 43 and open the driver list The driver list then opens onscreen 2 Click tap the RFID icon 3 Follow the onscreen instructions to proceed Once the RFID driver is installed an...

Страница 69: ...CD The programming resources include an reader DLL dynamic link library that covers a variety of reader functions and also a sample application To access the programming resources for RFID application...

Страница 70: ...e computer with an Smart Card reader install the driver for the Smart Card reader 1 Launch the driver installer as described in 2 11 2 Start to Install on page 43 and open the driver list The driver l...

Страница 71: ...232 Smart Card reader 2 in 1 module install the RS232 driver prior to make it run To install the RS232 driver 1 Launch the driver installer as described in 2 11 2 Start to Install on page 43 and open...

Страница 72: ...st 3 Follow the onscreen instructions to proceed 4 Install the utility for the GPS module Go to http www u blox com en evaluation tools a software u center u center html and download the u center GPS...

Страница 73: ...59 3 Chapter 3 Use the Computer Chapter 3 Use the Computer...

Страница 74: ...rated yet Follow 2 11 6 Install Touch Screen Driver on page 47 to install the driver for the touch screen when the touch screen is used for the first time and follow Proceed to Calibrate on page 100 t...

Страница 75: ...tual keyboard with all the standard keys The operating system has a native onscreen keyboard to facilitate text input To open the O S featured onscreen keyboard there are two approaches Approach 1 1 O...

Страница 76: ...pad to get the job done To launch the O S featured writing pad 1 Open the onscreen keyboard as mentioned in Approach 1 on page 61 The onscreen keyboard opens 2 From the tool bar of the onscreen keybo...

Страница 77: ...rtcut will appear in the notification area and also at Start button All Programs Arbor Arbor System Suite v2 0 Arbor System Suite v2 0 ARBOR System Suite shortcut in the notification area And the func...

Страница 78: ...e below to connect the computer to a WiFi hotspot 1 Assign a function key to launch the WiFi as described in 4 1 2 Use ARBOR System Suite on page 91 2 Launch the WiFi module by hitting the function ke...

Страница 79: ...alog will open and request for the password If it is an open network it will be connected in a few seconds 5 Enter the password to access the Wi Fi network The Wi Fi network will be connected in a few...

Страница 80: ...Bluetooth module to work install the driver as described in 2 11 9 Install Bluetooth Driver on page 50 3 4 1 Launch Bluetooth To be able to use Bluetooth launch the Bluetooth module first 1 Assign a...

Страница 81: ...e at Control Panel System and Security System 3 4 3 Hide Expose Computer By default the computer is NOT discoverable by other Bluetooth devices To hide or expose the computer 1 Launch the Bluetooth mo...

Страница 82: ...Select Open Settings from the context menu The O S featured Bluetooth Settings then open and show the Options tabbed page 4 On the Options tabbed page find the Discovery group box 5 Select or deselect...

Страница 83: ...tooth devices it has to pair with them To pair connect with other Bluetooth devices 1 Launch the Bluetooth module as described in 3 4 1 Launch Bluetooth on page 66 The Bluetooth launches 2 From the no...

Страница 84: ...is necessary to see the document of the Bluetooth device to connect and follow the onscreen instructions to proceed Note On the computer the Bluetooth exchanged files are save to local disk e g C User...

Страница 85: ...reen 3 5 1 Launch Camera The camera is ready to use without driver To launch the camera 1 Assign a function key to launch the camera as described in 4 1 2 Use ARBOR System Suite on page 91 The system...

Страница 86: ...disk by default at C Users your username My Documents ccd 3 5 3 Shoot A Video To shoot a video 1 Launch the camera also the camcorder as described in 3 5 1 Launch Camera on page 71 The camera applica...

Страница 87: ...ication program auto launches And the camera LED lights blue 2 From the camera application program s tool bar tap the configuration icon The Properties sheet opens 3 Make the configuration 4 Click the...

Страница 88: ...tall SIM Card on page 24 2 Restart the operating system The operating system restarts And the AirCard Watcher automatically launches upon the OS startup In case the AirCard Watcher doesn t automatical...

Страница 89: ...mobile network is discovered the AirCard Watcher shows the name of the service provider and a 3G gauge in its screen with the signal strength bars in green The network is discovered To disconnect fro...

Страница 90: ...Configure to Order on page 58 to install the drivers and the utility To use the GPS 1 After the drivers are installed for the GPS RS232 module two USB Serial Ports will be generated in the system Chec...

Страница 91: ...ty u center by Start button All Programs u blox u center u center u center then opens onscreen 5 When u center is started for the 1st time the COM port needs to be initialized Find the Receiver Toolba...

Страница 92: ...ports the COM settings listed below Parity None Data Bits 8 Stop Bits 1 Flow Control None 6 Click the down arrow besides the Connect disconnect button A list of available COM ports opens 7 Select the...

Страница 93: ...ill change to green color and the software s screen will start to show the information about the satellite constellation signal to noise ratio time etc If the baud rate are not correctly set the Commu...

Страница 94: ...er To view the NMEA text click View Text Console from the menu bar of the u center Then a small window Text Console will open and show the NMEA text To conserve power always power off the GPS module w...

Страница 95: ...r program your own application using the programming resources included in the driver CD that comes with your purchase See 2 11 12 1 Program Your Own RFID Application on page 55 Start to test the RFID...

Страница 96: ...group box select USB_HID and then click the Connect button The Status column then changes to a green Connected message meaning that the RFID reader COM port is opened 5 From the menu bar click Mode R...

Страница 97: ...The Inventory tabbed page opens 7 Click the Start button The table on the Inventory tabbed page starts to show the column titles including UID No Read Count and Protocol And the RFID reader is ready...

Страница 98: ...tilities 8 Find the RFID reader at the upper right of the computer s front side RFID reader 9 Tap slightly contact the RFID reader with the RFID tag The read and decoded data will be displayed in the...

Страница 99: ...ata Capture The barcode scanner is ready to use without driver Follow the guide below to capture barcode data 1 Assign a function key to trigger scanning See 4 1 2 Use ARBOR System Suite on page 91 2...

Страница 100: ...ed printed barcode within the reach of the scanning light If the printed barcode is successfully read the barcode will be encoded and the encoded data will be shown in the text editor that you have la...

Страница 101: ...R Code Code 39 Micro QR Code Code 93 and 93i Postal Code 2 of 5 Intelligent Mail Barcode EAN formerly 4 state customer Interleaved 2 of 5 Australian Post Label Code British Post Matrix 2 of 5 Canadian...

Страница 102: ...88 This page is intentionally left blank...

Страница 103: ...89 4 Chapter 4 Utilities Chapter 4 Utilities...

Страница 104: ...for the function keys as described in 2 11 7 Install Function Keys Driver on page 48 the ARBOR System Suite is accessible from the operating system s notification area or All Programs 4 1 1 Launch ARB...

Страница 105: ...becomes highlighted in blue See 3 6 Use 3 75G HSUPA Configure to Order on page 74 to know how to use the 3G Associates a function key to turn on off Wi Fi When the function key is associated with Wi F...

Страница 106: ...nable mute the speakers When the function key is associated with the speaker control the speaker graphic becomes highlighted in blue Associates a function key to turn on off the GPS module When the fu...

Страница 107: ...alled on the computer so the application program can be launched when the function key is hit When the function key is associated to launch a specific application program the graphic becomes highlight...

Страница 108: ...ogram 1 Launch ARBOR System Suite as described in 4 1 1 Launch ARBOR System Suite on page 90 The ARBOR System Suite then opens onscreen 2 Tap the button of a function key An Explorer window opens 3 Br...

Страница 109: ...erating system See 4 2 2 PenMount Gesture for more After the driver is installed for the touch panel as described in 2 11 6 Install Touch Screen Driver on page 47 both utilities are accessible from th...

Страница 110: ...res the touch device selected See 4 2 1 2 Device tabbed page on page 97 for the settings Tool Presents the tool s to test the performance of the touch screen About Delivers the developer version and o...

Страница 111: ...el opens 2 Tap the Device tab The Device tabbed page opens showing PenMount s touch devices present on the computer Normally there is only on PenMount touch device on the computer i e the resistive to...

Страница 112: ...nt on the computer Normally there is only one PenMount touch device on the computer i e the resistive touch screen and hence the number is normally a zero 0 To open Device 0 window 1 Open the Device t...

Страница 113: ...ed page 1 Open Device 0 window as described in 4 2 1 2 1 Device Window on page 98 The Device 0 window opens 2 Tap the Calibrate tab The Calibrate tabbed page opens The user interface on the Calibrate...

Страница 114: ...bbed page as described in Calibrate tabbed page on page 99 The Calibrate tabbed page opens Calibrate tabbed page opens 2 Tap the Standard Calibration button to run standard calibration OR Tap the Adva...

Страница 115: ...tart over the countdown for an ineffective tap and hold Edge Compensation tabbed page The Edge Compensation tabbed page helps users improve the accuracy of mouse pointer at the edges of the touch scre...

Страница 116: ...etting or tap Back to Default to recover the defaults About tabbed page Open the About tabbed page to view the version of PenMount controller board and the driver To access the About tabbed page 1 Ope...

Страница 117: ...mance of the touch screen Only drawing test is featured for the computer 1 Open PenMount Control Panel as described in 4 2 1 1 Launch PenMount Control Panel on page 95 The PenMount Control Panel opens...

Страница 118: ...104 Utilities 3 Tap the Draw button A blank screen opens Drawing tool opens 4 Draw on the touch screen with a stylus or simply your fingertip 5 Tap the upper left Menu Exit to quit the test...

Страница 119: ...105 Utilities 4 2 1 4 About tabbed page Access this About tabbed page to view the software s title version and support contact info About tabbed page...

Страница 120: ...ure The PenMount Gesture is a utility installed with the touch screen driver As long as the touch screen driver is installed as described in 2 11 6 Install Touch Screen Driver on page 47 the PenMount...

Страница 121: ...Enable Enables disables the touch screen to recognize PenMount supported gestures Deselected Disabled General Setting Sensing Time Adjusts the gesture sensing time between 200 ms 0 2 ms and 2500 ms 2...

Страница 122: ...OSK EXE Circle Saves files Ctrl S Cross Quits program Alt F4 Slash up Disable Disables the selected gesture Deselected Gesture enabled Hot Key Associates the selected gesture with a hot key which norm...

Страница 123: ...Mouse Click Send Middle Mouse Click Click mouse scroll wheel Mouse Scroll Forward Mouse Scroll Backward Disable touch function Disables the touch screen Enable touch function Enables the touch screen...

Страница 124: ...110 This page is intentionally left blank...

Страница 125: ...111 5 Chapter 5 BIOS Chapter 5 BIOS...

Страница 126: ...once the power is turned on When the computer is shut down the battery on the motherboard supplies the power for BIOS RAM The Main Setup screen lists the following information System Overview BIOS Ve...

Страница 127: ...screen Move to highlight previous next item Enter Select and access a setup item field Esc On the Main Menu Quit the setup and not save changes into CMOS a message screen will display and ask you to s...

Страница 128: ...ng into OS they still work according to Function Key setting described in Section Function Key instead of the configurations in BIOS Setup Utility here PPM C6 Support Enable Disable to save more power...

Страница 129: ...115 BIOS 5 2 1 IDE Configuration When entering the setup BIOS automatically detects the presence of IDE devices This item shows status of auto detected IDE devices and allows you to configure subitems...

Страница 130: ...16 BIOS 5 3 Boot Settings This item allows you to set your device s booting preferences There are totally three submenus in it including Boot Settings Configuration Boot Device Priority Hard Disk Driv...

Страница 131: ...display the full screen logo during the boot up sequence hiding normal POST messages When it is disabled the BIOS will display the normal POST messages instead of the full screen logo Bootup Num Lock...

Страница 132: ...118 BIOS 5 3 2 Boot Device Priority This setting determines the priority that the BIOS uses to look for a boot device from which the operating system is loaded during the DOS boot process...

Страница 133: ...119 BIOS 5 3 3 Hard Disk Drives This function displays the information of HDD detected Through it you can also set boot sequence from available HDD detected...

Страница 134: ...assword from CMOS memory You will be asked to confirm the password Type the password again and press Enter You may also press ESC to abort the selection and not enter a password With a password create...

Страница 135: ...ar the password just leave the field blank and press Enter when you are prompted to enter a new password Once the password is cleared the following message will appear at the center of the screen Pass...

Страница 136: ...n made in the menus in CMOS a special section of memory that stays on after you turn your system off The next time you boot up your computer the BIOS will configure your system according to the Setup...

Страница 137: ...Defaults When you press Enter on this item you get a confirmation dialog box containing a message as below Load Optimal Defaults OK Cancel Pressing OK loads the BIOS Optimal Default values for all th...

Отзывы: