6.2 Setting the Main RS-232C Port
35
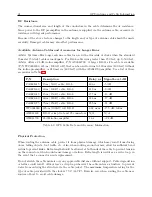
Menu Item
Default
Menu Item
Default
Main RS-232
9600, 8, N, 1
Local Offset & DST
none, OFF
Out-of-Lock
01 min.
Backlight
Auto
System Delays
60 ns
Prog Pulse
Sec. per Pulse
IRIG-B Time Data
UTC, 1344 OFF
Event/Deviation
1 PPS Deviation
Freq. Reference
Internal
Auto Survey
Power On Survey
Position Hold
On
Option Control
None
Table 6.2: Default Firmware Settings
6.1.4
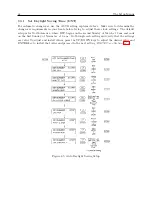
To Exit Setup Menus
To exit any configuration menu without saving, press any of the upper row of keys before pressing
ENTER (which installs a new value). To return to the configuration menus, press SETUP again.
If you make a configuration error, you can scroll through the menus again and press ENTER when
you find the menu you want to change.
6.2
Setting the Main RS-232C Port
Press SETUP key to configure the main RS-232C port, and press the ENTER key to begin setting
up the RS-232C port parameters (See Figure 6.1). To set up the broadcast mode, press SETUP
(instead of ENTER) and skip to Section 6.2.2 below.
Figure 6.1: Main RS-232C Setup
Содержание 1088A
Страница 4: ...iv ...
Страница 6: ...vi ...
Страница 18: ...xviii LIST OF FIGURES ...
Страница 23: ...1 4 Attaching Rack Mount Ears to 1088A B Series Clocks 3 Figure 1 2 Attaching Rack Mount Ears ...
Страница 24: ...4 Unpacking the Clock ...
Страница 32: ...12 Front and Rear Panels ...
Страница 38: ...18 Connecting Inlet Power Input and Output Signals ...
Страница 41: ...4 1 GPS Antenna Installation 21 Figure 4 2 Antenna Mounting Bracket Figure 4 3 Antenna Mounting with AS0044600 ...
Страница 46: ...26 GPS Antenna and Cable Information ...
Страница 48: ...28 Setting Internal Jumpers Figure 5 1 Model 1088B Main Board ...
Страница 76: ...56 The Setup Menus ...
Страница 112: ...92 Serial Communication and Command Set ...
Страница 127: ...B 4 Physical Dimensions 107 Figure B 1 Suggested Mounting of the AS0094500 Surge Arrester ...
Страница 128: ...108 Using Surge Arresters ...
Страница 137: ...C 5 Option 04 Parallel BCD Output 117 C 5 2 Option 04 Firmware Setup Figure C 2 Option 04 Firmware Setup ...
Страница 145: ...C 5 Option 04 Parallel BCD Output 125 Figure C 4 Option 04 Output Jumper Settings ...
Страница 146: ...126 Options List Figure C 5 Option 04 Board Layout and Jumper Locations ...
Страница 165: ...C 12 Option 17 Parallel BCD Output and Second RS 232 Port 145 Figure C 11 Option 17 Output Jumper Settings ...
Страница 166: ...146 Options List Figure C 12 Option 17 Board Layout and Jumper Locations ...
Страница 176: ...156 Options List C 14 5 Typical Network Configuration Figure C 15 Option 18 Network Configuration ...
Страница 187: ...C 16 Option 20A Four Fiber Optic Outputs 167 Figure C 22 Option 20A Jumper Locations ...
Страница 194: ...174 Options List Figure C 24 Option 23 Internal Jumper Setup ...
Страница 196: ...176 Options List Figure C 25 Option 27 Jumper Locations ...
Страница 214: ...194 Options List Figure C 28 Option 29 Connector Signal Locations ...
Страница 270: ...250 Options List ...


