background image

Application

D. Application - Sebum

13

Sebum

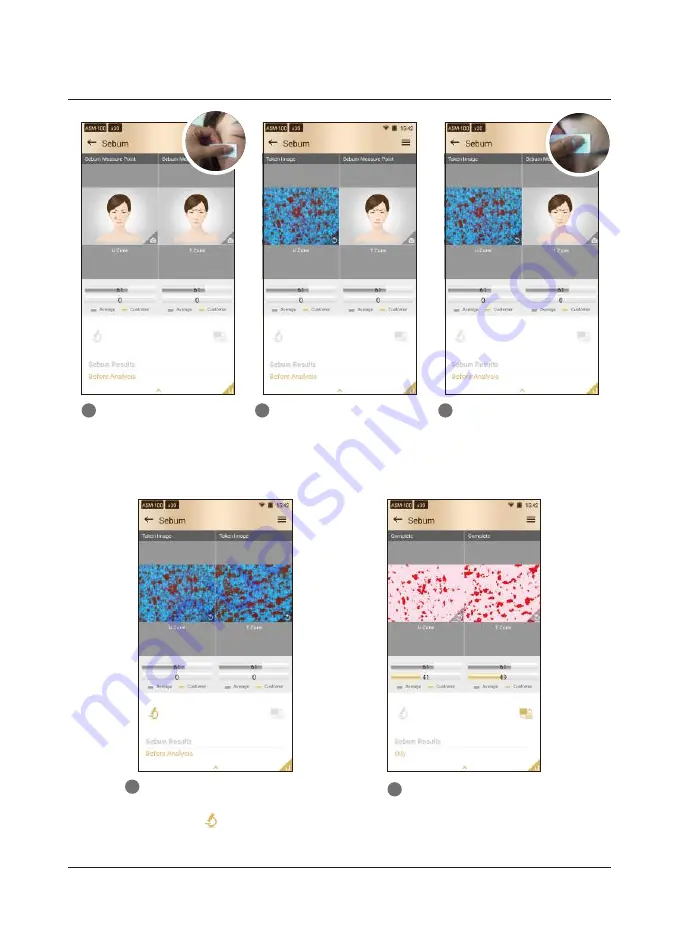
Put the sebum paper on 

U-zone of the cheek, then 

press it for 2~3 seconds.

1

Take a picture of pink area of 

the sebum paper.

2

Put the sebum paper on T-zone 

of forehead, then press it for

2~3 seconds.

3

Sebum result will appear.

5

4

Take a picture of pink area of 

the sebum paper.

Then, touch       button    to analyze.

U-zone

T-zone

Содержание ASM

Страница 1: ...User Manual ...

Страница 2: ...rranty Notes on use The images of this manual can be different with the actual things Theinformationcontainedinthismanualandfutureimprovementsaresubjecttochangewithoutnotice The latest version of the manual will be updated at the below link http www aramhuvis com downloads B H W Parts C System Settings ⅰ Both Sides ⅱ Settings ⅰ Date Time ⅱ Wi Fi ⅲ Sleep ⅳ Language 1 2 3 5 7 8 9 A Components ...

Страница 3: ...Components A Components 1 Main unit with skin lens Skin lens Charger 5V 3A Cleaning cloth Manual USB cable Air blower Cradle Sebum paper 100ea ...

Страница 4: ...H W Parts Both Sides 2 B H W Parts Both Sides ASM lens Indicate LED Lens change button USB slot 5v 3A On off button Flash X1 lens Volume up down button ...

Страница 5: ...o turn on the power Press and hold Power button Take your finger off from the button after Indicate LED turned on blue 1 2 How to turn off on the power Press and hold Power button Touch Power off 1 2 3 B H W Parts Settings 1 2 ...

Страница 6: ...ptor The default charger is American plug Plug can be added or changed for each country EU UK AU and etc Refer to the details as below how to change the plug type Pull out american type plug from adaptor Connect USB port with charger H W Parts Settings B H W Parts Settings 2 3 1 ...

Страница 7: ...System Settings 5 C System Settings Date Time Date Time Go to Date time 3 Go to Set date 4 Check if the setting is correctly applied 6 Touch button 1 Select the date and touch OK button 5 Touch button 2 ...

Страница 8: ...e Date Time System Settings 6 Touch Selecttimezone 7 Check if the setting is correctly applied 9 Touch Settime 10 Selectpropertimezone 8 Changeintothecurrenttime andtouch OK button 11 Check if the setting is correctly applied 12 ...

Страница 9: ...C System Settings Wi Fi 7 System Settings Wi Fi Touch Wi Fi 1 ChooseproperWi Fisignal 3 Turn on Wi Fi using On Off button 2 PutWi Fipassword 4 Wait until the device is connected to Wi Fi 5 ...

Страница 10: ... could see the Wi Fi mark on upper side of the screen Wi Fi Usage Email Wi Fi connection is needed to send analysis data by email Reference page 7 Wi Fi page 20 Email 7 Software update In order to update the software version Touch Display 1 Go to Sleep 2 Selecttheoptionyouwant toapply 3 8 Sleep ...

Страница 11: ...C System Settings Language System Settings Language 9 Touch Language input 1 Go to Language 2 Select preferred language 3 ...

Страница 12: ...Application 10 D Application Settings Settings Go to General Settings 2 AvailabletochangeLanguage VersionandEmailsetting 3 Touch button 1 ...

Страница 13: ...omer 1 Input the information 3 User sprofileiscreatedonthelist Thentouchuser sprofile tostart analyzing 5 11 D Application CRM Touch to register new customer 2 Touch button to start analyzing 6 Afterputtingallinformation touch 4 ...

Страница 14: ...oleft 4 3 Analyzing hydration and elasticity Touchthe button Pleasewaituntilvibrationandsound Neverputthesensorontheskinbefore themessage Touchtoskinplease 1 Aftercheckingthemessage Touchto skinplease pushthesensorcompletely tomarkedareaoftheface All surface of the sensor should be pushed completely 2 1 2 ...

Страница 15: ... U zoneofthecheek then pressitfor2 3seconds 1 Takeapictureofpinkareaof thesebumpaper 2 PutthesebumpaperonT zone offorehead thenpressitfor 2 3seconds 3 Sebum result will appear 5 4 Takeapictureofpinkareaof thesebumpaper Then touch button toanalyze U zone T zone ...

Страница 16: ... appear 4 Touch buttontocompare takenimagewith3sample images Good Normal Bad 5 Touch button to convert taken pore image in 3D 6 Touchscreentobring acameraintofocusandthen touch totakeapicture 2 Touch toactivatecamera andputthecameraontothe markedareaoftheface 1 zoom out zoom in ...

Страница 17: ...on to analyze 3 Result will appear 4 Touch buttontocompare takenimagewith3sample images Good Normal Bad 5 Touch toactivatecamera andputthecameraontothe markedareaoftheface 1 Touchscreentobring acameraintofocusandthen touch totakeapicture 2 zoom out zoom in ...

Страница 18: ...to analyze 3 Result will appear 4 Touch buttontocompare takenimagewith3sample images Good Normal Bad 5 Touch toactivatecamera andputthecameraontothe markedareaoftheface 1 Touchscreentobring acameraintofocusandthen touch totakeapicture 2 zoom out zoom in ...

Страница 19: ...reof outereyeareainwidthwaysto checkcrow sfeet 2 Result will appear 4 Touch buttontocompare takenimagewith3sample images Good Normal Bad 5 Touch button to convert taken pore image in 3D 6 17 D Application Wrinkle Application Wrinkle Touch toactivatecamera andputthecameraontothe markedareaoftheface 1 zoom out zoom in ...

Страница 20: ...button to analyze 3 Result will appear 4 Touch buttontocompare takenimagewith3sample images Good Normal Bad 5 Touch toactivatecamera andputthecameraontothe markedareaoftheface 1 zoom out zoom in Touchscreentobring acameraintofocusandthen touch totakeapicture 2 ...

Страница 21: ...D Application Result Application Result 19 Available to check the result The worst results will be marked in red 2 Touch button or Show All Result to see overall result 1 ...

Страница 22: ...electingsender smail address putreceiver smailaddress Thentouch Send button 6 Select the mail account to register on the list 5 Touch 2 Before sending Email the device shall be connected to Wi Fi Reference page 7 1 Go to Send Email 3 Select Gmail 4 ...

Страница 23: ...D Application Mirroring Application Mirroring 21 Go to General Settings 2 Touch button 1 Setthemirroringoption On 3 CaptureQRcodeusingQRcode readerapp Automaticallymoved toAppstore 4 ...

Страница 24: ...Then go to Wi Fi Setting 6 Install Aram VIEWER 5 D Application Mirroring InyourmobiledevicegotoWi Fi setting ThenfindSSIDandconnectit 7 Mirroring will be started 8 Application Mirroring 22 ...

Страница 25: ...tion View Mode 23 Touch View 1 Inviewmode itisableto takepictureswithcapture button 2 Theusercanselectanalysis parametertotakepictures inpropermode 3 The user can mark the defect or concern according to the image with note function 4 ...

Страница 26: ...r the normal use we will repair it free of charge under warranty 3 4 Repair cost could be charged after warranty period 5 For this product warranty period is 14 months from the Invoice date 6 Cost Within warranty Sending delivery Buyer repair cost and returning delivery Aram If the product is broken by user s fault repair cost could be charged After warranty Sending delivery and repair cost Buyer ...

Страница 27: ...MEMO ...

Страница 28: ...nce to radio or television reception which can be determined by turning the equipment off and on the user is encouraged to correct the interference by one of the following measures Reorient or relocate the receiving antenna Increase the separation between the equipment and receiver Connect the equipment into an outlet on a circuit different from which the receiver is connected Consult the dealer o...

Страница 29: ...tionPark 172 Dolma ro Bundang gu Seongnam si Gyeonggi do 13605 Rep Korea PRODUCTION DIVISION FACTORY 909 Byucksan Technopia 560 Dunchon daero Jungwon gu Seongnam si Gyeonggi do 13230 Rep Korea Tel 070 4687 1712 Fax 031 732 6330 Email info aramhuvis com http www aramhuvis com ...

Отзывы: