background image

36

Exit the function
or data change

Confirm access
or data change

Scroll
(LEFT / 
RIGHT)

Delete 
selected 
character

Data
decrease
of data

Scroll
(UP / 
DOWN)

Enter 
selected 
character

Par.

8.4

11.4.12 Device calibration

Allows starting calibration for the devices connected to the monitor.

THE BASIC SETTINGS (CHAP. 10) AFFECT WHICH AND HOW MENU ITEMS ARE DISPLAYED, HENCE WHICH ADVANCED SETTING 
IT IS POSSIBLE TO CONTROL.

 SENSORS

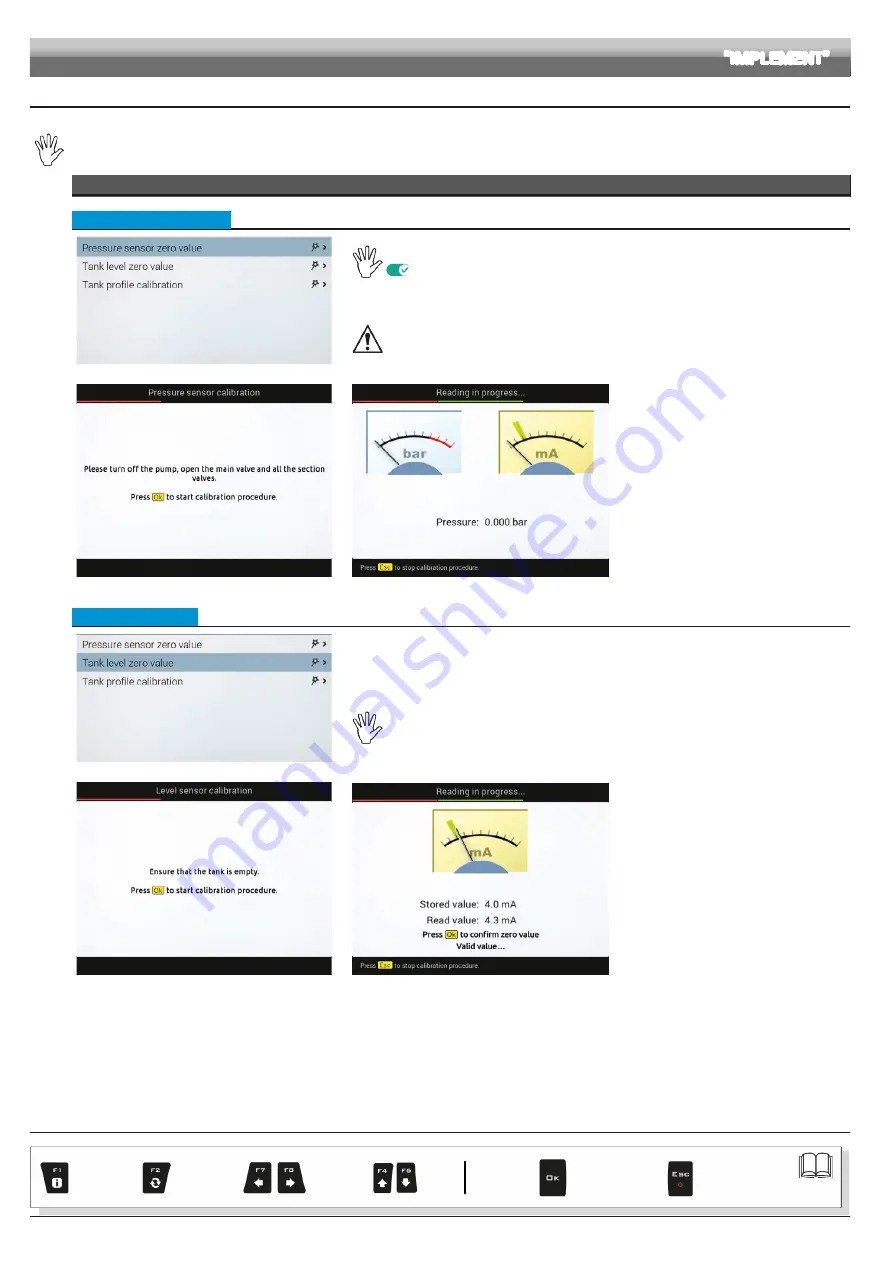
 • Pressure sensor zero value 

Fig. 74

To access this menu, the pressure sensor must be enabled
(

, par. 11.4.4)

In case a pressure value other than zero is displayed 

despite the absence of pressure inside the circuit

it is necessary to perform zero calibration of the sensor.

Before carrying out any operation disable the pump by disconnecting it from the power 
supply.
Make sure that the pump is correctly disabled, then open the main valve and all section 

valves.

Fig. 75

Fig. 76

1

 Select 

Pressure sensor zero value


(Fig. 74) and press 

OK

.

2

 The message in Fig. 75 is displayed: follow 

the instructions, then start the procedure by 
pressing 

OK

.

3

 Press 

OK

 to reset the pressure sensor 

residual signal.

Value out of range!

If this alarm is displayed, faulty pressure 
values have been detected: check the 
sensor operation.
If the problem persists, check for residual 
pressure in the system.

 • Tank level zero value 

Fig. 77

In these cases it is necessary to perform the level sensor zero adjustment.

1

 The monitor displays the presence of fluid inside the tank, 

even when it is empty

;

2

 A tank profile has been loaded (par. 11.4.9).


To use this menu the level sensor must be active

(

Tank level source

, chap. 10). Perform the adjustment with empty tank

Fig. 78

Fig. 79

1

 Select the item 

Tank level zero value

 (Fig. 

77) and press 

OK

.

2

 The message in Fig. 78 is displayed: follow 

the instructions, then start the procedure by 
pressing 

OK

.

3

 Press 

OK

 to reset the level sensor residual 

signal.

Value out of range!

If this alarm is displayed, faulty values have 
been detected: check the sensor operation.
If problem persists, check for residual fluid 
in the tank.

ADVANCED SETTINGS 

"IMPLEMENT"

CONTINUES > > > 

Содержание Bravo 400 S LT Series

Страница 1: ...INSTALLATION USE AND MAINTENANCE 4674L15XX 4674L17XX BRAVO 400S LT SERIES COMPUTER MULTI ROW SPRAYER Software rel 1 0 X...

Страница 2: ...part of the equipment to which it refers and must accompany the equipment in case of sale or change of ownership Keep it for any future reference ARAG reserves the right to modify product specificatio...

Страница 3: ...gressiveness 28 SECTION VALVES 28 Type 28 Shut off time 28 Switch on time 28 11 4 6 Nozzles data 29 Flowrate 29 Pressure 29 Minimum pressure 29 Maximum pressure 29 11 4 7 Wheel sensor 29 Constant 29 1...

Страница 4: ...14 4 F4Memories management 58 14 4 1 Jobs export 59 KML to USB SD card 59 Shape to USB SD card 59 Screenshots to USB SD card 59 14 4 2 Backup 60 Create backup file on USB SD card 60 Load backup file f...

Страница 5: ...unit makes it possible to control all phases of treatment in agricultural applications directly from the cabin of the farming machine it is installed in The computer is directly connected to the syst...

Страница 6: ...e 3 Power supply connector 4 Fixing kit 5 Safety covers for control unit valve connectors no 2 6 Valve and sensor harness 7 Seals for control unit valve connectors Legend 1 Bravo 400S LT 2 Power suppl...

Страница 7: ...Pressure sensor P Regulating valve S Speed sensor T Filling flowmeter Level sensor V1 Camera 1 V2 Camera 2 X RPM sensor 1 7 Section valves ASSEMBLY DIAGRAM FOR MULTI ROW SPRAYER WITH CENTRIFUGAL PUMP...

Страница 8: ...each by hand bear in mind that the computer should not obstruct the operator s freedom of movement or block his her view Consider all necessary connections of the computer Fig 5 the cable length and m...

Страница 9: ...it position The control unit must be fixed with the special brackets supplied and fitted to the unit positioning it as shown in the manual provided with the assembly MAKE SURE TO FOLLOW ALL THE SAFETY...

Страница 10: ...by failure to observe the above instructions 6 1 General precautions for a correct harness position Securing the cables secure the harness so that it does not interfere with moving parts route the ha...

Страница 11: ...par 5 1 System recommended composition Remove the protection cap 1 Fig 10 from the electric valve Position the seal 2 onto connector 3 and connect the latter pressing it fully home 4 be careful not to...

Страница 12: ...sensor level sensor filling flowmeter RPM sensor All ARAG sensors use the same type of connector Connect the sensor connector to the relevant harness make sure it is correctly fitted and push it unti...

Страница 13: ...achine battery 12 VDC ALWAYS switch on the system through the computer and then remember to switch it off using the specific key on the control panel If BRAVO 400S LT remains on for a long time with t...

Страница 14: ...ig 21 Insertion Insert the memory card making sure to orient it correctly the card cut edge A must be face down push the card until it engages into place and close the slot with the cover Removal Pres...

Страница 15: ...ely after system is checked to detect the compatibility of the internal device and its software version Before the Fig 23 Home page the monitor software version is displayed It can be consulted also f...

Страница 16: ...c settings chap 10 8 3 Switching off Keep switching off key Fig 30 pressed until the switching off message Fig 31 is displayed then release key Now press key OK to confirm switching off or key ESC to...

Страница 17: ...tion ENTERING TEXT B A 2 3 1B 1A 1A 1B 4 5 Fig 35 1A Press in succession to select the character you wish to type UP DOWN 1B Press in succession to select the character you wish to type RIGHT LEFT Pre...

Страница 18: ...tions chap 10 System setup chap 14 Home menu chap 11 Advanced setup chap 10 Basic settings Create Load settings User usrxx Configuration macxx impxx traxx The type of displayed configuration varies ba...

Страница 19: ...Main control valve installed on the control unit None 2 ways drain valve 3 ways main valve FLOWRATE REFERENCE SENSOR Device used to calculate flowrate Flowmeter Pressure sensor measured pressure is us...

Страница 20: ...e a new setup and press OK 2 User definition select Yes for extended configuration No for device reduced configuration par 11 2 FOR NEW USER ONLY Follow the steps and select the desired options OK nex...

Страница 21: ...follow the same procedure for setting Load User e d e Fig 48 Fig 49 Fig 50 Now you can start advanced setup all the modifications will be applied to ACTIVE SETTINGS mac imp tra usr 11 2 Device reduced...

Страница 22: ...o the selected item setup SELF PROPELLING MACHINE MACHINE WITH TOWED CARRIED IMPLEMENT 2 2 3 Fig 56 2 2 3 Fig 57 SELF PROPELLED START BASIC SETTINGS PROCEDURE chap 10 START GUIDANCE SETTINGS PROCEDURE...

Страница 23: ...e Number of covered rows Number of rows covered by the machine 1 7 Number of nozzles per half row Enter the number of nozzles that spray a side of the row 1 999 Total number of nozzles Total number of...

Страница 24: ...very row side figure associate the valve that is going to control it Fig 59 Section valve 1 sprays on the first row RIGHT HALF ROW SIDE Selection valve 2 sprays on the second row LEFT HALF ROW SIDE Fi...

Страница 25: ...pls l pls gal l min GPM l min GPM pls l pls gal l min GPM l min GPM 4621xA0xxxx 6000 22710 0 5 0 10 10 2 6 462x2xxx 1025 3880 2 5 0 7 50 13 2 4621xA1xxxx 3000 11355 1 0 30 20 5 3 462x3xxx 625 2366 5 0...

Страница 26: ...58 5 462x7xxx 60 227 40 0 10 6 800 211 3 Other 625 2366 10 2 60 200 52 8 The filling flowmeter allows displaying the tank filling data in real time Enter the values for the filling flowmeter installed...

Страница 27: ...the type of valve installed on the system and the relevant values The item Main Valve Type is shown as a REMINDER it is activated during the guided setup chap 10 It can not therefore be modified on th...

Страница 28: ...he selected valve to regulate the system flow F3 Decreases aggressiveness in percentage F5 Increases aggressiveness in percentage The ideal calibration is achieved when the application rate remains co...

Страница 29: ...on concerning speed is usually received by the GPS which is connected directly to the monitor If there is no GPS signal this menu allows to use the wheel sensor as a source of speed data instead of th...

Страница 30: ...ll change according to the selected source for tank level reading basic settings chap 10 TANK LEVEL SOURCE MANUAL FILLING FLOWMETER Reserve level Indicate range value The tank alarm is triggered when...

Страница 31: ...in use Select the item you wish to set up Enable disable the alarm Alarm enabled Alarm disabled Repeat the setup for each alarm Outside the range set in Minimum pressure Maximum pressure menus par 11...

Страница 32: ...the automatic regulation of the proportional valve when the pressure is lower than the set value Flowrate correction factor When using a paddle flowmeter and the sprayed fluid has a different viscosit...

Страница 33: ...restores the correct spraying depending on the section management mode enabled par 13 5 Boom section management the monitor will notify the operator that the section valves spraying outside the field...

Страница 34: ...ing parameters Spray closing delay Indicate the distance corresponding to the delayed closing of sections during spraying to ensure correct spraying range Closing delay 0 3 m Fig 67 Spray opening adva...

Страница 35: ...and resume spraying on the next track but it will have to be adjusted according to the characteristics of the operator and the speed of the machine The alarm is triggered ONLY if the direction of the...

Страница 36: ...d press OK 2 The message in Fig 75 is displayed follow the instructions then start the procedure by pressing OK 3 Press OK to reset the pressure sensor residual signal Value out of range If this alarm...

Страница 37: ...layed follow the instructions then start the procedure by pressing OK 6 Start the spraying system open in succession all section valves and the main control ON 7 Fig 82 8 Fig 83 The display will show...

Страница 38: ...OWED IMPLEMENT The settings displayed below vary based on the type of system set cap 10 Enter farming machine measures Press arrow keys UP DOWN to move among the value descriptions the image of the se...

Страница 39: ...w keys UP DOWN to move among the value descriptions the image of the selected value will be displayed Confirm by pressing OK to enter setup Enter the value Select and enter one by one all values Fig 9...

Страница 40: ...ar 11 6 3 Baud rate par 11 6 7 11 6 1 Tilt compensation Fig 95 Allows to enable disable the tilt compensation function of the vehicle with antenna only See ARAG catalog Tilt compensation enabled Tilt...

Страница 41: ...s the driving precision The precision alarm is triggered when the value of HDOP measured by the GPS receiver is above the set limit We recommend NOT to set values above 4 0 11 6 4 Receiver advanced da...

Страница 42: ...se From the menu it is possible to enable disable each single camera individually or both cameras None No camera connected 1 1 camera connected to input no 1 2 1 camera connected to input no 2 Both 2...

Страница 43: ...Geometry settings TRACTOR WITH REAR 3 POINT HITCH IMPLEMENT The settings displayed below vary based on the type of system set cap 10 Enter farming machine measures Press arrow keys UP DOWN to move am...

Страница 44: ...al enabled Signal disabled 11 8 2 Acoustic low priority alarms It allows to enable disable the acoustic signal when new Low priority alarms are triggered Signal enabled Signal disabled 11 8 3 Acoustic...

Страница 45: ...ions None Current rate Target rate Current rate Nozzles type Sprayed area Tractor angle Flowrate Direction RPM Calculated area Speed Pressure Applied quantity Tank level Tank range Row width Row range...

Страница 46: ...pdating par 11 9 4 Date and time par 11 9 5 Sampling period par 11 9 6 11 9 1 Language Set the computer language Available languages Cesky Deutsch Eesti English Espa ol Fran ais Magyar Italiano Lietuv...

Страница 47: ...Personal Computer with a text editor Each file will contain the following data Device Sw Version Sw Type GPSQ Date Time Lat Lon M Unit Speed Boom Width Target Rate Appl Rate Flow Press Spr Qnty Tank...

Страница 48: ...description of the corresponding procedures SWITCH BOX Fig 110 Controls to valves and or hydraulic functions with switchbox 3 Switches used to operate control unit valves par 12 2 4 Switches used to o...

Страница 49: ...tion of the corresponding procedures DISPLAY ITEMS Sections management par 13 4 Output setting par 13 1 Deviation distance between the position of the tractor and the track to be followed Instant outp...

Страница 50: ...e for the spraying Fig 115 Press OK to confirm the value Fig 116 Fig 117 Selected nozzle Select the nozzle among the ones on the list Fig 117 With this data you indicate the type of nozzle installed o...

Страница 51: ...s operation is fundamental for the monitor to guide you during spraying along tracks parallel to the reference track obtained by marking points A and B We recommend marking points A and B while the ma...

Страница 52: ...ATIC FUNCTIONS Fig 128 To access automatic functions start a job New job Resume job Continue last job chap 14 Home menu in the guidance screen press Auto When the list is active Fig 128 pressing the k...

Страница 53: ...To enable monitor to read and use the collected information the following is required The prescription map must be in Shapefile ESRI format The database field containing the indication of the spray ra...

Страница 54: ...As the machine advances the signal is triggered for each valve When overlapping returns within the set limit the monitor warns to OPEN the relevant spraying points Fig 131 Open the valves through the...

Страница 55: ...onding function The table below sums up all menu items and corresponding keys Par 14 1 F1 Continue last job Continues last job 14 3 F3 New job Start a new spraying 14 5 F5 Resume job Activate procedur...

Страница 56: ...2B 5 Fig 139 1 Press F2 to save current job the name edit screen is displayed Fig 139 Type the name 2A Press in succession to select the character you wish to type UP DOWN 2B Press in succession to s...

Страница 57: ...continue without saving 2A or ESC to interrupt the procedure and save 2B 2b 2a 1 Fig 141 IF AT THIS STAGE YOU CHOOSE TO CONTINUE WITHOUT SAVING 2A ALL CURRENT JOB DATA WILL BE LOST 2B The ESC key sto...

Страница 58: ...ata concern jobs carried out maps or machine configurations All the operations are described in next paragraphs When both memories are available use the pendrives for the exchange of the job data and...

Страница 59: ...t KML format to USB1 Fig 145 and press OK A confirmation message appears once the process is completed Press OK The map is saved on the USB pendrive inside a folder named kml Shape to USB SD card Fig...

Страница 60: ...on USB SD card Fig 148 Fig 149 Allows saving a copy backup of system settings on the USB pendrive Select Create backup file on USB1 Fig 148 and press OK Select the type of saving method OK advanced ba...

Страница 61: ...ettings Select Load backup file from USB1 Fig 156 and press OK Select the backup folder to be loaded Fig 157 and press OK The monitor requires to confirm ALL the settings active till that moment will...

Страница 62: ...ata from an external memory device to the monitor internal memory These are the data that can be copied on the internal memory Maps from USB Maps from SD card create a folder called maps on the extern...

Страница 63: ...ith a SD card Upgrade monitor firmware Allows updating the monitor firmware Fig 160 Before starting the procedure copy the upgrade files onto the pendrive Connect the pendrive to the computer The wind...

Страница 64: ...the monitor 1 Fig 163 Fig 164 IF YOU SELECT THE UPDATE FUNCTION SYSTEM IS PRESET TO KEEP ANY PREVIOUSLY SET CONFIGURATION THERE ARE CIRCUMSTANCES BASED ON THE UPDATE CRITICALITY WHERE ITS INSTALLATIO...

Страница 65: ...lect and press OK to switch to guidance mode 5 Complete the spraying Fig 168 2 Key F1 allows displaying additional information to the selected file Example 1 Fig 165 Fig 166 2a In this screen it is po...

Страница 66: ...e present press Menu in sequence to scroll them Par 15 1 Tank Tank filling management 15 2 Prescription map Overview of the prescription map in use 15 3 Job data Displays job data 15 4 Camera Displays...

Страница 67: ...g 170 Fig 171 Press F2 to set tank level to the maximum value The display will show the tank as full its total capacity has been set during advanced setup par 11 4 9 Press F4 to set tank level to zero...

Страница 68: ...map From this screen it is possible to view data of the prescription map during spraying and to check the position of the machine on the map Fig 175 Machine position Spray rate values legend The high...

Страница 69: ...working areas and at the same time view spraying data Enable camera view during advanced setup par 11 7 1 JOB DATA Fig 178 F2 Switch view between the two cameras F7 Select job data displayed on the LE...

Страница 70: ...2 2 2 1 Fig 181 The general points of interest can be memorized with this procedure or with the specific function par 16 3 2 It is possible to mark more points In this screen it is possible to memoriz...

Страница 71: ...or When this option is enabled the speed is calculated on the basis of the pulses received by the speed sensor installed on the wheel WARNING guidance information and all accessory functions surface c...

Страница 72: ...the basic settings chap 10 1 Press Menu 2 Press the key at the side of menu Device status DEVICE TOTALIZERS Fig 189 Allows consulting treatment total data EXTERNAL SIGNALS Fig 190 The monitor detects...

Страница 73: ...all available job functions and the corresponding function keys unavailable functions are displayed in gray Par 16 1 F1 Target rate Change spray rate 16 3 F3 Point marking Groups the marking of more p...

Страница 74: ...across the available items A Straight guidance mode B Free guidance mode 4 Confirm the selection 4 3 3 A B Fig 199 A STRAIGHT GUIDANCE MODE B FREE GUIDANCE MODE Fig 200 Fig 201 The tracks appearing on...

Страница 75: ...on you wish to save A in Fig 203 the symbol will be placed exactly on that point The monitor can save ONLY ONE BREAKING POINT every time you save a point the previous one will be deleted 16 3 2 F3 F5...

Страница 76: ...lation procedure Fig 208 The computer will connect starting and end points and will calculate the surface 2 Fig 206 EDGE OF THE FIELD 3b 3a Fig 207 5 4 Fig 208 The field external edge white line follo...

Страница 77: ...int When you are close to it you can see it on the display 4 Once you have reached the position the value of the distance reaches zero Fig 216 press OK or ESC to exit the procedure 4a 4b Fig 216 OK th...

Страница 78: ...e Fig 220 4 Keep driving when you have reached the minimum distance 30 m 95 5 ft the request Mark B will appear on the display Press OK The reference track T0 and all tracks to be followed during the...

Страница 79: ...concerning display modes will appear Fig 222 Pressing each key will enable the corresponding function F2 changes tractor themes par 16 8 1 F4 changes spraying themes par 16 8 2 F6 switches between day...

Страница 80: ...inations 3 Fig 225 SPRAYING THEME 1 DEFAULT THEME 2 THEME 3 THEME 4 THEME 5 16 8 3 F6 Daytime night time display mode 1 2 1 In the guidance screen press Func 2 Press F8 to view the available options 3...

Страница 81: ...16 1 Check the setup of the row width par 11 4 1 System not adequately sized to provide required rate Check maximum pressure valve adjustment Make sure control valve is adequate for specific system Co...

Страница 82: ...e the permitted limits Check the status of connection cables and connectors and sensor ref installation manual Flowmeter out of range Flowrate out of the limits allowed by flowmeter Modify working con...

Страница 83: ...t of the apparatus to the Assistance Center 2 The following are not covered by the guarantee damage caused by transport scratches dents and similar damage due to incorrect installation or to faults or...

Страница 84: ...a Palladio 5 A Tel 39 0522 622011 Fax 39 0522 628944 http www aragnet com info aragnet com Only use genuine ARAG accessories or spare parts to make sure manufacturer guaranteed safety conditions are m...

Отзывы: