background image

14 


Contents 


Checklist included parts 


 15 


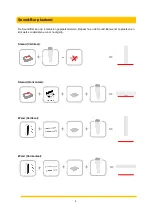
Placing the Sound-Bar 


 16 

 
Vertical wall mounting of the Sound-Bar 


 17 

 
Horizontal wall mounting of the Sound-Bar   

 18 


Connecting external devices (AUX-IN) 


 21 


Connecting your iPhone / iPad  


 22 


Connecting your Android SmartPhone 


 23 


Specifications Sound-Bar: 


Model    


:SPKSB45-W 


Bluetooth  


:Yes; V4.0 


Dimensions 


:480 x 80 x 70 mm 


Colour  


:RAL 9016 


Buttons 


:[On/Off] - [V+] - [V-] - [TWS] 


Power supply    

:AC adapter 230V /12v (2A) 


Connections   

:AUX mini-jack (auto-aux) 


Speakers 


:2 x 3” 12W s 2x diaphragm  


Power   


:25 W / peak 


Nominal 


:(RMS)  12 W 


Waterproof 


:Yes; IPX4 


Positioning 


:Standing H+V / Wall-mounted H+V 


Weight  


:1.4 kg 


en.aquasound.eu

 - 

[email protected]


Содержание SPKSB45-W

Страница 1: ...1 NL Gebruiksaanwijzing 2 EN Instruction manual 13 Bluetooth Sound Bar SPKSB45 W...

Страница 2: ...pelen met uw Android SmartPhone 11 Specificaties Sound Bar Model SPKSB45 W Bluetooth Ja V4 0 Afmeting 480 x 80 x 70 mm Kleur RAL 9016 Buttons On Off V V TWS Voeding Blok adapter 230V 12v 2A Aansluitin...

Страница 3: ...quaSound product De Sound Bar is een geavanceerde Bluetooth speaker voor de badkamer of keuken De onderstaande onderdelen vindt u in de verpakking Sound Bar 230V 12v adapter Eind kap Voet deel B Wand...

Страница 4: ...plaatsen De Sound Bar kan op 4 manieren geplaatst worden Bepaal hoe u de Sound Bar wenst te plaatsen en kijk welke onderdelen er voor nodig zijn Staand Vertikaal Staand Horizontaal Wand Vertikaal Wand...

Страница 5: ...wenst te monteren 3 Neem onderstaande tekening over op de muur en boor de twee rode gaten van 6 millimeter doorsnede in de muur 4 De meest ideale plaats voor een loze leiding 5 8 is de plaats aangeve...

Страница 6: ...en schroef de bouten in de pluggen 6 Draai de 2 vlindermoeren op de bouten voordat u verder gaat 7 Sluit nu de 12v voeding aan op de Sound Bar 8 Schuif aluminium wand bevestiging over de 2 vlindermoer...

Страница 7: ...ng 5 8 is 1 van de locaties aangegeven met een blauwe cirkel afhankelijk van een linkse of rechtse bediening De loze leiding mag maximaal 250 cm lang zijn en dient uit te komen in een ruimte waar de a...

Страница 8: ...8...

Страница 9: ...t of hoofdtelefoon aansluiting van de AquaSound TV of uw Sonos Bridge Het geluid van deze apparaten loopt nu via de Sound Bar Audio link kabel optioneel AUX select Het schakelen tussen Bluetooth en de...

Страница 10: ...00 of 1234 Binnen 10 15 seconde het apparaat is gekoppeld met uw iPhone U kunt uw iPhone gebruiken zoals u gewend bent U kunt nu muziek afspelen op uw iPhone het geluid wordt gestreamd naar de Sound B...

Страница 11: ...aten wordt getoond Selecteer Sound Bar of AquaSound in deze lijst Eerste keer code 0000 of 1234 Binnen 10 15 seconde het apparaat is gekoppeld met uw SmartPhone U kunt uw SmartPhone gebruiken zoals u...

Страница 12: ...12 www aquasound nl info aquasound nl...

Страница 13: ...13 EN Instruction manual Bluetooth Sound Bar SPKSB45 W...

Страница 14: ...2 Connecting your Android SmartPhone 23 Specifications Sound Bar Model SPKSB45 W Bluetooth Yes V4 0 Dimensions 480 x 80 x 70 mm Colour RAL 9016 Buttons On Off V V TWS Power supply AC adapter 230V 12v...

Страница 15: ...s AquaSound product The Sound Bar is an advanced Bluetooth speaker for use in the bathroom or kitchen The following parts are included in this package Sound Bar 230V 12v adapter Closing lid Stand part...

Страница 16: ...nd Bar can be placed in four different ways Choose how you would like to place the Sound Bar and check what parts are required for this placement Standing Vertical Standing Horizontal Wall mounted Ver...

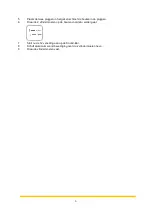
Страница 17: ...unt the Sound Bar 3 Copy the illustration below to the wall and drill two holes on the red spots 8 mm in diameter 4 The ideal place for a placement of a power lead in the wall is indicated by the Blue...

Страница 18: ...oles and screw the bots into the plugs 6 Screw the butterfly nuts onto the bolts before you continue 7 Connect the 12v power cable to the Sound Bar 8 Slide the aluminium wall mount over the butterfly...

Страница 19: ...the wall is indicated by one of the Blue Circles 5 8 depending on the desired side for the control buttons This lead can be up to 250 cm in length and should end in a room where the AC adapter 230V ca...

Страница 20: ...20...

Страница 21: ...io link cable to the Audio out port on the AquaSound TV or Sonos Bridge The sound of these devices will now be played through the Sound Bar Audio link cable optional AUTO AUX Switching to the sound fr...

Страница 22: ...th devices appears Select Sound Bar from the list first time code 0000 or 1234 In about 10 15 seconds the device Sound Bar is connected with your iPhone You can use your iPhone as usual You can play m...

Страница 23: ...nearby Bluetooth devices appears Select Sound Bar or AquaSound from the list first time code 0000 or 1234 In about 10 15 seconds the device Sound Bar or AquaSound is connected with your SmartPhone You...

Страница 24: ...24 en aquasound eu info aquasound eu...

Отзывы: